background image

- 14 -

Copyright © 2007 LG Electronics. Inc. All right reserved. 
Only for training and service purposes

LGE Internal Use Only

7.1 Manual white Balance 

* One of R Gain / G Gain / B Gain should be kept on 80,

and others are controlled lowering from 80 

1) Press "power on" of the control R/C, set heat run to white

by pressing 

, and heat run over 15 minutes 

(Set : RS-233 Host : PC, Baud Rate : 115200bps,

Download: Cortez).

2) Zero Calibrate CA-100+, and when controlling, stick the

sensor to the center of LCD module surface.

3) Double click In-start key on Controlling R/C and get in

‘white balance’.

4) Set test-pattern on and display inside pattern. Control is

carried out on three color temperature, COOL, MEDIUM,
WARM. (Control is carried out three times,)

5) When the R/G/B GAIN is 80 on OSD, it is the FULL

DYNAMIC Range of the Module. In order to control white
balance without the saturation of FULL DYNAMIC Range
and DATA, one of R Gain / G Gain / B Gain should be
kept on 80, and other two is controlled lowering from 80.

* Color Temperature: Cool, Medium, Warm
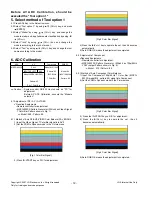
1. When R GAIN is set to 80

- Control G GAIN and B GAIN by lowering from 80. 

2. When B GAIN is set to 80

- Control R GAIN and G GAIN by lowering from 80.

3. When G GAIN is set to 80

- Control R GAIN and B GAIN by lowering from

192.

One of R Gain / G Gain / B Gain should be kept on
80, and adjust other two lower than 80.
(When R/G/B GAIN are all 80, it is the FULL

DYNAMIC Range of Module) 

8. Scart RGB(DVR) Adjustment Mode

Required Equipments

• Remote controller for adjustment 
• MSPG-925FS Pattern Generator (Which has Video Signal:

Color Bar Pattern shown in Fig. 8).  

=> Model: 232 / Pattern: 08  

1) Input the Video Signal:  Color Bar signal into AV1 (using

Full Scart Cable)

(MSPG-925FS, Model:232, Pattern:8)

2) Set the PSM to Dynamic mode in Picture menu.
3) Press the IN-START key on R/C for adjustment.
4) Press ths TURBO-PICTURE Key on R/C for adjustment

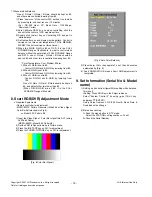
[Fig. 8 Color Bar Signal]

[ Fig. 9 Auto Color Balance]

5) Press the 

(Vol.+) key operate To set , then it becomes

automatically. [Fig. 9]

6)  Scart RGB(DVR) OK means Scart RGB adjustment is

completed.

9. Set Information(Serial No & Model

name)

1) Setting up like bottom figure(After setting white balance,

this is set)

(Setting: Press ADJ Key in the Adjust remocon.
Select "System Control 2" by using 

/

(CH+/-) key,

and press 

(ENTER)

Using Adjust remocon, RS-232 Host & Baud Rate &
Download value change

2) Bar-code scanning

1> Push the menu button in DTV mode. 

Select the STATION => Diagnostics => To set

2> Check the Serial Number.

Summary of Contents for 37LT75

Page 1: ...LCD TV SERVICE MANUAL CAUTION BEFORE SERVICING THE CHASSIS READ THE SAFETY PRECAUTIONS IN THIS MANUAL CHASSIS LD74A MODEL 37LT75 37LT75 ZA website http biz LGservice com Internal Use Only ...

Page 2: ...ly for training and service purposes LGE Internal Use Only CONTENTS CONTENTS 2 SAFETY PRECAUTIONS 3 SPECIFICATION 6 ADJUSTMENT INSTRUCTION 11 TROUBLE SHOOTING 15 BLOCK DIAGRAM 26 EXPLODED VIEW 34 EXPLODED VIEW PARTS LIST 35 REPLACEMENT PARTS LIST 36 SVC SHEET ...

Page 3: ...fe to operate without damage of electrical shock Leakage Current Cold Check Antenna Cold Check With the instrument AC plug removed from AC source connect an electrical jumper across the two AC plug prongs Place the AC switch in the on position connect one lead of ohm meter to the AC plug prongs tied together and touch other ohm meter lead in turn to each exposed metallic parts such as antenna term...

Page 4: ...e on your body by touching a known earth ground Alternatively obtain and wear a commercially available discharging wrist strap device which should be removed to prevent potential shock reasons prior to applying power to the unit under test 2 After removing an electrical assembly equipped with ES devices place the assembly on a conductive surface such as aluminum foil to prevent electrostatic charg...

Page 5: ... the solder joints of the two original leads If they are not shiny reheat them and if necessary apply additional solder Fuse and Conventional Resistor Removal Replacement 1 Clip each fuse or resistor lead at top of the circuit board hollow stake 2 Securely crimp the leads of replacement component around notch at stake top 3 Solder the connections CAUTION Maintain original spacing between the repla...

Page 6: ...ed 1 0 W 8 Type Size 760 0 x 450 0 x 48 0 32 877 0 x 516 8 x 55 5 37 1006 x 610 x 56 42 9 Pixel Pitch 0 17025 x 0 51075 32 0 200 x 0 600 37 0 227 x 0 681 42 10 Back Light 18 EEFL 32 20 EEFL 37 20 CCFL 42 11 Display Colors 16 7M 16 777 216 12 Coating 3H AG 1 Application range This spec sheet is applied to the 42 37 LCD TV used LD74A chassis 2 Specification Each part is tested as below without speci...

Page 7: ...Green X 0 282 0 284 0 286 Y 0 606 0 615 0 614 Blue X 0 145 0 144 0 146 Y 0 064 0 063 0 061 Contrast ratio 600 800 32 W O PC mode 700 900 37 800 1000 42 5 Luminance Variation 1 3 6 Component Video Input Y PB PR No Resolution H freq kHz V freq Hz Pixel clock MHz Proposed 1 720 480 15 73 60 00 SDTV DVD 480i 2 720 480 15 63 59 94 SDTV DVD 480i 3 720 480 31 47 59 94 480p 4 720 576 15 625 50 00 SDTV DVD...

Page 8: ... 800 600 37 879 60 31 40 00 VESA 46 875 75 00 49 50 4 832 624 49 725 74 55 57 283 Macintosh 5 1024 768 48 363 60 00 65 00 VESA XGA 56 470 70 00 75 00 60 123 75 029 78 75 6 1280 768 47 78 59 87 79 5 WXGA 7 1360 768 47 72 59 8 84 75 WXGA 8 1366 768 47 56 59 6 84 75 WXGA 9 1280 1024 63 595 60 0 108 875 SXGA FHD Model only 10 1400 1050 65 160 60 0 122 50 SXGA FHD Model only 11 1600 1200 74 077 60 0 13...

Page 9: ...920 1080 27 000 24 00 74 250 HDTV 1080P 24Hz 15 1920 1080 56 250 50 148 500 HDTV 1080P 50Hz 16 1920 1080 67 433 59 94 148 352 HDTV 1080P PC mode Ë1920 1080 60Hz Display 17 1920 1080 67 500 60 148 500 HDTV 1080P 8 1 HDMI input PC mode No Resolution H freq kHz V freq Hz Pixel clock MHz Proposed Remarks 1 720 400 31 468 70 08 28 321 2 640 480 31 469 59 94 25 17 VESA DTV mode 480p Display 37 684 75 00...

Page 10: ... 10 Copyright 2007 LG Electronics Inc All right reserved Only for training and service purposes LGE Internal Use Only 8 2 HDMI EDID Data HDMI1 HDMI2 ...

Page 11: ... 30 01 01 01 01 01 01 1B 21 50 A0 51 00 1E 30 48 88 40 35 00 BC 86 21 00 00 1C 26 36 80 A0 70 38 1F 40 50 50 20 85 04 BC 86 21 00 00 18 60 00 00 00 FD 70 00 3C 4B 1D 43 0E 00 0A 20 20 20 20 20 20 00 00 01 02 03 04 05 06 07 08 09 0A 0B 0C 0D 0E 0F 00 00 FF FF FF FF FF FF 00 1E 6D 10 01 03 80 46 27 78 EA D9 B0 A3 57 49 9C 25 20 11 49 4B A5 6E 00 31 40 45 40 61 40 D1 C0 01 01 30 01 01 01 01 01 01 02 ...

Page 12: ...f Auto RF AV S VIDEO Color Balance PAL_BGDHI 1 Input the Video Signal 7 Color Bar signal into AV3 2 Set the PSM to Dynamic mode in the Picture menu Fig 1 Color Bar Signal 3 Press IN START key on R C for adjustment Fig 2 Color Bar Signal 4 Press the Vol key to operate the set then it becomes automatically 5 Auto RGB OK means the adjustment is completed 6 2 Adjustment of Component Required Equipment...

Page 13: ... RS 232C UART Baud rate 115200 bps Luminance Y AV upper 200 cd m2 Typ 350 cd m2 Applying to Cool mode Connecting picture of the measuring instrument On Automatic control Inside PATTERN is used when W B is controlled Connect to auto controller or push control R C IN START Enter the mode of White Balance the pattern will come out Measurement color analyzer CS1000 or CA210 CH 9 Fig 7Connecting Pictur...

Page 14: ...s set to 80 Control R GAIN and G GAIN by lowering from 80 3 When G GAIN is set to 80 Control R GAIN and B GAIN by lowering from 192 One of R Gain G Gain B Gain should be kept on 80 and adjust other two lower than 80 When R G B GAIN are all 80 it is the FULL DYNAMIC Range of Module 8 Scart RGB DVR Adjustment Mode Required Equipments Remote controller for adjustment MSPG 925FS Pattern Generator Whic...

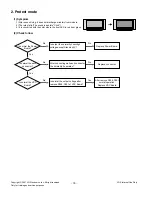
Page 15: ...heck follow Plug in power cord No Yes Is plug in power cord Connect cable No Is connect the Line Filter and Power Board Cable Replace fuse No Is normal the Fuse F100 on Power Board Connect Cable After remove the cable connect to Power Board except the SC100 connection cable authorizes the AC voltage marking on manual When ST BY 5V does not operate replace Power Board No Is connect the Power Board ...

Page 16: ...verted with the color where the front LED is red from green 2 Check follow Is normal the Power Board Replace Power Board Is output the normality Low High voltage except Stand by 5V Yes No No Is normal the each connector Replace connector After connecting well each connector the normality it operates Yes No No Is normal the VSC Board After remove P900 P901 normal operation Replace VSC Board Is norm...

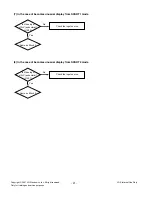
Page 17: ...e the front LED is green 2 Check follow Does minute discharge At Module Is The voltage P900 5pin on VSC 0V or Low Is output the normality Low High voltage except stand by 5V Is the inverter on Check the LCD Module Replace VSC board Is It ok Yes No Yes Yes Replace the Power board Yes No No Is the LVDS cable normal Reconnect the LVDS cable in P1901 Yes No Is the IC700 FLI8548 Output normal Replace t...

Page 18: ...play the OSD 1 Symptom 1 LED is green 2 The minute discharge continuously becomes accomplished from module 2 Check follow Is normal the LVDS cable Replace Power Board Is the LVDS cable connected well Cable inserts well Yes No No Replace FIL8548 IC IC700 No Yes Is normal the VSC Board Replace VSC B D Operates the FIL8548 IC IC700 Yes No Yes Is normal the Ctrl Board of Module Replace Ctrl B D No ...

Page 19: ...heck the Video Main Data Sub Video Main Video Sub should become normality display from the PIP mode or DW mode Re Check it Swap 3 In case of becomes unusual display from RF mode Is normal the Tuner Is normal the Input voltage IIC Communication and CVBS output Replace Tuner Is the Tuner Cable connected well Cable inserts well Yes No No No Yes Is normal the CXA2069Q Replace IC Is normal the Input vo...

Page 20: ...rmal the Input voltage IICCommunication and HV sync Yes No No Replace IC No Replace IC No Is normal the CXA2069Q Yes Same as Block A 5 In the case of becomes unusual display from Component RGB mode Is R G B input and H V Sync of the J1100 normal Yes Check the input source No Same as Block A 6 In the case of becomes unusual display from HDMI mode Is normal the HDMI002 IC1004 Yes Is normal the Input...

Page 21: ...ternal Use Only 7 In the case of becomes unusual display from SCART1 mode Is Video input of A V jack normal J1200 Yes Check the input source No Same as Block A 8 In the case of becomes unusual display from SCART2 mode Is Video input of A V jack normal J1201 Yes Check the input source No Same as Block A ...

Page 22: ... the Speaker Cable IC1300 operates Normal Replace IC1300 MSP4450 IC1301 operates Normal Replace IC1301 STA335BW Replace VSC BD Yes No Only HDMI is No sound Yes Download the EDID data No No No No No Only RF is no sound Yes Check the Tuner IN OUT No Check the signal before CXA2069 refer to circuit diagram Only AV component PC input is no sound Yes Only specific input except HDMI DTV RF is no sound Y...

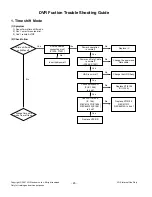
Page 23: ...n is normal Yes Replace IC No No Is time shift mode on in Menu No No Yes Are the cables connected well P1500 P1501 Power and Data Cable is normal P1500 P1501 Change the power and Data cable No Yes HDD is normal Change the HDD Assy No Yes Check BU9580KVT IC IC 1504 Is it ok Yes Replace VSC BD Replace STI5100 IC IC100 No Yes Check STI5100 IC IC 100 NEC61151F IC1600 NEC64015A IC1901 Is it ok Replace ...

Page 24: ...ode time shift or recorded TV Yes Go on 9page in this document MUTE key on Turn off the mute key No Yes Yes No Sound cable is OK Are power cables connected well Yes No No connect speak cable Sound is ok Connect power cables power B D Is Data cable P1501 ok Connect Data cable No Check speakers Are they ok Change the speakers No Yes Yes Yes Check MSP IC1300 Audio AMP IC1301 Is it ok Change the ICs I...

Page 25: ... 2 Check follow Check data cable P1501 Is it ok Yes Connect data cable P1501 Are the cables connected well P1500 P1501 Check BU9580KVT IC IC 1504 Is it ok Change HDD Is it ok Replace VSC BD No Yes1 Yes2 No No No No No connect cable well Check STI5100 IC IC 100 NEC61151F IC1600 NEC64015A IC1901 Is it ok Remove the recorded lists and Record one more time and Play again Is it ok ...

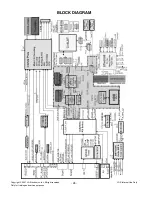
Page 26: ... 26 Copyright 2007 LG Electronics Inc All right reserved Only for training and service purposes LGE Internal Use Only BLOCK DIAGRAM ...

Page 27: ... 27 Copyright 2007 LG Electronics Inc All right reserved Only for training and service purposes LGE Internal Use Only ...

Page 28: ... 28 Copyright 2007 LG Electronics Inc All right reserved Only for training and service purposes LGE Internal Use Only ...

Page 29: ... 29 Copyright 2007 LG Electronics Inc All right reserved Only for training and service purposes LGE Internal Use Only ...

Page 30: ... 30 Copyright 2007 LG Electronics Inc All right reserved Only for training and service purposes LGE Internal Use Only ...

Page 31: ... 31 Copyright 2007 LG Electronics Inc All right reserved Only for training and service purposes LGE Internal Use Only ...

Page 32: ... 32 Copyright 2007 LG Electronics Inc All right reserved Only for training and service purposes LGE Internal Use Only ...

Page 33: ...MEMO 33 Copyright 2007 LG Electronics Inc All right reserved Only for training and service purposes LGE Internal Use Only ...

Page 34: ...PLODED VIEW Many electrical and mechanical parts in this chassis have special safety related characteristics These parts are identified by in the Schematic Diagram and EXPLODED VIEW It is essential that these special safety parts should be replaced with the same components as recommended in this manual to prevent X RADIATION Shock Fire or other Hazards Do not modify the original design without per...

Page 35: ...Copyright 2007 LG Electronics Inc All right reserved Only for training and service purposes LGE Internal Use Only ...

Page 36: ...Copyright 2007 LG Electronics Inc All right reserved Only for training and service purposes LGE Internal Use Only ...

Page 37: ...Copyright 2007 LG Electronics Inc All right reserved Only for training and service purposes LGE Internal Use Only ...

Page 38: ...Copyright 2007 LG Electronics Inc All right reserved Only for training and service purposes LGE Internal Use Only ...

Page 39: ...Copyright 2007 LG Electronics Inc All right reserved Only for training and service purposes LGE Internal Use Only ...

Page 40: ...Aug 2007 Printed in Korea P NO MFL38458103 ...

Reviews: