background image

GB-26

W

ATCHING TV / BASIC OPERA

TIONS

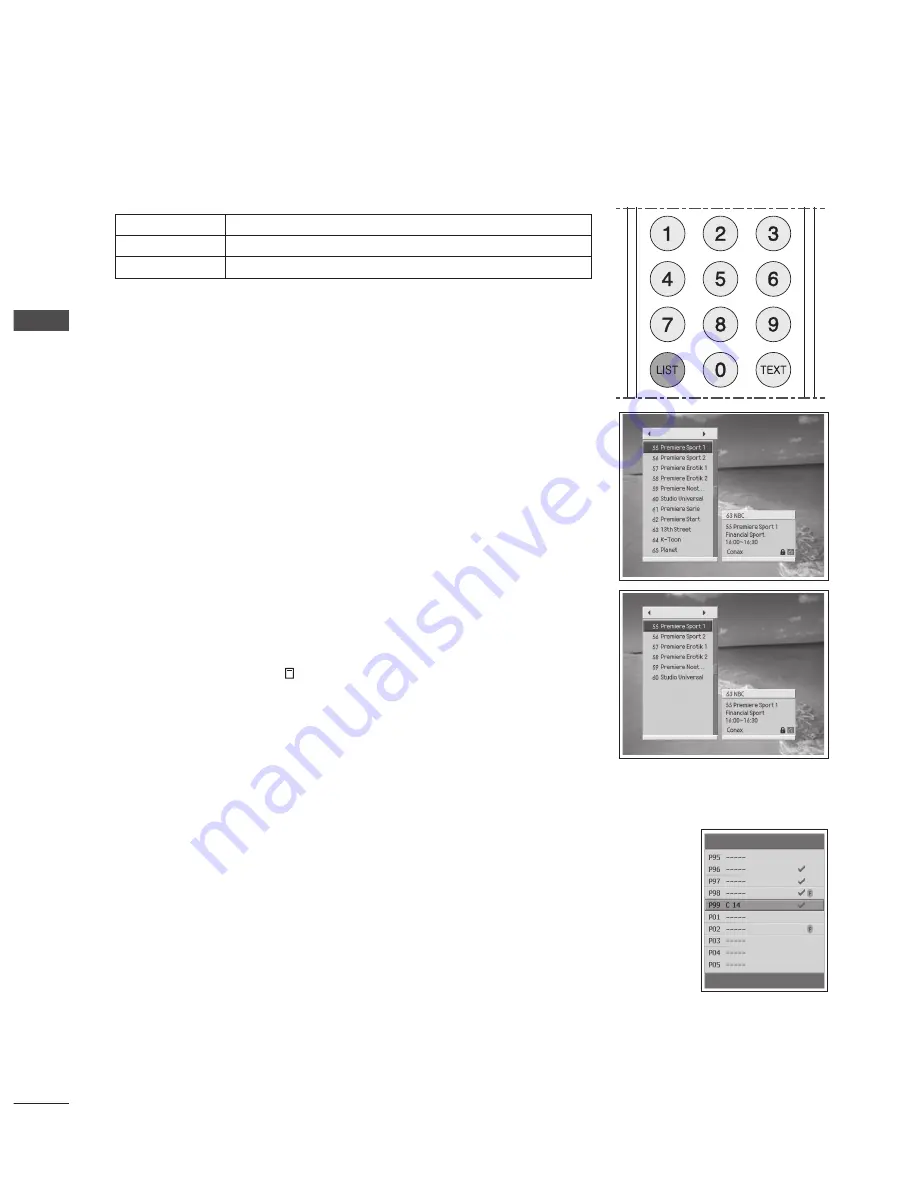
Displaying Channel List

Digital Channel List (In Digital Mode Only)

Three types of channel lists are provided for easy and quick channel browsing.

TV

The list of all Digital TV channels 

Radio

The list of all Digital radio channels

FAV-T 

or

 FAV-C

The list of Digital favourite channels (Terrestrial or Cable)

You can display channel list using the 

LIST

 button and switch to another channel on 

the channel list. 

➊ 

Press the 

LIST

 button while watching a programme to display the channel 

list.

➋ 

Select a channel using the 

∧/∨

 button and press the 

OK

 button to change 

the channel.

➌ 

Enter the channel number directly using the 

NUMBER 

buttons to move the 

cursor to the channel you want. And then press the 

OK

 button to change to 

the selected channel.

➍ 

Press the 

</>

 button to change a channel list group while the channel list is 

displayed.

NOTE

Press the 

P

∧/∨

(Page)

 button to move to the previous/next page.

Each time you press the 

TV/RAD

 button while the channel list is displayed, the 

channel list will be switched between TV and radio channel list.

If 

Within the current channel list

 option is selected in 

DTV SETUP-Edit 

Channels-Channel Change Mode

, you can only change programme within 

the selected channel list using the 

P

∧/∨ 

button while watching a programme.

To display scramble icon(

REC

MHP

13

) in the channel list, select 

On

 in 

DTV SETUP-

Preferences-Miscellaneous Settings-Option in CH List 

menu.

Analog Channel List (In Analog Mode Only)

You can view the list of all analog channels using the 

LIST

 button and switch to 

other channels on the channel list.

➊ 

Press the 

LIST

 button while watching the analog channels.

➋ 

To change the channel in analog channel list, select your desired channel 

using the 

∧/∨

 button and press 

OK

 button. The selected channel is 

displayed.

FAV-C

C h a n n e l s

TV

Summary of Contents for 37LG53 Series

Page 1: ...ing your TV Retain it for future reference Record model number and serial number of the TV Refer to the label on the back cover and quote this information To your dealer when requiring service LCD TV OWNER S MANUAL LCD TV MODELS 32LG53 37LG53 42LG53 ...

Page 2: ......

Page 3: ...the Menu Language 29 On Screen Menus Selection and Adjustment 29 Setting the Aspect Ratio 31 Displaying Teletext Information 32 EPG Electronic Programme Guide Viewing the Electronic Programme Guide 33 Finding a Programme 35 Viewing the Reserved Programme 36 CHANNEL SETUP Setting Digital Channels 37 Setting Analog Channels 43 PICTURE SETTINGS Selecting a Picture Mode 46 Customizing the Picture Sett...

Page 4: ...wer Cord Protection Cover Bolts for stand assembly Refer to p 6 1 screw for stand fixing Refer to p 4 Only 32 42LG53 Not using the desk type stand When installing the wall mounted unit use the protection cover for desk type stand installation Polishing Cloth Polishing cloth for use on the screen Lightly wipe any stains or fingerprints on the surface of the TV with the polishing cloth Do not use ex...

Page 5: ... potentially causing injury or damaging the product Use only an attached screw WARNING To prevent TV from falling over the TV should be securely attached to the floor wall per installation instructions Tipping shaking or rocking the machine may cause injury 1 screw Desk Intelligent sensor Adjusts picture according to the surrounding conditions PROGRAMME VOLUME OK MENU INPUT Power Standby Indicator...

Page 6: ...ocket AV1 AV2 Connect scart socket input or output from an external device to these jacks HDMI IN 1 2 3 Connect a HDMI signal to HDMI IN Or DVI VIDEO signal to HDMI DVI port with DVI to HDMI cable HDMI1 only RGB IN PC Connect the output from a PC RS 232C IN SERVICE ONLY PORT Connect to the RS 232C port on a PC COMPONENT IN Connect a component video audio device to these jacks ANTENNA IN Connect RF...

Page 7: ...om abrasion of the tightening part of the bolt Carefully place the TV screen side down on a cushioned surface to protect the screen from damage Assemble the TV as shown Assemble the parts of the Stand Body with the Cover Base of the TV Fix the 4 bolts securely using the holes in the back of the TV Swivel Stand After installing the TV you can adjust the TV manually to the left or right direction by...

Page 8: ... climb or hang from the TV Use the eye bolts or TV brackets bolts to fix the TV to the wall as shown in the picture If your TV has bolts in the eyebolts loosen these bolts Insert the eye bolts or TV brackets bolts and tighten them securely in the upper holes Secure the wall brackets with the bolts on the wall Match the height of the bracket that is mounted on the wall Use a sturdy rope to tie the ...

Page 9: ...ipment see the External Equipment Setup section of the manual Open the CABLE MANAGEMENT CLIP as shown and manage the cables Fit the CABLE MANAGEMENT CLIP as shown NOTE Do not use the CABLE MANAGEMENT CLIP to lift the TV If the TV is dropped you may be injured or the TV may be damaged CABLE MANAGEMENT CLIP ...

Page 10: ... 10cm all around the TV Wall Mount Horizontal Installation For adequate ventilation allow a clearance of 4 10cm all around the TV We recommend that you use a wall mounting bracket of LG brand when mounting the TV to a wall 4 inches 4 inches 4 inches 4 inches 4 inches 4 inches 4 inches 4 inches ...

Page 11: ... to the antenna as shown above If signal needs to be split for two TVs use an antenna signal splitter for connection 2 0 04 4 5 54 6 6 4 23 42 3 26 5 2 6 6 6 0 4 6 5 4 6 0 2 5 0 3 2 3 4 6 3 6 6 2 5 6 3 6 6 2 5 54 5 2 0 2 0 4 5 6 6 6 4 Wall Antenna Socket Outdoor Antenna VHF UHF Multi family Dwellings Apartments Connect to wall antenna socket RF Coaxial Wire 75 ohm Single family Dwellings Houses Co...

Page 12: ...e digital set top box Refer to the owner s manual for the digital set top box Select Component input source using the INPUT button on the remote control NOTE Depending on the manufacturer the Y PB PR jacks may be identified as Y Pb Pr Y B Y R Y or Y Cb Cr Connecting with an HDMI cable Connect the HDMI output of the digital set top box to the HDMI DVI IN 1 DVI HDMI DVI IN 2 or HDMI IN3 jack on the ...

Page 13: ...e Digital Audio Output Optical port Connect one end of an optical cable to the OPTICAL DIGITAL AUDIO OUT jack on the TV Connect the other end of the optical cable to the digital audio optical input on the audio equipment Turn on the audio equipment Refer to the external audio equipment instruction manual for operation NOTE This function is only available in Digital TV or Digital TV C mode CAUTION ...

Page 14: ...n on the remote control NOTE Depending on the manufacturer the Y PB PR jacks may be identified as Y Pb Pr Y B Y R Y or Y Cb Cr Connecting with a Euro Scart cable Connect the Euro scart socket of the DVD to the AV1 or AV2 socket on the TV Turn on the DVD player insert a DVD Refer to the DVD player s manual for operating instructions Select AV1 or AV2 input source using the INPUT button on the remot...

Page 15: ...DVI IN 1 DVI HDMI DVI IN 2 or HDMI IN 3 jack on the TV Turn on the DVD player insert a DVD Refer to the DVD player s manual for operating instructions Select HDMI1 HDMI2 or HDMI3 input source using the INPUT button on the remote control NOTE The TV can receive video and audio signals simultaneously when using a HDMI cable If the DVD does not support Auto HDMI you must set the output resolution app...

Page 16: ...e ANT IN socket of the VCR Press the PLAY button on the VCR and match the appropriate channel between the TV and VCR for viewing Connecting with a Euro Scart cable Connect the Euro scart socket of the VCR to the AV1 or AV2 socket on the TV Insert a video tape into the VCR and press PLAY on the VCR Refer to the VCR owner s manual Select AV1 or AV2 input source using the INPUT button on the remote c...

Page 17: ...quality is improved compared to normal composite RCA cable input Connect the audio outputs of the VCR to the AUDIO input jacks on the TV Insert a video tape into the VCR and press PLAY on the VCR Refer to the VCR owner s manual Select AV3 S Video input source using the INPUT button on the remote control RGB IN PC ANTENNA IN RS 232CIN CONTROL SERVICE AUDIO RGB IN PC RS 232CIN CONTROL SERVICE 2 1 DV...

Page 18: ...ule to PCMCIA Personal Computer Memory Card International Association CARD SLOT of TV as shown PC Setup This TV provides Plug and Play capability meaning that the PC adjusts automatically to the TV s settings Connecting with a D sub 15 pin cable Connect the RGB output of the PC to the RGB IN PC jack on the TV Connect the PC audio output to the AUDIO IN RGB DVI jack on the TV Turn on the PC and the...

Page 19: ...e separate Connect the signal cable from the monitor output port of the PC to the RGB IN PC port of the TV or the signal cable from the HDMI output port of the PC to the HDMI DVI IN 1 DVI port on the TV Connect the audio cable from the PC to the AUDIO IN RGB DVI on the TV Audio cables are not included with the TV If using a sound card adjust PC sound as required This TV uses a VESA Plug and Play S...

Page 20: ... 1366x768 47 13 59 65 1920x1080 66 647 59 988 720 x 480 31 47 31 50 59 9 60 720 x 576 31 25 50 1280 x 720 37 50 44 96 45 00 50 00 59 94 60 00 1920 x 1080 33 72 33 75 28 125 27 00 56 25 67 433 67 500 59 94 60 00 50 00 24 00 50 00 59 94 60 00 HDMI 2 HDMI3 DTV mode Resolution Horizontal Frequency kHz Vertical Frequency Hz 640x480 31 5 31 5 59 9 60 720 x 480 15 73 15 75 31 47 31 50 59 9 60 59 9 60 720...

Page 21: ...al TV C Digital TV C Digital TV C Analog TV Analog TV Analog TV AV1 SCART1 Last RF Outputs the broadcast you watched last among Analog TV Digital TV or Digital TV C broadcast AV1 CVBS AV2 SCART2 AV2 CVBS AV3 CVBS Side AV3 CVBS AV3 S VIDEO Side AV3 S VIDEO Component AV Mute PC AV Mute HDMI1 AV Mute HDMI2 AV Mute HDMI3 Side AV Mute ...

Page 22: ...ows the user to move back one step in an interactive application EPG or other user interaction function Shows the present screen information Selects the picture and sound mode Returns to the previously viewed programme VOL FAV MUTE P Adjusts the volume Displays the selected favourite programme Switches the sound on or off Selects a programme 0 9 number button LIST Selects a programme Selects numbe...

Page 23: ...h and then select Next to start the channel search Please wait for finishing the channel search If you want to stop the operation during search press the OK button If the channel search is stopped or finished you can edit the found channels Select All Select all the found channels Unselect All Unselect all the found channels Delete Delete the selected channels Select Save and press the OK button t...

Page 24: ...up Installation menu to search for more channels Switching Channel Press the P button Enter the channel number using the NUMBER buttons to move to the channel directly Press the TV RAD button to switch between digital TV channels and radio channels Press the Q VIEW button to go to the previous channel NOTE You can switch channels using the channel list or EPG Volume Control Press the VOL button to...

Page 25: ...nel name Programme name Current time Icons REC MHP 13 Reserved programme Subtitle information REC MHP 13 Locked channel REC MHP 13 Teletext information REC MHP 13 Scrambled channel REC MHP 13 Parental control level minimum age for viewing Compressed bitstream audio signal Current channel list Programme broadcasting time and progress bar Next programme information Displayed if next programme inform...

Page 26: ...by pressing the INFO or OK button while watching an analog TV channel or external input source P 11 16 34 Mono AV1 16 34 Component 16 34 720 x 480p P 11 6 34 Mono AV1 16 34 Component 16 34 720 x 480p P 11 16 34 Mono AV1 16 34 Component 16 34 720 x 480p Analog TV Input External Input AV1 2 3 External Input Component PC HDMI1 2 3 NOTE Whenever you switch channels this information is displayed for 5 ...

Page 27: ...a channel list group while the channel list is displayed NOTE Press the P Page button to move to the previous next page Each time you press the TV RAD button while the channel list is displayed the channel list will be switched between TV and radio channel list If Within the current channel list option is selected in DTV SETUP Edit Channels Channel Change Mode you can only change programme within ...

Page 28: ...nstantaneous Companding Audio Multiplex digital sound can be received Sound output can be selected according to the type of broadcast received by pressing the button repeatedly When Nicam stereo is received you can select Nic Stereo or Mono When Nicam dual is received you can select Nic Dual1 Nic Dual2 or Mono Audio Language Selection In Digital Mode only If the current programme is available in m...

Page 29: ...put Source Once you have connected your various audio and video systems you can view different sources by selecting input sources Press the INPUT button Select the main input among the sources using the button Digital TV Digital Terrestrial Broadcast Digital TV C Digital Cable Broadcast Analog TV Analog Broadcast AV1 SCART1 Input Source AV2 SCART2 Input Source AV3 CVBS CVBS Input Source on Side AV...

Page 30: ...nd Adjustment Your TV s OSD On Screen Display may differ slightly from what is shown in this manual Press the MENU button to display the menu Press the button to move among menus or items Press the OK or button to select enter a menu or confirm a selection Press the button to adjust the setting of an item Use the button in DTV Setup menu Press the MENU or EXIT button to return to normal TV viewing...

Page 31: ...Enter Edit Channels Channel editor Edit Channels Edit Channel Lists Edit Favourite Channels Channel Change Mode Installation In Analog Mode Only I n s t a l l a t i o n Country Auto Search Manual Search Edit Channels Finland Move Enter Installation Installation Installation DTV C Installation DTV T Move to the selected submenu Feature F e a t u r e Language Time Setting PC Screen OSD Transparency ...

Page 32: ...proportion to fill the entire screen useful for viewing 4 3 formatted DVDs Zoom1 The following selection will allow you to view the picture without any alteration while filling the entire screen However the top and bottom of the picture will be cropped Just Scan Following Selection will lead to you view the picture of best quality without loss of original picture in high resolution image NOTE If t...

Page 33: ... Update Displays TV programme when waiting for the new teletext page Reveal Shows the hidden information answers to quiz games for example Press it again to return to normal display Index Displays the teletext index page Hold Holds the display on a given page if the selected page is linked with several secondary pages that automatically follow To resume press it again Number 0 9 Press to enter the...

Page 34: ...al channels Move to previous or next programme within the same channel using the button Move to another channel using the button If there are multiple channels use the P button to move to channels by page Also you can enter the channel number using the NUMBER buttons on the remote control to move to the channel directly Select a programme and press the OK button Then you can watch the programme if...

Page 35: ...ching You can reserve a watching of the future programme in the Electronic Programme Guide EPG Select the desired programme and press the OK button The confirm message will be displayed Select OK and press the OK button to reserve the programme When a reservation has been completed the icon is displayed on the reserved programme Press the OK button again to cancel reservation Press the YELLOW butt...

Page 36: ...Select By Genre and press the OK button to search programme by genre Select the genre using the button and press the OK button If you select a programme from Found Programme List screen and press the OK button you can watch the programme if it is on air or reserve it if it is the future programme If you want to find another programmes press the BACK button to return to the previous menu NOTE Found...

Page 37: ...cked restricted by watching time you will be prompted to enter your password to complete the reservation The default password is 0000 If you have forgotten your password please contact your local TV distributor Editing a Reservation Select the scheduled programme and press the OK button to edit the reservation information Change Channel No and Time using the NUMBER buttons Change Repeat mode using...

Page 38: ...K or button Select Automatic Search using the button and press the OK or button Wait while channel search continues This may take a few minutes While operating search the cursor is located at Stop Therefore if you press the OK button during searching the operation is stopped and the channels found until then will be displayed If search operation is successfully completed and the channel does not e...

Page 39: ...does not exist select User Define and enter the value directly Select Network Search using the button and press the OK or button Select an option among Disable Enable and User Define using the button and press the OK button When you select User Define to set the network manually enter network value using the NUMBER buttons Select Append Symbol Rate using the button and press the OK or button Selec...

Page 40: ...sing the button and press the OK button When entering channel value the appropriate frequency value is displayed Select Frequency using the button and press the OK or button Enter the frequency using the NUMBER buttons and press the OK button When entering frequency the appropriate channel for the entered frequency is automatically displayed on channel Select Network Search using the button and pr...

Page 41: ...fine to set frequency manually enter frequency value using the NUMBER buttons Select Symbol Rate using the button and press the OK or button Select the symbol rate value using the button and press the OK button When you select User Define to set symbol rate manually enter symbol rate value using the NUMBER buttons Select Network Search using the button and press the OK or button Select Enable Disa...

Page 42: ...oose a channel using the button and then press the OK button You can select multiple channels Select Delete and press the OK button to delete the selected channel Select Lock Unlock and press the OK button to lock unlock the selected channel NOTE When the locked channel s is selected or all channels are locked Lock is switched to Unlock Enter the password using the NUMBER buttons to watch locked c...

Page 43: ... radio channel list Unselect All Unselects all the selected channel Channel Change Mode You can set to change the channel only within the current channel list group when switching channels Press the DTV SETUP button Select Edit Channels using the button and press the OK or button Select Channel Change Mode using button and press the OK or button Select All Channels or Within the Current Channel Li...

Page 44: ...press the OK or button Select Auto Search using the button and press the OK or button Search is highlighted Press the OK button to start to search channels The found channels are automatically saved in order To stop searching channels press the BACK button After the channel searching completes the first found channel if only will be automatically displayed I n s t a l l a t i o n Country Auto Sear...

Page 45: ...the or NUMBER button To change channel names select Name using the button Enter the new channel name using the buttons and press the OK button Select Search using the button and press the button to start searching channels During searching the arrow blinks Select Fine Tune using the button and press the button to obtain a good quality of the picture and sound until you reach the optimal setting Se...

Page 46: ...pears next to the channel name Move the selection to a new location using the button and press the GREEN button The selected channel is moved to its new location and all other channels are shifted accordingly Deleting Channels You can delete channels from the list Select a channel you want to delete using the button and press the YELLOW button The selected channel is deleted Adding Favourite Chann...

Page 47: ...e to suit your preference and viewing situations when you select the picture mode to User Press the MENU button Select Picture using the button and press the OK or button Select the picture mode to User using the buttons Select the required option using the button The following options are available Brightness Contrast Sharpness Colour Backlight Colour Temp Colour Temp Medium Cool Warm Press the b...

Page 48: ...tone Use Fleshtone function to improve the picture quality by adjusting colour balance Press the MENU button Select Picture using the button and press the OK or button Select Fleshtone using the button Select the required fleshtone using the button The following options are available Off Low Medium High P i c t u r e Mode Brightness Contrast Sharpness Colour Backlight Colour Temp NR Fleshtone Stan...

Page 49: ... following options are available Standard Music Cinema Sport Game User NOTE You can select a picture and sound mode by simply pressing the AV MODE button on the remote control Press again to switch Off Cinema Sport Game Adjusting the Sound Balance You can adjust the output of the right and left speakers to obtain the best stereo reproduction for your listening position Press the MENU button Select...

Page 50: ...tented SRS technology that solves the problem of playing 5 1multi channel content over two speakers TruSurround delivers a compelling virtual surround sound effect through two speaker playback system including built in television speakers It is fully compatible with all multi channel audio formats Press the MENU button Select Sound using the button and press the OK or button Select SRS TruSurround...

Page 51: ...Off Time is enabled enter hour minute using the NUMBER buttons Setting the Auto Power Off In case there is no signal it is possible have your TV automatically turned off to reduce power consumption Select Auto Power Off using the button and press the button to select On The TV will automatically be turned off if there is no signal for 5 minutes Adjusting OSD Transparency You can set the transparen...

Page 52: ...Position Adjusts the display position to PC if it does not fit the TV screen Select H Position V Position using the button Adjust the optimal position using the button Clock Adjusts the horizontal feature of screen by increasing or decreasing the number of pixels Select Clock using the button Adjust the optimal horizontal feature using the button Phase Sets the focus of screen Select Phase using t...

Page 53: ...using the button Adjust the optimal position using the button Default Setting You can set your TV settings to the default setting values WARNING Please note that once you perform the Default Setting all data such as channel list and user configured data are deleted To perform Default Setting Press the MENU button Select Feature using the button and press the OK or button Select Default Setting usi...

Page 54: ...he previous menu Press the DTV SETUP or EXIT button to exit from the menu screen You can easily select all menu items using the assigned number for each menu Parental Control You can set parental control for each programme and watching time You can also change your password Press the DTV SETUP button Select Preferences using the button and press the OK or button Select Parental Control using the b...

Page 55: ...ing the age level NOTE You have to enter the password to watch the programme which is blocked by the age level Some broadcasting companies do not broadcast the censorship classification Change Password You can change the current password Select Change Password using the button and press the OK or button Enter New Password using the NUMBER buttons select OK and press the OK button Enter the new pas...

Page 56: ...udio signal such as Dolby Digital or DTS NOTE Select Compressed if your amplifier system has multi channel digital audio surround decoding Dolby Digital and or DTS Subtitle Display You can select to display the subtitle automatically or not Select Subtitle Display using the button Select from Auto and Manual using the OK or button Auto Subtitles are displayed automatically in the predefined subtit...

Page 57: ...on and press the OK or button Select from Enable Disable using the OK or button Schedule You can reserve a programme and watch it anytime you want Press the DTV SETUP button Select Preferences using the button and press the OK or button Select Schedule using the button and press the OK or button The reserved programmes will be displayed in time order Select the programme you want to edit and press...

Page 58: ...tton Select an option between 1 20 seconds using the button and press the OK button NOTE When it is set to Disable the i plate will not be displayed when the channel is switched Option in Channel List You can set whether or not to display the scrambled icon in the i plate and channel list Select Option in CH List using the button Select On Off using the OK or button On Scramble icon is displayed i...

Page 59: ... release software downloading via a designated aerial system The equipment must be tuned properly according to the guidelines within this manual Update software when the quality of receiving signal strength is high If the weather is not so good that the quality of receiving signal strength is not recommendable perform the software update later Caution Please be careful to keep the power on and the...

Page 60: ...stallation using the button and press the OK or button Select Installation DTV T using the button and press the OK or button Select Software Update using the button and press the OK or button Select Manual Update using the button and press the OK or button Select Channel using the button and press the OK or button Select the channel number using the button and press the OK or button Select Frequen...

Page 61: ...y value using the NUMBER buttons Select Symbol Rate using the button and press the OK or button Select the symbol rate value using the button and press the OK button When you select User Define to set symbol rate manually enter symbol rate value using the NUMBER buttons Select Search and press the OK button to search software Existing new software will show If new software does not exist press the...

Page 62: ... or button Status You can view system information Signal Detection You can view the signal strength and signal quality of the channel that is currently on AV Common Interface You can view the current status of the CI Module NOTE The displayed information about a Common Interface may differ depending on Common Interface type System Status Signal Detection Common Interface System information display...

Page 63: ...annels Feature Language Time Setting PC PC Mode only Screen HDMI Mode only OSD Transparency Default Setting DTV Setup Digital Mode only Preferences Parental Control Language Setting Schedule Miscellaneous Settings Edit Channels Edit Channel Lists Edit Favourite Channels Channel Change Mode Installation Automatic Search Linear Search Digital TV C Mode only Manual Search Software Update System Statu...

Page 64: ...pliance or power tool Poor reception on some channels Station or cable channel experiencing problems tune to another station Station signal is weak reposition the antenna to receive weaker stations Check for sources of possible interference Lines or streaks in pictures Check antenna Change the position of the antenna No picture when connecting HDMI Check HDMI cable over version 1 3 If the HDMI cab...

Page 65: ... to use a wet cloth Extended Absence CAUTION If you expect to leave your TV dormant for prolonged periods such as a holiday unplug the power cord to protect against possible damage from lightning or power surges Product Specifications MODELS 32LG53 37LG53 42LG53 32LG5300 ZB 37LG5300 ZB 42LG5300 ZB Dimensions W x H x D with stand 813 8 x 598 8 x 231 9 mm 936 4 x 685 4 x 294 0 mm 1034 0 x 735 x 294 ...

Page 66: ......

Reviews: