background image

5

206-4137

Table of Contents

Safety Warnings . . . . . . . . . . . . . . . . . . . . . . . . . . . . . . .  2
Important Safety Instructions . . . . . . . . . . . . . . . . . . .  3 – 4
Table of Contents . . . . . . . . . . . . . . . . . . . . . . . . . . . . . .  5
Setup Checklist / Overview  . . . . . . . . . . . . . . . . . . . . . .  6
Pro:Centric TV Interactive Menu Features. . . . . . . . . . .  7
LD650H/LD655H Rear Jack Panel  . . . . . . . . . . . . . . . .  8
LG710H Rear Jack Panel  . . . . . . . . . . . . . . . . . . . . . . .  9
Side Connections Panel / RF Antenna Connection . . .  10
Installer Overview. . . . . . . . . . . . . . . . . . . . . . . . . . . . .   11
Installer Remote Control Typical Key Functions  . . . . .  12
Commercial Mode Setup for Master TV. . . . . . . . .  13 – 14
Installer Menu. . . . . . . . . . . . . . . . . . . . . . . . . . . . .  15 – 21
TV Setup Menus Overview  . . . . . . . . . . . . . . . . . . . . .  22
Adding Channel Icons / Custom Channel Labels  

(2-5-4 + MENU Mode) . . . . . . . . . . . . . . . . . . . . . . . . .  23
FTG Mode of Operation . . . . . . . . . . . . . . . . . . . . .  24 – 27

FTG Setup Overview  . . . . . . . . . . . . . . . . . . . . . . . .  24
Determining the TV Operating Mode / FTG  

Channel Map Configuration Utility Overview  . . . . . .  25
FTG Channel Map Configuration Utility / FTG  

Channel Map Editor Overview  . . . . . . . . . . . . . . . . .  26
FTG Installer Menu Configuration Utility Overview. .  27

Cloning Overview / Clonable Menu Features  . . . . . . .  28
Cloning Procedures . . . . . . . . . . . . . . . . . . . . . . . .  29 – 33

Learning / Teaching a Master TV Setup using  

a USB Memory Device . . . . . . . . . . . . . . . . . . . . . . .  29

Learning / Teaching a Master TV Setup using  

a TLL-1100A Clone Programmer  . . . . . . . . . . . .  30 – 31
Learning / Teaching a Master TV Setup using  

an LT2002 Clone Programmer . . . . . . . . . . . . . .  32 – 33

Remote Jack Pack / TV Connections & Setup  . . . . . .  34
Reference: Upgrading TV/PTC Software with a  

USB Memory Device . . . . . . . . . . . . . . . . . . . . . . . . . .  35
Reference: Power Consumption Settings  . . . . . . .  36 – 37

32/37/42/47/55LD650H, 32/37/42LD655H, 
32/37/42LG710H. . . . . . . . . . . . . . . . . . . . . . . . .  36 – 37

Reference: TV Camport Auto Sense Operation. . . . . .  38
Reference: TV Aux Input Configuration . . . . . . . . . . . .  39
Reference: 

b

-LAN Setup & Overview. . . . . . . . . . . . . .  40

Reference: RJP Model List and Input  

Auto-sensing Hierarchy  . . . . . . . . . . . . . . . . . . . . . . . .  41
Troubleshooting . . . . . . . . . . . . . . . . . . . . . . . . . . .  42– 45

General Troubleshooting. . . . . . . . . . . . . . . . . . . . . .  42
Troubleshooting Flowchart . . . . . . . . . . . . . . . . . . . .  43
Commercial Mode Check / FTG Operating  

Troubleshooting. . . . . . . . . . . . . . . . . . . . . . . . . . . . .  44
Clone Programmer Troubleshooting . . . . . . . . . . . . .  45

Glossary of Terms  . . . . . . . . . . . . . . . . . . . . . . . . . . . .  46
Document Revision History / Notes . . . . . . . . . . . . . . .  47
Back Cover. . . . . . . . . . . . . . . . . . . . . . . . . . . . . . . . . .  48

For Customer Support/Service, please call:   

1-888-865-3026


www.LGsolutions.com

Note: Design and specifications subject to change without prior notice.

Summary of Contents for 37LD650H

Page 1: ...se read this manual carefully before operating your set and retain it for future reference P NO SAC34134301 1101 REV04 www lg com 32LG710H 37LG710H 42LG710H 32LD650H 37LD650H 42LD650H 47LD650H 55LD650H 32LD655H 37LD655H 42LD655H ...

Page 2: ...ence received including interference that may cause undesired operation of the device Any changes or modifications in construction of this device which are not expressly approved by the party responsible for compliance could void the user s authority to operate the equipment CAUTION Do not attempt to modify this product in any way without written authorization from LG Electronics Unauthorized modi...

Page 3: ...e they exit from the appara tus Only use attachments accessories specified by the manufacturer Useonlywiththecart stand tripod bracket ortable specifiedbythemanufacturer orsoldwiththeappa ratus When a cart is used use caution when moving the cart apparatus combination to avoid injury from tip over Unplug this apparatus during lighting storms or when unused for long periods of time Refer all servic...

Page 4: ...tedtotheACwallout let it is not disconnected from the AC power source even if you turn off this unit by SWITCH Do not expose to dripping or splashing and do not place objects filled with liquids such as vases cups etc onorovertheapparatus e g onshelvesabove the unit G GR RO OU UN ND DI IN NG G Ensure that you connect the earth ground wire to prevent possible electric shock i e a TV with a three pr...

Page 5: ...ont panel of the TV V Ve en nt ti il la at ti io on n Install your TV where there is proper ventilation Do not install in a confined space such as a bookcase Do not cover the product with cloth or other mate rials e g plastic while plugged in Do not install in excessively dusty places Take care not to touch the ventilation openings When watching the TV for a long period the venti lation openings m...

Page 6: ...n Menus Selection 41 Channel Setup Auto Scan Auto Tuning 42 Add Delete Channel Manual Tuning 43 Channel Editing 44 Channel Label 44 Input List 45 Example Electronic Program Guide 46 USB Entry Modes 47 Photo List 49 Music List 53 Extra Contents 55 PICTURE CONTROL PIP Picture In Picture 56 Picture Size Aspect Ratio Control 58 Preset Picture Settings Picture Mode 61 Manual Picture Adjustment User Mod...

Page 7: ...ting 84 Auto Shut Off Setting 84 PARENTAL CONTROL RATINGS Set Password Lock System 85 Channel Blocking 88 Movie TV Rating 89 Downloadable Rating 94 External Input Blocking 95 APPENDIX Troubleshooting 96 Maintenance 98 Product Specifications 99 Programming the Remote Control 101 IR Codes 104 Open Source License 106 ...

Page 8: ...g the sweet spot giving a wider and richer sound field HDMI the HDMI logo and High Definition Multimedia Interface are trademarks or registered trademarks of HDMI Licensing LLC is a trademark of SRS Labs Inc TruSurround XT technology is incorporated under license from SRS Labs Inc Manufactured under license from Dolby Laboratories Dolby and the double D symbol are trademarks of Dolby Laboratories ...

Page 9: ...ead screw Refer to P 15 P 16 Screw for stand fixing Refer to P 20 Screws for stand assembly Refer to P 15 x 4 x 4 1 5V 1 5V Remote Control Batteries MUT E RE TU RN CC TV POW ER GUIDE PORTA L ENTER VO L CH 1 2 3 4 5 6 7 8 0 9 FLASHBK VCR DVD INPUT MENU INFO i STB P A G E PIP SA P PIPCH PIPCH PIP SW AP PIP INP UT AL PH A N UM RE MO VE RA TIO TIM ER AB C DE F GH I WX YZ TU V PQ RS MN O JK L Protectio...

Page 10: ...ton Power Standby Indicator Illuminates red in standby mode Illuminates blue when the set is switched on CH VOL MENU INPUT ENTER VOLUME Buttons ENTER Button MENU Button INPUT Button Remote Control Sensor CHANNEL Buttons Intelligent Sensor Adjusts picture according to the surrounding conditions 32 37 42LG710H ...

Page 11: ...ndi tions Power Standby Indicator Illuminates red in standby mode Illuminates blue when the set is switched on Remote Control Sensor SPEAKER CH VOL ENTER INPUT MENU VOLUME Buttons ENTER Button MENU Button INPUT Button POWER Button CHANNEL Buttons 32 37 42 47 55LD650H 32 37 42LD655H ...

Page 12: ...ONTROLOUT OPTICAL DIGITAL AUDIO OUT AV IN 1 AUDIO VIDEO MONO UPDATE RESET LAN SERVICE ONLY COMPONENT IN VIDEO AUDIO HDMI DVI IN 2 1 DVI RJP INTERFACE SPEAKEROUT 8 RGB PC AUDIO RGB DVI RGB IN RS 232C IN SERVICE ONLY TV LINK CFG GAME CONTROL 10 3 8 R ANTENNA IN ANTENNA IN M P I M P I 7 1 4 9 2 13 14 15 6 6 5 32 37 42LG710H 12 1 1 1 1 16 ...

Page 13: ... OUT AV IN 1 AUDIO VIDEO MONO COMPONENT IN L R AC IN 1 13 3 4 2 10 9 6 5 8 AV IN 2 L MONO R AUDIO VIDEO USB IN 15 7 47 55LD650H REMOTE CONTROL OUT OPTICAL DIGITAL UPDATE RESET LAN HDMI DVI IN 2 1 RJP INTERFACE SPEAKER OUT 8 RGB IN PC AUDIO IN RGB DVI TV LINK CFG GAMECONTROL M P I RS 232C IN SERVICE ONLY AUDIO OUT AV IN 1 AUDIO VIDEO MONO COMPONENT IN L R ANTENNA IN 1 13 3 4 2 10 6 5 8 7 9 14 1 1 1...

Page 14: ... 232C IN SERVICE ONLY Used for software updates OPTICAL DIGITAL AUDIO OUT Optical digital audio output for use with amps and home theater systems Note In standby mode this port doesn t work SPEAKER OUT 8Ω For use with external speakers REMOTE CONTROL OUT IR output for controlling an auxiliary device AV Audio Video IN 1 2 Analog composite connection Supports standard definition video only 480i COMP...

Page 15: ...ETACHMENT Carefully place the TV screen side down on a cushioned surface to protect the screen from damage 1 Remove the four screws that hold the base on 2 Detach the stand from the TV 3 INSTALLATION 4 or x 4 Tighten the stand with the four screws provided as parts of the TV Tighten the two of these four screws andthetwoTorxplusstarheadscrews provided as parts of the TV to secure the TV Tighten th...

Page 16: ...T AC IN CABLE MANAGEMENT Carefully place the TV screen side down on a cushioned surface to protect the screen from damage 1 Remove the screws that hold the stand on 2 Detach the stand from TV 3 AC IN CABLE MANAGEMENT INSTALLATION After removing the stand install the included p pr ro ot te ec ct ti io on n c co ov ve er r over the hole for the stand Press the P PR RO OT TE EC CT TI IO ON N C CO OV ...

Page 17: ... MANAGEMENT CLIP as shown If a CABLE HOLDER was included with your TV install it as shown 1 2 Put the cables inside the CABLE MANAGEMENT CLIP and snap it closed 3 G G Do not hold the CABLE MANAGEMENT CLIP when moving the TV If the TV is dropped you may be injured or the product may be broken G G With some TVs the PLUG IN TYPE HOLDER and the CABLE HOLDER are included If these holders are inserted i...

Page 18: ... as shown If a CABLE HOLDER was included with your TV install it as shown 2 AC IN AC IN PROTECTIVE BRACKET SCREW PLUG IN TYPE HOLDER For 32 37 42LD650H 32 37 42LD655H model Or G G Do not hold the CABLE MANAGEMENT CLIP when moving the TV If the TV is dropped you may be injured or the product may be broken G G With some TVs the PLUG IN TYPE HOLDER and the CABLE HOLDER are included If these holders a...

Page 19: ... differ from your TV 4 inches 4 inches 4 inches 4 inches SWIVEL STAND After installing the TV you can adjust the TV set manually to the left or right direction to suit your viewing posi tion G G Ensure adequate ventilation by following the clearance recommendations G G Do not mount near or above any type of heat source CAUTION 20 47 55LD650H 90 Other Models ...

Page 20: ...e injury WARNING 1 Screw provided as parts of the product Desk Stand 4 Screws not provided as parts of the product G Recommended screw size M5 x L L Table depth 8 10mm ex Table depth 15mm Screw M5 x 25 Desk Stand 32 37 42LD650H 32 37 42LD655H Stand Desk 32 37 42LG710H 47 55LD650H Stand Desk 4 Screws not provided as parts of the product 2 Screws 2 Washers 2 Nuts 4 Rubbers providedaspartsoftheproduc...

Page 21: ...use an LG brand wall mount when mounting the TV to a wall LG recommends that wall mounting be performed by a qualified professional installer A A B B Model VESA A B Standard Screw Quantity Wall Mounting Bracket sold separately 32LG710H 37LG710H 42LG710H 32LD650H 32LD655H 37LD650H 37LD655H 42LD650H 42LD655H 47LD650H 55LD650H 200 100 M4 4 200 100 M4 4 200 200 M6 4 400 400 M6 4 200 200 M6 4 A A B B A...

Page 22: ... not use screws longer then the standard dimen sion as they may cause damage to the inside of the TV G G For wall mounts that do not comply with the VESA standard screw specifications the length of the screws may differ depending on their specifica tions G G Do not use screws that do not comply with the VESA standard screw specifications Do not use fasten the screws too strongly this may damage th...

Page 23: ...oosen the bolts Insert the eye bolts or TV brackets bolts and tighten them securely in the upper holes Secure the wall brackets with the bolts sold separately to the wall Match the height of the bracket that is mounted on the wall to the holes in the product Ensure the eye bolts or brackets are tightened securely Use a sturdy rope sold separately to tie the product It is safer to tie the rope so i...

Page 24: ...en connecting the antenna Copper Wire For optimum picture quality adjust the antenna direction if needed To improve the picture quality in a poor signal area please purchase a signal amplifier and install properly If the antenna needs to be split for two TV s install a 2 Way Signal Splitter If the antenna is not installed properly contact your dealer for assistance To prevent damage do not connect...

Page 25: ...econnect RF cable 5 Insert card all the way into the slot making sure it is fully seated into back plane connector 6 Replace the two card retainer screws The MPI card is equipped with an RF jack for antenna cable signal source connection This card can be removed and replaced with a third party PPV Pay Per View card MPI Card Removal PPV Card Installation RF CABLE ANTENNA IN M P I M P I Card Slot G ...

Page 26: ...Turn on the digital set top box Refer to the owner s manual for the digital set top box Select C Co om mp po on ne en nt t input source using the I IN NP PU UT T button on the remote control To prevent the equipment damage never plug in any power cords until you have finished connecting all equipment Image shown may differ from your TV U RESET LAN SERVICE ONLY COMPONENT IN VIDEO AUDIO R S VIDEO AU...

Page 27: ...T T button on the remote control 2 1 HDMI DTV HDMI DVI IN 2 1 DVI RJP INTERFACE VID RGB HDMI DVI IN 2 1 DVI HDMI DTV OUTPUT 1 Horizontal Vertical Frequency kHz Frequency Hz 31 47 59 94 31 47 60 00 44 96 59 94 45 00 60 00 33 72 59 94 33 75 60 00 26 97 23 94 27 00 24 00 33 71 29 97 33 75 30 00 67 432 59 939 67 50 60 00 Resolution 720x480p 1280x720p 1920x1080i G G If the HDMI cables don t support Hig...

Page 28: ... DVI doesn t support audio so a separate audio connection is necessary NOTE Connect the DVI output of the digital set top box to the H HD DM MI I D DV VI I I IN N 1 1 D DV VI I jack on the TV Connect the audio output of the digital set top box to the A AU UD DI IO O R RG GB B D DV VI I jack on the TV 1 How to connect 2 How to use Turn on the digital set top box Refer to the owner s man ual for the...

Page 29: ... Select the C Co om mp po on ne en nt t input source on the TV using the I IN NP PU UT T button on the remote control Refer to the DVD player s manual for operating instructions 2 1 U RESET LAN SERVICE ONLY COMPONENT IN VIDEO AUDIO R S VIDEO AUDIO COMPONENT IN RGB PC AUDIO RGB DVI RGB IN TV LINK CFG Y L R PB PR 1 2 HDMI Connection Connect the HDMI output of the DVD to the H HD DM MI I D DV VI I I ...

Page 30: ...fer to the VCR owner s manual 2 1 Composite RCA Connection Connect the A AU UD DI IO O V VI ID DE EO O jacks between TV and VCR Match the jack colors Video yellow Audio Left white and Audio Right red 1 How to connect 2 How to use Insert a video tape into the VCR and press PLAY on the VCR Refer to the VCR owner s manual Select the A AV V1 1 input source on the TV using the I IN NP PU UT T button on...

Page 31: ... AL L A AU UD DI IO O O OU UT T Connect the other end of the optical cable to the digital audio input on the audio equipment Set the TV Speaker option Off in the AUDIO menu G G p p 7 73 3 See the external audio equipment instruction manu al for operation AUDIO OUT CONNECTION Send the TV s audio to external audio equipment via the Audio Output port UPDATE AV IN 1 AUDIO VIDEO REMOTE CONTROL OUT SPEA...

Page 32: ...tput of the PC to the R RG GB B P PC C jack on the TV Connect thePCaudio output tothe A AU UD DI IO O R RG GB B D DV VI I jack on the TV 1 How to connect 2 1 DVI to HDMI Connection UP RESET LAN SERVICE ONLY RJP INTERFACE COMPONENT IN VIDEO AUDIO S HDMI DVI IN 2 1 DVI DVI PC OUTPUT AUDIO RGB PC AUDIO RGB DVI RGB IN TV LINK CFG 1 2 2 How to use Turn on the PC and the TV Select the H HD DM MI I1 1 in...

Page 33: ...or a long period of time The fixed image could become permanently imprinted on the screen G G The synchronization input form for Horizontal and Vertical frequencies is separate G G Depending on the graphics card some resolution settings may not allow the image to be positioned on the screen properly NOTES Supported Display Specifications Resolution 720x400 1360x768 640x480 800x600 1024x768 1280x76...

Page 34: ... S Si iz ze e can also be adjusted Select P PI IC CT TU UR RE E Select R Re es so ol lu ut ti io on n 1 MENU 3 ENTER 4 Select S Sc cr re ee en n R RG GB B P PC C 2 ENTER 5 Select the desired resolution ENTER ENTER Auto Config Resolution Position Size Phase Reset SCREEN Move Prev Enter Move PICTURE E R G Brightness 50 Sharpness 50 Color 50 Tint 0 Advanced Control Picture Reset Screen RGB PC 1024 x ...

Page 35: ...picture needs to be adjusted again after Auto adjustment in RGB PC you can adjust the P Po os si it ti io on n S Si iz ze e or P Ph ha as se e Select P PI IC CT TU UR RE E Select A Au ut to o c co on nf fi ig g 1 MENU 3 ENTER 4 Select S Sc cr re ee en n R RG GB B P PC C 2 ENTER 5 ENTER Start Auto Configuration Select Y Ye es s ENTER Auto Config Resolution Position Size Phase Reset SCREEN Move Prev...

Page 36: ... any vertical bars or stripes visible on the screen background And the horizontal screen size will also change P Ph ha as se e This function allows you to remove any horizontal noise and clear or sharpen the image of characters Select P PI IC CT TU UR RE E Select P Po os si it ti io on n S Si iz ze e or P Ph ha as se e 1 MENU 3 ENTER 4 Select S Sc cr re ee en n R RG GB B P PC C 2 ENTER 5 ENTER Mak...

Page 37: ...eature operates only in RGB PC mode Select P PI IC CT TU UR RE E Select R Re es se et t 1 MENU 3 ENTER 4 Select S Sc cr re ee en n R RG GB B P PC C 2 ENTER 5 ENTER Select Y Ye es s ENTER Auto config Position Resolution Size Phase Reset SCREEN Move Prev To Set Yes No Enter Move PICTURE E R G Brightness 50 Sharpness 50 Color 50 Tint 0 Advanced Control Picture Reset Screen RGB PC ...

Page 38: ...l interactive menu Displays information about the selected or current events NUMBER button DASH FLASHBK VCR DVD USB control buttons PIP RATIO TIMER SAP PIP CH PIP SWAP PIP INPUT Enters channel numbers or other numbers required Also supports characters Selects a program number for multiple program channels such as 2 1 2 2 etc Tunes to the last channel or input viewed Controls video cassette recorde...

Page 39: ...ETURN MENU INPUT Navigates the on screen menus and adjusts the system settings to your preference Clears all on screen displays and returns to TV viewing from any menu Displays the main menu Rotates through inputs Also switches the TV on from standby VOLUME UP DOWN CC MUTE CHANNEL UP DOWN PAGE UP DOWN Adjusts the volume Selects a closed caption G G p p 7 78 8 Switches the sound on or off G G p p 4...

Page 40: ...ress the M MU UT TE E button You can cancel the Mute function by pressing the M MU UT TE E or V VO OL L or button Adjust the volume to suit your personal preference 1 2 3 TURNING ON THE TV First connect the power cord correctly At this moment the TV switches to standby mode In standby mode to turn TV on press the button on the TV or press the P PO OW WE ER R button on the remote control Select the...

Page 41: ...eep Timer Off Auto Off On TIME Enter Move Photo List Music List Extra Contents Eject USB Enter Move TV AV1 AV2 Component RGB PC HDMI1 HDMI2 INPUT Enter Move Lock System Off Set Password Block Channel Movie Rating TV Rating Children TV Rating General Downloadable Rating Input Block LOCK Enter Move Menu Language English Audio Language English Caption Off Set ID 1 Demo Mode Off Data Broadcasting OPTI...

Page 42: ...elect A Au ut to o T Tu un ni in ng g Select Y Ye es s Run A Au ut to o t tu un ni in ng g 1 MENU 3 2 ENTER ENTER 4 ENTER A password is required to gain access to Auto Tuning menu if the Lock System is turned on 5RETURN Return to the previous menu MENU Return to TV viewing CHANNEL SETUP Auto Tuning Manual Tuning Channel Edit Channel Label Enter Move CHANNEL Auto Tuning Manual Tuning Channel Edit C...

Page 43: ...AN NA AL LO OG G Select channel you want to add or delete 3 ENTER 4 Select A Ad dd d or D De el le et te e 5 ENTER A password is required to gain access to Manual Tuning menu if the Lock System is turned on 6RETURN Return to the previous menu MENU Return to TV viewing Enter Move CHANNEL Enter Move CHANNEL Channel Select channel type and RF channel number F F DIGITAL G G 2 Close Delete DIGITAL 2 1 ...

Page 44: ... Ed di it t MENU Return to TV viewing Return to the previous menu 5RETURN Choose preset labels for your channels If a channel label is provided on the signal from the broadcasting station the TV displays a short name for a channel even if you didn t preset a label for the channel Select C CH HA AN NN NE EL L Select C Ch ha an nn ne el l L La ab be el l Select a Channel 1 MENU 3 2 ENTER ENTER Selec...

Page 45: ...C ENTER T TV V Select it to watch over the air cable and digital cable broadcasts A AV V1 1 2 2 Select them to watch a VCR or other external equipment C Co om mp po on ne en nt t Select them to watch DVD or a Digital set top box R RG GB B P PC C Select it to view PC input H HD DM MI I1 1 2 2 Select them to watch high definition devices HDMI2 ...

Page 46: ...lease Greatest Hits Kids EVENT CHANNEL SELECTION PORTAL INFO ENTER PROGRAMMING GRID Program listings arranged in time slots CHANNEL LIST Shows available channels in numerical order DATE TIME OSD Shows current Date Time CHANNEL INDICATOR Currently tuned channel and program PROGRAM TITLES Highlight a title and press Enter to display additional program information FEATURED ATTRACTION Highlight and cl...

Page 47: ... not appear you can select Photo List or Music List on Extra contents On a USB device you can not add a new folder or delete an existing folder or ENTRY MODES ENTER Image shown may differ from your TV Enter Move USB Select U US SB B Select E Ej je ec ct t 1 MENU 3 2 ENTER ENTER 4RETURN Return to the previous menu MENU Return to TV viewing When removing the USB device Photo List Music List Extra Co...

Page 48: ...s not offered by USB maker or an excessively long cable the device may not be recognized G G Some USB storage devices may not be supported or operate properly G G File alignment method of USB storage device is similar to Window XP and filename can recognize up to 100 English characters G G Please backup important files because data on the USB device may be damaged Data management is the con sumer ...

Page 49: ... ot to o L Li is st t 2 1 MENU 1 2 3 4 5 Navigation Popup Menu Exit 5 Page 2 3 No Marked Photo List Up Folder 1366x768 125KB KY101 06 10 2008 KY102 04 03 2008 JMJ001 01 01 2000 JMJ002 06 15 2008 JMJ003 04 03 2008 JMJ004 02 18 2008 KY103 03 30 2008 KY104 06 19 2008 KY105 01 31 2008 JMJ005 05 13 2008 JMJ006 05 26 2008 JMJ007 02 18 2008 JMJ008 02 18 2008 Up Folder Drive1 JMJ001 3 4 2 1 Supported phot...

Page 50: ...No Marked Photo List Up Folder 1366x768 125KB KY101 06 10 2008 KY102 04 03 2008 JMJ001 01 01 2000 JMJ002 06 15 2008 JMJ003 04 03 2008 JMJ004 02 18 2008 KY103 03 30 2008 KY104 06 19 2008 KY105 01 31 2008 JMJ005 05 13 2008 JMJ006 05 26 2008 JMJ007 02 18 2008 JMJ008 02 18 2008 Up Folder Drive1 Drive1 JMJ001 JMJ001 1366x768 125KB View Mark Mark All Delete Close Navigation Exit Popup Menu Navigation Ex...

Page 51: ...05 01 31 2008 JMJ005 05 13 2008 JMJ006 05 26 2008 JMJ007 02 18 2008 JMJ008 02 18 2008 Up Folder Page 2 3 No Marked Photo List Up Folder 1366x768 125KB KY101 06 10 2008 KY102 04 03 2008 JMJ001 01 01 2000 JMJ002 06 15 2008 JMJ003 04 03 2008 JMJ004 02 18 2008 KY103 03 30 2008 KY104 06 19 2008 KY105 01 31 2008 JMJ005 05 13 2008 JMJ006 05 26 2008 JMJ007 02 18 2008 JMJ008 02 18 2008 Up Folder Drive1 Dri...

Page 52: ...ing slide show Set the time interval of the slide show in O Op pt ti io on n G G B BG GM M Listen to music while viewing photos in full size Set the BGM device and album in O Op pt ti io on n G G R Ro ot ta at te e Rotate photos Rotates the photo 90 180 270 360 clockwise G G D De el le et te e Delete photos G G O Op pt ti io on n Set values for S Sl li id de e S Sp pe ee ed d and M Mu us si ic c A...

Page 53: ...dis played here Current page Total pages Total number of marked files Corresponding buttons on the remote control 1 3 4 5 2 Select U US SB B Select M Mu us si ic c L Li is st t 1 2 MENU Music List Up Folder Title Duration 3 4 2 1 Page 2 3 No Marked Drive1 Navigation Popup Menu Exit 5 A A 00 00 04 16 Up Folder Supported music file MP3 Bit rate range 32 Kbps 320 Kbps Sampling rate Sampling Frequency...

Page 54: ...e G G P Pl la ay y During stop Play the selected file Once a song finishes playing the next selected one will be played When there are no selected files to play the next one in the current folder will be played If you go to a different folder and press the E EN NT TE ER R button the current song in playback will stop G G P Pl la ay y M Ma ar rk ke ed d Play the selected files Once a file finishes ...

Page 55: ...iles downloaded from a paid service with copyright protection are not supported and will not play G G Press E EN NT TE ER R A A or R RE ET TU UR RN N button to stop the screen saver EXTRA CONTENTS Extra Contents will be activated when Data Channel service is available Select U US SB B Select E Ex xt tr ra a C Co on nt te en nt ts s 1 2 MENU ENTER ENTER NOTE G G Pro Centric contents in USB memory s...

Page 56: ...n screen and PIP window sources PIP CH Selects next higher channel for PIP window PIP CH Selects next lower channel for PIP window PIP Operation 1 Connect auxiliary source s to TV connections panel 2 Enter Installer menu to be sure source s is enabled 3 Use the interactive remote provided in the room to operate PIP 4 Press PIP on remote Use the PIP function keys to operate the available PIP featur...

Page 57: ...CTURE CONTROL 57 AV1 AV2 HDMI1 HDMI2 TV TV AV1or AV2 HDMI1 HDMI2 AV1or AV2 Main Picture Source Available Sub Picture Sources HDMI1or HDMI2 Component RGB PC TV AV1 AV2 HDMI1or HDMI2 TV AV1 AV2 HDMI1 HDMI2 ...

Page 58: ... TV RGB PC input source can only use 4 3 or 16 9 aspect ratio Press the R RA AT TI IO O button repeatedly to select the picture options S Se et t B By y P Pr ro og gr ra am m 4 4 3 3 1 16 6 9 9 Z Zo oo om m J Ju us st t S Sc ca an n 1 RATIO 2RETURN Return to TV viewing 1 16 6 9 9 You can also adjust A As sp pe ec ct t R Ra at ti io o in the P PI IC CT TU UR RE E menu ...

Page 59: ...ure proportion to match the source s image 4 3 Choose 4 3 when you want to view a picture with an original 4 3 aspect ratio 16 9 Adjust the picture horizontally in a linear pro portion to fill the entire screen 4 3 4 3 16 9 16 9 Set By Program Set By Program ...

Page 60: ...ll be cropped Just Scan Normally the edges of video signals are cropped 1 2 Just Scan turns off this cropping and shows the complete video Notes If there is noise on the edges of the original signal it will be visible when Just Scan is activated J Ju us st t S Sc ca an n operates only with DTV CADTV HDMI DTV DVI DTV 720p 1080i Component 720p 1080i input sources ...

Page 61: ... nt t S Se en ns so or r it is changed contrast brightness sharp ness color and tint automatically V Vi iv vi id d S St ta an nd da ar rd d N Na at tu ur ra al l C Ci in ne em ma a S Sp po or rt t and G Ga am me e Settings are preset for the optimum picture quality at the factory I In nt te el ll li ig ge en nt t S Se en ns so or r The most suitable picture is automatically adjusted accord ing to ...

Page 62: ...6 9 Picture Mode Standard Backlight 70 Contrast 90 Brightness 50 Sharpness 70 Color 60 Tint 0 B Ba ac ck kl li ig gh ht t This function adjusts the brightness of LCD panel to control the brightness of the screen Adjusting the backlight is recommended when setting the brightness of the set When decreas ing the backlight the brightness of the black becomes darker without any loss in video signal and...

Page 63: ...Ad dv va an nc ce ed d C Co on nt tr ro ol l Select your desired options 1 MENU 3 2 ENTER ENTER 5RETURN Return to the previous menu Return to TV viewing Make appropriate adjustments 4 MENU Enter Move PICTURE E Enter Move PICTURE E Picture Mode Standard Backlight 70 Contrast 90 Brightness 50 Sharpness 70 Color 60 Tint 0 Advanced Control R G Color Temperature Medium Dynamic Contrast F F Medium G G D...

Page 64: ...an adjust brightness of dark area and middle gray level area of the picture Low The reflection of the screen gets darker High The reflection of the screen gets brighter Set black level of the screen to proper level This function enables to select Low or High in the following mode AV NTSC M HDMI or Component Adjust the brightness of the screen to prevent the screen from being too bright Dims extrem...

Page 65: ...ed Control Picture Reset Screen RGB PC E Select P PI IC CT TU UR RE E Select P Pi ic ct tu ur re e R Re es se et t Initialize the adjusted value 1MENU 2 ENTER Select Y Ye es s 3 ENTER 5MENU Return to TV viewing 4 ENTER Backlight 70 Contrast 90 Brightness 50 Sharpness 70 Color 60 Tint 0 Advanced Control Picture Reset Screen RGB PC R G No Yes All picture settings will be resetted Continue R G Resett...

Page 66: ...while D De em mo o M Mo od de e starts If you want to stop the demo press any button Except VOL and MUTE button Enter Move OPTION Menu Language English Audio Language English Caption Off Set ID 1 Demo Mode Off Data Broadcasting Enter Move OPTION Menu Language English Audio Language English Caption Off Set ID 1 Demo Mode Off Data Broadcasting Off On Displays a slide show to explain the various feat...

Page 67: ...ure allows users to enjoy stable volume levels by making automatic adjustments for each program Select A AU UD DI IO O Select A Au ut to o V Vo ol lu um me e Select O On n or O Of ff f 1 MENU 3 2 ENTER ENTER 4RETURN Return to the previous menu MENU Return to TV viewing Enter Move AUDIO E L R Enter Move AUDIO E L R Auto Volume On Clear Voice II On Level 3 Balance 0 Sound Mode Standard SRS TruSurrou...

Page 68: ...IO E L R Enter Move AUDIO E L R Auto Volume Off Clear Voice II Off Level 3 Balance 0 Sound Mode Standard SRS TruSurround XT Off Treble 50 Bass 50 Auto Volume Off Clear Voice II Off Level 3 Balance 0 Sound Mode Standard SRS TruSurround XT Off Treble 50 Bass 50 Standard Music Cinema Sport Game S St ta an nd da ar rd d M Mu us si ic c C Ci in ne em ma a S Sp po or rt t and G Ga am me e are preset for...

Page 69: ... in ne em ma a S Sp po or rt t or G Ga am me e 3 ENTER ENTER Make appropriate adjustments 5 ENTER 6RETURN Return to the previous menu MENU Return to TV viewing Enter Move AUDIO L R E Auto Volume Off Clear Voice II Off Level 3 Balance 0 Sound Mode Standard SRS TruSurround XT Off Treble 50 Bass 50 Enter Move AUDIO L R E Auto Volume Off Clear Voice II Off Level 3 Balance 0 Sound Mode Standard SRS Tru...

Page 70: ...Tr ru uS Su ur rr ro ou un nd d X XT T TruSurround XT is a patented SRS technology that solves the problem of playing 5 1 multichannel content over two speakers I In nf fi in ni it te e S So ou un nd d Infinite Sound is a patented LG proprietary sound process ing technology that strives immersive 5 1 surround sound with just two front speak ers For 32 37 42 47 55LD650H 32 37 42LD655H Enter Move AU...

Page 71: ...uSurround XT Off Treble 50 Bass 50 Auto Volume Off Clear Voice II On Level 3 Balance 0 Sound Mode Standard SRS TruSurround XT Off Treble 50 Bass 50 Off On Select A AU UD DI IO O Select C Cl le ea ar r V Vo oi ic ce e I II I Select O On n or O Of ff f 1MENU 3 2 ENTER ENTER 6RETURN Return to the previous menu MENU Return to TV viewing Select L Le ev ve el l 4 ENTER Make appropriate adjustments 5 ENT...

Page 72: ...to suit your taste and room situations 4RETURN Return to the previous menu MENU Return to TV viewing Enter Move AUDIO Enter Move AUDIO L R E Auto Volume Off Clear Voice II Off Level 3 Balance 0 Sound Mode Standard SRS TruSurround XT Off Treble 50 Bass 50 L R E Auto Volume Off Clear Voice II Off Level 3 Balance 0 Sound Mode Standard SRS TruSurround XT Off Treble 50 Bass 50 Close E E E E Balance 0 L...

Page 73: ...video signal Turn the TV speakers off if using external audio equipment Select A AU UD DI IO O Select T TV V S Sp pe ea ak ke er r Select O On n or O Of ff f 1 MENU 3 2 ENTER ENTER 4RETURN Return to the previous menu MENU Return to TV viewing Enter Move AUDIO E Level 3 Balance 0 Sound Mode Standard SRS TruSurround XT Off Treble 50 Bass 50 Reset TV Speaker On L R Enter Move AUDIO E Level 3 Balance ...

Page 74: ...O O Select R Re es se et t 1 MENU 2 ENTER Initialize the adjusted value 3 ENTER MENU Return to TV viewing 4 Enter Move AUDIO E Level 3 Balance 0 Sound Mode Standard SRS TruSurround XT Off Treble 50 Bass 50 Reset L R Enter Move AUDIO E Level 3 Balance 0 Sound Mode Standard SRS TruSurround XT Off Treble 50 Bass 50 Reset L R Resetting audio configuration i i E ...

Page 75: ...CAST SETUP For Analog only This TV can receive MTS stereo programs and any SAP Secondary Audio Program that accom panies the stereo program if the station transmits an additional sound signal Mono sound is automatically used if the broadcast is only in Mono If other languages are available on the digital signal select them with the S SA AP P button RETURN MONO SAP STEREO ...

Page 76: ...r Move OPTION Menu Language English Audio Language English Caption Off Set ID 1 Demo Mode Off Data Broadcasting Menu Language English Audio Language English Caption Off Set ID 1 Demo Mode Off Data Broadcasting English Spanish French Select O OP PT TI IO ON N Select A Au ud di io o L La an ng gu ua ag ge e Select your desired language 1MENU 3 2 ENTER ENTER 4RETURN Return to the previous menu MENU R...

Page 77: ...ID 1 Demo Mode Off Data Broadcasting Menu Language English Audio Language English Caption Off Set ID 1 Demo Mode Off Data Broadcasting English Español Français Select O OP PT TI IO ON N Select M Me en nu u L La an ng gu ua ag ge e Select your desired language From this point on the on screen menus will be shown in the selected language 1MENU 3 2 ENTER ENTER 4RETURN Return to the previous menu MENU...

Page 78: ... on n Select O On n 1MENU 3 2 ENTER ENTER Select C CC C1 1 4 4 or T Te ex xt t1 1 4 4 4 Analog Broadcasting System Captions When selecting O Of ff f Sub menus for Analog DTV and Digital Option become disabled C CA AP PT TI IO ON N The term for the words that scroll across the bottom of the TV screen usually the audio portion of the pro gram provided for the hearing impaired T TE EX XT T The term f...

Page 79: ...P PT TI IO ON N Select C Ca ap pt ti io on n Select O On n 1MENU 3 2 ENTER ENTER Select C CC C1 1 4 4 T Te ex xt t1 1 4 4 or S Se er rv vi ic ce e1 1 6 6 4 5RETURN Return to the previous menu MENU Return to TV viewing Enter Move OPTION Enter Move OPTION Menu Language English Audio Language English Caption Off Set ID 1 Demo Mode Off Data Broadcasting Menu Language English Audio Language English Cap...

Page 80: ...t T Te ex xt t O Op pa ac ci it ty y Specify the opacity for the text color B Bg g B Ba ac ck kg gr ro ou un nd d C Co ol lo or r Select a background color B Bg g B Ba ac ck kg gr ro ou un nd d O Op pa ac ci it ty y Select the opacity for the background color E Ed dg ge e T Ty yp pe e Select an edge type E Ed dg ge e C Co ol lo or r Select a color for the edges 7RETURN Return to the previous menu ...

Page 81: ...ar 2009 Hour 10 AM 02 Minute 10 Time Zone Eastern Daylight Saving Auto Close F F Auto G G Select T TI IM ME E Select C Cl lo oc ck k Select A Au ut to o 1MENU 3 2 ENTER ENTER Select your viewing area time zone U S A E Ea as st te er rn n C Ce en nt tr ra al l M Mo ou un nt ta ai in n P Pa ac ci if fi ic c A Al la as sk ka a or H Ha aw wa ai ii i Canada E Ea as st te er rn n C Ce en nt tr ra al l M...

Page 82: ...ock Off Time Off On Time Off Sleep Timer Off Auto Off On Select T TI IM ME E Select C Cl lo oc ck k Select M Ma an nu ua al l 1MENU 3 2 ENTER ENTER Select the Year Month Date Hour or Minutes option 4 Set the Year Month Date Hour or Minutes option 5 6RETURN Return to the previous menu MENU Return to TV viewing Month Date 21 Year 2009 Hour 10 AM 02 Minute 10 Time Zone Eastern Daylight Saving Auto Cl...

Page 83: ...e Off On Time Off Sleep Timer Off Auto Off On Clock Off Time Off On Time 6 30 AM Once Sleep Timer Off Auto Off On Select T TI IM ME E Select O Of ff f T Ti im me e or O On n T Ti im me e Select R Re ep pe ea at t 1MENU 3 2 ENTER ENTER Select O Of ff f O On nc ce e D Da ai il ly y M Mo on n F Fr ri i M Mo on n S Sa at t S Sa at t S Su un n or S Su un n 4 Select and set H Ho ou ur r or M Mi in nu ut...

Page 84: ...Select T TI IM ME E Select S Sl le ee ep p T Ti im me er r Make appropriate adjustments 1MENU 3 2 ENTER ENTER 4RETURN Return to the previous menu MENU Return to TV viewing Off 10 min 20 min 30 min 60 min 90 min 120 min 180 min 240 min AUTO SHUT OFF SETTING If set to on and there is no input signal the TV turns off automatically after 15 minutes Enter Move TIME Enter Move TIME Clock Off Time Off On...

Page 85: ... blocked by TV Rating and or Individual Categories Movies that have been shown at the theaters or direct to video movies use the Movie Rating System MPAA only Ratings for Television programs including made for TV movies TV G General audience TV PG Parental guidance suggested TV 14 Parents strongly cautioned TV MA Mature audience only TV Y All children TV Y7 Children 7 years older SET PASSWORD LOCK...

Page 86: ...n TV Rating General Downloadable Rating Input Block Select L Lo oc ck k S Sy ys st te em m Select O On n or O Of ff f 3 2 ENTER Enter Move LOCK Lock System On Set Password Block Channel Movie Rating TV Rating Children TV Rating General Downloadable Rating Input Block Off On When you select O On n the Lock System is enable Select L LO OC CK K 1MENU ENTER 4RETURN Return to the previous menu MENU Ret...

Page 87: ...as ss sw wo or rd d Choose any 4 digits for your new password As soon as the 4 digits are entered re enter the same 4 digits on the C Co on nf fi ir rm m 4 3 ENTER 1 2 3 4 5 6 7 8 0 9 ABC DEF GHI WXYZ TUV PQRS MNO JKL Enter Move LOCK Lock System Off Set Password Block Channel Movie Rating TV Rating Children TV Rating General Downloadable Rating Input Block Close New Confirm Select L LO OC CK K 1ME...

Page 88: ...c ck k C Ch ha an nn ne el l Select a channel to block or unblock 4 3 ENTER Block or unblock a channel 5 Blocks any channels that you do not want to watch or that you do not want your children to watch Select L LO OC CK K 1MENU ENTER Input the password 21 2 3 4 5 6 7 8 0 9 ABC DEF GHI WXYZ TUV PQRS MNO JKL 6RETURN Return to the previous menu MENU Return to TV viewing Ch Change Page Change CH Navig...

Page 89: ...ti in ng g Select G G P PG G P PG G 1 13 3 R R N NC C 1 17 7 X X or B Bl lo oc ck ki in ng g O Of ff f 4 3 ENTER Enter Move LOCK Lock System Off Set Password Block Channel Movie Rating TV Rating Children TV Rating General Downloadable Rating Input Block Blocking off Permits all programs G PG PG 13 R NC 17 X Blocking Off G General audience PG Parental guidance suggested PG 13 Parents strongly cauti...

Page 90: ... programs intended for mature audi ences in the TV Rating sub menu your children can view those programs Select L LO OC CK K 1MENU ENTER Input the password 21 2 3 4 5 6 7 8 0 9 ABC DEF GHI WXYZ TUV PQRS MNO JKL 6RETURN Return to the previous menu MENU Return to TV viewing Enter Move LOCK Lock System Off Set Password Block Channel Movie Rating TV Rating Children TV Rating General Downloadable Ratin...

Page 91: ...exual situations applies to TV PG TV 14 TV MA Violence applies to TV PG TV 14 TV MA Select L LO OC CK K 1MENU ENTER Input the password 21 2 3 4 5 6 7 8 0 9 ABC DEF GHI WXYZ TUV PQRS MNO JKL 6RETURN Return to the previous menu MENU Return to TV viewing Select T TV V R Ra at ti in ng g G Ge en ne er ra al l Enter Move LOCK Lock System Off Set Password Block Channel Movie Rating TV Rating Children TV...

Page 92: ... Block Channel TV Rating English TV Rating French Downloadable Rating Input Block Blocking off Permits all programs E C C8 G PG 14 18 Blocking Off If T TV V R Ra at ti in ng g E En ng gl li is sh h or T TV V R Ra at ti in ng g F Fr re en nc ch h is locked enter the password to unlocked it temporarily E Exempt C Children C8 Children eight years and older G General programming suitable for all audie...

Page 93: ...TER Enter Move LOCK Lock System Off Set Password Block Channel TV Rating English TV Rating French Downloadable Rating Input Block Blocking off Permits all programs E G 8ans 13ans 16ans 18ans Blocking Off E Exempt G General 8ans General Not convenient for lit tle children 13ans Not convenient for children of 13 years and younger 16ans Not convenient for children of 16 years and younger 18ans This p...

Page 94: ...ing TV Rating Children TV Rating General Downloadable Rating Input Block Close E E Select D Do ow wn nl lo oa ad da ab bl le e R Ra at ti in ng g Select desired D Do ow wn nl lo oa ad da ab bl le e R Ra at ti in ng g option 4 3 ENTER Select desired option and block it 5 ENTER Select L LO OC CK K 1MENU ENTER Input the password 21 2 3 4 5 6 7 8 0 9 ABC DEF GHI WXYZ TUV PQRS MNO JKL 6RETURN Return to...

Page 95: ... ABC DEF GHI WXYZ TUV PQRS MNO JKL 6RETURN Return to the previous menu MENU Return to TV viewing Enter Move LOCK Lock System Off Set Password Block Channel Movie Rating TV Rating Children TV Rating General Downloadable Rating Input Block Enter Move LOCK Lock System Off Set Password Block Channel Movie Rating TV Rating Children TV Rating General Downloadable Rating Input Block AV1 F F Off G G AV2 O...

Page 96: ...adcast Is the power cord inserted into wall power outlet Check your antenna direction and or location Test the wall power outlet plug another product s power cord into the outlet where the product s power cord was plugged in This is normal the image is muted during the product startup process Please contact your service center if the picture has not appeared after five minutes Adjust Color in menu...

Page 97: ...nusual sound from inside the product No sound when connecting HDMI or USB No output from one of the speakers A Au ud di io o P Pr ro ob bl le em ms s Press the VOL or VOLUME button Sound muted Press the MUTE button Try another channel The problem may be with the broadcast Are the audio cables installed properly Adjust Balance in menu option A change in ambient humidity or temperature may result in...

Page 98: ...ashing detergent Wring the cloth until it s almost dry and then use it to wipe the screen Make sure the excess water is off the screen and then let it air dry before you turn on your TV G G If you expect to leave your TV dormant for a long time such as a vacation it s a good idea to unplug the power cord to protect against possible damage from lightning or power surges CAUTION 2 1 G G Do not use w...

Page 99: ...midity 42LG710H 42LG710H UA 1026 2 x 734 1 x 293 4 mm 40 4 x 28 9 x 1 1 5 inch 1026 2 x 687 9 x 1 1 1 8 mm 40 4 x 27 0 x 4 4 inch 21 10 kg 46 51 lbs 18 48 kg 40 74 lbs 37LG710H 37LG710H UA 918 6 x 684 8 x 293 4 mm 36 1 x 26 9 x 1 1 5 inch 918 6 x 635 8 x 1 1 1 7 mm 36 1 x 25 0 x 4 39 inch 17 97 kg 39 61 lbs 15 41 kg 33 97 lbs 32LG710H 32LG710H UA 797 x 597 x 232 5 mm 31 3 x 23 5 x 9 15 inch 797 x ...

Page 100: ...kg 24 4 lbs 9 4 kg 20 7 lbs 916 0 mm x 626 0 mm x 261 0 mm 36 0 inch x 24 6 inch x 10 2 inch 916 0 mm x 560 0 mm x 88 9 mm 36 0 inch x 22 0 inch x 3 5 inch 14 6 kg 32 1 lbs 12 0 kg 26 4 lbs Dimensions Width x Height x Depth Weight With stand Without stand With stand Without stand 1024 0 mm x 686 6 mm x 261 0 mm 40 3 inch x 27 0 inch x 10 2 inch 1024 0 mm x 621 0 mm x 87 1 mm 40 3 inch x 24 4 inch ...

Page 101: ...ds correctly If the component does not operate correctly the remote control requires pro gramming to operate the device Turn on the component to be programmed then press the corresponding mode button such as S ST TB B on the remote control The remote control button of the desired device is illuminated Press the M ME EN NU U and M MU UT TE E buttons simultaneously and the remote control is ready to...

Page 102: ...GA 045 046 059 MINOLTA 013 020 MITSUBISHI 013 020 045 046 049 051 059 061 151 MTC 034 040 MULTITECH 024 034 NEC 012 023 039 043 048 NORDMENDE 043 OPTONICA 053 054 PANASONIC 066 070 074 083 133 140 145 PENTAX 013 020 031 033 063 PHILCO 031 034 067 PHILIPS 031 033 034 054 067 071 101 PILOT 101 PIONEER 013 021 048 PORTLAND 108 PULSAR 072 QUARTZ 01 1 014 QUASAR 033 066 075 145 RCA 013 020 033 034 040 ...

Page 103: ...E SKY SATELLITE 143 PANASONIC 060 142 PANSAT 121 PERSONAL CABLE 1 17 PHILIPS 071 PICO 105 PRESIDENT 019 102 PRIMESTAR 030 1 10 1 1 1 PROSAT 072 PSI TH 157 RCA 066 106 REALISTIC 043 074 SAMSUNG 123 SATELLITE SERVICE CO 028 035 047 057 085 SCIENTIFIC ATLANTA 032 138 SKY LIFE 150 SONY 103 STARCAST 041 SUPER GUIDE 020 124 125 SAMART TH 156 TEECOM 023 026 075 087 088 090 107 130 137 TOSHIBA 002 127 TRU...

Page 104: ... C4 C5 C6 C7 D0 D1 D2 D3 D4 D5 D6 D7 D0 D1 D2 D3 D4 D5 D6 D7 Lead code Low custom code High custom code Data code Data code Repeat code Tf 4 5 ms 9 ms 0 56 ms 1 12 ms 0 56 ms 2 24 ms Tf Tf Tf 108ms 455KHz Bit 0 Bit 1 1 How to Connect Connect your wired remote control to the Remote Control port on the TV 2 Remote Control IR Codes Output waveform Single pulse modulated with 37 917KHz signal at 455KH...

Page 105: ...l Button 79 FF RATIO Remote control Button AB GUIDE Remote control Button OC PORTAL Remote control Button AA INFO Remote control Button 10 19 Number Key 0 9 Remote control Button 4C Dash Remote control Button 1A FLASHBK Remote control Button 02 VOL Remote control Button 03 VOL Remote control Button 00 CH Remote control Button 01 CH Remote control Button 0E GG TIMER Remote control Button 39 CC Remo...

Page 106: ...ors reputations Finally any free program is threatened constantly by software patents We wish to avoid the danger that redistributors of a free program will individually obtain patent licenses in effect making the program proprietary To prevent this we have made it clear that any patent must be licensed for everyone s free use or not licensed at all The precise terms and conditions for copying dis...

Page 107: ...ne readable copy of the corresponding source code to be distributed under the terms of sections 1 and 2 above on a medium customarily used for software interchange or c Accompany it with the information you received as to the offer to distribute corresponding source code This alter native is allowed only for noncommercial distribution and only if you received the program in object code or exe cuta...

Page 108: ...the body of this license 9 The Free Software Foundation may publish revised and or new versions of the General Public License from time to time Such new versions will be similar in spirit to the present ver sion but may differ in detail to address new problems or con cerns Each version is given a distinguishing version number If the program specifies a version number of this license which applies ...

Page 109: ...re Foundation Inc 51 Franklin Street Fifth Floor Boston MA 021 10 1301 USA Also add information on how to contact you by electronic and paper mail If the program is interactive make it output a short notice like this when it starts in an interactive mode Gnomovision version 69 Copyright C year name of author Gnomovision comes with ABSOLUTELY NO WARRANTY for details type show w This is free softwar...

Page 110: ...y for the free library Also if the library is mod ified by someone else and passed on the recipients should know that what they have is not the original version so that the origi nal author s reputation will not be affected by problems that might be introduced by others Finally software patents pose a constant threat to the existence of any free program We wish to make sure that a company can not ...

Page 111: ...copy an appropriate copyright notice and disclaimer of warranty keep intact all the notices that refer to this license and to the absence of any warranty and distribute a copy of this license along with the Library You may charge a fee for the physical act of transferring a copy and you may at your option offer warranty protection in exchange for a fee 2 You may modify your copy or copies of the L...

Page 112: ... ten lines or less in length then the use of the object file is unrestricted regardless of whether it is legal ly a derivative work Executable containing this object code plus portions of the library will still fall under Section 6 Otherwise if the work is a derivative of the library you may distribute the object code for the work under the terms of Section 6 Any executable containing that work al...

Page 113: ...ny further restrictions on the recipients exercise of the rights granted herein You are not responsible for enforcing compliance by third parties with this license 1 1 If as a consequence of a court judgment or allegation of patent infringement or for any other reason not limited to patent issues conditions are imposed on you whether by court order agreement or otherwise that contradict the con di...

Page 114: ...F SUCH HOLDER OR OTHER PARTY HAS BEEN ADVISED OF THE POSSIBILITY OF SUCH DAMAGES END OF TERMS AND CONDITIONS How to apply these terms to your new libraries If you develop a new library and you want it to be of the great est possible use to the public we recommend making it free soft ware that everyone can redistribute and change You can do so by permitting redistribution under these terms or alter...

Page 115: ... is not already covered code governed by this license 1 10 1 Patent claims means any patent claim s now owned or hereafter acquired including without limitation method process and apparatus claims in any patent licensable by grantor 1 1 1 Source code means the preferred form of the covered code for making modifications to it including all modules it contains plus any associated interface definitio...

Page 116: ...e you distribute You may not offer or impose any terms on any source code version that alters or restricts the applicable version of this license or the recipients rights hereunder However you may include an additional document offering the additional rights described in section 3 5 3 2 Availability of source code Any modification which you create or to which you con tribute must be made available...

Page 117: ...hat any terms which differ from this license are offered by you alone not by the Initial developer or any contributor You hereby agree to indemnify the initial developer and every contributor for any liability incurred by the initial developer or such contributor as a result of any such terms You offer 3 7 Larger works You may create a larger work by combining covered code with other code not gove...

Page 118: ...of the 60 day notice period specified above b any software hardware or device other than such par ticipant s contributor Version directly or indirectly infringes any patent then any rights granted to You by such participant under sections 2 1 b and 2 2 b are revoked effective as of the date you first made used sold distributed or had made modifications made by that participant 8 3 If you assert a ...

Page 119: ...nsed Multiple Licensed means that the initial developer permits you to utilize portions of the covered code under your choice of the NPL or the alternative licenses if any specified by the initial developer in the file described in exhibit A EXHIBIT A Mozilla Public License The contents of this file are subject to the Mozilla Public License Version 1 1 the license you may not use this file except ...

Page 120: ... Setup pages 13 14 Cloning Information pages 28 33 b LAN Setup Overview page 40 Pro Idiom is a registered trademark of Zenith Electronics LLC Pro Centric is a trademark of LG Electronics U S A Inc b LAN is a trademark of LodgeNet Interactive Corporation All other trademarks or registered trademarks are the property of their respective owners ...

Page 121: ...the cable entry as practical REGULATORY INFORMATION This equipment has been tested and found to comply with the limits for a Class B digital device pursuant to Part 15 of the FCC Rules These limits are designed to provide reasonable protection against harmful interference when the equipment is operated in a residential installation This equipment generates uses and can radiate radio frequency ener...

Page 122: ...ounting a TV on the wall make sure not to install the TV by the hanging power and signal cables on the back of the TV 17 Do not allow an impact shock or any objects to fall into the product and do not drop objects onto the screen 18 Power Cord Caution It is recommended that appliances be placed upon a dedicated circuit that is a single outlet circuit which powers only that appliance and has no add...

Page 123: ...d in wire to an antenna discharge unit size of grounding conductors location of antenna discharge unit connection to grounding elec trodes and requirements for the grounding electrode Antenna Grounding According to NEC ANSI NFPA 70 24 Cleaning When cleaning unplug the power cord and rub gently with a soft cloth to prevent scratching Do not spray water or other liquids directly on the TV as electri...

Page 124: ...ning Procedures 29 33 Learning Teaching a Master TV Setup using a USB Memory Device 29 Learning Teaching a Master TV Setup using a TLL 1100A Clone Programmer 30 31 Learning Teaching a Master TV Setup using an LT2002 Clone Programmer 32 33 Remote Jack Pack TV Connections Setup 34 Reference Upgrading TV PTC Software with a USB Memory Device 35 Reference Power Consumption Settings 36 37 32 37 42 47 5...

Page 125: ... b LAN module is internal to the TV and allows the hotel institution head end equipment to com municate with the TV for configuration and control See Reference section b LAN Setup Overview for further information The b LAN module also comprises the data tuner required for Pro Centric operation see next page Pass through Mode This mode allows you to configure a Master TV Setup for cloning purposes ...

Page 126: ...ail resources account access Use the Installer Remote to operate both interactive menus and regular TV features Press PORTAL on the Installer Remote to access the interactive menus Channel Guide Shows available TV programs Indicates the channel and the program start and finish times and also identifies the TV network Information Typically displays hotel information for example photos of guest room...

Page 127: ...AUDIO OUT REMOTE CONTROL OUT SPEAKER OUT 8 ANTENNA IN COMPONENT IN RS 232C IN SERVICE ONLY UPDATE RESET AUDIO IN RGB DVI R L PB Y PR 2 1 HDMI DVI IN OPTICAL DIGITAL RJP INTERFACE VIDEO L MONO AUDIO R AV IN 1 RGB IN PC LAN GAME CONTROL AUDIO OUT REMOTE CONTROL OUT SPEAKER OUT 8 TV LINKCFG 47 55LD650H LAN Restricted to service use only RGB IN PC Connection for RGB output from PC TV LINK CFG Use for ...

Page 128: ...nnection for composite audio video output from external device SPEAKER OUT 8Ω Connect to 8 ohm external speaker input REMOTE CONTROL OUT IR output for controlling an auxiliary device RGB IN PC Connection for RGB output from PC TV LINK CFG Use for local FTG configuration RS 232C IN Use for downloading software updates etc UPDATE Restricted to software updates RESET Press RESET to re initialize the ...

Page 129: ...H TVs Side Connections Panel All LD650H LD655H LG710H TVs VIDEO IN Connect to video output port on external device L MONO AUDIO R IN Connect to audio output jacks on external device For only mono audio output connect to Left audio input A V 2 Input RF ANTENNA Connect to Antenna Cable input on MPI card MPI PORT Connect external MPI control devices i e clone programmer PPV provider etc Note 47 55LD6...

Page 130: ...le for selected LG DVD VCR products Cloning Cloning refers to the process of capturing a Master TV Setup and trans ferring it to a Target TV The Master TV s clonable features need to be configured as part of the Commercial Mode Setup This is a critical step If the Master TV s clonable features channel icons or labels digital font options etc are not set up correctly the cloned TVs will all have pr...

Page 131: ...e supplied with the TV VCR DVD BUTTONS Controls some video cassette recorders or DVD players RECORD button not functional in DVD mode Set up for VCR recording Once Regularly Weekly Off RECORD button only VOLUME UP DOWN Increases decreases sound level CC Press to activate English subtitles MUTE Switches sound ON or OFF CHANNEL UP DOWN Selects available channels found with Auto Tuning Moves to next ...

Page 132: ...oadcast Set to 000 CATV Set to 001 default HRC Set to 002 IRC Set to 003 d Set any other Installer Menu items that affect your TV program ming network to the required configuration For example en able disable Aux sources set a Start Channel etc e After you have adjusted all required Installer Menu item set tings press ENTER on the Installer Remote to exit the menu and save your changes 2 Set up TV...

Page 133: ...ENU on the Installer Remote to initiate the transfer of the Master TV Setup to the PTC Once the transfer is complete the TV will exit the Installer Menu Note The maximum number of active channels that can be trans ferred is 141 Total channels numbering more than 141 will result in erratic TV operation 5 Add Custom Channel and Aux Source Labels for Analog Channels 2 5 4 MENU Mode Enter the Installe...

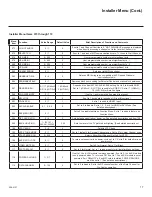
Page 134: ...e available menu items or access an item directly by keying in the line number and then pressing MENU For example to access the SLEEP TIMER option which is item 015 press 0 1 5 MENU To change a setting use the Left Right arrow keys or enter a value directly Using the Installer Menu Items 000 119 are immediately accessible only upon entering the Installer Menu Refer to the table on pages 16 and 17 ...

Page 135: ...Chip Parental Control functions 022 MAX BLK HRS 0 99 12 Sets number of V Chip blocking hours 023 CAPTION LOCK 0 1 0 Set to 1 to retain caption setting set before TV turned OFF 028 CH OVERIDE 0 1 1 If set to 0 limits direct access to favorite channels 029 OLD OCV 0 1 0 Set to 1 to change MPI operation to OCV 030 ACK MASK 0 1 0 If set to 1 changes MPI for some OCV boxes 031 POLL RATE 20 169 94 Selec...

Page 136: ...rd is locked out IR is still functional 091 YPrPb2 EN 0 1 1 Set to 1 to enable HDMI 2 input 093 RJP AVAILABLE 0 1 2 5 6 0 Set to 0 to disable Set to 1 2 5 or 6 for HDMI or DVI Mode See detailed descriptions 094 SAP MENU EN 0 1 1 Set to 0 to disable feature on Function Menu Set to 1 to enable feature on Function Menu 096 DEF ASP RATIO 0 4 2 Sets default aspect ratio at power up See detailed descrip...

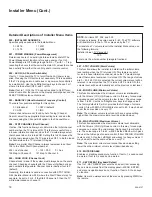
Page 137: ...example be set to 3 or 4 If the Start Channel is 3 then the TV will remain locked on channel 3 NOTE For items 007 008 and 009 For legacy reasons the scale used is 0 63 The PTC software will translate this to the 0 100 scale used by the TV To translate a TV volume level to the Installer Menu value use the following formula Installer Value TV Value x 63 100 Enter only the whole number disregard frac...

Page 138: ...ing unless changed by Pay Per View provider Sets baud rate Step size of 4 3 uS Only affects Function Menu if enabled by some PPV providers 034 CAMPORT EN Camera Port Enable Set to 1 to enable Video 2 input on display panel If set to 0 Video 2 input on display panel is not functional Note S Video overrides Video 035 COMPPORT EN Computer Port Enable Enable disable TV display panel HDMI 1 input jack ...

Page 139: ... 5 Timeout 25 5MS 25 5 MS Handshake time 084 PERMANENT BLK Permanent Block Allows Lock Parental Control blocking schemes to be permanent by disabling the blocking hours function Set to 1 to install Paren tal Control restrictions permanently Set to 0 for user specified hours control of blocking schemes 087 REAR RGB EN Rear RGB Enable Controls access to rear RGB input on TV Set to 0 to disable RGB i...

Page 140: ...Same as NTSC 103 ATSC TUNE MODE Sets ATSC tuning mode Default set to 1 for Physical Channel scan Set to 0 for Virtual Channel scan 104 START MINOR CHANNEL Sets XXX XXX digital Minor Start Channel at power up 0 NTSC If not 0 number selected is the digital Minor Start Channel number 106 ASP RATIO LOCK Aspect Ratio Lock Set to 1 to retain previous aspect ratio with power off Set to 0 to retain defaul...

Page 141: ...Enter Move Auto Tuning Manual Tuning Channel Edit Channel Label TV AV1 AV2 Component RGB PC HDMI1 II HDMI2 INPUT Enter Move LOCK Enter Move Lock System Off Set Password Block Channel Movie Rating TV Rating Children TV Rating General Downloadable Rating Input Block 90 90 50 50 50 0 PICTURE Enter Move Aspect Ratio 16 9 Picture Mode Standard Backlight Contrast Brightness Sharpness Color Tint OPTION E...

Page 142: ...Down to return to channels Channel Up Down Tunes in the next channel in scan Left Right Arrows Select the item to change If I is shown the icon can be changed If a number is shown it indicates the position of the character that can be changed Up Down Arrows Select the icon or the character to be displayed Tip Arrows can be held down for fast scrolling 0 9 Use to enter the index number of the icon ...

Page 143: ...ssary to make changes to Installer Menu items Write them back to the EBL in FTG Mode 6 Save the FTG Channel Map and FTG Installer Menu settings to an FTG Configuration rml file for future use 7 Tune the TV to a Logical Channel in the FTG Channel Map Laptop PC REMOTE CONTROLOUT SPEAKER OUT 8 VIDEO L MONO COMPONENT IN VIDEO AUDIO R L RS 232C IN SERVICE ONLY UPDATE RESET AUDIO RGB DVI PB Y PR 2 1 DVI...

Page 144: ...r Menu Configuration Utilities that comprise the FTG Configuration Application Refer to the Free To Guest FTG Configuration Application manual for further information Writing an FTG Channel Map into the EBL will switch the EBL from Pass through Mode to FTG Mode FTG CHANNEL MAP CONFIGURATION UTILITY PRINT MAP Click to display a printable FTG Channel Map Report The report can also be exported as an ...

Page 145: ...nel s Data and the FTG Channel Map EXIT Click to exit editor and return to FTG Channel Map Configuration Utility LOGICAL CHANNEL MAPPING Select a Logical Channel number then assign it the RF Major and Minor chan nel numbers to complete the mapping CUSTOM CHANNEL LABELS ICONS Enter custom labels and select icons by name on menu or by number SET CHANNEL ATTRIBUTES Check select Encrypted OSD or Blank...

Page 146: ...r Menu settings in the EBL to the FTG Configuration Application WRITE Click to transfer the FTG Installer Menu settings to the EBL IR REMOTE ACCESS Toggle IR Remote Access to ON to obtain access to TV setup menus and Installer Menu CONFIGURATION SETTINGS Select tabs for categories of Installer Menu items to set up TV HOSPITAL GRADE TV ONLY Set Hospital items on Installer Menu for hospital grade TV...

Page 147: ...e indicat ed does not appear there is a problem with that step and cloning may not be successful Warning Copying a blank or incorrect memory into a TV STB or other device will cause the TV STB or other device to operate erratically or become inoperable Warning Do not connect a clone programmer to any PPV card installed in the Master TV or any MPI port while the TV is in PPV Mode or the clone progr...

Page 148: ...TER Note Filenames identify the TV and the TLL version see figure at right Teaching status will be shown on the progress bar When the Teaching process is complete the USB Download menu will reappear on screen 6 When Teaching is done remove the USB memory device turn OFF the TV and unplug the TV power cord for 15 seconds 7 Reconnect the TV power cord and turn ON the TV The Master TV Setup should be...

Page 149: ...essage will be displayed Cloning is accomplished using the TV clone programmer MPI ports for com munication see figure TLL 1100A Cloning Notes Read the IMPORTANT CLONING INFORMATION on page 28 before beginning any cloning procedures Ensure the TLL 1100A is either fully charged or connected to AC power Teaching and Learning is only pos sible between identical model TVs STBs however the TLL 1100A cl...

Page 150: ...lone Selection Menu Then press ENTER to transfer the Master TV Setup to the Target TV Teaching usually takes 3 to 4 minutes TEACHING IN PROGRESS will be displayed on the screen during Teaching When the Teaching process is complete a TEACHING COMPLETE message will be displayed 4 When Teaching is done disconnect the MPI cable from the Target TV turn OFF the TV and unplug the TV power cord for 15 sec...

Page 151: ... Master TV Setup Cloning Procedures Cont Learning Teaching a Master TV Setup using an LT2002 Clone Programmer Cloning is accomplished using the TV clone programmer MPI ports for com munication see figure LT2002 Cloning Notes Read the IMPORTANT CLONING INFORMATION on page 28 before beginning any cloning procedures A slow flashing green light indicates that there are communication problems between t...

Page 152: ...ress POWER to transfer the Master TV Setup to the Target TV Teaching usually takes 3 to 4 minutes TEACHING IN PROGRESS will be displayed on the screen during Teaching When the Teaching process is complete a TEACHING COMPLETE message will be displayed 4 When Teaching is done press any key on the Installer Remote to return to the Clone Selection Menu Then press ENTER 5 Disconnect the MPI cable from ...

Page 153: ... 232C IN SERVICE ONLY UPDATE RESET AUDIO RGB DVI PB Y PR 2 1 DVI HDMI DVI IN OPTICAL DIGITAL AUDIO OUT RJP INTERFACE RGB IN R AUDIO AV IN 1 RGB PC LAN SERVICE ONLY TV LINK CFG GAME CONTROL HDMI DVI IN 1 Connect HDMI con nector from RJP cable bundle AUDIO VIDEO IN 1 Connect Composite Video Audio connectors from RJP cable bundle Composite Video on legacy RJP only RGB IN PC Connect RGB connector from...

Page 154: ...ss ENTER again to exit the Installer Menu Typical Installer Menu CPU Version PTC Version TV Software Update Current TV Software Version Information epak 3 0b 0 rootfs RELEASE 0 00 1 model RELEASE 3 12 0 emanual RELEASE 0 00 1 ezcal RELEASE 3 0b 0 kernel RELEASE 3 12 0 lgfont RELEASE 3 12 0 micom RELEASE 0 d0 b8 710H_V3 31_usb i cpak 3 31 0 lgapp RELEASE 3 31 0 lgres RELEASE 3 31 0 model RELEASE 3 ...

Page 155: ...83 1 67 7 40 30 60 134 6 88 0 22 40 170 77 5 65 3 42 42 50 118 9 81 5 28 13 160 71 9 63 0 44 44 40 104 1 75 2 33 69 150 67 1 61 3 45 94 30 89 1 69 2 38 98 140 61 4 59 0 47 97 20 72 6 62 5 44 89 130 55 8 56 4 50 26 10 57 1 56 1 50 53 120 50 2 54 1 52 29 1 41 5 49 7 56 17 110 44 3 51 8 54 32 Item 099 Back Lighting Static Picture Lumin Power Consumption Watts Percent Savings Item 099 Back Lighting Dy...

Page 156: ...62 71 10 41 58 61 72 110 23 5 54 5 64 03 1 31 53 65 02 101 21 52 8 65 15 Item 099 Back Lighting Static Picture Lumin Power Consumption Watts Percent Savings Item 099 Back Lighting Dynamic Picture Lumin Power Consumption Watts Percent Savings 100 286 185 0 200 113 109 41 08 90 250 164 5 11 08 190 108 103 44 32 80 216 147 5 20 27 180 96 96 4 47 89 70 185 5 133 5 27 84 170 83 89 7 51 51 60 159 121 3 ...

Page 157: ... direct access to an RF channel or Aux channel is requested while the Camport is active then when the video plug is removed the TV will switch to the last requested channel Source changes using any Source keys INPUT are ignored Channel Up Down and Flashback commands are not direct access tuning commands and they are also ignored Previous State Before Inserting CAMPORT Operation While CAMPORT is Ac...

Page 158: ...abeling 130 90 Video2 Side CV SVIDEO 34 CAMPORT_EN 0x01 Video Front Camport 0 Video Front Camport 0 VIDEO 2 131 91 Video1 Rear CV SVIDEO 39 REAR_AUX_EN 0x02 Rear Video Aux 1 Rear Video Aux 0 VIDEO 1 132 92 HDMI2 DTV PC 91 YPrPb2 EN 1 0x04 S Video Rear 2 S Video Rear 0 VIDEO 5 133 93 HDMI1 DVI DTV PC 35 COMPPORT_EN 1 0x08 Front Computer 3 Front Computer 0 VIDEO 3 134 94 RGB PC 87 REAR RGB EN 2 0x10...

Page 159: ...card is installed POWER SAVINGS must be set to 001 See table below Also see note regarding MPI cards at the top of the page POWER SAVINGS 32 37 42LD650H LD655H MPI Slot 001 Supported 003 default Not Supported 007 Not Supported POWER SAVINGS TV Power On State TV Standby State b LAN Power b LAN Power 001 On On 003 default Off On 007 Off Off The b LAN module is internal to the TV It allows the hotel ...

Page 160: ...01ML N A RJP 110F RJP 210F RJP 110FW RJP 210FW RJP 110W RJP 210W RJP 110WBR RJP 210WBR RJP 110S RJP 210S RJP 120G RJP 220G RJP 120T RJP 220T RJP 201B RJP 301B RJP 202B RJP 302B RJP Input Auto sensing Hierarchy Priority Video Audio 1st Highest Digital Video In Audio In 3 5mm 2nd PC Video In Audio In L R 3rd Video In Digital Video In ...

Page 161: ... Menu settings Erratic Operation Installer Menu setup Wrong Installer Menu settings Adjust Installer Menu settings as required Installer Remote Remote doesn t work Remote not in TV Mode Use MODE key to select TV puts remote into TV Mode Not aimed at IR remote sensor Point remote at TV s IR receiver on TV Remote too far from IR sensor Move remote closer to TV s IR receiver or darken room MPI not co...

Page 162: ... the AC Power cord Then observe POWER LED on front of TV POWER LED lit No Yes Press POWER on Installer Remote TV responded No Yes TV responded No Yes End Bad TV Bad PPV Card Press VOLUME UP DOWN or MUTE key on User supplied Remote Bad Analog or Digital Board TV turned ON Yes No Press VOLUME UP DOWN or MUTE key on Installer Remote Bad TV Troubleshooting Cont Troubleshooting Flowchart ...

Page 163: ...ing MENU until the TV stops responding FTG Operation Troubleshooting The following table provides troubleshooting information for when the EBL is configured in the FTG Mode of operation Symptom Possible Cause s Solution s Communication Error Communications Timeout Cable s not connected Check and connect communication cables TV not powered Check connect the TV power cord TV not turned ON TV needs t...

Page 164: ...and then ON LT2002 Press RESET on clone programmer Then redo Learn Teach Learning usually takes about 90 sec onds Teaching usually takes 3 to 4 minutes Remote does not operate clone programmer Wrong Installer Remote Only use an LG Installer Remote to operate clone programmer with TV Clone menu does not dis play on TV screen TLL 1100A shows error mes sage or LT2002 LED does not blink MPI cord not c...

Page 165: ...ector HDMI High definition multi media interface HDSTB High definition set top box Refers to a tuner device that receives high definition television signals which have higher res olution than ordinary analog TV signals HDTV High definition television Refers to tele vision signals that have higher resolu tion than ordinary analog TV signals INPUT Refers to the input jack that receives a signal from...

Page 166: ...on B Power Savings updates for LD65xH TVs troubleshooting update Product documentation is available online at www LGsolutions com products From the Products page select TVs Systems Solutions then LCD TVs then the applicable TV Click the Literature Downloads tab at the bottom of the TV page and select the required document s from the Downloads list ...

Page 167: ... 2623 USA Consumer User USA Commercial User CANADA LG Customer Information Center The model and serial number of the TV is located on the back and or on one side of the TV Record these numbers below should you ever need service MODEL SERIAL ...

Reviews: