background image

W

A

TCHING 

TV 

CHANNEL 

CONTR

OL

43

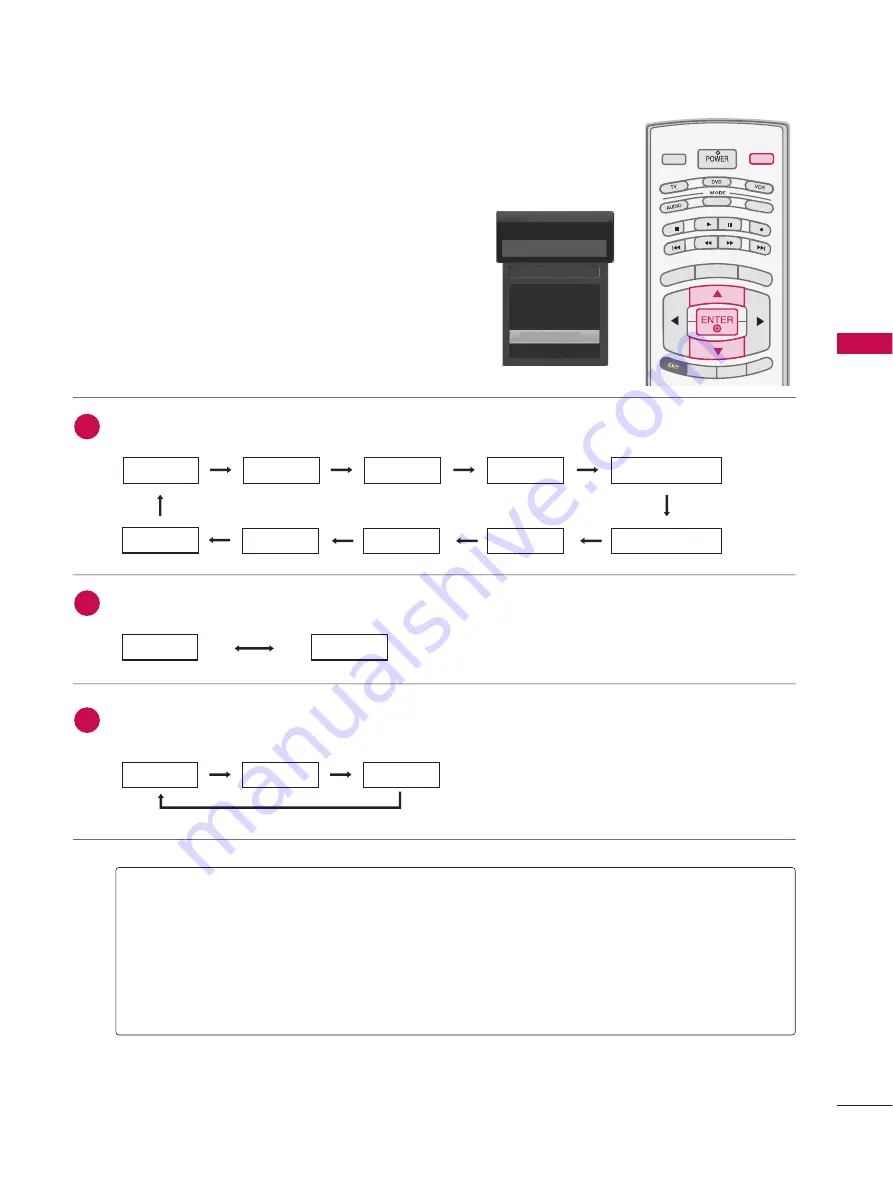
INPUT LIST

A

An

ntteen

nn

naa : Select it when watching the DTV/TV.

C

Caab

bllee: Select it when watching the CADTV/CATV.

A

AV

V  1

1,,  A

AV

V  2

2 : Select it when watching the VCR or external equipment.

C

Co

om

mp

po

on

neen

ntt  1

1--2

2 : Select it when using the DVD or the Digital set-top box depend on connector.

R

RG

GB

B--P

PC

C : Select it when using PC depend on connector.

H

HD

DM

MII,,  H

HD

DM

MII2

2,,  H

HD

DM

MII3

3 : Select it when using DVD, PC or Digital set-top box depend on connector.

Antenna

Cable

AV 1

AV 2

Component1

E

E

Input List

AV 2

Press the

IIN

NP

PU

UT

T

button to display external device that is

connected to the unit, on screen.

Press the 

E

EN

NT

TE

ER

R

button to change the input to the active

external device. Use the 

D

D

or 

E


button to select the

input source.

TV INPUT

STB

STB

MENU

BRIGH

T +

BRIG

HT -

TIMER

RATIO

SIMPLINK

PICTURE

SOUND

SAP

CC

MARK

USB EJECT

INPUT

MEDIA HOST

MEDIA HOST

A

An

ntteen

nn

naa

C

Caab

bllee

If all external input sources are connected:      

If no external input sources are not connected:

If there is any external input source connected:

(ex: When connected only to AV 2)

A

An

ntteen

nn

naa

C

Caab

bllee

A

AV

V1

1

A

An

ntteen

nn

naa

C

Caab

bllee

A

AV

V2

2

A

AV

V2

2

C

Co

om

mp

po

on

neen

ntt1

1

H

HD

DM

MII2

2

H

HD

DM

MII1

1

R

RG

GB

B--P

PC

C

C

Co

om

mp

po

on

neen

ntt2

2

2

3

1

H

HD

DM

MII3

3

Summary of Contents for 37LB4D

Page 1: ... number and serial number of the set See the label attached on the back cover and quote this information to your dealer when you require service LCD TV OWNER S MANUAL LCD TV MODELS 3 37 7L LB B5 5D D 4 42 2L LB B5 5D D 4 47 7L LB B5 5D D 5 52 2L LB B5 5D D 3 32 2L LB B4 4D D 3 37 7L LB B4 4D D 4 42 2L LB B4 4D D E EN NE ER RG GY Y S ST TA AR R i is s a a s se et t o of f p po ow we er r s sa av vi...

Page 2: ...ily with one remote control It has three HDMI ports that connect audio and video devices with one cable and produces the high est quality digital images and sound R TruSurround XT Manufactured under license from Dolby Laboratories Dolby and the double D symbol are trademarks of Dolby Laboratories High definition television High resolution digital television broadcast and playback system composed o...

Page 3: ... modifications not expressly approved by the party responsible for compliance could void the user s authority to operate the equipment CAUTION Do not attempt to modify this product in any way without written authorization from LG Electronics Unauthorized modification could void the user s authority to operate this product The lightning flash with arrowhead symbol within an equilateral triangle is ...

Page 4: ...e they exit from the apparatus Only use attachments accessories specified by the manufacturer Unplug this apparatus when unused for long periods of time Important safety instructions shall be provided with each apparatus This information shall be given in a separate booklet or sheet or be located before any operating instructions in an instruction for installation for use and supplied with the app...

Page 5: ...sulation are dangerous Any of these conditions could result in electric shock or fire Periodically examine the cord of your appliance and if its appearance indicates dam age or deterioration unplug it discontinue use of the appliance and have the cord replaced with an exact replacement part by an authorized servicer Protect the power cord from physical or mechanical abuse such as being twisted kin...

Page 6: ...l Manual Tuning 41 Channel Editing 42 Input List 43 SimpLink 44 Input Label 46 Entry Modes 47 Photo List 48 Music List 52 PICTURE CONTROL Picture Size Aspect Ratio Control 54 Preset Picture Settings Picture Mode Preset 55 Color Tone Preset 56 Manual Picture Adjustment Picture Mode User Mode 57 Color Tone User Mode 58 XD Picture Improvement Technology 59 Advanced Cinema 3 2 Pulldown Mode 60 Advance...

Page 7: ...ting 80 Auto Shut off Setting 81 PARENTAL CONTROL RATINGS Set Password Lock System 82 Channel Blocking 84 Movie TV Rating 85 External Input Blocking 88 Key Lock 88 APPENDIX Troubleshooting 89 Maintenance 91 Product Specifications 92 Programming the Remote Control 94 IR Codes 98 External Control through RS 232C 100 ...

Page 8: ...ble on the screen should be acceptable This also occurs in other Plasma TV manufacturers products The tiny dots appearing does not mean that this TV is defective Thus a few cell defects are not sufficient cause for the TV to be exchanged or returned Our production technology minimizes these cell defects during the manufacture and operation of this prod uct If the TV feels cold to the touch there m...

Page 9: ...pliance for the product APM CC AUTO DEMO M C EJECT TV INPUT TV INPUT STB STB MENU BRIGHT BRIGHT TIMER RATIO SIMPL INK BACK BACK 4 bolts for stand assembly Refer to p 13 3 32 2 3 37 7 i in nc ch he es s o on nl ly y Slightly wipe stained spot on the exterior only with the polishing cloth for the product exterior if there is stain or fingerprint on surface of the exterior Do not wipe roughly when re...

Page 10: ...oth If a polishing cloth is included with your product use it R Remote Control Sensor Power Standby Indicator illuminates red in standby mode illuminates green when the set is switched on CH VOL ENTER MENU INPUT I CHANNEL E E D D Buttons VOLUME F F G G Buttons ENTER Button MENU Button INPUT Button POWER Button 32 37 42LB4D Intelligent Eye Adjusts picture according to the surrounding con ditions ...

Page 11: ... G G Buttons ENTER Button MENU Button INPUT Button POWER Button 37 42 47 52LB5D Remote Control Sensor Power Standby Indicator illuminates red in standby mode illuminates green when the set is switched on Intelligent Eye Adjusts picture according to the surrounding con ditions ...

Page 12: ...VIDEO VIDEO S VIDEO USB IN USB IN AV IN 2 L MONO R AUDIO VIDEO USB IN BACK PANEL INFORMATION 32 37 42LB4D USB Input S VIDEO Input Connect S Video out from an S VIDEO device AUDIO VIDEO Input Connect audio video output from an external device to these jacks AV IN 2 L MONO R AUDIO A VIDEO S VIDEO USB IN 37 42 47 52LB5D AV IN 2 L MONO R AUDIO VIDEO S VIDEO USB IN AV IN 2 V IN 2 L L MONO MONO R AUDIO ...

Page 13: ...nect audio video output from an external device to these jacks S VIDEO Connect S Video out from an S VIDEO device AUDIO OUT Connect analog audio to various types of equipment DIGITAL AUDIO OUT Connect digital audio to various types of equipment Note In standby mode these ports do not work ANTENNA CABLE IN Connect over the air signals to this jack Connect cable signals to this jack Power Cord Socke...

Page 14: ... bolts or TV brackets and bolts to tighten the product to the wall as shown in the picture Insert the eye bolts and tighten them securely in the upper holes Secure the wall brackets with the bolts not provided as parts of the product must purchase separately to the wall Match the height of the bracket that is mounted on the wall to the holes in the product Ensure the eye bolts or brackets are tigh...

Page 15: ...els 1 2 3 Carefully place the product screen side down on a cushioned surface that will protect product and screen from damage Assemble the product stand with the product as shown Install the 4 bolts securely in the back of the product in the holes provided ...

Page 16: ... LE E M MA AN NA AG GE EM ME EN NT T as shown Bundle the cables using the supplied twist holder Hold the C CA AB BL LE E M MA AN NA AG GE EM ME EN NT T with both hands and pull it upward NOTE G G Do not hold the CABLE MANAGEMENT when moving the product If the product is dropped you may be injured or the product may be broken How to remove the cable management CABLE MANAGEMENT TWIST HOLDER 1 2 3 He...

Page 17: ...GE EM ME EN NT T as shown Bundle the cables using the supplied twist holder Hold the C CA AB BL LE E M MA AN NA AG GE EM ME EN NT T with both hands and pull it upward NOTE G G Do not hold the CABLE MANAGEMENT when moving the product If the product is dropped you may be injured or the product may be broken How to remove the cable management CABLE MANAGEMENT TWIST HOLDER 1 2 3 Here shown may be some...

Page 18: ...ches 4 inches 4 inches VESA WALL MOUNTING This product accepts a VESA compliant mounting interface pad optional There 4 threaded holes are available for attaching the bracket G G Screw length needed depends on the wall mount used For further information refer to the VESA Wall Mounting Instruction Guide NOTE 37 42 47 52LB5D 37 42LB4D AV IN 2 L MONO R AUDIO VIDEO S VIDEO USB IN AV IN 2 L MONO R AUDI...

Page 19: ... scans are complete NOTE ANTENNA CABLE IN To improve the picture quality in a poor signal area please purchase a signal amplifier and install properly If the antenna needs to be split for two TV s install a 2 Way Signal Splitter If the antenna is not installed properly contact your dealer for assistance Antenna UHF Signal Amplifier VHF 3 Using both cable and antenna Cable TV Wall Jack Antenna RF C...

Page 20: ... N V VI ID DE EO O 1 1 jacks on the set Match the jack colors Y green PB blue and PR red Connect the audio output of the digital set top box to the C CO OM MP PO ON NE EN NT T I IN N A AU UD DI IO O 1 1 jacks on the set 2 How to use Turn on the digital set top box Refer to the owner s manual for the digital set top box Select C CO OM MP PO ON NE EN NT T 1 1 input source with using the I IN NP PU U...

Page 21: ...button on the remote control When connecting HDMI cable Connect the digital set top box to H HD DM MI I D DV VI I I IN N1 1 2 2 or 3 3 jack on the set No separated audio connection is necessary 1 How to connect 2 How to use Turn on the digital set top box Refer to the owner s manual for the digital set top box Select H HD DM MI I1 1 H HD DM MI I2 2 or H HD DM MI I3 3 input source with using the I ...

Page 22: ...N N1 1 2 2 or 3 3 jack on the set Connect the audio output of the digital set top box to the A AU UD DI IO O R RG GB B D DV VI I jack on the set 1 How to connect Turn on the digital set top box Refer to the owner s manual for the digital set top box Select H HD DM MI I1 1 H HD DM MI I2 2 or H HD DM MI I3 3 input source with using the I IN NP PU UT T button on the remote control 2 How to use 2 1 1 ...

Page 23: ...N NT T I IN N V VI ID DE EO O1 1 jacks on the set Match the jack colors Y green PB blue and PR red Connect the audio outputs of the DVD to the C CO OM MP PO ON NE EN NT T I IN N A AU UD DI IO O1 1 jacks on the set 1 How to connect 2 How to use Turn on the DVD player insert a DVD Select C CO OM MP PO ON NE EN NT T 1 1 input source with using the I IN NP PU UT T button on the remote control If conne...

Page 24: ...nput source Refer to the DVD player s manual for operating instructions When connecting HDMI cable Connect the HDMI output of the DVD to the H HD DM MI I D DV VI I I IN N1 1 2 2 or 3 3 jack on the set No separated audio connection is necessary 1 How to connect 2 How to use Select H HD DM MI I1 1 H HD DM MI I2 2 or H HD DM MI I3 3 input source with using the I IN NP PU UT T button on the remote con...

Page 25: ...NNA ANTENNA CABLE IN CABLE IN Wall Jack Antenna Connect the RF antenna out socket of the VCR to the A An nt te en nn na a socket on the set Connect the antenna cable to the RF antenna in socket of the VCR 1 How to connect Set VCR output switch to 3 or 4 and then tune TV to the same channel number Insert a video tape into the VCR and press PLAY on the VCR Refer to the VCR owner s manual 2 How to us...

Page 26: ...the I IN NP PU UT T button on the remote control If connected to A AV V I IN N 2 2 select A AV V2 2 input source If you have a mono VCR con nect the audio cable from the VCR to the A AU UD DI IO O L L M MO ON NO O jack of the set NOTE When connecting with an S Video cable Connect the S VIDEO output of the VCR to the S S V VI ID DE EO O input on the set The picture quality is improved compared to n...

Page 27: ...d Audio Right red 1 How to connect 2 How to use Select A AV V2 2 input source with using the I IN NP PU UT T button on the remote control If connected to A AV V I IN N 1 1 input select A AV V1 1 input source Operate the corresponding external equipment 1 AV IN 2 L MONO R AUDIO A VIDEO S VIDEO USB IN L R VIDEO AV IN 2 L MONO R AUDIO A VIDEO USB IN L R VIDEO 1 Camcorder Video Game Set 32 inches 37 4...

Page 28: ...adjust the brightness and contrast on the VIDEO menu until the picture is clear If the refresh rate of the PC graphic card can not be changed change the PC graphic card or consult the manufacturer of the PC graphic card NOTE RGB RGB RGB OUTPUT AUDIO When connecting D sub 15 pin cable Connect the RGB output of the PC to the R RG GB B P PC C jack on the set Connect the PC audio output to the A AU UD...

Page 29: ...cs card s output resolution to 1920x1080 60Hz 32 37 42LB4D models 1360x768 60Hz NOTE DVI PC OUTPUT AUDIO RGB RGB Connect the DVI output of the PC to the H HD DM MI I D DV VI I I IN N1 1 2 2 ou 3 3 jack on the set Use the HDMI to DVI cable Connect the PC audio output to the A AU UD DI IO O R RG GB B D DV VI I jack on the set 1 How to connect Turn on the PC and the set Select H HD DM MI I1 1 H HD DM...

Page 30: ...to another resolu tion change the refresh rate to another rate or adjust the brightness and contrast on the PIC TURE menu until the picture is clear If the refresh rate of the PC graphic card can not be changed change the PC graphic card or consult the manu facturer of the PC graphic card G G Avoid keeping a fixed image on the screen for a long period of time The fixed image may become permanently...

Page 31: ...3 640x480 800x600 1024x768 Supported Display Specifications HDMI DTV Horizontal Vertical Frequency KHz Frequency Hz 31 47 60 00 31 47 59 94 45 00 60 00 44 96 59 94 33 75 60 00 33 72 59 94 67 50 60 00 67 432 59 939 27 00 24 00 26 97 23 94 33 75 30 00 33 71 29 97 Resolution 720x480 1280x720 1920x1080 1280x1024 1600x1200 1920x1080 1280x768 1280x768 Supported Display Specifications Y CB PB CR PR Horiz...

Page 32: ...e the best picture appearance Picture Mode Color Temperature XD Advanced Aspect Ratio Picture Reset Screen G Selection G or leads you to the screen adjustment menu Picture Mode User1 Color Temperature Cool XD Advanced Aspect Ratio 16 9 Picture Reset Screen Press the M ME EN NU U button and then use D D or E E button to select the P PI IC CT TU UR RE E menu Press the G G button and then use D D or ...

Page 33: ...as se e This function allows you to remove any horizontal noise and clear or sharpen the image of char acters Use D D or E E button to select R Re es so ol lu ut ti io on n P Po os si it ti io on n S Si iz ze e or P Ph ha as se e Press the E EN NT TE ER R button and then use D D E E or F F G G button to make appropriate adjustments The P Ph ha as se e adjustment range is 1 16 6 1 16 6 The S Si iz ...

Page 34: ...O USB IN USB IN AV IN 2 L MONO R AUDIO VIDEO USB IN Connect the USB device to the U US SB B I IN N jacks on the side of TV 1 How to connect 1 2 How to use After connecting the U US SB B I IN N jacks you use the function G G p p 4 47 7 MEDIA MEDIAHOST HOST MEDIA MEDIAHOST HOST 1 AV IN 2 L MONO R AUDIO VIDEO S VIDEO USB IN AV IN 2 V IN 2 L L MONO MONO R AUDIO AUDIO VIDEO VIDEO USB IN USB IN 1 32 inc...

Page 35: ... Connect one end of the optical or coaxial cable to the TV s O OP PT TI IC CA AL L or C CO OA AX XI IA AL L port of D DI IG GI IT TA AL L A AU UD DI IO O O OU UT T Connect the other end of the optical or coaxial cable to the digital audio input on the audio equipment Set the TV Speaker option Off in the AUDIO menu G G p p 7 70 0 See the external audio equipment instruction manual for operation 1 H...

Page 36: ...n menus and adjust the system settings to your preference Clear all on screen displays and return to TV viewing from any menu Select the amount of time before your TV turns off auto matically G G p p 8 80 0 Change the aspect ratio G G p p 5 54 4 See a list of AV devices connected to TV When you toggle this button the SimpLink menu appears at the screen Increase decrease the sound level Switch the ...

Page 37: ...de the Sliding Cover PICTURE SOUND SAP CC MARK USB EJECT Adjust the factory preset picture depend on the viewing environment G G p p 5 55 5 Select the appropriate type of sound for type of program G G p p 6 65 5 Select MTS sound Mono Stereo and SAP analog mode Change the audio language DTV mode G G p p 6 69 9 Select the Caption On Off G G p p 7 73 3 Enter the selected functions G G p p 4 49 9 Remo...

Page 38: ...U UT T T TV V I IN NP PU UT T C CH H D D or E E N Nu um mb be er r 0 0 9 9 but ton on the remote control Select the viewing source by using the I IN NP PU UT T button on the remote control This TV is programmed to remember which mode it was last set to even if you turn the TV off When finished using the TV press the P PO OW WE ER R button on the remote control The TV reverts to standby mode TV INP...

Page 39: ...NNEL SELECTION Press the C CH H D D or E E or N NU UM MB BE ER R buttons to select a channel number TV INPUT STB TIMER RATIO SIMPLINK PICTURE PICTURE PICTURE SOUND SOUND SAP SAP CC CC MARK MARK USB EJECT USB EJECT BACK BACK MEDIAHOST 1 ...

Page 40: ...itch the sound off press the M MU UT TE E but ton You can cancel the Mute function by pressing the M MU UT TE Eor V VO OL L D D or E E button Adjust the volume to suit your personal preference TV INPUT STB PICTURE SOUND SAP CC MARK USB EJECT BACK TV INPUT TV INPUT STB STB MENU BRIGHT BRIGHT TIMER RATIO SIMPLINK BACK PICTURE SAP CC MARK USB EJECT MEDIAHOST MEDIAHOST MEDIAHOST 2 3 1 ...

Page 41: ...Channel Edit 2 1 AUDIO Picture Mode User1 Color Temperature Cool XD Advanced Aspect Ratio 16 9 Picture Reset Screen Sound Mode Standard Auto Volume On Balance 0 TV Speaker On Clock Oct 19 2006 03 44 AM Off Time Off On Time Off Sleep Time Off Auto Sleep Off Language English Input Label SimpLink Off Key Lock Off Caption Off Set ID 1 Lock System Off Set Password Block Channel Movie Rating TV Rating C...

Page 42: ...R button to begin the channel search Allow A Au ut to o T Tu un ni in ng g to complete the channel search cycle for A AN NT TE EN NN NA A and C CA AB BL LE E Automatically finds all channels available through antenna or cable inputs and stores them in memory on the channel list Run Auto Tuning again after any Antenna Cable connection changes A password is required to gain access to Auto Tuning men...

Page 43: ...add or delete Press the E EN NT TE ER R button to add or delete for the channel number Press E EX XI IT T button to return to TV viewing or press M ME EN NU U button to return to the previous menu TV INPUT STB PICTURE SOUND SAP CC MARK USB EJECT BACK TV INPUT STB BACK PICTURE SAP CC MARK USB EJECT TV INPUT TV INPUT STB STB BRIGHT BRIGHT TIMER RATIO SIMPLINK BACK PICTURE SOUND CC MARK USB EJECT MEN...

Page 44: ... TV INPUT TV INPUT STB STB BRIGHT BRIGHT TIMER RATIO SIMPLINK BACK PICTURE SOUND CC MARK USB EJECT MENU MEDIAHOST MEDIAHOST MEDIAHOST MEDIAHOST From the default channel list created from the Auto Tuning channel search you can create two different types of channel lists in memory custom list and favorite channel list A custom list can be created by toggling each channel on or off with ENTER button ...

Page 45: ...N NP PU UT T button to display external device that is connected to the unit on screen Press the E EN NT TE ER R button to change the input to the active external device Use the D D or E E button to select the input source TV INPUT STB STB MENU BRIGHT BRIGHT TIMER RATIO SIMPLINK PICTURE SOUND SAP CC MARK USB EJECT INPUT MEDIAHOST MEDIAHOST A An nt te en nn na a C Ca ab bl le e If all external inpu...

Page 46: ...ct the O OP PT TI IO ON N menu Press the G G button and then use D D or E E button to select S Si im mp pL Li in nk k Press the G G button and then use D D or E E button to select O On n Press E EX XI IT T button to return to TV viewing or press M ME EN NU U button to return to the previous menu 4 2 3 1 Language English Input label SimpLink Off Key Lock Off Caption Off Set ID 1 Language Input labe...

Page 47: ...es of the discs are conveniently dis played at the bottom of the screen V VC CR R p pl la ay yb ba ac ck k Play and control the connected VCR H HD DD D R Re ec co or rd di in ng gs s p pl la ay yb ba ac ck k Play and control recordings stored in HDD A Au ud di io o O Ou ut t t to o H HT T s sp pe ea ak ke er r A Au ud di io o O Ou ut t t to o T TV V Select HT speaker or TV speaker for Audio Out T ...

Page 48: ... PC HDMI1 HDMI2 or HDMI3 Press the F F or G G button to select the label Press E EX XI IT T button to return to TV viewing or press M ME EN NU U button to return to the previous menu TV INPUT STB PICTURE SOUND SAP CC MARK USB EJECT BACK TV INPUT STB BACK PICTURE SAP CC MARK USB EJECT TV INPUT TV INPUT STB STB BRIGHT BRIGHT TIMER RATIO SIMPLINK BACK PICTURE SOUND CC MARK USB EJECT MENU MEDIAHOST ME...

Page 49: ... TV or unplug the USB device when the connected USB storage device is working When such device is suddenly separated or unplugged the stored files or the USB storage device may be damaged To unplug the USB storage device please press the U US SB B E EJ JE EC CT T button on the remote control and then unplug it safely Please do not connect the USB storage device which was artificially maneuvered on...

Page 50: ...al pages Total number of marked thumbnail photos Corresponding buttons on the remote control Usable USB memory It s available to playback the photo file jpg in the USB device The On Screen Display may be different from your set Images are an example to assist with the TV operation PHOTO LIST ...

Page 51: ... marked you can view all photos individually or all pho tos in the folder in a slide show 1 2 Use D D E E F F G G button to navigate the appropriate thumb nail photos then press the E EN NT TE ER R button to show the PopUp menu Repeatedly press E EX XI IT T button to return to TV viewing or press the button to return to the Media Host menu MEDIAHOST MEDIAHOST V Vi ie ew w Display the selected item...

Page 52: ...layed on the screen in full size 4 S Sl li id de e S Sh ho ow w When no picture is selected all photos in the current folder are displayed during slide show When selected the selected photos are displayed during slide show To start slide show press E EN NT TE ER R button on S et the time interval of the slide show in O Op pt ti io on n A slide show continues for a maximum of 4 hours After 4 hours ...

Page 53: ...enu on the full sized screen Use F F or G G button to select H Hi id de e and press E EN NT TE ER R button To see the menu again on the full sized screen press E EN NT TE ER R button to display Use D D E E F F G G button to select the previous or next photo Use D D E E F F G G button to select and control the menu on the full sized screen Use E EX XI IT T button to go back to the photo list from t...

Page 54: ...assist with the TV operation TV INPUT STB BACK PICTURE SOUND SAP MARK USB EJECT TV INPUT STB BACK SOUND SAP CC MARK USB EJECT TV INPUT STB BACK PICTURE SOUND SAP CC MARK USB EJECT TV INPUT TV INPUT STB STB MENU BRIGHT BRIGHT TIMER RATIO SIMPLINK BACK PICTURE SOUND SAP CC MARK USB EJECT TV IN PIC M MEDIAHOST MEDIAHOST MEDIAHOST MEDIAHOST MEDIAHOST Screen Components Current page Total pages Total nu...

Page 55: ...propriate musics then press the E EN NT TE ER R button to show up the pop up menu Repeatedly press E EX XI IT T button to return to TV viewing or press button to return to the Media Host menu If you don t press any button for a while during the play ing the play information box as shown in the below will float as a screen saver The Screen Saver Screen saver is to prevent screen pixel damage due to...

Page 56: ...spect ratio is dis played on your TV When you receive an analog picture with a 4 3 aspect ratio on your 16 9 TV you need to specify how the picture is to be displayed RGB PC input source use 4 3 or 16 9 aspect ratio PICTURE SIZE ASPECT RATIO CONTROL Press the R RA AT TI IO O button repeatedly to select the desired picture format You can also adjust A As sp pe ec ct t R Ra at ti io o in the P PI IC...

Page 57: ... Picture Mode adjusts the TV for the best picture appearance Select the preset value in the Picture Mode menu based on the program category I In nt te el ll li ig ge en nt t E Ey ye e D Dy yn na am mi ic c S St ta an nd da ar rd d M Mi il ld d Settings are preset for optimum picture quality at the factory and are not adjustable In the U Us se er r 1 1 and U Us se er r 2 2 modes only user can direc...

Page 58: ...lect C Co ol lo or r T Te em mp pe er ra at tu ur re e Press the G G button and then use D D or E E button to select either C Co oo ol l M Me ed di iu um m W Wa ar rm m or U Us se er r Press E EX XI IT T button to return to TV viewing or press M ME EN NU U button to return to the previous menu TV INPUT STB PICTURE SOUND SAP CC MARK USB EJECT BACK TV INPUT STB BACK PICTURE SAP CC MARK USB EJECT TV ...

Page 59: ...nd then use F F or G G button to make appropriate adjustments Press E EX XI IT T button to return to TV viewing or press M ME EN NU U button to return to the previous menu Adjust the picture appearance to suit your preference and viewing situations TV INPUT STB PICTURE SOUND SAP CC MARK USB EJECT BACK TV INPUT STB BACK PICTURE SAP CC MARK USB EJECT TV INPUT TV INPUT STB STB BRIGHT BRIGHT TIMER RAT...

Page 60: ...te adjustments The adjustment range of R Re ed d G Gr re ee en n or B Bl lu ue e is 20 20 Press E EX XI IT T button to return to TV viewing or press M ME EN NU U button to return to the previous menu TV INPUT STB PICTURE SOUND SAP CC MARK USB EJECT BACK TV INPUT STB BACK PICTURE SAP CC MARK USB EJECT TV INPUT TV INPUT STB STB BRIGHT BRIGHT TIMER RATIO SIMPLINK BACK PICTURE SOUND CC MARK USB EJECT ...

Page 61: ... G button to select O On n or O Of ff f Press E EX XI IT T button to return to TV viewing or press M ME EN NU U button to return to the previous menu XD is LG Electronics unique picture improving technology to display a real HD source through an digital signal processing algorithm When selecting Picture Mode options Dynamic Standard and Mild XD is automatically change to Auto When selecting Pictur...

Page 62: ...ECT BACK TV INPUT STB BACK PICTURE SAP CC MARK USB EJECT TV INPUT TV INPUT STB STB BRIGHT BRIGHT TIMER RATIO SIMPLINK BACK PICTURE SOUND CC MARK USB EJECT MENU MEDIAHOST MEDIAHOST MEDIAHOST MEDIAHOST Set up the TV for the best picture appearance for viewing movies This feature is disable only in RGB PC HDMI1 HDMI2 HDMI3 or Component1 2 except 480i mode When you operate Cinema 3 2 Pull Down Mode or...

Page 63: ... E button to select B Bl la ac ck k l le ev ve el l Press the G G button and then use F F or G G button to select L Lo ow w or H Hi ig gh h L Lo ow w The reflection of the screen gets darker H Hi ig gh h The reflection of the screen gets brighter Press E EX XI IT T button to return to TV viewing or press M ME EN NU U button to return to the previous menu Adjusting the contrast and the brightness o...

Page 64: ... or G G button to select O Of ff f L Lo ow w or H Hi ig gh h L Lo ow w Set amount of film judder to low H Hi ig gh h Set amount of film judder to high If you have some problem in viewing picture set T Tr ru uM M to L Lo ow w or O Of ff f Press E EX XI IT T button to return to TV viewing or press M ME EN NU U button to return to the previous menu Picture Mode Color Temperature XD Advanced G Aspect ...

Page 65: ...ARK USB EJECT BACK TV INPUT STB BACK PICTURE SAP CC MARK USB EJECT TV INPUT TV INPUT STB STB BRIGHT BRIGHT TIMER RATIO SIMPLINK BACK PICTURE SOUND CC MARK USB EJECT MENU TV IN PIC M MEDIAHOST MEDIAHOST MEDIAHOST MEDIAHOST Use to quickly reset all the Picture menu options to their origi nal factory preset values Picture Mode Color Temperature XD Advanced Aspect Ratio Picture Reset G Screen Selectio...

Page 66: ...MER RATIO SIMPLINK BACK PICTURE SOUND CC MARK USB EJECT MENU MEDIAHOST MEDIAHOST MEDIAHOST MEDIAHOST AUTO VOLUME LEVELER AUTO VOLUME Press the M ME EN NU U button and then use D D or E E button to select the A AU UD DI IO O menu Press the G G button and then use D D or E E button to select A Au ut to o V Vo ol lu um me e Press the G G button and then use D D or E E button to select O On n or O Of ...

Page 67: ...ppropriate sound setup as shown below S St ta an nd da ar rd d M Mu us si ic c M Mo ov vi ie e S Sp po or rt ts s and U Us se er r your own settings Press E EX XI IT T button to return to TV viewing PRESET SOUND SETTINGS Sound Mode PICTURE SOUND SAP CC MARK USB EJECT BACK BACK BACK PICTURE PICTURE SOUND SAP SAP CC CC MARK MARK USB EJECT USB EJECT You can also adjust Sound Mode in the A AU UD DI IO...

Page 68: ... the desired sound option T Tr re eb bl le e B Ba as ss s or F Fr ro on nt t S Su ur rr ro ou un nd d TV INPUT STB PICTURE SOUND SAP CC MARK USB EJECT BACK TV INPUT STB BACK PICTURE SAP CC MARK USB EJECT TV INPUT TV INPUT STB STB BRIGHT BRIGHT TIMER RATIO SIMPLINK BACK PICTURE SOUND CC MARK USB EJECT MENU MEDIAHOST MEDIAHOST MEDIAHOST MEDIAHOST Adjust the sound to suit your taste and room situatio...

Page 69: ... return to TV viewing or press M ME EN NU U button to return to the previous menu Front Surround 3D EchoSound System S SR RS S T Tr ru uS Su ur rr ro ou un nd d X XT T Takes advantage of any multi channel format without needing to add extra speakers or equipment Dialog clarity bass enrichment and the addition of stereo audio enhancement produces an immersive sound experience from standard stereo m...

Page 70: ...aker to suit your taste and room situations Press the M ME EN NU U button and then use D D or E E button to select the A AU UD DI IO O menu Press the G G button and then use D D or E E button to select B Ba al la an nc ce e Press the G G button and then use or button to make appropriate adjustments Press E EX XI IT T button to return to TV viewing or press M ME EN NU U button to return to the prev...

Page 71: ...n you select Stereo or SAP on the remote control Mono sound is automatically received if the broadcast is only in Mono even though Stereo or SAP has been selected Select Mono if you want to listen to the mono sound in remote areas during stereo SAP broadcasting Stereo or SAP can be received in Analog channel Use the S SA AP P button to select your desired MTS mode in analog signal Each time you pr...

Page 72: ...e D D or E E button to select the A AU UD DI IO O menu Press the G G button and then use D D or E E button to select T TV V S Sp pe ea ak ke er r Press the G G button and then use D D or E E button to select O On n or O Of ff f Press E EX XI IT T button to return to TV viewing or press M ME EN NU U button to return to the previous menu Turn the TV speakers off if using external audio equipment Fea...

Page 73: ...then use D D or E E button to select the O OP PT TI IO ON N menu Press the G G button and then use D D or E E button to select L La an ng gu ua ag ge e Press the G G button and then use D D or E E button to select A Au ud di io o Press the G G button and then use or button to select English Spanish or French Press E EX XI IT T button to return to TV viewing or press M ME EN NU U button to return t...

Page 74: ...ge Press E EX XI IT T button to return to TV viewing or press M ME EN NU U button to return to the previous menu The menus can be shown on the screen in the selected language First select your language TV INPUT STB PICTURE SOUND SAP CC MARK USB EJECT BACK TV INPUT STB BACK PICTURE SAP CC MARK USB EJECT TV INPUT TV INPUT STB STB BRIGHT BRIGHT TIMER RATIO SIMPLINK BACK PICTURE SOUND CC MARK USB EJEC...

Page 75: ...s provided by the broadcaster This TV is programmed to memorize the caption text mode which was last set when you turn the power off CC ACK TV INPUT STB BACK PICTURE SAP CC MARK USB EJECT TV INPUT STB BACK PICTURE SOUND CC MARK USB EJECT TV INPUT STB BACK BACK PICTURE PICTURE SOUND SOUND SAP SAP CC MARK MARK USB EJECT USB EJECT TV INP MAR IAHOST MEDIAHOST MEDIAHOST MEDIAHOST 2 1 Using the C CC C b...

Page 76: ...lect C Ca ap pt ti io on n Press the G G button and then use D D or E E button to select A An na al lo og g Press the G G button and then use or button to select C CC C1 1 C CC C4 4 T Te ex xt t1 1 T Te ex xt t4 4 Press E EX XI IT T button to return to TV viewing or press M ME EN NU U button to return to the previous menu 2 3 4 1 Language English Input Label SimpLink Off Key Lock Off Caption Off S...

Page 77: ...guage English Input Label SimpLink Off Key Lock Off Caption Off Set ID 1 Language Input Label SimpLink Key Lock Caption Set ID Mode On Analog Text1 Digital Service3 Digital Option Press the M ME EN NU U button and then use D D or E E but ton to select the O OP PT TI IO ON N menu Press the G G button and then use D D or E E button to select C Ca ap pt ti io on n Press the G G button and then use D ...

Page 78: ...on and then use D D or E E button to select D Di ig gi it ta al l O Op pt ti io on n Press the G G button and then use or button to select C Cu us st to om m Use D D or E E button to customize the Style Font etc to your preference A preview icon is provided at the bottom of the screen use it to see the caption language S Si iz ze e Set the size the words will appear in F Fo on nt t Select a typefa...

Page 79: ...Ce en nt tr ra al l M Mo ou un nt ta ai in n P Pa ac ci if fi ic c N Ne ew w F F l la an nd d or A At tl la an nt ti ic c Press the G G button and then use D D or E E button to select A Au ut to o O Of ff f O On n depending on whether or not your viewing area observes Daylight Saving time Press E EX XI IT T button to return to TV viewing or press M ME EN NU U button to return to the previous menu ...

Page 80: ... ME E menu Press the G G button and then use D D or E E button to select C Cl lo oc ck k Press the G G button and then use D D or E E button to select M Ma an nu ua al l Press the G G button and then use F F or G G button to select either the year date or time option Once selected use the D D or E E button to set the year date and time options Press E EX XI IT T button to return to TV viewing or p...

Page 81: ...f ff f Press the G G button and then use D D or E E button to set the hour Press the G G button and then use D D or E E button to set the minutes O On nl ly y O On n T Ti im me e Press the G G button and then use D D or E E button to select the channel at turn on Press the G G button and then use D D or E E button to set the sound level at turn on Press E EX XI IT T button to return to TV viewing ...

Page 82: ... to select O Of ff f BACK TV INPUT STB BACK SOUND SAP CC MARK USB EJECT TV INPUT STB BACK PICTURE SOUND SAP CC MARK USB EJECT TV INPUT STB BACK PICTURE SOUND SAP CC MARK USB EJECT TV INPUT TV INPUT STB STB MENU BRIGHT BRIGHT RATIO SIMPLINK BACK PICTURE SOUND SAP CC MARK USB EJECT TV INP PICTU MA TIMER TIMER MEDIAHOST MEDIAHOST MEDIAHOST MEDIAHOST MEDIAHOST MEDIAHOST The Sleep Time turns the TV off...

Page 83: ...O On n or O Of ff f Press E EX XI IT T button to return to TV viewing or press M ME EN NU U button to return to the previous menu TV INPUT STB PICTURE SOUND SAP CC MARK USB EJECT BACK TV INPUT STB BACK PICTURE SAP CC MARK USB EJECT TV INPUT TV INPUT STB STB BRIGHT BRIGHT TIMER RATIO SIMPLINK BACK PICTURE SOUND CC MARK USB EJECT MENU TV INP PIC M MEDIAHOST MEDIAHOST MEDIAHOST MEDIAHOST 2 3 4 1 Cloc...

Page 84: ...blocked by TV Rating and or Individual Categories Movies that have been shown at the theaters or direct to video movies use the Movie Rating System MPAA only Ratings for Television programs including made for TV movies TV G General audience TV PG Parental guidance suggested TV 14 Parents strongly cautioned TV MA Mature audience only TV Y All children TV Y7 Children 7 years older SET PASSWORD LOCK ...

Page 85: ...utton to choose S Se et t p pa as ss sw wo or rd d Press the G G button and then choose any 4 digits for your new password and enter the them on the n ne ew w As soon as the 4 digits are entered reenter the same 4 digits on the C Co on nf fi ir rm m Then your changed password has been memorized Press E EX XI IT T button to return to TV viewing or press M ME EN NU U button to return to the previous...

Page 86: ... G G button to select a channel and then use the E EN NT TE ER R button to block or unblock it Press E EX XI IT T button to return to TV viewing or press M ME EN NU U button to return to the previous menu 2 3 4 1 Lock System Set Password Block Channel G Movie Rating TV Rating Children TV Rating General Input Block Selection G or leads you to the block channel screen Lock System Off Set Password Bl...

Page 87: ...ect G G P PG G P PG G 1 13 3 R R N NC C 1 17 7 or X X G General audiences PG Parental guidance suggested PG 13 Parents strongly cautioned R Restricted NC 17 No one 17 and under admitted X Adult only Blocking Off Permits all programs Press E EX XI IT T button to return to TV viewing or press M ME EN NU U button to return to the previous menu G G If you set PG 13 G and PG movies will be available PG...

Page 88: ...lence Lock System Off Set Password Block Channel Movie Rating TV Rating Children TV Rating General Input Block TV Rating General for USA only After inputting the password use the D D or E E button to choose T TV V R Ra at ti in ng g G Ge en ne er ra al l Press the G G button and then use the D D or E E button to select A Ag ge e D Di ia al lo og gu ue e L La an ng gu ua ag ge e S Se ex x or V Vi i...

Page 89: ...G 8 8 a an ns s 1 13 3 a an ns s 1 16 6 a an ns s 1 18 8 a an ns s or B Bl lo oc ck ki in ng g O Of ff f E Exempt G General 8 ans General Not convenient for little children 1 3 ans Not convenient for children of 1 3 years and younger 16 ans Not convenient for children of 1 6 years and younger 18 ans This programs is only for adults Blocking Off Permits all programs Press E EX XI IT T button to ret...

Page 90: ...el Movie Rating TV Rating Children TV Rating General Input Block For USA For Canada Lock System Off Set Password Block Channel TV Rating English TV Rating French Input Block KEY LOCK The TV can be set up so that it can only be used with the remote control This feature can be used to prevent unauthorized viewing by locking out the front panel controls This TV is programmed to remember which option ...

Page 91: ...ly Activate any function to restore the brightness of the picture Check for local interference such as an electrical appliance or power tool Station or cable product experiencing problems tune to another station Station signal is weak reorient antenna to receive weaker station Check for sources of possible interference Check antenna Change the direction of the antenna TROUBLESHOOTING T Th he e o o...

Page 92: ...u option A change in ambient humidity or temperature may result in an unusual noise when the product is turned on or off and does not indicate a fault with the product Picture OK No sound Unusual sound from inside the product No output from one of the speakers Adjust resolution horizontal frequency or vertical frequency Check the input source Work the Auto configure or adjust clock phase or H V po...

Page 93: ...ter and a little fabric softener or dish washing detergent Wring the cloth until it s almost dry and then use it to wipe the screen Make sure the excess water is off the screen and then let it air dry before you turn on your TV Cleaning the Cabinet To remove dirt or dust wipe the cabinet with a soft dry lint free cloth Please be sure not to use a wet cloth Extended Absence If you expect to leave y...

Page 94: ...QAM VHF 2 13 UHF 14 69 CATV 1 135 DTV 2 69 CADTV 1 135 75 Ω 0 40 C Less than 80 20 60 C Less than 85 40 7x29 5x1 1 3 inches 1033 1x750 0x287 6 mm 40 7x27 0x3 5 inches 1033 1x686 5x88 5 mm 60 6 pounds 27 5kg 50 7 pounds 23 0kg 36 5x27 3x1 1 1 inches 927 0x692 8x283 2 mm 36 5x24 8x3 5 inches 927 0x630 0x88 0 mm 44 1 pounds 20 0kg 35 3 pounds 16 0kg 4 47 7L LB B5 5D D 47LB5DF UC 45 1x32 5x13 0 inches...

Page 95: ... Range Storage Humidity Range The specifications shown above may be changed without prior notice for quality improvement AC100 240V 50 60Hz NTSC M ATSC 64 256 QAM VHF 2 13 UHF 14 69 CATV 1 135 DTV 2 69 CADTV 1 135 75 Ω 0 40 C Less than 80 20 60 C Less than 85 3 37 7L LB B4 4D D 37LB4DS UA 4 42 2L LB B4 4D D 42LB4DS UA 36 5x27 5x1 1 0 inches 926 6x697 6x280 4 mm 36 5x25 0x3 5 inches 926 6x635 6x88 ...

Page 96: ...tinuously at the same time for two seconds the currently selected device button is illuminated If you don t press any button for 20 seconds the light on the mode button will be turned off In that case you have to repeat from step 2 Enter the appropriate code from the code table on the following pages When pressing the button the light blinks at a time If the device turned off the programming is su...

Page 97: ...A 045 046 059 MINOLTA 013 020 MITSUBISHI 013 020 045 046 049 051 059 061 151 MTC 034 040 MULTITECH 024 034 NEC 012 023 039 043 048 NORDMENDE 043 OPTONICA 053 054 PANASONIC 066 070 074 083 133 140 145 PENTAX 013 020 031 033 063 PHILCO 031 034 067 PHILIPS 031 033 034 054 067 071 101 PILOT 101 PIONEER 013 021 048 PORTLAND 108 PULSAR 072 QUARTZ 01 1 014 QUASAR 033 066 075 145 RCA 013 020 033 034 040 0...

Page 98: ...ANDY 017 TEXSCAN 029 TOCOM 039 040 056 TOSHIBA 100 UNIKA 007 014 024 UNITED CABLE 004 053 UNIVERSAL 005 007 014 024 026 027 032 035 VIEWSTAR 012 015 018 086 087 088 089 ZENITH 100 1 14 060 093 ALPHASTAR DSR 123 AMPLICA 050 BIRDVIEW 051 126 129 CHANNEL MASTER 013 014 015 018 036 055 CHAPARRAL 008 009 012 077 CITOH 054 CURTIS MATHES 050 145 DRAKE 005 006 007 010 01 1 052 1 12 1 16 141 DX ANTENNA 024...

Page 99: ...H 049 MCS 104 MEMOREX 107 NAD 046 ONKYO 013 040 041 047 048 056 057 132 133 140 OPTIMUS 158 PANASONIC 007 033 064 1 13 142 220 241 251 PENNEY 104 PHILIPS 026 1 12 143 PIONEER 039 042 043 063 065 091 093 094 1 15 123 127 250 QUASAR 1 13 RCA 080 RCX 092 REALISTIC 103 106 SAMSUNG 124 145 146 182 193 194 195 203 204 244 245 246 SANSUI 01 1 135 138 144 SANYO 019 083 234 SCOTT 106 186 SHARP 031 032 051 ...

Page 100: ... C4 C5 C6 C7 D0 D1 D2 D3 D4 D5 D6 D7 Lead code Low custom code High custom code Data code Data code Repeat code Tf 4 5 ms 9 ms 2 25 ms 9 ms 0 55 ms 0 56 ms 1 12 ms 0 56 ms 2 24 ms Tf Tf Tf 108ms 455KHz Bit 0 Bit 1 1 How to Connect Connect your wired remote control to the Remote Control port on the TV 2 Remote Control IR Codes Output waveform Single pulse modulated with 37 917KHz signal at 455KHz T...

Page 101: ...6 TV Discrete IR Code TV Input Selection 5A AV1 Discrete IR Code AV1 Input Selection D0 AV2 Discrete IR Code AV2 Input Selection BF COMPONENT1 Discrete IR Code Component1 Input Selection D4 COMPONENT2 Discrete IR Code Component2 Input Selection D5 RGB PC Discrete IR Code RGB PC Input Selection CE HDMI1 Discrete IR Code HDMI1 Input Selection CC HDMI2 Discrete IR Code HDMI2 Input Selection 76 Ratio ...

Page 102: ...he product s functions externally Connect the serial port of the control device to the RS 232C jack on the product back panel Note RS 232C connection cables are not supplied with the product PC Type of Connector D Sub 9 Pin Male No Pin Name 1 No connection 2 RXD Receive data 3 TXD Transmit data 4 DTR DTE side ready 5 GND 6 DSR DCE side ready 7 RTS Ready to send 8 CTS Clear to send 9 No Connection ...

Page 103: ...SAP CC MARK USB EJECT TV INPUT STB BRIGHT BRIGHT TIMER RATIO SIMPLINK BACK PICTURE SOUND CC MARK USB EJECT MENU TV INP PIC M MEDIAHOST MEDIAHOST MEDIAHOST Communication Parameters Baud rate 9600 bps UART Data length 8 bits Parity None Stop bit 1 bit Communication code ASCII code Use a crossed reverse cable RS 232C Configurations 7 Wire Configurations Standard RS 232C cable PC PDP RXD 2 3 TXD TXD 3...

Page 104: ... 1 Sharpness k k 0 64 12 OSD Select k l 0 1 13 Remote Control Key Lock 14 Treble k r 0 64 15 Bass k s 0 64 16 Balance k t 0 64 17 Color Temperature k u 0 3 18 Red adjustment k v 0 C8 19 Green adjustment k w 0 C8 20 Blue adjustment k 0 C8 k m 0 1 21 Tune Command 22 Channel Add Del 23 Key 24 Input Select 25 Back Light C CO OM MM MA AN ND D1 1 C CO OM MM MA AN ND D2 2 DATA0 Hexadecimal DATA1 Hexadeci...

Page 105: ...command Set ID use the small character if set ID is 10 it will send the 0 a Data use the small character if data is 0xab it will send the a b OK use the large character in this model TV will send the echo CR LF with ack mes sage When it send the power on ack message it will be like below Ex ka 01 01 CR LF a 01 OK01x CR LF C Co om mm ma an nd d1 1 C Co om mm ma an nd d2 2 S Se et t I ID D D Da at t...

Page 106: ... C Co om mm ma an nd d2 2 d d To select screen mute on off Transmission k d Set ID Data Cr Data 0 Screen mute off Picture on Data 1 Screen mute on Picture off Acknowledgement d Set ID OK NG Data x 0 05 5 V Vo ollu um me e M Mu ut te e C Co om mm ma an nd d2 2 e e To control volume mute on off You can also adjust mute using the MUTE button on remote control Transmission k e Set ID Data Cr Data 0 Vo...

Page 107: ...ol lock is released 1 14 4 T Tr re eb blle e C Co om mm ma an nd d2 2 r r To adjust treble You can also adjust treble in the Audio menu Transmission k r Set ID Data Cr Data Min 0 Max 64 transmit by Hexadecimal code Refer to Real data mapping 1 See page 104 Acknowledgement r Set ID OK NG Data x 1 15 5 B Ba as ss s C Co om mm ma an nd d2 2 s s To adjust bass You can also adjust bass in the Audio men...

Page 108: ...annel to following physical major minor num ber Transmission m a Set ID Data0 Data1 Data2 Data3 Data4 Data5 Cr Data 0 Physical Channel Number Transmit by Hexadecimal code NTSC air 02 45 NTSC cable 01 0E 7D ATSC air 01 45 ATSC cable 01 87 Data1 Data2 Major Channel Number two part Channel Number One part Data1 High byte Data2 Low byte Two part channel number Major number Minor number One part channe...

Page 109: ...ture two part using physical channel ATSC air Acknowledgement a Set ID OK Data0 Data1 Data2 Data3 Data4 x a Set ID NG Data0 x 2 22 2 C Ch ha an nn ne ell A Ad dd d D De ell C Co om mm ma an nd d m m b b To add and delete the channels Transmission m b Set ID Data Cr Data 0 Channel Delete Data 1 Channel Add Acknowledgement b Set ID OK NG Data x 2 23 3 K Ke ey y C Co om mm ma an nd d m m c c To send ...

Page 110: ......

Reviews: