background image

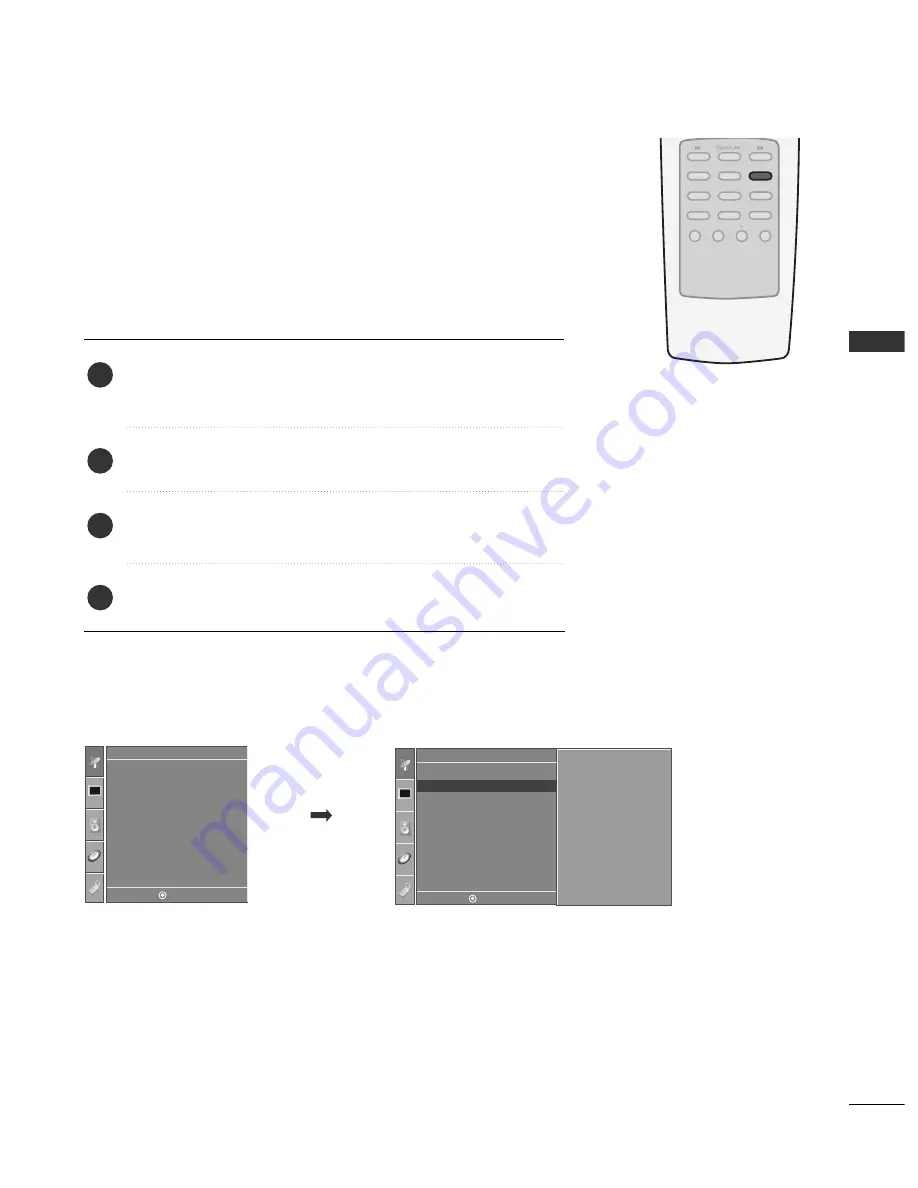
Add/Delete Channel (Manual Tuning)

33

W

ATCHING 

TV 

CHANNEL 

CONTR

OL

Auto Tuning

Manual Tuning

Favorite Channel

Setup

Setup

TV                            13

Memory                  off

Fine                           0

DE F G 

MENU

DE F G 

MENU

You can add or delete channels from the channel scan manually.

Use the C

C H

H  (

D

or 

E

E

) or NUMBER buttons to select the channel

number you want to add or delete.

Press the C

CH

H  EED

DIIT

T button.

Press the C

CH

H  EED

DIIT

T button to select M

Meem

mo

orryy or EErraassee.

Press the EEN

NT

TEER

R button.

1

2

3

4

You can also use the SSEET

TU

UPP menu to adjust M

Maannuuaall  T

Tuunniinngg.

Auto Tuning

Manual Tuning

G

Favorite Channel

FAV

REVIEW

PIP INPUT

CH EDIT

PIP CH - PIP CH +

SLEEP CAPTION

MTS

SIZE

POSITION

PIP

Summary of Contents for 32PC5RV

Page 1: ...rating your set Retain it for future reference Record model number and serial number of the set See the label attached on the back cover and quote this information to your dealer when you require service PLASMA TV OWNER S MANUAL 32PC5RV www lg ca ...

Page 2: ......

Page 3: ... modifications not expressly approved by the party responsible for compliance could void the user s authority to operate the equipment CAUTION Do not attempt to modify this product in any way without written authorization from LG Electronics Unauthorized modification could void the user s authority to operate this product The lightning flash with arrowhead symbol within an equilateral triangle is ...

Page 4: ...cent to that safety instruction Read these instructions Keep these instructions Heed all warnings Follow all instructions Do not use this apparatus near water Clean only with dry cloth Do not block any ventilation openings Install in accordance with the manufacturer s instructions Do not install near any heat sources such as radiators heat registers stoves or other apparatus including amplifiers t...

Page 5: ...ulation are dangerous Any of these conditions could result in electric shock or fire Periodically examine the cord of your appliance and if its appearance indicates dam age or deterioration unplug it discontinue use of the appliance and have the cord replaced with an exact replacement part by an authorized servicer Protect the power cord from physical or mechanical abuse such as being twisted kink...

Page 6: ...s Selection 31 Channel Setup Auto Scan Auto Tuning 32 Add Delete Channel Manual Tuning 33 Fine Tuning Adjustment 34 Favorite Channels Setup 35 SimpLink 36 Key Lock 38 Factory Reset 39 PICTURE CONTROL PIP Double Window 40 Picture Size Aspect Ratio Control 41 Preset Picture Settings Picture Mode Preset 42 Color Tone Preset 43 Manual Picture Adjustment Picture Mode User Mode 44 Color Tone User Mode 4...

Page 7: ... Auto On Off Time Setting 63 Sleep Time Setting 64 Auto Shut off Setting 65 PARENTAL CONTROL RATINGS Set Password Lock System 66 Movie TV Rating 68 Age Block 69 Content Block 70 Aux Block 70 Canadian 71 APPENDIX Troubleshooting 72 Maintenance 74 Product Specifications 75 ...

Page 8: ...rent main picture quality factors With HDMI CEC support of LG s audio video device connected to the HDMI high definition multimedia interface LG TV with this logo works easily with one remote control HDMITM the HDMI logo and High Definition Multimedia Interface are trademarks or registered trademarks of HDMI Licensing ...

Page 9: ...Refer to p 10 Slightly wipe stained spot on the exterior only with the polishing cloth for the product exterior if there is stain or fingerprint on surface of the exterior Do not wipe roughly when removing stain Please be cautions of that excessive pressure may cause scratch or discoloration Polishing Cloth Copyright 2007 LGE All Rights Reserved D sub 15 pin Cable 1 5V 1 5V Owner s Manual Power Co...

Page 10: ...e And then wipe the product with a cloth If a polishing cloth is included with your product use it CH VOL MENU INPUT ENTER CH VOL MENU INPUT ENTER Power Standby Indicator Illuminates red in standby mode Illuminates green when the set is switched on Remote Control Sensor POWER Button INPUT Button MENU Button ENTER Button VOLUME F F G G Buttons CHANNEL E E D D Buttons ...

Page 11: ...DTV AV OUT Connect second TV or monitor to the AV OUT socket on the set AV IN Connect audio video output from an external device to these jacks HDMI DVI IN 1 HDMI IN 2 Connect a HDMI signal to HDMI IN Or DVI VIDEO signal to HDMI DVI port with DVI to HDMI cable ANTENNA IN Connect over the air signals to this jack Power Cord Socket This TV operates on an AC power The voltage is indicated on the Spec...

Page 12: ...de down on a cushioned surface that will protect product and screen from damage Assemble the product stand with the product as shown Install the 4 bolts securely in the back of the product in the holes provided 1 2 3 BACK COVER FOR WIRE ARRANGEMENT Arrange the cables as shown picture ...

Page 13: ... on or hang from the TV Insert the eye bolts or TV brackets and bolts to tighten the product to the wall as shown in the picture If your product has the bolts in the eye bolts position before inserting the bolts loosen the bolts Secure the wall brackets with the bolts not provided as parts of the product must purchase separately to the wall Match the height of the bracket that is mounted on the wa...

Page 14: ...a clearance of 4 inches on all four sides from the wall PROTECTION COVER When installing the wall mounted unit use the protection cover for desk type stand installation 4 inches 4 inches 4 inches G G Ensure adequate ventilation by following the clearance recommendations CAUTION 4 inches ...

Page 15: ...Outdoor Antenna VHF UHF Wall Antenna Socket RF Coaxial Wire 75 ohm Bronze Wire Be careful not to bend the bronze wire when connecting the antenna The TV will let you know when the analog and cable scans are complete NOTE Antenna UHF Signal Amplifier VHF To improve the picture quality in a poor signal area please purchase a signal amplifier and install properly If the antenna needs to be split for ...

Page 16: ...p box Refer to the owner s manual for the digital set top box Select C Co om mp po on ne en nt t 1 1 input source with using the I IN NP PU UT T button on the remote control If connected to C CO OM MP PO ON NE EN NT T I IN N2 2 input select C Co om mp po on ne en nt t 2 2 input source 1 2 To prevent the equipment damage never plug in any power cords until you have finished connecting all equipment...

Page 17: ...How to connect 2 How to use Turn on the digital set top box Refer to the owner s manual for the digital set top box Select H HD DM MI I1 1 or H HD DM MI I2 2 input source with using the I IN NP PU UT T button on the remote control 2 1 HDMI DTV OUTPUT 1 Resolution 720x480p 1280x720p 1920x1080i Supported Display Resolution HDMI DTV mode Horizontal Vertical Frequency KHz Frequency Hz 31 47 59 94 31 5...

Page 18: ...DM MI I D DV VI I I IN N 1 1 jack on the set Connect the audio output of the digital set top box to the A AU UD DI IO O I IN N R RG GB B D DV VI I jack on the set 1 How to connect 2 How to use Turn on the digital set top box Refer to the owner s manu al for the digital set top box Select H HD DM MI I1 1 input source with using the I IN NP PU UT T button on the remote control 2 1 ...

Page 19: ... NE EN NT T I IN N V VI ID DE EO O1 1 jacks on the set Match the jack colors Y green PB blue and PR red Connect the audio outputs of the DVD to the C CO OM MP PO ON NE EN NT T I IN N A AU UD DI IO O1 1 jacks on the set 1 How to connect 2 How to use Turn on the DVD player insert a DVD Select C Co om mp po on ne en nt t 1 1 input source with using the I IN NP PU UT T button on the remote control If ...

Page 20: ...D DV VI I I IN N 1 1 or H HD DM MI I I IN N 2 2 jack on the set No separated audio connection is necessary HDMI supports both audio and video 1 How to connect 2 How to use Select H HD DM MI I1 1 or H HD DM MI I2 2 input source with using the I IN NP PU UT T button on the remote control Refer to the DVD player s manual for operating instructions 2 1 1 ...

Page 21: ...ufactures warranty does not cover the product bearing this phenomenon L MONO L MONO R AUDIO AUDIO VI VIDEO L R S VIDEO VIDEO OUTPUT SWITCH ANT IN ANT OUT Wall Jack Antenna Connect the RF antenna out socket of the VCR to the A AN NT TE EN NN NA A I IN N socket on the set Connect the antenna cable to the RF antenna in socket of the VCR 1 How to connect Set VCR output switch to 3 or 4 and then tune T...

Page 22: ...atch the jack colors Video yellow Audio Left white and Audio Right red 1 How to connect 2 How to use Insert a video tape into the VCR and press PLAY on the VCR Refer to the VCR owner s manual Select A AV V input source with using the I IN NP PU UT T button on the remote control 1 G G If you have a mono VCR con nect the audio cable from the VCR to the A AU UD DI IO O L L M MO ON NO O jack of the se...

Page 23: ...ween TV and external equipment Match the jack colors Video yellow Audio Left white and Audio Right red 1 How to connect 2 How to use Select A AV V input source with using the I IN NP PU UT T button on the remote control Operate the corresponding external equipment T L R VIDEO Camcorder Video Game Set 1 1 ...

Page 24: ...ion RGB PC mode Horizontal Vertical Frequency KHz Frequency Hz 31 468 70 09 31 469 70 08 31 469 59 94 31 5 60 00 31 5 60 00 37 879 60 31 48 363 60 00 NOTE G G To get the the best picture quality adjust the PC graphics card to 852x480 60Hz G G Check the image on your TV There may be noise associated with the resolution vertical pattern contrast or brightness in PC mode If noise is present change th...

Page 25: ... fi ig g When A Au ut to o c co on nf fi ig g has finished O OK K will be shown on screen If the position of the image is still not correct try Auto adjustment again If picture needs to be adjusted more after Auto adjust ment in RGB PC you can adjust the M Ma an nu ua al l c co on nf fi ig g Press E EX XI IT T button to return to TV viewing or press M ME EN NU U button to return to the previous me...

Page 26: ...e Reset Screen XD Demo Picture Screen Phase 50 Clock 0 H Position 0 V Position 0 2 Picture To Set DE F G MENU DE F G MENU DE F G MENU If the picture isn t clear after auto adjustment and especially if characters are still trembling adjust the picture phase manually To correct the screen size adjust Clock This function works in the following mode RGB PC COM PONENT 480i 480p 720p 1080i HDMI 480p 720...

Page 27: ... select V VG GA A M Mo od de e Press the G G button and then use D D or E E button to select the desired VGA resolution Press E EX XI IT T button to return to TV viewing or press M ME EN NU U button to return to the previous menu 1 2 3 4 5 1 3 4 Picture Mode Color Temperature XD Advanced Aspect Ratio Picture Reset Screen XD Demo Picture Screen 640x480 848x480 852x480 2 Picture To Set DE F G MENU D...

Page 28: ...E E button to select R Re es se et t You can initialize Clock Phase H V Position PIP size PIP position Press the G G button 1 2 3 4 Initializing Reset to original factory settings 1 3 4 Picture Mode Color Temperature XD Advanced Aspect Ratio Picture Reset Screen XD Demo Picture Screen To Set 2 Picture To Set DE F G MENU DE F G MENU DE F G MENU Picture Mode Color Temperature XD Advanced Aspect Rati...

Page 29: ... connect G G Component RGB PC HDMI input sources cannot be used for AV out NOTE 2 1 1 L MONO R AUDIO VIDEO G G When connecting with external audio equipments such as amplifiers or speakers please turn the TV speakers off G G p p 5 57 7 NOTE EXTERNAL STEREO Use to connected either an external amplifier or add a sub woofer to your surround sound system Connect the input jack of the stereos amplifier...

Page 30: ...ss the D D E E button and then ENTER button to select the desired input source TV AV Component 1 Component 2 RGB PC HDMI1 or HDMI2 Switch the sound on or off G G p p 3 30 0 Change the aspect ratio G G p p 4 41 1 Clear all on screen displays and return to TV viewing from any menu Displays the main menu See a list of AV devices connected to TV When you toggle this button the SimpLink menu appears at...

Page 31: ...effective range R 0 INPUT MUTE 1 2 3 4 5 6 7 8 9 POWER TV VOLUME UP DOWN CHANNEL UP DOWN THUMBSTICK Up Down Left Right ENTER SIZE POSITION PIP PIP CH PIP INPUT Increase decrease the sound level Select available channels Navigate the on screen menus and adjust the system settings to your preference Control the SIMPLINK compatible devices Adjusts the sub picture size G G p p 4 40 0 Moves the sub pic...

Page 32: ...tion Auto tuning L Lo oc ca at ti io on n I In n S St to or re e It maintains the picture mode optimized for the shop environ ment It maintains the picture mode as dynamic at a specific interval It s not available to use Low Power H Ho om me e The user can adjust the picture mode to use Note In order to reset the installation guide select Factory Reset at the Option menu G G p p 3 39 9 ENTER CH VO...

Page 33: ... F F G G button to display the available menus 2 1 Setup Picture Audio Time Option Language SIMPLINK Key Lock Caption Text ISM Method Low Power Lock Factory Reset Option Clock Off Time On Time Sleep Time Auto Sleep Time Picture Mode Color Temperature XD Advanced Aspect Ratio Picture Reset Screen XD Demo Picture Auto Tuning Manual Tuning Favorite Channel Setup Sound Mode Auto Volume Balance 0 TV Sp...

Page 34: ...o Tuning if the TV is ever moved to another location Auto Tuning will search for channels only through the Antenna jack Press the M ME EN NU U button and then use D D or E E button to select the S Se et tu up p menu Press the G G button and then use D D or E E button to select A Au ut to o T Tu un ni in ng g Press the G G button A Au ut to o T Tu un ni in ng g starts the channel search If you want...

Page 35: ...E E or NUMBER buttons to select the channel number you want to add or delete Press the C CH H E ED DI IT T button Press the C CH H E ED DI IT T button to select M Me em mo or ry y or E Er ra as se e Press the E EN NT TE ER R button 1 2 3 4 You can also use the S SE ET TU UP P menu to adjust M Ma an nu ua al l T Tu un ni in ng g Auto Tuning Manual Tuning G Favorite Channel FAV REVIEW PIP INPUT CH E...

Page 36: ...I IT T button to return to TV viewing or press M ME EN NU U button to return to the previous menu 1 2 3 4 5 6 Normally fine tuning is only necessary if reception is poor To remove fine tuning from a channel reprogram the finely tuned channel with Auto program or Manual Program If a finely tuned channel is memorized the color of the channel number changes to yellow 1 Auto Tuning Manual Tuning Favor...

Page 37: ...S 1 2 3 4 5 6 Press the M ME EN NU U button and then use D D or E E button to select the S Se et tu up p menu Press the G G button and then use D D or E E button to select F Fa av vo or ri it te e C Ch ha an nn ne el l Press the G G button and then use D D or E E button to select the first favorite program position Use the F F or G G button to set the desired channel number for first favorite prog...

Page 38: ...U button to return to the previous menu 1 2 3 4 NOTE G G Connect the HDMI DVI IN 1 or HDMI IN 2 terminal of the TV to the rear terminal HDMI output of the Simplink device with the HDMI cable G G After connecting the HDMI terminal for the home theater with simplink function in the above method connect the VARIABLE OUT terminal on the back of the TV to the VARIABLE AUDIO IN terminal on the back of t...

Page 39: ... To operate SIMPLINK the HDMI cable over 1 2 Version with CEC function should be used CEC Consumer Electronics Control Version 1 2 is the cable connected to No 13 Pin and is the line to exchange information between units SIMPLINK Menu T TV V v vi ie ew wi in ng g Switch to the previous TV channel regardless of the current mode D DI IS SC C p pl la ay yb ba ac ck k Select and play discs When multip...

Page 40: ...n n the display K Ke ey y L Lo oc ck k O On n appears on the screen if any button on the front panel is pressed while viewing the set Press the M ME EN NU U button and then use D D or E E button to select the O Op pt ti io on n menu Press the G G button and then use D D or E E button to select K Ke ey y l lo oc ck k Press the G G button and then use D D or E E button to select O On n or O Of ff f ...

Page 41: ...enu Press the G G button and then use D D or E E button to select F Fa ac ct to or ry y R Re es se et t Press the G G button 2 3 1 It initializes the entire OSD On Screen Display settings The Installation Guide Setup window is displayed again after the initialization DE F G MENU DE F G MENU Language SIMPLINK Key lock Caption Text ISM Method Low Power Lock Factory Reset G ENTER CH VOL CH VOL MENU E...

Page 42: ... for PIP Use the P PI IP P C CH H button to select a channel for the sub picture The selected channel number is displayed just below the input source of main picture 1 FAV REVIEW PIP INPUT CH EDIT PIP CH PIP CH SLEEP CAPTION MTS SIZE POSITION PIP Sub Picture Size Adjustment PIP mode only Press the S SI IZ ZE E button to adjust the sub picture size With S SI IZ ZE E button in PIP mode sub picture i...

Page 43: ...fway trade off between alteration and screen coverage You can move the Zoom2 screen using D D or E E button 4 3 NOTE Press the R RA AT TI IO O button repeatedly to select the desired picture format You can also adjust A As sp pe ec ct t R Ra at ti io o in the P Pi ic ct tu ur re e menu 16 9 Horizon Zoom 1 Zoom 2 D D E E This feature lets you choose the way an analog picture with a 4 3 aspect ratio...

Page 44: ...ton to return to the previous menu 1 2 3 4 1 Picture Mode Color Temperature XD Advanced Aspect Ratio Picture Reset Screen XD Demo Picture 3 2 Picture Dynamic Standard Mild User1 User2 DE F G MENU DE F G MENU Picture Mode Preset Picture Mode adjusts the TV for the best picture appear ance Select the preset value in the Picture Mode menu based on the program category D Dy yn na am mi ic c S St ta an...

Page 45: ... return to the previous menu 1 2 3 4 1 Picture Mode Color Temperature XD Advanced Aspect Ratio Picture Reset Screen XD Demo Picture 3 2 Picture Cool Medium Warm User DE F G MENU DE F G MENU Color Tone Preset Choose one of three automatic color adjustments Set to warm to enhance hotter colors such as red or set to cool to see less intense colors with more blue When selecting Picture Mode options Us...

Page 46: ...n nt t Press the G G button and then use F F or G G button to make appropriate adjustments Press E EX XI IT T button to return to TV viewing or press M ME EN NU U button to return to the previous menu NOTE G G In RGB PC HDMI No signal mode you can t adjust color sharpness and tint to the levels you prefer 1 2 3 4 5 6 1 Picture Mode Color Temperature XD Advanced Aspect Ratio Picture Reset Screen XD...

Page 47: ...ss E EX XI IT T button to return to TV viewing or press M ME EN NU U button to return to the previous menu 1 2 3 4 5 6 1 Picture Mode Color Temperature XD Advanced Aspect Ratio Picture Reset Screen XD Demo Picture 3 2 Picture Cool Medium Warm User 5 4 User Red 25 F G E DE F G MENU DE F G MENU DE F G MENU You can also adjust the detailed settings Red Green Blue by selecting the C Co ol lo or r T Te...

Page 48: ... use D D or E E button to select A Au ut to o or M Ma an nu ua al l Press E EX XI IT T button to return to TV viewing or press M ME EN NU U button to return to the previous menu 2 3 4 1 S Se el le ec ct ti in ng g t th he e M Ma an nu ua al l 1 Press the G G button and then use D D or E E button to select X XD D C Co on nt tr ra as st t X XD D C Co ol lo or r or X XD D N NR R N No oi is se e X XD ...

Page 49: ...se D D or E E button to select X XD D D De em mo o Press the G G button to begin X XD D D De em mo o To stop X XD D D De em mo o press the M ME EN NU U button 1 2 3 4 XD Demo 1 Picture Mode Color Temperature XD Advanced Aspect Ratio Picture Reset Screen XD Demo Picture 3 2 Picture To Start XD Off XD On MENU Exit DE F G MENU DE F G MENU Picture Mode Color Temperature XD Advanced Aspect Ratio Pictur...

Page 50: ... use D D or E E button to select A Ad dv va an nc ce ed d Press the G G button and then use D D or E E button to select C Ci in ne em ma a Press the G G button and then use D D or E E button to select O On n or O Of ff f Press E EX XI IT T button to return to TV viewing or press M ME EN NU U button to return to the previous menu 1 2 3 4 5 1 Picture Mode Color Temperature XD Advanced Aspect Ratio P...

Page 51: ...t B Bl la ac ck k L Le ev ve el l Press the G G button and then use D D or E E button to select L Lo ow w or H Hi ig gh h L Lo ow w The reflection of the screen gets darker H Hi ig gh h The reflection of the screen gets brighter Press E EX XI IT T button to return to TV viewing or press M ME EN NU U button to return to the previous menu 1 2 3 4 5 1 Picture Mode Color Temperature XD Advanced Aspect...

Page 52: ...hite Wash removes ghost images from the screen Watch the TV normally for a while before using this fea ture to see if the ghost image disappears on its own O Or rb bi it te er r Orbiter may help prevent ghost images However it is best not to allow any fixed image to remain on the screen To avoid a ghost image on the screen the image will move once per 2 minutes I In nv ve er rs si io on n Inversio...

Page 53: ...e G G button and then use D D or E E button to select O On n or O Of ff f When you select O On n the screen darkens Press E EX XI IT T button to return to TV viewing or press M ME EN NU U button to return to the previous menu 2 3 4 1 Low power reduces the plasma display power consumption Even though the Low power function is O On n in Store Mode it s ineffective DE F G MENU DE F G MENU Language SI...

Page 54: ...ue Returns to the default settings Picture Mode Color Temperature XD Advanced Aspect Ratio at the fac tory 1 2 3 Use to quickly reset all the Picture menu options to their original factory preset values 1 Picture Mode Color Temperature XD Advanced Aspect Ratio Picture Reset Screen XD Demo Picture 3 2 Picture To Set DE F G MENU DE F G MENU Picture Mode Color Temperature XD Advanced Aspect Ratio Pic...

Page 55: ...o select the A Au ud di io o menu Press the G G button and then use D D or E E button to select S So ou un nd d M Mo od de e Press the G G button and then use D D or E E button to select S Su ur rr ro ou un nd d M MA AX X S St ta an nd da ar rd d M Mu us si ic c M Mo ov vi ie e S Sp po or rt ts s or U Us se er r Press E EX XI IT T button to return to TV viewing or press M ME EN NU U button to retu...

Page 56: ...n Select a sound band by pressing the F F or G G button Make appropriate sound level with the D D or E E button Press E EX XI IT T button to return to TV viewing or press M ME EN NU U button to return to the previous menu 1 2 3 4 5 6 1 Sound Mode Auto Volume Balance 0 TV Speaker Audio 3 4 2 Audio Surround MAX Standard Music Movie Sports User User 0 1 0 5 1 5 5 0 10 kHz 5 DE F G MENU DE F G MENU DE...

Page 57: ...E E button to select A Au ut to o V Vo ol lu um me e Press the G G button and then use D D or E E button to select O On n or O Of ff f Press E EX XI IT T button to return to TV viewing or press M ME EN NU U button to return to the previous menu 1 2 3 4 1 Sound Mode Auto Volume Balance 0 TV Speaker Audio 1 3 2 Audio Off On DE F G MENU DE F G MENU Sound Mode Auto Volume G Balance 0 TV Speaker ENTER ...

Page 58: ... then use D D or E E button to select B Ba al la an nc ce e Press the G G button and then use F F or G G button to make desired adjustment Press E EX XI IT T button to return to TV viewing or press M ME EN NU U button to return to the previous menu 1 2 3 4 1 Sound Mode Auto Volume Balance 0 TV Speaker Audio 1 3 2 Audio DE F G MENU DE F G MENU Sound Mode Auto Volume Balance R15 G TV Speaker ENTER C...

Page 59: ... NU U button and then use D D or E E button to select the A Au ud di io o menu Press the G G button and then use D D or E E button to select T TV V S Sp pe ea ak ke er r Press the G G button and then use D D or E E button to select O On n or O Of ff f Press E EX XI IT T button to return to TV viewing or press M ME EN NU U button to return to the previous menu 1 2 3 4 1 Sound Mode Auto Volume Balan...

Page 60: ...ght speakers Signal mode is stereo SAP The secondary language is heard from left and right speakers in mono sound Use the M MT TS S button to select your desired MTS mode in analog signal Each time you press the M MT TS S button M Mo on no o S St te er re eo o or S SA AP P appear in turn Press E EX XI IT T button to save and return to TV viewing FAV REVIEW PIP INPUT CH EDIT PIP CH PIP CH SLEEP CAP...

Page 61: ...se D D or E E button to select your desired language From this point on the on screen menus will be shown in the selected language Press E EX XI IT T button to return to TV viewing or press M ME EN NU U button to return to the previous menu 1 2 3 4 Language SIMPLINK Key Lock Caption Text ISM Method Low Power Lock Factory Reset Option 3 2 Option English Español Spanish Français French 1 DE F G MENU...

Page 62: ...t a caption mode for displaying captioning information if provided on a program Analog caption displays information at any position on the screen and is usually the program s dialog Text displays information usually at the bottom position and is used for a data service generally not program related Caption Text if provided by the broadcaster would be available for both digital and analog channels ...

Page 63: ...n use D D or E E button to select A Au ut to o Press the G G button and then use D D or E E button to select your viewing area time zone Your choices are A Au ut to o N Nf fl ld d Newfoundland A At tl la an nt ti ic c E E S S T T Eastern Standard Time C C S S T T Central Standard Time M M S S T T Mountain Standard Time P P S S T T Pacific Standard Time Press the G G button and then use D D or E E ...

Page 64: ...hen use D D or E E button to set the hour Press the G G button and then use D D or E E button to set the minutes Press E EX XI IT T button to return to TV viewing or press M ME EN NU U button to return to the previous menu If the current time setting is wrong reset the clock manually 2 3 4 5 6 1 1 3 2 Time Auto Manual AM Clock Off Time On Time Sleep Time Auto Sleep Time DE F G MENU DE F G MENU Clo...

Page 65: ...nd then use D D or E E to select the channel at turn on Press E EX XI IT T button to return to TV viewing or press M ME EN NU U button to return to the previous menu The time function operates only if the current time has been set The Off Time function overrides the On Time function if they are both set to the same time The TV must be in standby mode for the On Time to work If you do not press any...

Page 66: ...s the TV off at the preset time Note that this setting is cleared when the TV is turned off 2 1 NOTE G G To view the remaining sleep time press the S SL LE EE EP P button once G G To cancel the sleep time repeatedly press the S SL LE EE EP P button until the display appears G G If you turn the TV off after setting the sleep timer the setting will be erased You can also set up the S Sl le ee ep p T...

Page 67: ... E button to select A Au ut to o S Sl le ee ep p Press the G G button and then use D D or E E button to select O On n or O Of ff f Press E EX XI IT T button to return to TV viewing or press M ME EN NU U button to return to the previous menu 2 3 4 1 1 Clock Off Time On Time Sleep Time Auto Sleep Time 1 2 3 Time Off On DE F G MENU DE F G MENU Clock Off Time On Time Sleep Time Auto Sleep G ENTER CH V...

Page 68: ...V Rating and or Individual Categories Movies that have been shown at the theaters or direct to video movies use the Movie Rating System MPAA only Ratings for Television programs including made for TV movies TV G General audience TV PG Parental guidance suggested TV 14 Parents strongly cautioned TV MA Mature audience only TV Y All children TV Y7 Children 7 years older SET PASSWORD LOCK SYSTEM Setti...

Page 69: ... by inputting a new password twice 2 1 NOTE G G If you ever forget your password key in 7 7 7 7 on the remote control 3 4 Press the M ME EN NU U button and then use D D or E E button to select the O Op pt ti io on n menu Press the G G button and then use the D D or E E button to select L Lo oc ck k Press the G G button and then use the D D or E E button to select S Se et t p pa as ss sw wo or rd d...

Page 70: ...r E E button to select M MP PA AA A Press the G G button and then use the D D or E E button to select block options Unblocked Permits all programs G above General audience PG above Parental guidance suggested PG 13 above Parents strongly cautioned R above Restricted NC 17 above No one 17 and under admitted X Adult only Press E EX XI IT T button to return to TV viewing or press M ME EN NU U button ...

Page 71: ...rs older Press E EX XI IT T button to return to TV viewing or press M ME EN NU U button to return to the previous menu TV Rating General Based on the ratings blocks certain TV programs that you and your family do not want to view TV Rating Children Prevents children from watching certain children s TV programs according to the ratings limit set The children rating does not apply to other TV progra...

Page 72: ...G MENU Dialog G Language Sex Violence F Violence Unblocked TV PG above TV 14 above AUX BLOCK Enables you to select a source to block from the external source devices you have hooked up Press the M ME EN NU U button and then use D D or E E button to select the O Op pt ti io on n menu Press the G G button and then use the D D or E E button to select L Lo oc ck k Press the G G button and then use the...

Page 73: ...ears and older 18 Adult programming G above General 8ans General Not convenient for little children 13ans Not convenient for children of 13 years and younger 16ans Not convenient for children of 16 years and younger 18ans This programs is only for adults Press E EX XI IT T button to return to TV viewing or press M ME EN NU U button to return to the previous menu TV Rating English Selecting canadia...

Page 74: ...ted No broadcast on station tuned with Auto off activated Check whether the product is turned on Try another channel The problem may be with the broadcast Is the power cord inserted into wall power outlet Check your antenna direction and or location Test the wall power outlet plug another product s power cord into the outlet where the product s power cord was plugged in This is normal the image is...

Page 75: ...e color Vertical bar or stripe on background Horizontal Noise Incorrect position Press the VOL or VOLUME button Sound muted Press MUTE button Try another channel The problem may be with the broadcast Are the audio cables installed properly Adjust Balance in menu option A change in ambient humidity or temperature may result in an unusual noise when the product is turned on or off and does not indic...

Page 76: ...and a little fabric softener or dish washing detergent Wring the cloth until it s almost dry and then use it to wipe the screen Make sure the excess water is off the screen and then let it air dry before you turn on your TV Cleaning the Cabinet To remove dirt or dust wipe the cabinet with a soft dry lint free cloth Please be sure not to use a wet cloth Extended Absence If you expect to leave your ...

Page 77: ... F 20 60 C Less than 85 Dimensions Width x Height x Depth Weight Power requirement Television System Program Coverage External Antenna Impedance Environment condition including stand excluding stand including stand excluding stand Operating Temperature Operating Humidity Storage Temperature Storage Humidity 32 3 x 23 8 x 10 1 inches 819 9 x 603 8 x 255 4 mm 32 3 x 21 8 x 3 1 inches 819 9 x 554 2 x...

Page 78: ......

Reviews: