background image

ENGLISH

21

CUSTOMIZING SETTINGS

Menu > Next Menu > Color

Description

Gamma

Set your own gamma value. : Gamma 0, Gamma 1, Gamma 2 on the monitor, 

high gamma values display whitish images and low gamma values display 

blackish images.

Color Temp

Custom

• Red:

Set your own red color levels. 

• Green: 

Set your own green color levels. 

• Blue:

Set your own blue color levels.

Select the screen color.  

Warm: 

Set the screen to warm color temperature (more red).    

Medium:

 Set the screen to medium color temperature.    

Cool: 

Set the screen to cool color temperature (more blue).

Display

1

  Press 

SETTINGS

 button on the back of the Monitor 

set to display the 

Menu

 OSD.   

2

  Select the "

Next Menu

" button to enter the more 

option settings. 

3

  Select 

Display

 by pressing the + button. 

4

  Enter to 

Display

 by pressing the 

H

  button.

5

  Set the options by pressing the + or - or 

H

 buttons.

6

  Press 

INPUT

 to leave the OSD menu.

To return to the upper menu or set other menu items, 

press 

SETTINGS

 button.

Each option is explained below.

Volume

1

  Press 

SETTINGS

 button on the back of the Monitor 

set to display the 

Menu

 OSD.  

2

  Select the "

Next Menu

" button to enter the more 

option settings. 

3

  Select 

Volume

 by pressing the + button. 

4

  Enter to 

Volume

 by pressing the 

H

  button.

5

  Set the options by pressing the + or - buttons.

6

  Press 

INPUT

 to leave the OSD menu.

To return to the upper menu or set other menu items, 

press 

SETTINGS

 button.

Each option is explained below.

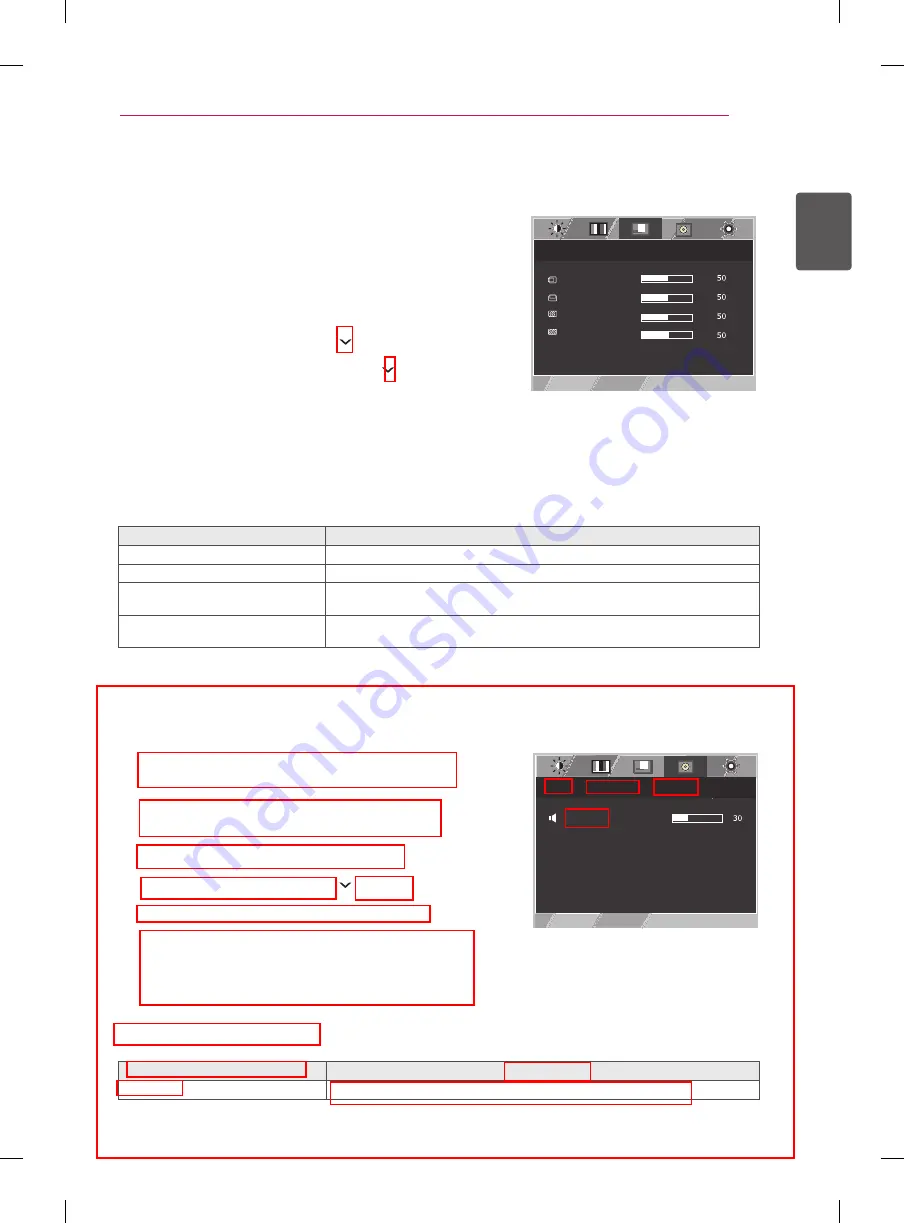
Menu > Next Menu > Display 

Description

Horizontal

To move image left and right. 

Vertical 

To move image up and down.

Clock

To minimize any vertical bars or stripes visible on the screen background.The 

horizontal screen size will also change.

Phase

To adjust the focus of the display. This item allows you to remove any horizontal 

noise and clear or sharpen the image of characters.

Menu > Next Menu > Volume

Description

Volume 

To adjust the Volume of headphone/earphone.(Only for HDMI input)

MENU   >  NEXT MENU   >  DISPLAY

HORIZONTAL

VERTICAL

CLOCK

PHASE

MENU   >  NEXT MENU   >  VOLUME

VOLUME

Summary of Contents for 32MB24

Page 1: ...uld be followed and controlled the following specification 1 Eco hazardous substances test report should be submitted when Part certification test and First Mass Production Printed in China 28 3 Origin Notification Printed in India Printed in Algeria N O T E 2 Especially Don t use or contain lead Pb and cadmium Cd in ink Printed in Thailand Printed in Vietnam Printed in Korea Inside 4 Bindery Prin...

Page 2: ...Front ENG P No 2 27 Blank 1312 REV00 Revision number Total pages 28 pages Part number MFL68024203 Pagination sheet ...

Page 3: ...lg com OWNER S MANUAL LCD LED MONITOR 32MB24 Please read this manual carefully before operating your set and retain it for future reference LCD LED MONITOR MODEL P NO MFL68024203 1312 REV00 Printed in Korea ...

Page 4: ...the stand base 11 Mounting on a table 11 Tidying cables 11 Using the Kensington lock 12 Installing the wall mount plate 12 Installing on the Wall 14 USING THE MONITOR 14 Connecting to a PC 14 D SUB connection 15 HDMI connection 15 Connecting AV Devices 15 HDMI Connection 16 Connecting Peripherals 16 Connecting Headphones 17 CUSTOMIZING SETTINGS 18 Customizing Settings 18 Menu Settings 19 Picture 2...

Page 5: ...s They may result in a shock or fire hazard Call your service technician for replacement As long as this unit is connected to the AC wall outlet it is not disconnected from the AC power source even if the unit is turned off Do not Open the Display y y There are no user serviceable components inside y y There are Dangerous High Voltages inside even when the power is OFF y y Contact your dealer if t...

Page 6: ... not press the LCD screen with your finger for a long time as this may cause some afterimages Some dot defects may appear as Red Green or Blue spots on the screen However this will have no impact or effect on the display performance If possible use the recommended resolution to obtain the best image quality for your LCD display If used under any mode except the recommended resolution some scaled o...

Page 7: ...o the regulations of your local authority On Cleaning y y Unplug the display before cleaning the face of the display screen y y Use a slightly damp not wet cloth Do not use an aerosol directly on the display screen because over spraying may cause electrical shock y y When cleaning the product unplug the power cord and scrub gently with a soft cloth to prevent scratching Do not clean with a wet clo...

Page 8: ...as different licenses Visit www lg com for more information on the license The terms HDMI and HDMI High Definition Multimedia Interface and the HDMI logo are trademarks or registered trademarks of HDMI Licensing LLC in the United States and other countries ...

Page 9: ... Stand Body Stand Body y y Always use genuine components to ensure safety and product performance y y The product warranty will not cover damage or injury caused by the use of counterfeit components CAUTION y y Note that the components may look different from those shown here y y Without prior notice all information and specifications in this manual are subject to change to im prove the performanc...

Page 10: ...ENGLISH 8 ASSEMBLING AND PREPARING Component and Button Description SETTINGS INPUT OK D SUB HDMI IN H P DC IN 19 V Buttons Screen Power indicator Power button ...

Page 11: ...ng or lifting the monitor discon nect the power cord and all cables y y Hold the top and bottom of the monitor frame firmly Do not hold the panel itself y y When holding the monitor the screen should face away from you to prevent it being scratched y y When moving the monitor avoid any strong shock or vibrations to the product y y When moving the monitor keep it upright never turn the monitor on i...

Page 12: ... the monitor Damage caused in this way will not be cov ered by the product warranty y y Do not carry the monitor upside down by just holding the base This may cause the monitor to fall off the stand and could result in personal injury y y When lifting or moving the monitor do not touch the monitor screen The force applied to the monitor screen may cause damage to it CAUTION Front Stand Base Stand ...

Page 13: ...wer cord prior to moving or installing the monitor There is risk of electric shock CAUTION Cable Holder Tidying cables Gather and bind the cables with the supplied cable holder Using the Kensington lock The connector for the Kensington lock is located at the rear of the monitor For more information on installation and usage refer to the Kensington lock user manual or visit the website at http www ...

Page 14: ...d from your local retail store Alternatively please refer to the manual for how to install and set up a tilting wall mounting bracket 10 cm 10 cm 10 cm 10 cm To install the monitor to a wall attach a wall mount ing bracket optional to the back of the monitor Make sure that the wall mounting bracket is se curely fixed to the monitor and to the wall 1 Use the screws and wall mounting bracket that co...

Page 15: ...ct the local dealer or quali fied personnel y y Applying excessive force when tightening screws may cause damage to the monitor Dam age caused in this way will not be covered by the product warranty y y Use the wall mounting bracket and screws that conform to VESA standards Damage caused by the use or misuse of inappropriate components will not be covered by the product warranty y y When measured ...

Page 16: ...n connecting the power cord to the out let use a grounded 3 hole multi socket or a grounded power outlet y y The monitor may flicker when turned on in an area of low temperature This is normal y y Sometimes red green or blue spots may ap pear on the screen This is normal y y When using a D Sub signal input cable connector for Macintosh NOTE CAUTION y y Connect the input signal cable and turn it in...

Page 17: ...PC to the monitor using the HDMI cable may cause device compatibility issues y y Using a DVI to HDMI cable may cause com patibility issues CAUTION Connecting AV Devices HDMI Connection HDMI transmits digital video and audio signals from your AV device to the monitor Connect your AV device to the monitor using the HDMI cable as shown in the illustration below HDMI IN H P D SUB D SUB OUT PC DC IN 19...

Page 18: ...I IN H P D SUB DC IN 19 V sold separately y y Peripheral devices are sold separately y y If you use Angled earphones it may cause a problem with connecting another external device to the monitor Therefore it is recom mended to use Straight earphones Angled Straight y y Depending on the audio settings of the PC and external device headphones and speaker functions may be limited NOTE ...

Page 19: ...s OSD Locked OSD Unlocked This function allows you to lock the current control settings so that they cannot be inadvertently changed Press and hold the SETTINGS button for several seconds The message OSD LOCKED should appear You can unlock the OSD controls at any time by pushing the SETTINGS button for several seconds The message OSD UNLOCKED should appear H INPUT You can choose the input signal W...

Page 20: ...the screen Vertical Clock To improve the clarity and stability of the screen Phase Volume To adjust the Volume Others Language To customize the screen status for a user s operating environment Power Indicator Response Time Sets a response time for displayed pictures based on the speed of the screen y y Analog D SUB Analog signal input y y HDMI HDMI Digital signal input Menu Analog HDMI Description...

Page 21: ...utton Each option is explained below Menu Next Menu Picture Description Sharpness To adjust the clearness of the screen Black Level You can set the offset level If you select High the screen will be bright and if you select Low the screen will be dark only for HDMI input Offset As the criteria for video signal it is the darkest screen the monitor can show Overscan To select the range of output ima...

Page 22: ...INGS button Each option is explained below Menu Next Menu Color Description Gamma Set your own gamma value Gamma 0 Gamma 1 Gamma 2 on the monitor high gamma values display whitish images and low gamma values display blackish images Color Temp Custom Red Set your own red color levels Green Set your own green color levels Blue Set your own blue color levels Select the screen color Warm Set the scree...

Page 23: ...Volume by pressing the button 4 Enter to Volume by pressing the H button 5 Set the options by pressing the or buttons 6 Press INPUT to leave the OSD menu To return to the upper menu or set other menu items press SETTINGS button Each option is explained below Menu Next Menu Display Description Horizontal To move image left and right Vertical To move image up and down Clock To minimize any vertical ...

Page 24: ...ol names are displayed Power Indicator Use this function to set the power indicator on the bottom side of the monitor to On or Off If you set Off it will go off If you set On at any time the power indicator will automatically be turned on Response Time Sets a response time for displayed pictures based on the speed of the screen For a normal environment it is recommended that you use Normal For a f...

Page 25: ... unlock the OSD controls at any time by pushing the MENU button for several seconds the message OSD UNLOCKED will appear Display image is incorrect Display Position is incorrect y y Press the AUTO button to automatically adjust your display image to the ideal setting On the screen background vertical bars or stripes are visible y y Press the AUTO button to automatically adjust your display image t...

Page 26: ...n y y If the selected resolution is HDMI 1080i 60 50 Hz the screen may be flickering Change the resolution to the recommended resolution 1080P y y Check Control Panel Display Settings and see if the frequency or the resolution were changed If yes readjust the video card to the recommend resolution y y If the recommended resolution optimal resolution is not selected letters may be blurred and the s...

Page 27: ...SUB Connector HDMI Connector Power Sources Voltage 19 V 1 3 A Power Consumption Typical On Mode 47 W Typ Sleep Mode 0 5 W Off Mode 0 5 W AC DC Adapter LCAP35 type manufactured by Lien Chang Electronic OUTPUT 19 V 2 53 A Environmental conditions Operating Temperature Operating Humidity 10 C to 35 C 10 to 80 Storage Temperature Storage Humidity 20 C to 60 C 5 to 90 non Condensing Dimensions Width x ...

Page 28: ...4 x 768 60 023 75 029 1152 x 864 67 5 75 1280 x 1024 63 981 60 02 1280 x 1024 79 976 75 035 1680 x 1050 65 29 59 954 1920 x 1080 67 50 60 Recommend Mode D SUB HDMI DTV Mode is not supported interlace mode HDMI TIMING Display Modes Resolution Horizontal Frequency kHz Vertical Frequency Hz 480P 31 5 60 576P 31 25 50 720P 37 5 50 720P 45 60 1080i 28 12 50 1080i 33 75 60 1080P 56 25 50 1080P 67 5 60 R...

Page 29: ...POSTURE Adjust the Monitor set and your posture to allow you to view images at the optimal viewing angle Place your hands gently on the keyboard keeping your arms bent at the elbows and horizontally outright Adjust the location of the Monitor set to avoid it reflecting light ...

Page 30: ...ns before using the product Keep the Owner s Manual in an accessible place for future reference The model and serial number of the SET is located on the back and one side of the SET Record it below should you ever need service MODEL SERIAL ...

Reviews: