background image

16

ENG

ENGLISH

ASSEMBLING AND PREPARING

 CAUTION 


y

Make sure that the screws are inserted correctly 

and fastened securely. (If they are not fastened 

securely enough, the Stand may tilt after being 

installed.) 

Do not use too much force and over tighten the 

screws; otherwise screw may be damaged and 

not tighten correctly. 

4

5

M4 x 8

1EA

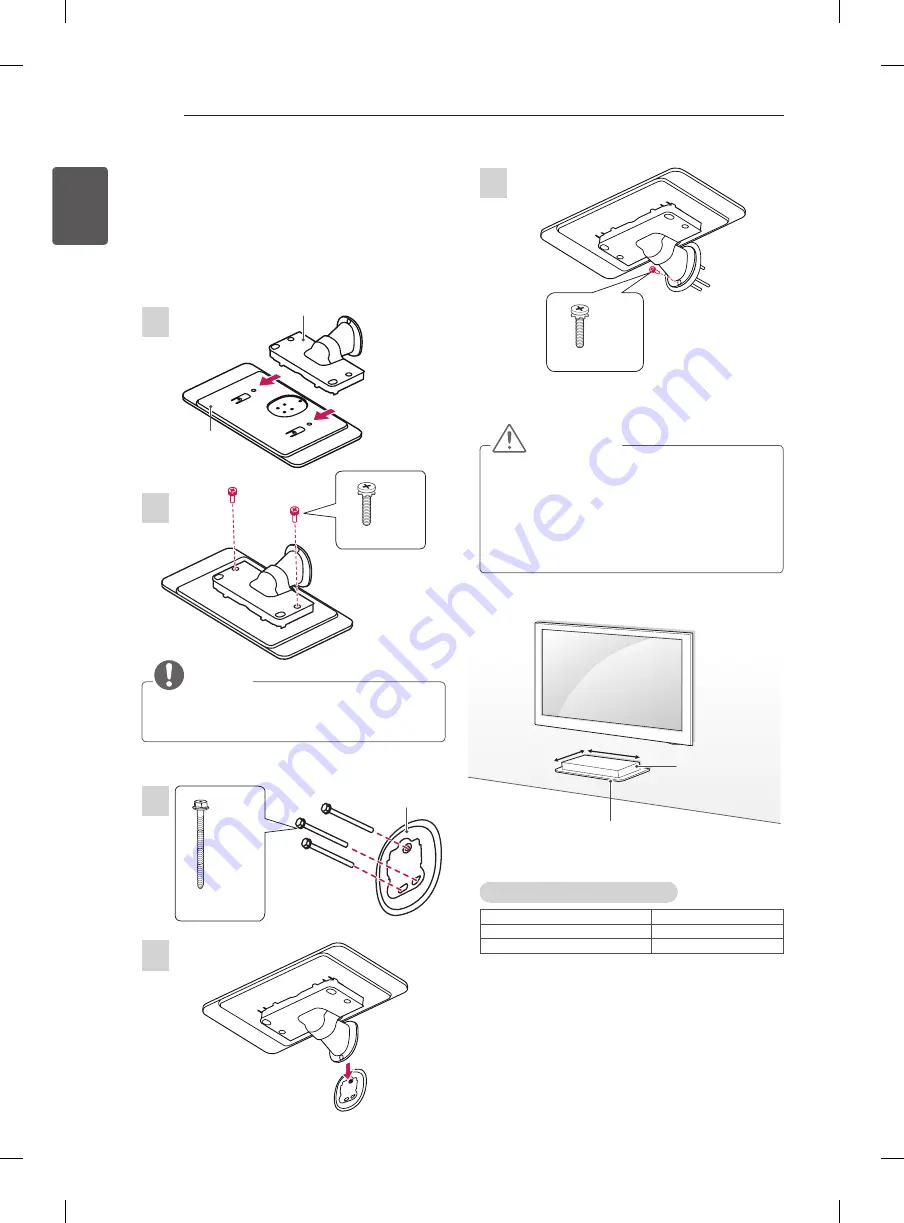
Attaching the shelf stand

Image shown may differ from your TV.

- You can use the shelf stand by putting STB (Set top 

box).

2

3

1

LN515*

M4 x 8

2EA

Stand Base

P5 x 69.5

3EA

Wall Plate

Stand Body

350mm

150mm

Shelf Stand

STB

(Set top box)

Shelf Stand conditions of use

STB Dimensions (W x D)

350mm x 150mm

STB Weight

2.5kg

Maximum supported weight

3.5kg

 NOTE


y

To install wall mount anchor, you can refer to 

p.17.

Summary of Contents for 32LN510 Series

Page 1: ...rinted in Indonesia www lg com BUKU PANDUAN TV LED Baca panduan ini dengan baik sebelum mengoperasikan TV Simpanlah sebagai pegangan selanjutnya TV LED LG menggunakan layar LCD dengan lampu latar LED 32LN512 32LN515 39LN512 42LN512 32LN513 39LN513 42LN513 www lg com id INDONESIA ...

Page 2: ...uran Kunci 41 TELETEXT 41 41 Simple Text 41 Memilih Halaman 41 pada mode Daftar 41 Fastext 41 Memilih Halaman 41 42 42 42 42 Kabel Daya 42 43 SPESIFIKASI 46 LISENSI Menghubungkan Antena Menghubungkan HDMI Menghubungkan Komponen Menghubungkan Komposit Menghubungkan USB PERINGATAN y Jika pesan ini Anda hiraukan maka memungkinkan untuk terjadi hal hal yang dapat menyebabkan cedera atau kematian PERHA...

Page 3: ...ihubungkan pada ground Kecuali untuk perangkat yang tidak ada groundnya Anda dapat tersengat listrik atau cedera y y Tancapkan kabel daya dengan benar Jika kabel daya tidak benar api dapat keluar y y Pastikan kabel daya tidak kontak langsung dengan benda panas seperti pemanas Hal ini dapat menyebabkan ke bakaran atau bahaya sengatan listrik y y Jangan menempatkan objek yang berat atau produk itu s...

Page 4: ...but sumpit atau kawat ke dalam produk atau benda benda yang mudah terbakar seperti kertas dan sejenisnya Anak anak harus mendapat perhatian khusus Sengatan listrik kebakaran atau cedera dapat terjadi Jika objek yang asing jatuh ke dalam produk cabut kabel listrik dan hubungi pusat layanan y y Jangan semprotkan air diatas produk atau mengosoknya dengan bahan yang mudah terbakar tiner atau bensin Ke...

Page 5: ...ng opsional pastikan memasangnya dengan hati hati agar tidak terjatuh y y Gunakan aksesoris yang direkomendasikan ditentukan oleh pabrik y y Saat memasang antena konsultasikan dengan petugas servis Jika tidak mungkin dapat menyebabkan bahaya kebakaran dan sengatan listrik y y Kami merekomendasikan jarak menonton TV setidaknya 2 sampai 7 kali ukuran diagonal layar Jika Anda menonton TV dalam jangka...

Page 6: ... benda tajam lain seperti kuku pensil atau pena dapat menyebabkan goresan pada layar y y Jangan menekan atau menahan dengan jari jari Anda terlalu lama Dapat menyebabkan efek distorsi pada layar y y Saat membersihkan produk dan komponennya cabut kabel daya dan gunakan kain lembut untuk membersihkan Jangan terlalu keras dapat menyebabkan goresan atau luntur Jangan menyemprotkan air atau menggunakan...

Page 7: ...ntung posisi layar pandang kiri kanan atas bawah Fenomena ini terjadi karena karakteristik panel Tidak berhubungan dengan kemampuan produk dan bukan merupakan kerusakan y y Gambar diam misal logo stasiun penyiaran menu layar OSD tampilan video game yang dibiarkan terlalu lama dapat menyebabkan kerusakan layar meninggalkan bekas gambar yang dikenal dengan gambar sisa Gambar sisa ini tidak dijamin d...

Page 8: ...RAKITAN Membuka Periksa box produk Anda untuk item item di dalamnya Jika ada aksesoris yang hilang hubungi penyalur lokal dimana Anda membeli produk ini Ilustrasi pada panduan ini mungkin sedikit berbeda dengan item dan produk Anda yang sebenarnya y Jangan menggunakan item bajakan untuk memastikan keselamatan dan masa guna produk y Segala kerusakan dan kecelakaan yang diakibatkan dari item bajakan...

Page 9: ...enyangga 4EA P5 x 25 4EA M4 x 14 Hanya LN515 Lihat h 12 Sekrup Rak Penyangga 3EA M4 x 8 Hanya LN515 Lihat h 16 Sekrup Untuk Merakit di Meja 1EA Lihat h 13 Pelat Dinding Hanya LN515 Lihat h 16 Sekrup penyangga dinding 3EA P5 x 69 5 Hanya LN515 Lihat h 16 Penahan penyangga dinding 3EA Hanya LN515 Lihat h 17 Badan Penyangga Dudukan Penyangga Hanya LN510 LN511 LN512 LN513 Lihat h 12 Badan Penyangga Du...

Page 10: ...r Speakers Sensor Remote Kontrol Indikator Daya Mencari program program yang telah Anda simpan Mengatur tingkat suara volume Memilih tampilan pilihan menu atau mengkonfirmasi suatu masukan Mengakses ke menu utama menyimpan masukan Anda atau keluar dari menu Mengganti sumber masukan Menghidupkan atau mematikan daya ...

Page 11: ...abut kabel daya dan semua kabel y Saat memegang TV posisikan layar membelakangi Anda untuk mencegah kerusakan y Pegang bingkai atas dan bawah TV dengan erat Pastikan tidak menyentuh bagian transparan atau area speaker y Saat memindahkan TV ukuran besar harus dilakukan setidaknya oleh 2 orang y Saat memindahkan TV dengan tangan pegang TV seperti ilustrasi berikut y Saat memindahkan TV jangan digunc...

Page 12: ...KITAN Merakit TV Gambar yang ditunjukan dapat berbeda dari TV Anda Memasang Dudukan 2 2 3 3 4 1 1 Badan Penyangga Alas Dudukan Badan Penyangga Alas Dudukan P5 x 25 3EA P5 x 25 4EA M4 x 14 4EA M4 x 14 4EA LN510 LN511 LN512 LN513 LN515 ...

Page 13: ...rup kendur langkah kebalikan saat memasangnya CATATAN Memasang TV pada Meja 1 Angkat dan atur TV ke posisi yang sesuai pada meja Beri jarak 10 cm minimal dari dinding untuk ventilasi yang baik 10 cm 10 cm 10 cm 10 cm 2 Hubungkan kabel daya pada colokan dinding y Jangan letakkan TV dekat atau pada sumber panas dapat menyebabkan kebakaran atau kerusakan yang lain PERHATIAN Kencangkan TV pada meja ag...

Page 14: ...dera yg terjadi khusus nya pada anak anak dapat dihindari dengan langkah pencegahan sebagai berikut Menggunakan kabinet atau dudukan yang sesuai dengan rekomendasi produsen televisi Hanya menggunakan furnitur yang dapat dengan aman menahan televisi Pastikan televisi tidak berada pada posisi meng gantung di tepi furnitur penyangga dudukan Tidak meletakkan televisi pada furnitur yang tinggi misal ny...

Page 15: ... terlebih dahulu sebelum me mindahkan atau memasang TV Jika tidak dapat terjadi kejutan listrik y Jika Anda memasang TV pada langit langit atau dinding miring dapat terjatuh dan melukai Gunakan braket penyangga resmi LG dan hubungi penyalur lokal atau orang yang berpengalaman profesional y Jangan memasang sekrup terlalu kencang dapat menyebabkan kerusakan pada TV dan tidak digaransi y Gunakan sekr...

Page 16: ...ngkan dengan benar 4 5 M4 x 8 1EA Memasang rak penyangga Gambar yang ditunjukkan mungkin berbeda dari TV Anda YAnda dapat menggunakan rak penyangga dengan menempatkan STB Set top box 2 3 1 LN515 M4 x 8 2EA Dudukan penyangga P5 x 69 5 3EA Pelat Dinding Badan Penyangga 350mm 150mm Rak Penyangga STB Set top box Dimensi STB L x T 350mm x 150mm Berat STB 2 5kg Berat maksimal yang didukung 3 5kg CATATAN...

Page 17: ...tunjuk pasang produk sehingga setiap lokasi terpaku bisa menahan beban tarikan luar 70 kgf 686 N dan beban geser 100 kgf 980 N atau diatasnya Gunakan bor Ø8 mm dan palu untuk beton dampak bor 1 2 4 3 Penahan penyangga dinding 6 5 Sekrup penyangga dinding 1 Ø8 mm untuk melubangi lokasi penahan ketebalannya antara 80 mm 100 mm 2 3 Saat memasukan penahan gunakan palu 4 dengan menyesuaikanya pada loka...

Page 18: ... Kabel Merapikan Kabel Kabel Gunakan Pengikat Kabel untuk merapikan dan memposisikan kabel bersama sama y Jangan memindahkan TV dengan memegang pengikat kabel dapat menyebakan pengikat kabel patah luka luka dan kerusakan TV dapat terjadi PERHATIAN ...

Page 19: ... y Jika Anda merekam program TV pada perekam DVD atau VCR pastikan untuk menghubungkan kabel sinyal input ke TV melalui perekam DVD atau VCR Untuk informasi lebih lanjut tentang rekaman lihat manual yang disediakan oleh perangkat yang terhubung y Ikuti petunjuk operasi yang disediakan pada perangkat eksternal tersebut y Jika mennghubungkan perangkat permainan ke TV gunakan kabel yang disediakan ol...

Page 20: ... TV Menghubungkan perangkat eksternal dan TV dengan kabel komponen seperti yang ditunjukkan pada gambar berikut y Disarankan untuk menggunakan TV dengan menghubungkan HDMI untuk kualitas gambar terbaik y Gunakan kabel HDMI kecepatan tinggi terbaru dengan fungsi CEC Customer Electronics Control y Kabel HDMI dengan kecepatan tinggi telah diuji untuk membawa sinyal HD hingga1080p dan lebih tinggi y M...

Page 21: ...sinyal audio dan video analog dari perangkat eksternal ke TV Hubungkan perangkat eksternal dan TV menggunakan kabel Komposit seperti terlihat pada ilustrasi berikut KUNING PUTIH MERAH KUNING PUTIH MERAH Menghubungkan USB Menghubungkan perangkat USB seperti USB flash memory hard drive eksternal atau USB card reader ke TV dan mengakses menu Smart Share untuk menggunakan file multimedia ...

Page 22: ...aker y y Jika Anda menggukan perangkat Auido Eksternal opsional bukan built in speaker Atur speaker TV ke fitur nonaktif Menghubungkan Stereo Eksternal Gunakan untuk menghubungkan ke amplifier eksternal amplifier atau surround sistem suara surround AVIN2 AUDIO OUT L R AUDIO IN Tidak disediakan Stereo Eksternal CATATAN ...

Page 23: ...a EXIT Menghilangkan semua tampilan pada layar dan kembali ke tontonan TV 1 Tombol TELETEXT Tombol ini berfungsi untuk menggunakan teletext Tombol Kontrol Menu Kontrol USB 2 Tombol Warna Mengakses fungsi khusus pada beberapa menu Merah Hijau Kuning Biru 1 4 5 6 7 8 9 LIST Q MENU SETTINGS EXIT PICTURE SOUND INDEX REVEAL UPDATE HOLD Q VIEW 0 FAV MUTE 2 3 INPUT TIME TEXT TV P 2 1 Penjelasan pada buku...

Page 24: ... berubah ke kondisi standby Mengatur Program Pengaturan Program Otomatis Gunakan ini untuk pencarian otomatis dan menyimpan semua program yang tersedia 1 SETTINGS dan tombol Navigasi untuk bergulir ke PENGATURAN dan tekan OK 2 Pencarian Program Otomatis dan tekan OK 3 Mulai dan pilih Mulai untuk memulai pencarian otomatis TV akan mencari dan menyimpan program yang tersedia secara otomatis 4 Untuk ...

Page 25: ...K untuk menyimpan 6 ꕣ BACK Pencarian Program Manual Pencarian Program Manual memungkinkan Anda mencari dan mengatur program sesuai keinginan 1 SETTINGS dan tombol Navigasi untuk bergulir ke PENGATURAN 2 Tekan tombol navigasi untuk memilih Pencarian Program Manual 3 Menyimpan 4 atau tombol angka untuk memilih nomor program yang Anda inginkan 5 untuk bergulir ke Sistem 6 Sistem TV 7 Band 8 V UHF ata...

Page 26: ...i ke atas Tombol kuning Berpindah Program Tekan tombol kuning lagi untuk menyelesaikan fungsi ini Tombol biru Memilih jumlah program yang akan dilewati Tekan tombol biru lagi untuk menyelesaikan melewati program 4 ꕣ BACK Memilih program pada daftar program 1 LIST tuntuk mengakses daftar program 2 yang diinginkan dan tekan OK 3 LIST y y Program itu telah dibentuk untuk dapat dilewati oleh program o...

Page 27: ...eda dari TV Anda OK Move INPUT TV AV1 AV2 Component HDMI1 HDMI2 Move OK Sumber masukan Keterangan TV Menonton TV melalui siaran udara dan kabel AV Menonton video dari VCR atau perangkat eksternal lainnya Component HDMI 14 9 Anda dapat menikmati tampilan TV dengan format 14 9 atau program umum dengan rasio 14 9 Tampilan ini mirip dengan tampilan rasio 4 3 dengan pergeseran atas bawah CATATAN Tekan ...

Page 28: ...si dibawah USB 2 0 dapat digunakan tapi kemungkinan tidak dapat bekerja dengan baik untuk Daftar Film y y Maksimal 999 folder atau file dapat dideteksi dalam satu folder y y Jika terdapat terlalu banyak folder atau file dalam satu folder perangkat kemungkinan tidak dapat mengaksesnya dengan baik y y Untuk USB HDDs ekternal direkomendasikan menggunakan perangkat dengan arus voltase kurang dari 5 V ...

Page 29: ...yer3 32 kHz 44 1 kHz 48 kHz y y Sampling rate MPEG2 Layer3 16 kHz 22 05 kHz 24 kHz y y Sampling rate MPEG2 5 Layer3 8 kHz 11 025 kHz 12 kHz Film DAT MPG MPEG VOB AVI DIVX MP4 MKV TS TRP TP ASF WMV FLV Movie Film mpg mpeg dat ts trp tp vob mp4 mov mkv divx avi asf wmv flv avi motion jpeg mp4 motion jpeg mkv motion jpeg supporting file Format Video DivX3 11 DivX4 12 DivX5 x DivX6 Xvid1 00 Xvid1 01 X...

Page 30: ...y y File yang tidak didukung hanya ditampilkan dengan gambar ikon y y File yang tidak normal ditampilkan dalam bentuk bitmap 6 ꔊ 2 13 ꔋ ꔡ ꘩ Option Slide show BGM Hide Pilihan Keterangan Slideshow Menjalankan atau menghentikantayangan slide dari foto yang dipilih Jika tidak ada foto yang dipilih semua foto yang dipilih semua foto pada folder akan ditampilkan berurutan Untuk mengatur kecepatan tampi...

Page 31: ...file musik sebelumnya akan diputar Jika Anda menekan tombol file musik berikutnya akan diputar EXIT Jika Anda menekan tombol EXIT hanya musik akan berhenti dan tidak kembali ke tayangan normal TV ꕌ atau ꕍ Saat menggunakan tombol ꕌatauꕍ saat pemutaran posisi kursor akan terlihat pada layar Pilihan Q MENU untuk daftar musik 1 Tekan Q MENU Akan muncul window pop up 2 Tekan tombol Navigasi untuk memil...

Page 32: ...nt will appear on the status bar In some files this function may not work properly Saran untuk memutar file video y y y y y y y y y y y y y y y Beberapa sub judul yang dibuat pengguna kemungkinan tidak bekerja dengan baik Beberapa karakter khusus tidak didukung pada sub judul Tempelan HTML tidak didukung pada sub judul Sub judul dalam bahasa selain bahasa yang yang didukung tidak dapat ditampilkan...

Page 33: ...igasi untuk memilih pengaturan yang sesuai Lihat h 36 Saat memilih Atur audio 1 Tekan tombol Navigasi untuk memilih tampilan Mode Suara Volume Otomatis Keseimbangan 2 Tekan tombol Navigasi untuk memilih pengaturan yang sesuai Lihat h 38 y y Kami tidak menjamin kelancaran pemutaran pada profile encode tingkatatau lebih tinggi H 264 AVC y y Audio codec DTS tidak didukung y y File film dengan ukuran ...

Page 34: ... digit kode menonaktifkan DivX dari perangkat di www divx com vod CATATAN y y Sekali menonaktifkan dijalankan anda harus mendaftarkan perangkat Anda kembali untuk melihat konten DivX VOD 1 SETTINGS untuk mengakses menu utama 2 USB dan tekan OK 3 DivX R VOD dan tekan OK 4 Tekan tombol Navigasi untuk memilih Menonaktifkan dan tekan OK 5 Yes untuk mengkonfirmasi 6 EXIT Untuk kembali ke menu sebelumny...

Page 35: ...i atau membuka program dan pemograman MASUKAN Melihat sumber masukan USB Menampilkan foto dan memutar musik film yang tersimpan di USB Anda Menyesuaikan Pengaturan Mengatur PENGATURAN 1 SETTINGS dan tombol Navigasi untuk memilih PENGATURAN 2 atau pilihan yang Anda inginkan dan tekan OK 3 tekan ꕣ BACK y yGambar yang ditunjukkan dapat berbeda dari TV Anda OK Move SETUP Auto Tuning Manual Tuning Prog...

Page 36: ...kan dalam 3 detik y y Saat anda memilih Layar Mati layar akan mati dalam waktu 3 detik and y y Jika Anda menyesuaikan Hemat Energi Maximum Fitur lampu latar tidak bekerja Pengaturan Keterangan Picture Mode Memilih salah satu gambar yang telah ditetapkan atau menyesuaikan pilihan di setiap mode untuk kualitas layar TV terbaik Anda juga dapat menyesuaikan pilihan disetiap mode Mode Vivid Menyesuaika...

Page 37: ...maksimalkan penggunaan warna untuk meningkatkan kualitas warna Standar Menampilkan pengaturan warna standar Lebar Meningkatkan jumlah jumlah warna yang digunakan Edge Enhancer Menampilkan video lebih jelas dan alami Pengaturan Keterangan Lampu Latar Mengatur kecerahan layar dengan mengatur lampu latar LCD Jika Anda mengurangi tingkat kecerahanlayar sedikit lebih gelap dan penggunaan daya akan berk...

Page 38: ...nggi Bass Mengontrol suara keluaran lebihlembutJikaAndamenaikkan bass akan meningkatkan keluaran suara ke rentang frekuensi lebih rendah Reset Mengembalikanpengaturanmode suara ke awal pengaturan pabrik TV Speaker Mematikan speaker internal dari TV saat menggunakan sistem stereo Hi Fi eksternal Pengaturan AUDIO 1 SETTINGS dan tombol Navigasi untuk memilih AUDIO 2 peraturan atau pilihan yang Anda i...

Page 39: ...loudspeaker kiri dan kanan Pilihlah keluaran suara sebagai berikut L R Sinyal audio dari input audio L dikirimkan ke loudspeaker sebelah kiri dan sinyal audio dari input audio R dikirimkan ke loudspeaker sebelah kanan L L Sinyal audio dari input audio L dikirimkan ke loudspeaker sebelah kiri dan kanan R R Sinyal audio dari input audio R dikirimkan ke loudspeaker sebelah kiri dan kanan Pengaturan W...

Page 40: ...AN 1 ekan SETTINGS dan tombol Navigasi untuk memilih PILIHAN 2 untuk pengaturan atau pilihan yang Anda inginkan dan tekan OK 3 Jika ingin kembali ke menu sebelumnya tekan ꕣ BACK y y Gambar yang ditampilkan dapat berbeda dari TV Anda OK Move OPTION Language Language Input Label Initial Setting Home Use Move OK Pengaturan Audio yang tersedia dijelaskan sebagai berikut Pengaturan Keterangan Language ...

Page 41: ...n dapat dipilih dengan menekan tombol dengan warna yang sama Memilih Halaman 1 INDEX untuk memilih halaman index 2 diberi kode warna di bagian bawah dengan warna yang sama 3 memilih halaman dengan memasukkan 3 digit angka menggunakan tombol ANGKA pada mode 4 Tombol P dapat digunakan untuk memilih nomor halaman sebelum atau sesudahnya Fungsi Khusus Teletext Index Untuk memilih halaman index Waktu S...

Page 42: ...IAN PERAWATAN Membersihkan TV Anda Perbaharui dan bersihkan TV Anda secara teratur untuk tampilan terbaik dan memperpanjang usia y y Matikan daya cabut kabel daya dan semua kabel terlebih dahulu sebelum membersihkan Jika TV tidak digunakan untuk waktu yang lama cabut kabel daya dari terminal dinding untuk mencegah kemungkinan kerusakan akibat petir atau atau kenaikan tegangan Masalah Penyelesaian ...

Page 43: ...N513 39LN513 42LN513 32LN5130 TI 32LN513Y TI 39LN5130 TI 39LN513Y TI 42LN5130 TI 42LN513Y TI 738 0 x 497 0 x 207 0 894 0 x 587 0 x 236 0 968 0 x 629 0 x 236 0 738 0 x 449 0 x 79 0 894 0 x 537 0 x 79 0 968 0 x 579 0 x 79 0 7 0 9 7 10 7 6 4 8 6 9 6 AC 100 240 V 50 60 Hz AC 100 240 V 50 60 Hz AC 100 240 V 50 60 Hz 32LN515 32LN5150 TA 32LN5150 TL 32LN515Y TA 32LN515Y TL 738 0 x 497 0 x 212 0 738 0 x 4...

Page 44: ...F UHF 2 hingga 78 CATV 01 hingga 71 PAL SECAM B G D K PAL I NTSC M BG VHF UHF 1 hingga 69 CATV 01 hingga 47 I VHF UHF 1 hingga 69 CATV 01 hingga 47 DK VHF UHF 1 hingga 69 CATV 01 hingga 47 M VHF UHF 2 hingga 78 CATV 01 hingga 71 TV Digital TV Analog New Zealand Singapore DVB T PAL SECAM B G D K PAL I UHF 21 to 69 Australia DVB T VHF 06 to 12 UHF 27 to 69 Indonesia Israel Myanmar Sri Lanka DVB T UH...

Page 45: ...25 50 1280x720 37 5 44 96 45 50 59 94 60 1920x1080 33 72 33 75 28 125 26 97 27 33 716 33 75 56 25 67 43 67 5 59 94 60 50 23 97 24 29 976 30 00 50 59 94 60 Informasi untuk Terminal Input Komponen Terminal komponen PadaTV Y PB PR Terminal output video pada DVD player Y PB PR Y B Y R Y Y Cb Cr Y Pb Pr Komponen Sinyal 480i 576i O 480p 576p O 720p 1080i O 1080p O Hanya 50 Hz 60 Hz ...

Page 46: ...kat resmi DivX Certified untuk memutar video DivX Kunjungi divx com untuk informasi rinci dan perangkat lunak untuk mengkonversi file Anda ke video DivX DIVX VIDEO ON DEMAND Perangkat dengan DivX Certified harus didaftarkan untuk dapat memutar film DivX Video on Demand VOD yang dibeli Untuk kode pendaftaran terletak di bagian DivX VOD pada menu pengaturan perangkat ini kunjungi divx com untuk info...

Page 47: ......

Page 48: ...asan Industri MM2100 Blok G Cikarang Barat Bekasi Jawa Barat 17520 INDONESIA Catat nomor model dan nomor seri TV Mengacu pada label di penutup belakang dan Informasikan pada dealer Anda apabila memerlukan jasa pelayanan MODEL SERIAL ...

Page 49: ... carefully before operating your set and retain it for future reference LG LED TV applies LCD screen with LED backlights www lg com 32LN510 39LN510 42LN510 32LN511 39LN511 42LN511 32LN512 32LN515 39LN512 42LN512 32LN513 39LN513 42LN513 ENG ENGLISH ...

Page 50: ...nection 22 Audio System connection 22 External Stereo Connection 23 REMOTE CONTROL 24 WATCHING TV 24 Turning the TV on for the first time 24 Watching TV 24 Managing programmes 24 Automatically setting up programme 25 Manually setting up programme 26 Editing your programme list 26 Selecting a programme on the programme list 26 Using additional options 26 Adjusting aspect ratio 27 Using the input li...

Page 51: ...t with Grounded earth pin Except for devices which are not grounded on earth Otherwise possibility you may be electrocuted or injured y y Insert power cable plug completely into wall socket otherwise if not secured completely into socket fire ignition may break out y y Ensure the power cord does not come into contact with hot objects such as a heater This may cause a fire or an electric shock haza...

Page 52: ...drop metallic objects such as coins hair pins chopsticks or wire into the product or inflammable objects such as paper and matches Children must pay particular attention Electrical shock fire or injury can occur If a foreign object is dropped into the product unplug the power cord and contact the service centre y y Do not spray water on the product or scrub with an inflammable substance thinner or...

Page 53: ...refully so as not to drop y y Only use the attachments accessories specified by the manufacturer y y When installing the antenna consult with a qualified service technician If not installed by a qualified technician this may create a fire hazard or an electric shock hazard y y We recommend that you maintain a distance of at least 2 to 7 times the diagonal screen size when watching TV If you watch ...

Page 54: ...y upon the panel with a hand or sharp object such as nail pencil or pen or make a scratch on it as it may cause damage to screen y y Avoid touching the screen or holding your finger s against it for long periods of time Doing so may produce some temporary or permanent distortion damage to screen y y When cleaning the product and its components unplug the power first and wipe it with a soft cloth A...

Page 55: ...ur viewing position left right top down This phenomenon occurs due to the characteristic of the panel It is not related with the product performance and it is not malfunction y y Displaying a still image e g broadcasting channel logo on screen menu scene from a video game for a prolonged time may cause damage to the screen resulting in retention of the image which is known as image sticking The wa...

Page 56: ...3 Connect an external device to the TV set ASSEMBLING AND PREPARING Unpacking Check your product box for the following items If there are any missing accessories contact the local dealer where you purchased your product The illustrations in this manual may differ from the actual product and item CAUTION y y Do not use any unapproved items to ensure the safety and product life span y y Any damages ...

Page 57: ...0 LN511 LN512 LN513 See p 12 Stand Screws 4EA P5 x 25 4EA M4 x 14 Only LN515 See p 12 Stand Rack Screws 3EA M4 x 8 Only LN515 See p 16 Desk mount Screw 1EA See p 13 Wall Plate Only LN515 See p 16 Wall mount screws 3EA P5 x 69 5 Only LN515 See p 16 Wall mount anchors 3EA Only LN515 See p 17 Stand Body Stand Base Only LN510 LN511 LN512 LN513 See p 12 Stand Body Stand Base Only LN515 See p 12 16 ...

Page 58: ...saved programmes H Adjusts the volume level H Selects the highlighted menu option or confirms an input S Accesses the main menu or saves your input and exits the menus H Changes the input source Turns the power on or off SETTINGS INPUT OK buttons Screen Speakers Remote control sensor Power indicator ...

Page 59: ...nd all cables y y When holding the TV the screen should face away from you to avoid damage y y Hold the top and bottom of the TV frame firmly Make sure not to hold the transparent part speaker or speaker grill area y y When transporting a large TV there should be at least 2 people y y When transporting the TV by hand hold the TV as shown in the following illustration y y When transporting the TV d...

Page 60: ...G AND PREPARING Setting up the TV Image shown may differ from your TV Attaching the stand 2 2 3 3 4 1 1 Stand Body Stand Base Stand Body Stand Base P5 x 25 3EA P5 x 25 4EA M4 x 14 4EA M4 x 14 4EA LN510 LN511 LN512 LN513 LN515 ...

Page 61: ...by performing the stand attachment in reverse Mounting on a table 1 Lift and tilt the TV into its upright position on a table Leave a 10 cm minimum space from the wall for proper ventilation 10 cm 10 cm 10 cm 10 cm 2 Connect the power cord to a wall outlet CAUTION y y Do not place the TV near or on sources of heat as this may result in fire or other damage Securing the TV to a table Fix the TV to ...

Page 62: ...be potentially hazardous due to falling Many injuries particularly to children can be avoided by taking simple precautions such as Using cabinets or stands recommended by the manufacturer of the television Only using furniture that can safely support the television Ensuring the television is not overhanging the edge of the supporting furniture Not placing the television on tall furniture for examp...

Page 63: ...0B A B CAUTION y y Disconnect the power first and then move or install the TV Otherwise electric shock may occur y y If you install the TV on a ceiling or slanted wall it may fall and result in severe injury Use an authorized LG wall mount and contact the local dealer or qualified personnel y y Do not over tighten the screws as this may cause damage to the TV and void your warranty y y Use the scr...

Page 64: ...wise screw may be damaged and not tighten correctly 4 5 M4 x 8 1EA Attaching the shelf stand Image shown may differ from your TV You can use the shelf stand by putting STB Set top box 2 3 1 LN515 M4 x 8 2EA Stand Base P5 x 69 5 3EA Wall Plate Stand Body 350mm 150mm Shelf Stand STB Set top box Shelf Stand conditions of use STB Dimensions W x D 350mm x 150mm STB Weight 2 5kg Maximum supported weight...

Page 65: ...hat each fixated location can withstand the pull out load of 70 kgf 686 N and shear load of 100 kgf 980 N or above Use the Ø8 mm drill bit for concrete and hammer Impact drill 1 2 4 3 Wall mount anchor 6 5 Wall mount screw 1 Use a drill bit Ø8 mm to drill a hole for the anchor location within a depth of 80 mm 100 mm 2 Clean the drilled hole 3 Insert the sealed anchor to the hole When inserting the...

Page 66: ...REPARING Tidying cables Use Cable Holder to neatly secure and position cables together Cable Holder CAUTION y y Do not move the TV by holding the cable holder as the cable holders may break and injuries and damage to the TV may occur ...

Page 67: ...t y y If you record a TV programme on a DVD recorder or VCR make sure to connect the TV signal input cable to the TV through a DVD recorder or VCR For more information of recording refer to the manual provided with the connected device y y Refer to the external equipment s manual for operating instructions y y If you connect a gaming device to the TV use the cable supplied with the gaming device A...

Page 68: ...the latest High Speed HDMI Cable y y High Speed HDMI Cables are tested to carry an HD signal up to 1080p y y Supported HDMI Audio format Dolby Digital Up to 48kHz PCM Up to 192 kHz 32k 44 1k 48k 8 8k 96k 176k 192k DTS Not Supported Component connection Transmits analogue video and audio signals from an external device to the TV Connect the external device and the TV with a component cable as shown...

Page 69: ...d the TV with the composite cable as shown AVIN2 AUDIO OUT VIDEO MONO AUDIO L R YELLOW WHITE RED RED YELLOW WHITE Not Provided DVD Blu Ray HD Cable Box VCR USB connection Connect a USB storage device such as a USB flash memory external hard drive or a USB memory card reader to the TV and access the USB menu to use various multimedia files USB IN USB Not Provided ...

Page 70: ...d of the built in speaker NOTE y y If you use an optional external audio device instead of the built in speaker set the TV speaker feature to off External Stereo Connection Use to connect to an external amplifier or surround sound system AVIN2 AUDIO OUT L R AUDIO IN Not Provided External Stereo ...

Page 71: ...TURE Changes the image mode SOUND Changes the sound mode INPUT Changes the input source Number buttons Enters numbers LIST Accesses the saved programme list Q VIEW Returns to the previously viewed programme FAV Accesses your favourite programme list I II Selects the sound output MUTE Mutes all sounds Adjusts the volume level P Scrolls through the saved programmes PAGE Moves to the previous or next...

Page 72: ...vironment select Home Use y y Store Demo is suitable for the retail environment y y If you select Store Demo any customized settings will switch back to the default settings of Store Demo in 5 minutes 4 When the basic settings are complete press the OK NOTE y y If you do not complete the Initial setting it will appear whenever the TV turns on y y Disconnect the power cord from the power outlet whe...

Page 73: ...ess the OK to store it 6 When you return to the previous menu press ꕣ BACK Manually setting up programme Manual Tuning lets you manually tune and arrange the stations in whatever order you desire 1 Press SETTINGS and the Navigation buttons to scroll to SETUP 2 Press the Navigation buttons to scroll to Manual Tuning 3 Press the Navigation buttons to scroll to Storage 4 Press the Navigation buttons ...

Page 74: ... the Programme edit menu This function enables you to skip the stored programmes 1 Press SETTINGS and the Navigation buttons to scroll to SETUP 2 Press the Navigation buttons to scroll to Programme Edit 3 Edit programmes using the following buttons Button Description Red button Deletes a programme Press the Red button twice The selected programme is deleted all the following programmes are shifted...

Page 75: ... 16 NOTE y y If you enlarge or reduce an image the image may be distorted Using the input list Selecting an input source 1 Press INPUT to access the input sources The connected device displays on each input source 2 Press the Navigation buttons or input button to scroll to one of the input sources and press OK y y Image shown may differ from your TV OK Move INPUT TV AV1 AV2 Component HDMI1 HDMI2 M...

Page 76: ...n the connected USB storage device is working When such device is suddenly separated or unplugged the stored files or the USB storage device may be damaged y y Please do not connect the USB storage device which was artificially manoeuvred on the PC The device may cause the product to malfunction or fail to be played Never forget to use only a USB storage device which has normal music files image f...

Page 77: ...tion 1 Moves to the upper level folder 2 Preview Displays the thumbnail folder name of the file in the selected folder 3 Current page Total pages 4 Total number of marked files 5 Contents under the folder focused on 1 6 Available buttons on the remote control Supported file format Type Supported file format Photo JPEG Baseline 64 x 64 to 8192 x 8192 Progressive 64 x 64 to 1024 x 768 y y You can pl...

Page 78: ...ected photo Mark All Selects all files Close Exits the Mark Mode NOTE y y Non supported files are displayed the preview image by icon only y y Abnormal files are displayed in the form of bitmap 6 The following options are available while viewing photos ꔊ 2 13 ꔋ ꔡ ꘩ Option Slide show BGM Hide Option Description Slideshow Starts or stops a slideshow with selected photos If there are no selected phot...

Page 79: ...When you press the button the pre vious music file will be played When you press the button the next music file will be played EXIT When you press the EXIT button only the music will be stopped and the player will not return to normal TV viewing ꕌ or ꕍ When using the ꕌorꕍ button during playback a cursor indicating the position can be played Q MENU options for music list 1 Press Q MENU A pop up win...

Page 80: ...n to normal TV viewing Skips to specific points in a file during playback The time of a specific point will appear on the status bar In some files this function may not work properly Tips for using playing video files y y Some user created subtitles may not work properly y y Some special characters are not supported in subtitles y y HTML tags are not supported in subtitles y y Subtitles in languag...

Page 81: ...ebrew Arabic Arab Parsi Krudish Unicode UTF 16 Vietnamese language NOTE y y Only 10 000 of sync blocks can be supported within the subtitle file y y When playing a video you can adjust the Picture Size by pressing Q MENU or accessing Aspect Ratio in the PICTURE menu When you select the Set video 1 Press the Navigation buttons to scroll to make appropriate adjustments See p 36 When you select the S...

Page 82: ...0x576 WxH pixels y y Frame rate under 30 frames sec 720x480 under 25 frames sec under 720x576 y y Video Codec MPEG 1 MPEG 2 MPEG 4 H 264 AVC DivX 3 11 DivX 4 12 DivX 5 x DivX 6 Xvid 1 00 Xvid 1 01 Xvid 1 02 Xvid 1 03 Xvid 1 10 beta1 Xvid 1 10 beta2 JPEG VC1 Sorenson H 263 H 264 DivX VOD Deregistration You should deregister your device with 8 digit DivX deregistration code from your device at www d...

Page 83: ... tings LOCK Locks or unlocks programmes and programmes INPUT Views the input sources with their labels USB Displays photo and play music movie content stored on your USB Customizing Settings SETUP Settings 1 Press SETTINGS and the Navigation buttons to scroll to SETUP 2 Press the Navigation buttons to scroll to the setting or option you want and press OK 3 When you return to the previous menu pres...

Page 84: ...y Saving is off Minimum Medium Maximum Selects the brightness level Screen off The screen turns off in 3 seconds NOTE y y When you select Screen Off the screen will be turned off in 3 seconds and Screen Off will start y y If you adjust Energy Saving Maximum Backlight feature will not work Setting Description Picture Mode Selects one of the preset image or customizes options in each mode for the be...

Page 85: ... operates only in 480i 576i 1080i 1080p 24Hz Resolution Colour Gamut Advanced Control Maximizes the utilization of colour to increase colour quality Standard Displays standard set of colours Wide Increase number of colours used Edge Enhancer Shows clearer and distinctive yet natural edges of the video Basic image options Setting Description Backlight Adjusts the brightness of the screen by control...

Page 86: ...requency range Bass Controls the softer sounds in the output When you turn up the bass it will increase the output to the lower frequency range Reset Resets the sound mode to the default setting TV Speaker Turns off the internal speaker of the TV when using an external Hi Fi system AUDIO Settings 1 Press SETTINGS and the Navigation buttons to scroll to AUDIO 2 Press the Navigation buttons to scrol...

Page 87: ... output sound for the left and right loudspeakers Select the sound output L R Audio signal from audio L input is sent to the left loudspeaker and audio signal from audio R input is sent to the right loudspeaker L L Audio signal from audio L input is sent to left and right loudspeakers R R Audio signal from audio R input is sent to left and right loudspeakers TIME Settings 1 Press SETTINGS and the ...

Page 88: ...ed programmes The programmes can be selected but the screen blank and the audio is muted Input Block Blocks the input sources OPTION Settings 1 Press SETTINGS and the Navigation buttons to scroll to OPTION 2 Press the Navigation buttons to scroll to the setting or option you want and press OK 3 When you return to the previous menu press ꕣ BACK y y Image shown may differ from your TV OK Move OPTION...

Page 89: ... wish to programme 3 Press the OK button The selected page is stored as the selected page number blinking once to confirm this From now on you can select this page with the same coloured button 4 The three other coloured buttons are programmed in this way Fastext The teletext pages are colour coded along the bottom of the screen and are selected by pressing the correspond ing coloured button Page ...

Page 90: ...esult in scratches and image distortions y y Do not use any chemicals as this may damage the product y y Do not spray liquid onto the surface If water enters the TV it may result in fire electric shock or malfunction Power cord Remove the accumulated dust or dirt on the power cord regularly TROUBLESHOOTING Problem Solution Cannot control the TV with the remote control y y Check the remote control ...

Page 91: ...8 6 9 6 Power requirement AC 100 240 V 50 60 Hz AC 100 240 V 50 60 Hz AC 100 240 V 50 60 Hz MODELS 32LN512 39LN512 42LN512 32LN5120 TC 32LN512Y TC 39LN5120 TC 39LN512Y TC 42LN5120 TC 42LN512Y TC Dimensions W x H x D With stand mm 738 0 x 497 0 x 207 0 894 0 x 587 0 x 236 0 968 0 x 629 0 x 236 0 Without stand mm 738 0 x 449 0 x 79 0 894 0 x 537 0 x 79 0 968 0 x 579 0 x 79 0 Weight With stand kg 7 0...

Page 92: ... 1 to 69 CATV 01 to 47 DK VHF UHF 1 to 69 CATV 01 to 47 M VHF UHF 2 to 78 CATV 01 to 71 Vietnam Malaysia Television System PAL SECAM B G D K PAL I NTSC M Programme Coverage BG VHF UHF 1 to 69 CATV 01 to 47 I VHF UHF 1 to 69 CATV 01 to 47 DK VHF UHF 1 to 69 CATV 01 to 47 M VHF UHF 2 to 78 CATV 01 to 71 Iran Algeria Tunisia Digital model Television System PAL SECAM B G D K PAL I NTSC M Programme Cov...

Page 93: ...0x720 37 5 44 96 45 50 59 94 60 1920x1080 33 72 33 75 28 125 26 97 27 33 716 33 75 56 25 67 43 67 5 59 94 60 50 23 97 24 29 976 30 00 50 59 94 60 Component port connecting information Component ports on the TV Y PB PR Video output ports on DVD player Y PB PR Y B Y R Y Y Cb Cr Y Pb Pr Signal Component 480i 576i O 480p 576p O 720p 1080i O 1080p O 50 Hz 60 Hz only ...

Page 94: ...This is an official DivX Certified device that plays DivX video Visit divx com for more information and software tools to convert your files into DivX video ABOUT DIVX VIDEO ON DEMAND This DivX Certified device must be registered in order to play purchased DivX Video on Demand VOD movies To obtain your registration code locate the DivX VOD section in your device setup menu Go to vod divx com for m...

Page 95: ......

Page 96: ...er when requiring any service MODEL SERIAL PT LG ELECTRONICS INDONESIA Kawasan Industri MM2100 Blok G Cikarang Barat Bekasi Jawa Barat 17520 INDONESIA TANDA PENDAFTARAN PETUNJUK PENGGUNAAN MANUAL DAN KARTU JAMINAN GARANSI PURNA JUAL DALAM BAHASAINDONESIABAGI PRODUK TELEMATIKA DAN ELEKTRONIKA NOMOR P XX LGXX XXXX XXX XXXXX XXXXX ...

Reviews: