background image

ENGLISH

7

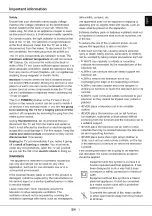
Mounting to the Wall

Attach an optional wall mount bracket at the rear of the TV carefully 
and install the wall mount bracket on a solid wall perpendicular to 
the floor. When you attach the TV to other building materials, please 
contact qualified personnel. LG recommends that wall mounting be 
performed by a qualified professional installer. We recommend the use 
of LG’s wall mount bracket. LG’s wall mount bracket is easy to move with 
cables connected. When you do not use LG’s wall mount bracket, please 
use a wall mount bracket where the device is adequately secured to the 
wall with enough space to allow connectivity to external devices. It is 
advised to connect all the cables before installing fixed wall mounts.

10 cm

10 cm

10 cm

10 cm

10 cm

(Depending on model)


Remove the stand before installing the TV on a wall mount 
by performing the stand attachment in reverse. 


For more information of screws and wall mount bracket, 
refer to the Separate purchase.


If you intend to mount the product to a wall, attach VESA 
standard mounting interface (optional parts) to the back 
of the product. When you install the set to use the wall 
mounting bracket (optional parts), fix it carefully so as 
not to drop.


When mounting a TV on the wall, make sure not to install 
the TV by hanging the power and signal cables on the 
back of the TV.


Do not install this product on a wall if it could be exposed 
to oil or oil mist. This may damage the product and cause 
it to fall.

(Depending on model)


Do not use a sharp object when you detached the cable 
cover. This could damage the cable or the cabinet. It may 
also cause personal harm. (Depending on model)

75UM76*

49/55SM86*

55/65/75/86SM90*


When installing the wall mounting bracket, it is recommended to 
cover the stand hole using tape, in order to prevent the influx of 
dust and insects. (Depending on model) 

Stand hole

Summary of Contents for 32LM6300PCB.AHK

Page 1: ...ase read this manual carefully before operating your set and retain it for future reference www lg com Copyright 2019 LG Electronics Inc All Rights Reserved LG LED TV applies LCD screen with LED backlights Safety and Reference ...

Page 2: ...ion Do not block or cover the product with cloth or other materials while unit is plugged in Take care not to touch the ventilation openings When watching theTV for a long period the ventilation openings may become hot Protect the power cord from physical or mechanical abuse such as being twisted kinked pinched closed in a door or walked upon Pay particular attention to plugs wall outlets and the ...

Page 3: ...es approved by LG Electronics Otherwise this may result in fire electric shock malfunction or product damage Never disassemble the AC adapter or power cord This may result in fire or electric shock Handle the adapter carefully to avoid dropping or striking it An impact could damage the adapter To reduce the risk of fire or electrical shock do not touch theTV with wet hands If the power cord prongs...

Page 4: ...or an optimal connection HDMI cables and USB devices should have bezels less than 10 mm thick and 18 mm width Use an extension cable that supports USB 2 0 if the USB cable or USB memory stick does not fit into yourTV s USB port A B A B A 10 mm B 18 mm Use a certified cable with the HDMI logo attached If you do not use a certified HDMI cable the screen may not display or a connection error may occu...

Page 5: ...portation regardless of its type and size It is recommended to move theTV in the box or packing material that theTV originally came in Before moving or lifting theTV disconnect the power cord and all cables When holding theTV the screen should face away from you to avoid damage Hold the top and bottom of theTV frame firmly Make sure not to hold the transparent part speaker or speaker grill area Wh...

Page 6: ...duct life span Any damage or injuries caused by using unapproved items are not covered by the warranty Make sure that the screws are inserted correctly and fastened securely If they are not fastened securely enough theTV may tilt forward after being installed Do not use too much force and over tighten the screws otherwise screw may be damaged and not tighten correctly Securing TV to the Wall Depen...

Page 7: ...on a wall mount by performing the stand attachment in reverse For more information of screws and wall mount bracket refer to the Separate purchase If you intend to mount the product to a wall attachVESA standard mounting interface optional parts to the back of the product When you install the set to use the wall mounting bracket optional parts fix it carefully so as not to drop When mounting aTV o...

Page 8: ... However if the device doesn t support it it may not work properly In that case change theTV s HDMI ULTRA HD Deep Colour setting to Off USB Some USB Hubs may not work If a USB device connected using a USB Hub is not detected connect it to the USB port on theTV directly External Devices Available external devices are Blu ray player HD receivers DVD players VCRs audio systems USB storage devices PC ...

Page 9: ...pps will close and any recording in progress will stop 2 You can access and adjust the menu by pressing the button when TV is on 3 You can use the function when you access menu control Adjusting the menu When theTV is turned on press the button one time You can adjust the Menu items using the button Turns the power off Changes the input source Adjusts the volume level Scrolls through the saved pro...

Page 10: ...s INPUT Changes the input source Number buttons Enters numbers Accesses the QUICK HELP Accesses the saved programmes list More Actions Displays more remote control functions Edits QUICK ACCESS QUICK ACCESS is a feature that allows you to enter a specified app or LiveTV directly by pressing and holding the number buttons Adjusts the volume level Audio descriptions function will be enabled Depending...

Page 11: ...K ACCESS is a feature that allows you to enter a specified app or Live TV directly by pressing and holding the number buttons Adjusts the volume level MUTE Mutes all sounds MUTE Accesses the Accessibility menu Scrolls through the saved programmes Voice recognition Network connection is required to use the voice recognition function Once the voice display bar is activated on the TV screen press and...

Page 12: ... the product and try again Check if there is any obstacle between the product and the remote control Check if the batteries are still working and properly installed to to No image display and no sound is produced Check if the product is turned on Check if the power cord is connected to a wall outlet Check if there is a problem in the wall outlet by connecting other products TheTV turns off suddenl...

Page 13: ...h supplies a large amount of current to operate a product It varies depending on the product This generated sound does not affect the performance and reliability of the product When cleaning the product be careful not to allow any liquid or foreign objects to enter the gap between the upper left or right side of the panel and the guide panel Depending on model Make sure to wring any excess water o...

Page 14: ...e 75 Ω Wireless module LGSBWAC92 specifications Wireless LAN IEEE 802 11a b g n ac Frequency Range Output Power Max 2400 to 2483 5 MHz 5150 to 5350 MHz 5725 to 5850 MHz 18 dBm 18 dBm 12 dBm Bluetooth Frequency Range Output Power Max 2400 to 2483 5 MHz 8 dBm As band channels can vary per country the user cannot change or adjust the operating frequency This product is configured for the regional fre...

Page 15: ...ausing serious personal injury or death Many injuries particularly to children can be avoided by taking simple precautions such as Using cabinets or stands recommended by the manufacturer of the television set Only using furniture that can safely support the television set Ensuring the television set is not overhanging the edge of the supporting furniture Not placing the television set on tall fur...

Page 16: ...The model and serial number of the product are located on the back and on one side of the product Record them below in case you ever need service Model Serial No ...

Reviews: