- 11 -
1) Initial switch(SW1401) is located in neutrality.
2) Reduce by forth~fifth of H-SIZE and then check the
things rolled the screen occurs.If not, you locate the
switch in neutrality.
If the things rolled A(the left) occurs, move SW1401 to
the right.
If the things rolled B(the right) occurs, move SW1401 to
the left.
(6) Re-adjust 60Hz H,V SIZE and POSITION after adjusting
HRS.
(7) 60Hz PINCUSION adjustment
: Adjust PIN-PHASE, PIN-AMP, AFC-BOW, AFC-ANGLE,
UP-CPIN, LO-CPIN to be straight without pin cushion
distortion and trapezoid distortion in “1.Raster,Cent,H/V
Size(60Hz)” adjustment mode.
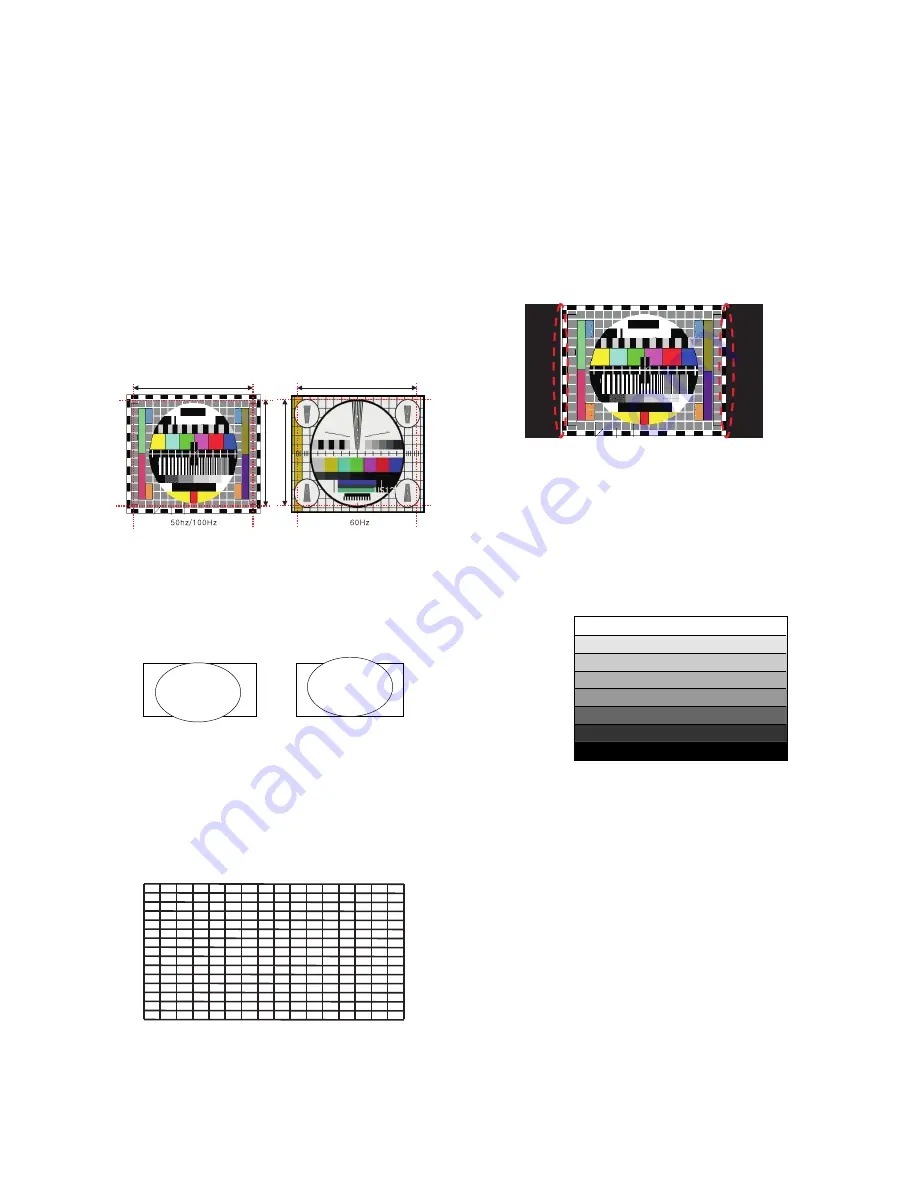
(8) Vertical, horizontal deflection adjustment of 50, 100Hz
1) Select “2.V-SIZE” in adjustment mode.
2) As shown above <Fig. 12>(a), adjust large circle with the
dotted line of screen, though to do width dotted line size.
3) To be up and down symmetry, adjust the larger one than
outer angle of the screen with 5.LO-VLIN or 6.UP-VLIN.
(9) Raster H-center & Horizontal deflection adjustment
1) Select 3. H Position in the adjustment mode and adjust
until left and right screen are symmetrically equal.
2) With“4. H-SIZE”, adjust the screen size as shown above
dotted line rate of <Fig . 12>(a).
(10) 50, 100Hz PINCUSION adjustment
* This adjustment must be operated after changing signal
to PAL B/G or Multi signal.
1) Adjust “2.Raster, Cen, H/V Size(100Hz)” by pressing
“ADJ” button on the SVC remote control.
2) Adjust “3.Pin-Cushion(100Hz)” by pressing “ADJ” button
on the SVC remote control.
3) Adjust “4.Raster,Cent,H/V Size(50Hz)” by pressing
“ADJ” button on the SVC remote control.
4) Adjust “5.Pin-Cushion(50Hz)” by pressing “ADJ” button
on the SVC remote control.
10-2. 4:3 deflection adjustment(only 50Hz)
1) Adjust “6. 4:3 Pin-Cushion(50Hz)” by pressing “ADJ”
button on the SVC remote control.
2) Adjust the Pin-cushion data to be vertical line a left/right
line of 4:3 screen (ARC).
11. Component MST3000 Offset/Gain
Adjustment
11-1. Test Equipment
801GF(802B, 802F, 802R) Pattern Generator or MASTER
Pattern Generator
11-2. Preliminary Steps
(1) Turn the power supply on.
(2) Enter the Component 1 mode.
(3) Receive the “1080I” Format, “Hoz30Bar” Pattern of the
Video Pattern Generator.
(4) Certainly, adjust the output signal in state of 700mVp-p
±10mV.
11-3. ADC Offset Adjustment
(1) After receiving a signal press the ADJ Key on the SVC
Remote Control repeatedly to access the Adjustment
mode.
A
B
Actual screen size
(a)
(b)
<Fig . 12>
<Fig . 14>
<Fig . 13>
L-LIN
U-LIN
100% White
100% Yellow
100% Cyan
30% Gray
30% Gray
100% Red
100% Blue
Black
<Fig . 16> 1080I Format, Hoz30Bar Pattern
<Fig . 15> 1080I Format, Hoz30Bar Pattern
Summary of Contents for 32FS4D
Page 14: ... 14 14 2 CXA2150 100Hz R_CUTOFF UP_CPIN Initial data Initial data Initial data ...
Page 15: ... 15 14 3 CXA2150 60Hz R_CUTOFF UP_CPIN Initial data Initial data Initial data ...
Page 17: ... 17 TROUBLE SHOOTING 1 Power 2 Main 1 Power failure ...
Page 19: ... 19 1 Reference A 2 Reference B 4 SOUND BLOCK 1 ATSC 1 NTSC ...
Page 20: ... 20 PRINTED CIRCUIT BOARD MAIN ...
Page 21: ... 21 MAIN BOTTOM ...
Page 22: ... 22 DEFLECTION ...
Page 23: ... 23 DIGITAL TOP CONTROL ...
Page 24: ... 24 DIGITAL BOTTOM ...
Page 25: ... 25 CPT HRS CS ...
Page 26: ... 26 SIDE A V TELETEXT POWER S W LED PRE AMP ...
Page 27: ... 27 BLOCK DIAGRAM ...
Page 39: ......
Page 40: ......
Page 41: ......
Page 42: ......


