LG 27MP58VQ Service Manual Download Page 5

- 5 -

Copyright © 2010 LG Electronics. Inc. All right reserved.
Only for training and service purposes

LGE Internal Use Only

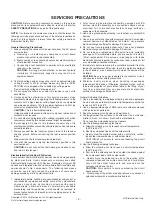
IC Remove/Replacement

Some chassis circuit boards have slotted holes (oblong) through
which the IC leads are inserted and then bent flat against the
circuit foil. When holes are the slotted type, the following technique
should be used to remove and replace the IC. When working with
boards using the familiar round hole, use the standard technique
as outlined in paragraphs 5 and 6 above.

Removal

1.  Desolder and straighten each IC lead in one operation by gently

prying up on the lead with the soldering iron tip as the solder
melts.

2.  Draw away the melted solder with an anti-static suction-type

solder removal device (or with solder braid) before removing the
IC.

Replacement

1.  Carefully insert the replacement IC in the circuit board.
2.  Carefully bend each IC lead against the circuit foil pad and

solder it.

3.  Clean the soldered areas with a small wire-bristle brush.

(It is not necessary to reapply acrylic coating to the areas).

"Small-Signal" Discrete TransistorRemoval/Replacement

1.  Remove the defective transistor by clipping its leads as close as

possible to the component body.

2.  Bend into a "U" shape the end of each of three leads remaining

on the circuit board.

3.  Bend into a "U" shape the replacement transistor leads.
4.  Connect the replacement transistor leads to the corresponding

leads extending from the circuit board and crimp the "U" with
long nose pliers to insure metal to metal contact then solder
each connection.

Power Output, Transistor Device
Removal/Replacement

1.  Heat and remove all solder from around the transistor leads.
2. Remove the heat sink mounting screw (if so equipped).
3.  Carefully remove the transistor from the heat sink of the circuit

board.

4.  Insert new transistor in the circuit board.
5. Solder each transistor lead, and clip off excess lead.
6.  Replace heat sink.

Diode Removal/Replacement

1.  Remove defective diode by clipping its leads as close as

possible to diode body.

2.  Bend the two remaining leads perpendicular y to the circuit

board.

3.  Observing diode polarity, wrap each lead of the new diode

around the corresponding lead on the circuit board.

4.  Securely crimp each connection and solder it.
5. Inspect (on the circuit board copper side) the solder joints of

the two "original" leads. If they are not shiny, reheat them and if
necessary, apply additional solder.

Fuse and Conventional Resistor
Removal/Replacement

1.  Clip each fuse or resistor lead at top of the circuit board hollow

stake.

2.  Securely crimp the leads of replacement component around

notch at stake top.

3.  Solder the connections.

CAUTION:

Maintain original spacing between the replaced

component and adjacent components and the circuit board to
prevent excessive component temperatures.

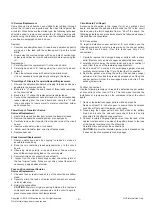
Circuit Board Foil Repair

Excessive heat applied to the copper foil of any printed circuit
board will weaken the adhesive that bonds the foil to the circuit
board causing the foil to separate from or "lift-off" the board. The
following guidelines and procedures should be followed whenever
this condition is encountered.

At IC Connections

To repair a defective copper pattern at IC connections use the
following procedure to install a jumper wire on the copper pattern
side of the circuit board. (Use this technique only on IC
connections).

1.  Carefully remove the damaged copper pattern with a sharp

knife. (Remove only as much copper as absolutely necessary).

2. carefully scratch away the solder resist and acrylic coating (if

used) from the end of the remaining copper pattern.

3.  Bend a small "U" in one end of a small gauge jumper wire and

carefully crimp it around the IC pin. Solder the IC connection.

4. Route the jumper wire along the path of the out-away copper

pattern and let it overlap the previously scraped end of the good
copper pattern. Solder the overlapped area and clip off any
excess jumper wire.

At Other Connections

Use the following technique to repair the defective copper pattern
at connections other than IC Pins. This technique involves the
installation of a jumper wire on the component side of the circuit
board.

1.  Remove the defective copper pattern with a sharp knife.

Remove at least 1/4 inch of copper, to ensure that a hazardous
condition will not exist if the jumper wire opens.

2. Trace along the copper pattern from both sides of the pattern

break and locate the nearest component that is directly
connected to the affected copper pattern.

3. Connect insulated 20-gauge jumper wire from the lead of the

nearest component on one side of the pattern break to the lead
of the nearest component on the other side.
Carefully crimp and solder the connections.

CAUTION:

Be sure the insulated jumper wire is dressed so the

it does not touch components or sharp edges.

Summary of Contents for 27MP58VQ

Page 1: ...R SERVICE MANUAL North Latin America http aic lgservice com Europe Africa http eic lgservice com Asia Oceania http biz lgservice com CAUTION BEFORE SERVICING THE UNIT READ THE SAFETY PRECAUTIONS IN THIS MANUAL CHASSIS NO LM68A MODEL 27MP58VQ Internal Use Only ...

Page 2: ...right reserved Only for training and service purposes LGE Internal Use Only CONTENTS CONTENTS 2 PRECAUTION 3 SERVICING PRECAUTIONS 4 SPECIFICATIONS 6 TIMING CHART 11 ADJUSTMENT 14 BLOCK DIAGRAM 18 TROUBLE SHOOTING 19 EXPLODED VIEW 22 SVC SHEET ...

Page 3: ...he module from the ESD as it may damage the electronic circuit C MOS Make certain that treatment person s body are grounded through wrist band Do not leave the module in high temperature and in areas of high humidity for a long time The module not be exposed to the direct sunlight Avoid contact with water as it may a short circuit within the module If the surface of panel become dirty please wipe ...

Page 4: ...any electrostatic charge on your body by touching a known earth ground Alternatively obtain and wear a commercially available discharging wrist strap device which should be removed to prevent potential shock reasons prior to applying power to the unit under test 2 After removing an electrical assembly equipped with ES devices place the assembly on a conductive surface such as aluminum foil to prev...

Page 5: ...the solder joints of the two original leads If they are not shiny reheat them and if necessary apply additional solder Fuse and Conventional Resistor Removal Replacement 1 Clip each fuse or resistor lead at top of the circuit board hollow stake 2 Securely crimp the leads of replacement component around notch at stake top 3 Solder the connections CAUTION Maintain original spacing between the replac...

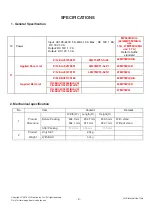
Page 6: ... Black Stabilizer 7 Input D SUB IN RGB Analog xxMP58VQ xxMP58D xxMP58A 1ea at the back DVI IN DVI IN xxMP58VQ xxMP58D 1ea at the back HDMI IN HDMI IN xxMP58VQ 1ea at the back HP OUT Audio L R OUT xxMP58VQ 1ea at the back 8 Power Cord Length 1 5 0 05 M Shape Wall out Color Black Refer to Suffix standard and power cord table 9 Cable Signal Cable D SUB Length 1 5m Shape Detachable Type Color Black Pi...

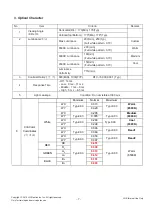
Page 7: ...d Panel List P N EAJ63109401 LM215WF3 SJJ5 22MP58VQ D A P N EAJ62570001 LM238WF1 SJE1 24MP58VQ D P N EAJ63370101 LM270WF5 SJN1 27MP58VQ Applied BLU List P N EBV61138104 22MP58VQ D A P N EBV61158009 BLACK P N EBV61158010 WHITE 24MP58VQ D P N EBV61138207 BLACK P N EBV61138208 WHITE 27MP58VQ 2 Mechanical specification No Item Content Remark 1 Product Dimension Width W Length D Height H Before Packing...

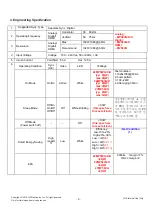
Page 8: ...300K Luminance 150 min Full white pattern 0 7V Cool Luminance Uniformity n i m 5 7 3 Contrast Ratio 명암 비 600 MIN 1000 TYP DFC 5 000 000 1 Typ 4 Response Time Off 14ms Low 9 ms 11 ms Middle 7 ms 9 ms High 5 ms 6 5 ms 5 Light Leakage Condition Do not visible at 300 Lux 6 CIE Color Coordinates 색 좌표 Minimum Normal Maximum White WX Typ 0 03 0 313 Typ 0 03 Warm 6500K WY 0 329 WX Typ 0 03 0 295 Typ 0 03 ...

Page 9: ...ing Condition Sync H V Video LED Wattage On Mode On On Active White 22MP58VQ D A typ 24 W max 28 W 24MP58VQ D typ 26 W max 30 W 27MP58VQ typ 29 W max 34 W Test condition 1 1920x1080 60Hz 2 burst pattern 3 100 240V 4 After aging 30min Sleep Mode Off On On Off Off Off Off White Blinking 0 3W this spec have to meet all inch 측정방법 제어판 Æ 전원 옵션에서 디스플레이 끄기 와 PC를 절전모드로 하기 두가지 설정이 있는데 PC 를 절전모드로 하기만 선 택하고 측...

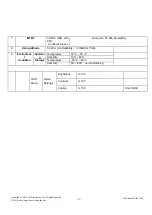
Page 10: ... 000 HRS with 90 Confidence level Lamp Life 30 000 Hours Min 8 Using Altitude 5 000 m for Reliability 3 000m for FOS 9 Environmen t Condition 0peratin g Temperature 10 C 35 C Humidity 10 80 Storage Temperature 20 C 60 C Humidity 5 90 non condensing OSD Menu Quick Settings Brightness 0 100 Contrast 0 100 Volume 0 100 Only HDMI ...

Page 11: ... 100 Color Adjust Gamma Off Gamma0 Gam ma1 Gamma2 Color Temp Custom Warm Me dium Cool Red 0 100 Green 0 100 Blue 0 100 Six Color 0 100 All Hue Saturation Reset Reset Cancel Display Horizontal 0 100 Only D sub Vertical 0 100 Clock 0 100 Phase 0 100 General Language English Germanic French Spanish Italian Swedish Finnish Portuguese Polish Russian Greek Chinese Japanese Korean Ukrainian Portuguese br...

Page 12: ...om The Right of Active Area to the Bezel C The Distance from The Top of Active Area to the Bezel D The Distance from The Bottom of Active Area to the Bezel D 5 Applying module Character No Item Content Remark Maker LGD Type TFT Active Display Area 23 inches 58 42 cm diagonal Pixel Pitch mm 0 2652 mm x 0 2652 V mm Electrical Interface 2ch LVDS Color Depth 6 bit with A FRC 16 7M colors LCD Module 1 ...

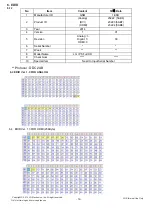
Page 13: ...FOR ANALOG Protocol DDC 2AB 6 4 EDID Ver 1 3 FOR HDMI 256Byte No Item Content 16진 Data 1 Manufacturer ID GSM 1E 6D 2 Product ID Analog DVI HDMI 23222 5AB6 23223 5AB7 23224 5AB8 3 Year 2014 4 Version 1 01 5 Revision Analog 3 Digital 3 HDMI 3 03 6 Serial Number 7 Week 8 Model Name LG IPS Full HD 9 Check Sum 10 Special Item Need to Input Serial Number ...

Page 14: ... Lines 75 500 480 1 3 16 4 H Pixels 40 0 37 879 1056 800 40 128 88 800 x 600 V Lines 60 317 628 600 1 4 23 5 H Pixels 49 5 46 875 1056 800 16 80 160 800 x 600 V Lines 75 0 625 600 1 3 21 6 H Pixels 65 0 48 363 1344 1024 24 136 160 1024 x 768 V Lines 60 0 806 768 3 6 29 7 H Pixels 78 75 60 023 1312 1024 16 96 176 1024 x 768 V Lines 75 029 800 768 1 3 28 8 H Pixels 108 0 67 500 1600 1152 64 128 256 ...

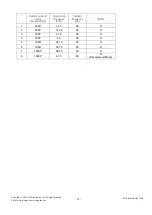
Page 15: ...service purposes LGE Internal Use Only Factory support mode Preset Mode Horizontal frequency KHz Vertical frequency Hz HDMI 1 480P 31 5 60 O 2 576P 31 25 50 O 3 720P 37 5 50 O 4 720P 45 60 O 5 1080i 28 12 50 O 6 1080i 33 75 60 O 7 1080P 56 25 50 O 8 1080P 67 5 60 O Recommend Mode ...

Page 16: ...nal to RJ 45 input with LAN cable connected network devices such as routers Check USB 1 1 Port Keyboard Mouse RJ 45 input Check USB 2 0 Port USB Memory Stick 2port RJ 45 input Check Audio Ear phone out Mic in Speaker RJ 45 input PC audio volume MAX LAN cable Router PC vSpace S W for N Ver 4 5 xx xx Caution Ver 4 4 xx xx for N1742L family 3 2 2 Total Assembly Line Ready Heat run during5 minutes in ...

Page 17: ...y Confirm that each items satisfy under standard condition that was written product spec Confirm Applying Module MICOM Setting Confirm with Service OSD Confirm at Service OSD by Menu Power key on from Power off Confirm first set of new lot by periods and confirm periodically when there is Process change or Adjustment setting change 3 2 5 5 OSD Adjustment device Confirmation Confirm operation menti...

Page 18: ... SIZE MODE 1 13 Pattern4 Full Screen CLOCK PHASE FULL SIZE MODE 12 13 Pattern 4 Full screen 5 Screen Compensation AUTO FULL SIZE MODE 12 13 Pattern 4 Full screen Normal Mode 40W Typ Pattern 4 Blue Stand By Mode 1W Pattern 6 Flicker Suspend Mode 1W Pattern 7 Flicker DPMS Off 1W 15W Pattern 8 Flicker 6 DPM Confirmation RGB LAN Power Switch Off 1W MODE 12 off 7 Gray scale Confirmation Linear gray Sca...

Page 19: ...ern 4 Cross hatch pattern Horizontal 10Line Vertcial 8Line Rectangle Pattern Pattern 5 1 Dot on 1 Dot off Rectangle Pattern Pattern 6 Vertical Sync only input Use signal cable of which Pin 5 is GND Pattern 7 Horizontal Sync only input Use signal cable of which Pin 5 is GND Pattern 8 State of without Vertical Horizontal Sync and Video Signal Use signal cable of which Pin 5 is GND Pattern 9 8 Color ...

Page 20: ...BLOCK DIAGRAM Main 19 Copyright 2010 LG Electronics Inc All right reserved Only for training and service purposes LGE Internal Use Only ...

Page 21: ...es LGE Internal Use Only 1 NO POWER Replace X100 N Check JK100 Voltage Level 19 5V Check Power connector OK Replace Adapter Y N Y Check IC103 Output Voltage Level 1 2V 3 3V Replace IC103 Recheck Y N Check X100 Clock 14 3181MHz Check IC102 Output Voltage Level 5V Replace IC102 Recheck N Y Replace IC101 Flash Memory ...

Page 22: ...EN ON Replace Cable N Module Back Light On Check IC100 Replace Main Scaler IC Y N N Check Panel Power 5V P101 Check IC102 Output 5V Replace IC102 Recheck Y N Check Panel Clock P101 10 11 22 23 Check IC100 Repair Main B D Y N Check FFC Cable for Damage or Open Conductors Check LED Driver FB P102 1 6 Replace T Con Board or Module ...

Page 23: ...es LGE Internal Use Only 3 NO VIDEO_D SUB Replace Main Scaler IC100 Check signal format and resolution Is it supported Check JK202 for proper connection or Damage Replace Connector Y N Check I2C Signal JK202 Pin No 12 15 Re Download EDID Data Y N Y Check Dsub Cable for Damage or Open Connector ...

Page 24: ...ses LGE Internal Use Only 4 NO VIDEO_DVI Replace Main Scaler IC100 Check signal format and resolution Is it supported Check JK202 for proper connection or Damage Replace Connector Y N Check I2C Signal JK202 Pin No 12 15 Re Download EDID Data Y N Y Check Dsub Cable for Damage or Open Connector ...

Page 25: ...oses LGE Internal Use Only 5 NO VIDEO_HDMI Replace Main Scaler IC100 Check signal format and resolution Is it supported Check JK200 for proper connection or Damage Replace Connector Y N Check I2C Signal JK203 Pin No 6 7 Re Download EDID Data Y N Y Check HDMI Cable for Damage or Open Connector ...

Page 26: ...rvice purposes LGE Internal Use Only 6 NO SOUND_HDMI Replace Main Scaler IC100 Check the Input source D sub DVI don t support sound Check the sound setting in PC Setting like a right image Y N Check JK201 Soldering Do re soldering Y N Y Check HDMI Cable for Damage or Open Connector ...

Page 27: ... These parts are identified by in the Schematic Diagram and EXPLODED VIEW It is essential that these special safety parts should be replaced with the same components as recommended in this manual to prevent X RADIATION Shock Fire or other Hazards Do not modify the original design without permission of manufacturer IMPORTANT SAFETY NOTICE 300 310 210 ...

Page 28: ......

Page 29: ......

Page 30: ......

Reviews: