background image

11

ENGLISH

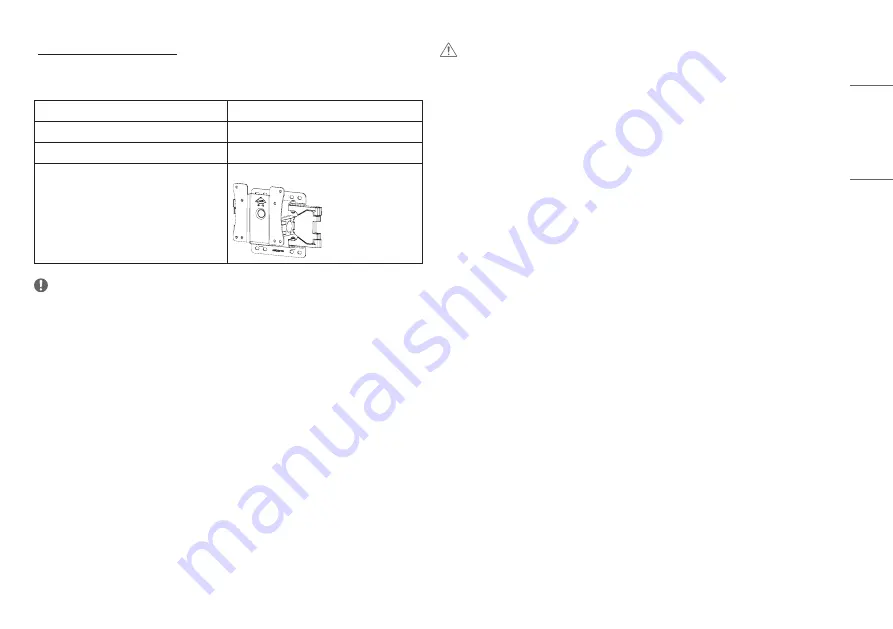
Installing the Wall Mount Plate

To install the monitor to a wall, attach a wall mounting bracket (optional) to the back of the monitor.

Make sure that the wall mounting bracket is securely fixed to the monitor and to the wall.

Wall Mount (mm)

100 x 100

Standard screw

M4 x L10

Number of screws

4

Wall Mount Plate (Optional)

LSW149

 NOTE


Use the screws specified by VESA standards. 


The wall mount kit includes the installation guide and all necessary parts.


The wall mounting bracket is optional. You can obtain optional accessories from your local dealer.


The length of the screw may differ for each wall mounting bracket. If you use screws longer than the standard 
length, it may damage the inside of the product.


For more information, please refer to the user manual for the wall mounting bracket.


Be careful not to apply too much force while mounting the wall mount plate as it may cause damage to the 
screen.


Remove the stand before installing the monitor on a wall mount by performing the stand attachment in 
reverse.

 CAUTION 


Unplug the power cord before moving or installing the monitor to avoid electric shock.


Installing the monitor on the ceiling or on a slanted wall may result in the monitor falling off, which could 
lead to injury. Use an authorised LG wall mount and contact the local dealer or qualified personnel.


To prevent injury, this apparatus must be securely attached to the wall in accordance with the installation 
instructions.


Applying excessive force when tightening screws may cause damage to the monitor. Damage caused in this 
way will not be covered by the product warranty.


Use the wall mounting bracket and screws that conform to VESA standards. Damage caused by the use or 
misuse of inappropriate components will not be covered by the product warranty.


When measured from the back of the monitor, the length of each installed screw must be 8 mm or less.

Summary of Contents for 27EP950

Page 1: ...lease read this manual carefully before operating your set and retain it for future reference www lg com Copyright 2021 LG Electronics Inc All Rights Reserved Owner s Manual OLED MONITOR 27EP950 32EP950 ...

Page 2: ...DMI HDMIHigh DefinitionMultimedia Interface andtheHDMILogoaretrademarksorregistered trademarksofHDMILicensingAdministrator Inc TABLE OF CONTENTS LICENSE 2 OPEN SOURCE SOFTWARE NOTICE INFORMATION 3 ASSEMBLING AND PREPARING 3 USINGTHE MONITOR 12 USER SETTINGS 15 TROUBLESHOOTING 21 PRODUCT SPECIFICATION 23 ...

Page 3: ...waysusegenuineLGcomponentstoensuresafetyandproductperformance Theproductwarrantywillnotcoverdamageorinjurycausedbytheuseofunauthorisedcomponents Itisrecommendedthatusethesuppliedcomponents IfyouusegenericcablesnotcertifiedbyLG thescreenmaynotdisplayortheremaybeimagenoises Illustrationsinthisdocumentrepresenttypicalprocedures sotheymaylookdifferentfromtheactual product Donotapplyforeignsubstances o...

Page 4: ... Topurchaseoptionalaccessories visitanelectronicsstoreoranonlineshoppingsite orcontacttheretailer fromwhichyoupurchasedtheproduct Thepowercordprovidedmaydifferdependingupontheregion Supported Software YoucandownloadandinstallthelatestversionfromtheLGEwebsite www lg com Product and Button Description Power LED Joystick Button Power LED White Onmode Amber ABL AutomaticBrightnessLimiter mode Off Offm...

Page 5: ... Moving and Lifting the Monitor Whenmovingorliftingthemonitor followtheseinstructionstopreventthemonitorfrombeingscratchedor damagedandtoensuresafetransportation regardlessofitsshapeorsize Placethemonitorintheoriginalboxorpackingmaterialbeforeattemptingtomoveit Beforemovingorliftingthemonitor disconnectthepowercordandallothercables Holdthebottomandsideofthemonitorframefirmly Donotholdthepanelitsel...

Page 6: ...ocreateimages Standingthemonitorpanelupverticallymaycausethemonitortofallduetothejoystickandcausedamage orinjury Inaddition thismaycausethejoystickbuttontomalfunction Installing on aTable Liftthemonitorandplaceitonthetableinanuprightposition Placethemonitoratleast100mmawayfrom thewalltoensuresufficientventilation 100mm ...

Page 7: ...0 mm WARNING Whenadjustingthescreenheight donotplaceyourhandonthestandbodytoavoidinjurytoyourfingers Adjusting the Angle 1 Placethemonitormountedonthestandbaseinanuprightposition 2 Adjusttheangleofthescreen Theangleofthescreencanbeadjustedforwardorbackwardfrom 5 to20 foracomfortableviewing experience WARNING Toavoidinjurytothefingerswhenadjustingthescreen donotholdthelowerpartofthemonitor sframeas...

Page 8: ...toofastorwithexcessiveforce Thetablemaybe scratchedbycontactwiththemonitor shead Theheadmaycomeincontactwiththestandandscratchthebase Becarefulasyoumayinjureyourfingerbyjammingitbetweentheheadandthestand Monitor s head Stand 1 Raisethemonitoruptothemaximumheight 2 Adjusttheangleofthemonitorinthedirectionofthearrowasshowninthefigure ...

Page 9: ...itor90 asshowninthefigure NOTE AutoPivotfeatureofthedisplayisnotsupported ThescreencanberotatedeasilyusingthescreenpivotshortcutkeyprovidedwithyourWindowsoperating system NotethatsomeWindowsversionsandsomegraphicscarddriversmayusedifferentsettingsforthe screenpivotkeyormaynotsupportthepivotkeyatall ...

Page 10: ...misoptional Youcanobtainoptionalaccessoriesfrommostelectronicsstores Installing on theWall Thismonitormeetsthespecificationsforthewallmountplateorothercompatibledevices Installthemonitoratleast100mmawayfromthewallandleaveabout100mmofspaceateachsideofthe monitortoensuresufficientventilation Detailedinstallationinstructionscanbeobtainedfromyourlocalretail store Alternatively pleaserefertothemanualfo...

Page 11: ...lnottoapplytoomuchforcewhilemountingthewallmountplateasitmaycausedamagetothe screen Removethestandbeforeinstallingthemonitoronawallmountbyperformingthestandattachmentin reverse CAUTION Unplugthepowercordbeforemovingorinstallingthemonitortoavoidelectricshock Installingthemonitorontheceilingoronaslantedwallmayresultinthemonitorfallingoff whichcould leadtoinjury UseanauthorisedLGwallmountandcontactth...

Page 12: ...G thescreenmaynotdisplayortheremaybeimagenoises Donotpressthescreenforaprolongedtime Thismaycauseimagedistortion Donotdisplayastillimageonthescreenforaprolongedtime Thismaycauseimageretention UseaPC screensaverifpossible Whenconnectingthepowercordtotheoutlet useagrounded 3 hole powerstriporagroundedpower outlet Themonitormayflickerwhenturnedoninanareawherethetemperatureislow Thisisnormal Sometimes...

Page 13: ...isplayPort Connection TransmitsdigitalvideoandaudiosignalsfromyourPCtothemonitor NOTE TheremaybenovideooraudiooutputdependingontheDP DisplayPort versionofthePC MakesuretousethesuppliedDisplayPortcableoftheproduct Otherwise thismaycausethedeviceto malfunction IfyouareusingaMiniDisplayPortoutputgraphicscard useaMiniDPtoDP MiniDisplayPorttoDisplayPort cableorgenderthatsupportsDisplayPort1 4 Soldsepar...

Page 14: ...sasaUSBhub NOTE ItisrecommendedyouinstallallWindowsUpdatestokeepyourWindowsup to datebeforeconnectingto theproductforuse Peripheraldevicesaresoldseparately Akeyboard mouse orUSBdevicecanbeconnectedtotheUSBport Thechargingspeedmayvarydependingonthedevice Tousethemonitor sdownstreamUSBport connectiontothehostPCmustbeestablishedbyusingaUSBC C orUSBC AcablefortheUSB Cport oraUSBB AcablefortheUSB Bport...

Page 15: ...esport NOTE Peripheraldevicesaresoldseparately DependingontheaudiosettingsofthePCandexternaldevice headphonesandspeakerfunctionsmaybe limited Ifyouuseangledearphones itmaycauseaproblemwithconnectinganotherexternaldevicetothemonitor Therefore itisrecommendedtousestraightearphones Angled Straight Recommend USER SETTINGS NOTE Yourmonitor sOSD OnScreenDisplay maydifferslightlyfromthatshowninthismanual...

Page 16: ...angeitin Settings General HotkeySettings Exit Exitsthemainmenu Menu Settings 1 ToviewtheOSDmenu pressthejoystickbuttonatthebottomofthemonitorandthenenterthe Settings 2 Movethejoystickup downandleft righttosettheoptions 3 Toreturntotheuppermenuorsetothermenuitems movethejoystickto orpressing it 4 IfyouwanttoexittheOSDmenu movethejoystickto untilyouexit Input Picture General NOTE On Off ...

Page 17: ...0bits 4 1019 to0 255 10bits 0 1023 SuperWhite Extendedfrom16 254 10bits 64 1019 to0 255 10bits 0 1023 Picture Settings Picture PictureMode SelectthePicturemodethatsuitstheeachstandardmode Custom BT 2020 BT 709 P3 D65 HDR P3 D65PQ HDR BT 2100PQ AdobeRGB sRGB and Calibration Installationof for Calibration Brightness Adjuststhebrightnessofthescreen Contrast Adjuststhecontrastofthescreen BlackOffset A...

Page 18: ...echaractersorpicturequalitymaybepooraccordingtoGraphiccard performance WhiletheHDRfunctionison screenflickeringorcrackingmayoccurwhenchangingthemonitorinputor poweron offaccordingtoGraphiccardperformance General Settings General Language Setsthemenuscreentothedesiredlanguage USB CMulti EDID ChangetheEDIDaccordingtothe PictureMode settingon USB C input Itcanbesetwhen DisplayPortVersion is 1 4 Ifthe...

Page 19: ...eoinput On preventthemonitorgoestothesleepmode Off monitorgoestothesleepmode AutomaticStandby Ifthereisnooperationonthemonitorforacertainperiodoftime themonitorwill automaticallyswitchtostandbymode DisplayPortVersion SetDisplayPortVersiontothesameversionastheconnectedexternaldevice Tousethe HDRfunction setto 1 4 HotkeySettings Selectthehotkeymenuof keyintheMainMenu PictureMode PeakBrightness PQCli...

Page 20: ...informationthatareconstantlyvisibleinafixedpositiononthe screen e g iconsonthedesktop fixedwindowssuchasmenus orlogoswhilewatchingbroadcasts etc Fixedmenu icononagameconsoleorset topbox Fixedmenuonthetopcornerofthewebbrowser Recommended Measures for Preventing Image Retention Turnon ScreenSaver and ScreenShift whenusingthemonitor Goto Menu Settings General andturnon ScreenSaver Thisisstronglyadvis...

Page 21: ...sectionofthismanualtosetthe appropriatefrequency Screen display is unstable and shaky Images displayed on the monitor leave shadow trails Didyouselecttheappropriateresolution IftheselectedresolutionisHDMI1080i60 50Hz interlaced thescreenmaybeflickering Changethe resolutionto1080portherecommendedresolution Notsettingthegraphicscardtotherecommended optimal resolutionmayresultinblurredtext a dimmedsc...

Page 22: ...atingsystem OS youuse 4K resolution is unavailable Didyoucheckthecableconnection Checkifthecableisproperlyconnected Itisrecommendedtousetheaccessoriessuppliedwiththeproduct Istheresolutionandrefreshratesetproperly SettheproperresolutionandrefreshrateinthePCscreenresolutionsettingsortheplayer soptionmenu Doestheconnectedexternaldevicesupport4Kresolution Itisavailableonlyonexternaldevicesthatsupport...

Page 23: ...oning Pixel Ratio 99 999 Environmental Conditions OperatingConditions Temperature 0 Cto40 C Humidity Lessthan80 StoringConditions Temperature 20 Cto60 C Humidity Lessthan85 Dimensions MonitorSize WidthxDepthxHeight 27EP950 WithStand mm 624 3x239 3x587 3 WithoutStand mm 624 3x35 3x372 8 32EP950 WithStand mm 726 5x239 3x616 5 WithoutStand mm 726 5x35 3x435 8 Weight Without Packaging 27EP950 WithStan...

Page 24: ...Mode 60W Typical SleepMode StandbyMode 0 5W OffMode 0 3W 32EP950 PowerRating 19 5V 10 8A PowerConsumption OperatingMode 72W Typical SleepMode StandbyMode 0 5W OffMode 0 3W TheOperatingModeofPowerConsumptionismeasuredwithLGEteststandard FullWhitepattern Maximumresolution Outgoingcondition ThePowerConsumptionlevelcanbedifferentbyoperatingconditionandmonitorsetting Themonitorgoestothesleepmodeinacoup...

Page 25: ...H V Remarks 640x480 31 469 59 94 800x600 37 879 60 317 1024x768 48 363 60 1920x1080 67 5 60 2048x1080 26 27 23 90 2560x1440 88 79 59 95 3840x2160 52 44 24 00 3840x2160 106 47 99 3840x2160 133 31 60 DP USB CPreferredtiming 3840x2160 111 09 50 4096x2160 52 40 23 98 4096x2160resolutionmaynotbesupporteddependingonthecomputer ...

Page 26: ...x768 48 363 60 1920x1080 67 5 60 2048x1080 26 27 23 90 2560x1440 88 79 59 95 3840x2160 52 44 24 00 3840x2160 67 50 30 HDMI1 4Preferredtiming HDMIULTRAHDDeepColor Off 3840x2160 106 47 99 3840x2160 135 60 HDMI2 0Preferredtiming HDMIULTRAHDDeepColor On 4096x2160 52 40 23 98 HDMIULTRAHDDeepColor Off 4096x2160resolutionmaynotbesupporteddependingonthecomputer ...

Page 27: ...27 ENGLISH HDMITiming Video Resolution Horizontal Frequency kHz Vertical Frequency Hz 480p 31 5 60 720p 45 60 1080p 67 5 60 2160p 112 5 50 2160p 135 60 ...

Page 28: ...Themodelandserialnumberoftheproductarelocatedonthebackandononesideoftheproduct Recordthembelowincaseyoueverneedservice Model SerialNo ...

Reviews: