background image

12

ENGLISH

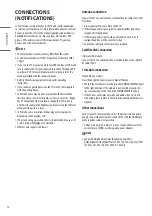
Antenna connection

Connect the TV to a wall antenna socket with an RF cable (75 Ω) (Not 
Provided).


y

Use a signal splitter to use more than 2 TVs.


y

If the image quality is poor, install a signal amplifier properly to 
improve the image quality.


y

If the image quality is poor with an antenna connected, try to 
realign the antenna in the correct direction.


y

An antenna cable and converter are not supplied.

Satellite dish connection

(Only satellite models)
Connect the TV to a satellite dish to a satellite socket with a satellite 
RF cable (75 Ω).

CI module connection

(Depending on model)
View the encrypted (pay) services in digital TV mode.


y

Check if the CI module is inserted into the COMMON INTERFACE port 
in the right direction. If the module is not inserted properly, this 
can cause damage to the TV and the COMMON INTERFACE port.


y

If the TV does not display any video and audio when CI+ CAM is 
connected, please contact to the Terrestrial/Cable/Satellite Service 
Operator.

Other connections

Connect your TV to external devices. For the best picture and audio 
quality, connect the external device and the TV with the HDMI cable. 
Some separate cable is not provided.


y

USB port supports 0.5 A electric current. If you need more electric 
current in case of HDD, use the separate power adaptor.

 NOTE


y

Supported HDMI Audio format (Depending on model):
Dolby Digital / Dolby Digital Plus (32 kHz / 44.1 kHz / 48 kHz), PCM 
(32 kHz / 44.1 kHz / 48 kHz / 96 kHz / 192 kHz)
 

CONNECTIONS 

(NOTIFICATIONS)

Connect various external devices to the TV and switch input modes 
to select an external device. For more information about an external 
device’s connection, refer to the manual supplied with each device. 
Available external devices are: Blu-ray player, HD receivers, DVD 
players, VCRs, audio systems, USB storage devices, PC, gaming 
devices, and other external devices.

 NOTE


y

The external device connection may differ from the model.


y

Connect external devices to the TV regardless of the order of the 
TV port.


y

If you record a TV program on a Blu-ray/DVD recorder or VCR, make 
sure to connect the TV signal input cable to the TV through a DVD 
recorder or VCR. For more information of recording, refer to the 
manual provided with the connected device.


y

Refer to the external equipment’s manual for operating 
instructions.


y

If you connect a gaming device to the TV, use the cable supplied 
with the gaming device.


y

In PC mode, there may be noise associated with the resolution, 
vertical pattern, contrast or brightness. If noise is present, change 
the PC output to another resolution, change the refresh rate to 
another rate or adjust the brightness and contrast on the [Picture] 
menu until the picture is clear.


y

In PC mode, some resolution settings may not work properly 
depending on the graphics card.


y

When connecting via a wired LAN, it is recommended to use a CAT 
7 cable. (Only when 

 port is provided.)


y

Ethernet only supports 100 Base-T.

Summary of Contents for 24TQ510S

Page 1: ... com Copyright 2022 LG Electronics Inc All Rights Reserved Safety and Reference LED TV OWNER S MANUAL LG LED TV applies LCD screen with LED backlights Please read this manual carefully before operating your TV and retain it for future reference ...

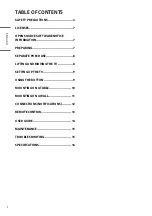
Page 2: ...RE NOTICE INFORMATION 7 PREPARING 7 SEPARATE PURCHASE 8 LIFTING AND MOVING THE TV 8 SETTING UP THE TV 9 USING THE BUTTON 9 MOUNTING ON A TABLE 10 MOUNTING ON A WALL 11 CONNECTIONS NOTIFICATIONS 12 REMOTE CONTROL 13 USER GUIDE 14 MAINTENANCE 15 TROUBLESHOOTING 15 SPECIFICATIONS 16 ...

Page 3: ...ors or hear a strange sound unplug the power cord and contact the service center If you continue to use without taking proper measures electrical shock or fire can occur y y If you dropped the product or the case is broken turn off the product and unplug the power cord If you continue to use without taking proper measures electrical shock or fire can occur Contact the service center y y Do not dro...

Page 4: ...with poor ventilation e g on a bookshelf in a closet or outside and avoid placing on cushions or carpets y y In addition do not install it where there are heating objects such as lighting equipment Precautions to the AC adapter and electrical power WARNING y y If water or any foreign substance goes inside the product TV monitor power cord or AC adapter disconnect the power cord immediately and con...

Page 5: ...evice is installed near the wall outlet to which it is connected and that the outlet is easily accessible y y As long as this unit is connected to the AC wall outlet it is not disconnected from the AC power source even if the unit is turned off CAUTION y y Be sure to keep the outlet AC adapter and pins of the power plug clean from dust and etc This may cause a fire y y Do not unplug the power cord...

Page 6: ...anel with a hand or a sharp object such as a nail pencil or pen or make a scratch on it y y Keep the proper distance from the product Your vision may be impaired if you look at the product too closely y y Set the appropriate resolution and clock by referring to the User s Guide Your vision can be impaired y y Use authorised detergent only when cleaning the product Do not use benzene thinner or alc...

Page 7: ...y be added to thisTV in the future y y TheTV can be placed in standby mode in order to reduce the power consumption And theTV should be turned off if it will not be watched for some time as this will reduce energy consumption y y The energy consumed during use can be significantly reduced if the level of brightness of the picture is reduced and this will reduce the overall running cost y y The ite...

Page 8: ...nt theTV from being scratched or damaged and for safe transportation regardless of its type and size y y It is recommended to move theTV in the box or packing material that theTV originally came in y y Before moving or lifting theTV disconnect the power cord and all cables y y When holding theTV the screen should face away from you to avoid damage y y Hold the top and bottom of theTV frame firmly ...

Page 9: ...rew parts when assembling the product Doing so may damage the product NOTE y y Remove the stand before installing theTV on a wall mount by performing the stand attachment in reverse USING THE BUTTON y y You can operate yourTV by pressing the button y y Image shown may differ from yourTV Basic functions Power On Press Power Off1 Press and Hold Menu Control Press2 Menu Selection Press and Hold3 1 Al...

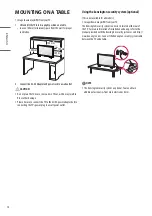
Page 10: ...TV to the AC DC power adapter before connecting theTV s power plug to a wall power outlet Using the kensington security system optional This is not available for all models y y Image shown may differ from yourTV The Kensington security system connector is located at the rear of theTV For more information of installation and using refer to the manual provided with the Kensington security system or ...

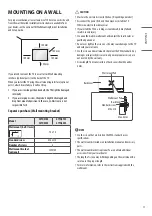
Page 11: ...t is optional You can obtain additional accessories from your local dealer y y The length of screws may differ depending on the wall mount Be sure to use the proper length y y For more information refer to the instructions supplied with the wall mount MOUNTING ON A WALL For proper ventilation allow a clearance of 100 mm on each side and from the wall Detailed installation instructions are availabl...

Page 12: ...olby Digital Dolby Digital Plus 32 kHz 44 1 kHz 48 kHz PCM 32 kHz 44 1 kHz 48 kHz 96 kHz 192 kHz CONNECTIONS NOTIFICATIONS Connect various external devices to theTV and switch input modes to select an external device For more information about an external device s connection refer to the manual supplied with each device Available external devices are Blu ray player HD receivers DVD players VCRs au...

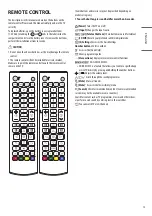
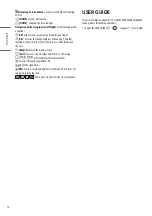
Page 13: ...tton press and hold for more than 3 seconds Power Turns theTV on or off Input Changes the input source Teletext buttons These buttons are used for teletext CC SUB Recalls your preferred subtitle in digital mode Q Settings Accesses the Quick Settings Number buttons Enters numbers 1 Accesses the Quick Help Shows programme guide More actions Displays more remote control functions 1 Edits QUICK ACCESS...

Page 14: ...rts Alert or Art Gallery press and hold down on the text Back Returns to the previous level Exit Clears on screen displays and returns toTV viewing Control buttons for media contents Accesses the saved programmes list Set the sleep timer REC Starts to record and displays record menu ThisTV does not support recording function These access special functions in some menus USER GUIDE For more informat...

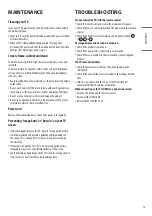
Page 15: ...age displays on theTV screen for a long period of time it will be imprinted and become a permanent disfigurement on the screen This is image burn or burn in and not covered by the warranty y y If the aspect ratio of theTV is set to 4 3 for a long period of time image burn may occur on the letterboxed area of the screen y y Avoid displaying a fixed image on theTV screen for a long period of time 2 ...

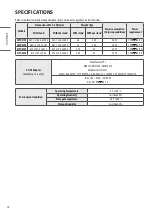
Page 16: ... x 150 1 x 367 563 1 x 58 x 340 9 3 3 3 25 28W 19V 2 0 A 27TQ615S 612 x 152 5 x 423 1 612 x 73 9 x 368 5 3 75 3 5 32W 19V 2 0 A 27TQ625S 612 x 150 x 394 8 612 x 73 9 x 368 5 3 55 3 5 32W 19V 2 0 A AC DC Adapter Depending on country Manufacturer PI Model AD2137S20 AD10530LF Manufacturer Honor Model ADS 45FSQ 19 19040EPG 1 ADS 45SQ 19 3 19040E ADS 45FSN 19 19040GPG In AC 100 240V 50 60 Hz Out DC 19V...

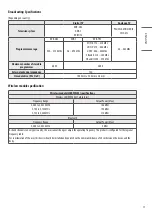
Page 17: ... W x H x D 100 0 mm x 55 0 mm x 5 0 mm Wireless module specification Wireless module LGSBWAC03 specifications Wireless LAN IEEE 802 11a b g n ac Frequency Range Output Power Max 2 400 to 2 483 5 MHz 5 150 to 5 725 MHz 5 725 to 5 850 MHz 18 5 dBm 19 5 dBm 11 5 dBm Bluetooth Frequency Range Output Power Max 2 400 to 2 483 5 MHz 9 dBm As band channels can vary per country the user cannot change or ad...

Page 18: ...is placed If the existing television set is going to be retained and relocated the same considerations as above should be applied Symbols Refers to alternating current AC Refers to direct current DC Refers to class II equipment Refers to stand by Refers to ON power Refers to dangerous voltage Service Unplug the monitor from the wall outlet and refer servicing to qualified service personnel when y ...

Page 19: ...The model and serial number of the product are located on the back and on one side of the product Record them below in case you ever need service Model Serial No ...

Reviews: