background image

35

ENGLISH

CUSTOMIZING TV SETTING

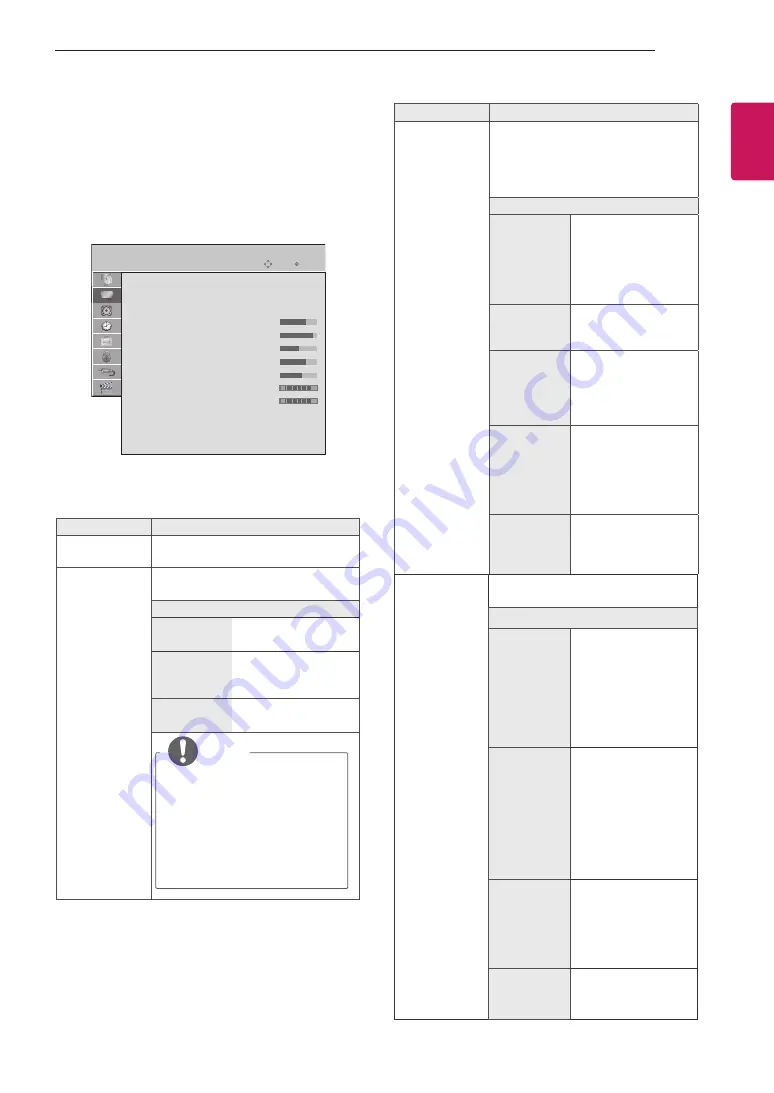
PICTURE Settings

1  Press 

SETTINGS

 and the Navigation buttons to 

scroll to 

PICTURE

.

2  Press the Navigation buttons to scroll to the setting 

or option you want and press 

OK

.

3  When you return to the previous menu, press  

 BACK

.


y

Image shown may differ from your TV. 

OK

Move

PICTURE

Aspect Ratio

: 16:9

ꕊ 

Energy Saving

: Off

Picture Mode

: Standard
• Backlight

70

• Contrast

90

• Brightness

50

• Sharpness

70

• Colour

60

• Tint

0

R

G

• Colour Temperature 0

W

C

• Advanced Control
• Reset

Screen

Move OK

The available picture settings are described in the 

following.

Setting

Description

Aspect Ratio

Changes  the  image  size  to  view  im-

ages at its optimal size.

Energy Saving

Reduces the power consumption by 

adjusting the screen brightness.

Option
Off

The 

Energy Saving

 is 

off

Minimum/

Medium/

Maximum

Selects the brightness 

level. 

Screen off 

The screen turns off in 

3 seconds.


NOTE


y

 When you select 

Screen 

Off

, the screen will be 

turned off in 3 seconds and 

Screen Off 

will start. 


y

If you adjust “Energy 

Saving- Maximum”, 

Backlight feature will not 

work.

Setting

Description

Picture Mode 

Selects one of the preset image or 

customizes options in each mode for 

the best TV screen performance. You 

are also able to customize advanced 

options of each mode.

Mode
Vivid

Adjusts the video 

image for the retail 

environment by en-

hancing the contrast, 

brightness, colour, 

and sharpness.

Standard

Adjusts the image for 

the normal environ-

ment.

Cinema

Optimizes the video 

images for a cin-

ematic look to enjoy 

movies as if you are in 

a movie theatre.

Sport

Optimizes the video 

image for high and 

dynamic actions by 

emphasizing primary 

colours such as white, 

grass, or sky blue.

Game

Optimizes the video 

image for a fast gam-

ing screen such as 

PCs or games.

Screen

Customizes the PC display options in 

RGB mode.

Option

Resolution

Sets the desired reso-

lution. Options may 

only be selected when 

the PC resolution is 

set to 1024x768@60/

1280x768@60/1360x

768@60/1366x768@

60(default).

Auto config.

Sets to adjust the 

screen position, clock, 

and phase automati-

cally.  

The displayed image 

may be unstable for 

a few seconds while 

the configuration is in 

progress. 

Position/

Size/Phase

Adjusts the options 

when the picture is 

not clear, especially 

when characters are 

shaky, after the auto 

configuration.

Reset

Restores the options 

to the default setting.

Summary of Contents for 22MA33A

Page 1: ...OWNER S MANUAL LED TV Please read this manual carefully before operating your TV and retain it for future reference LG LED TV applies LCD screen with LED backlights 22MA33A 22MA33B 24MN33A 24MN33B 26MA33A 28MN30A 29MN33A ...

Page 2: ...e 23 Watching TV 23 Managing programmes 23 Automatically setting up programme 24 Manually setting up programme 25 Editing your programme list 25 Selecting a programme on the programme list 25 Using additional options 25 Adjusting aspect ratio 26 Using the input list 27 ENTERTAINMENT 27 Connecting USB storage devices 28 Browsing files 29 Viewing photos 30 Listening to music 31 Viewing movies 33 Div...

Page 3: ... official DivX Certified device that plays DivX video Visit divx com for more information and software tools to convert your files into DivX videos ABOUT DIVX VIDEO ON DEMAND This DivX Certified device must be registered in order to play purchased DivX Video on Demand VOD movies To obtain your registration code locate the DivX VOD section in your device setup menu Go to vod divx com for more infor...

Page 4: ... to the TV 3 Connect an external device to the TV y y Image shown may differ from your TV y y Your TV s OSD On Screen Display may differ slightly from that shown in this manual y y The available menus and options may differ from the input source or product model that you are using y y New features may be added to this TV in the future NOTE ...

Page 5: ...ue to upgrade of product functions NOTE y y Do not use any pirated items to ensure the safety and product life span y y Any damages or injuries by using pirated items are not covered by the warranty CAUTION y y The items supplied with your product may vary depending on the model y y Product specifications or contents of this manual may be changed without prior notice due to upgrade of product func...

Page 6: ... Batteries AAA CD Owner s Manual Cards AC DC Adapter Cable Tie Power Cord AC DC Adapter or Depending on the country Depending on the country Depending on the country Stand Base See p 22 See p 11 See p 14 See p 20 See p 13 See p 13 See p 13 D SUB Cable ...

Page 7: ...volume level OK Selects the highlighted menu option or confirms an input SETTINGS Accesses the main menus or saves your input and exits the menus INPUT Changes the input source I Turns the power on or off Standby Light y y Lighting On Turned off y y Lighting Off Turned on Parts and buttons Depending on the country All of the bottoms are touch sensitive and can be operated through simple touch with...

Page 8: ...ned on Connection panel See p 16 Touch button Description Scrolls through the saved programmes Adjusts the volume level OK Selects the highlighted menu option or confirms an input SETTINGS Accesses the main menus or saves your input and exits the menus INPUT Changes the input source I Turns the power on or off All of the bottoms are touch sensitive and can be operated through simple touch with you...

Page 9: ...on Connection panel See p 16 Touch button Description Scrolls through the saved programmes Adjusts the volume level OK Selects the highlighted menu option or confirms an input SETTINGS Accesses the main menus or saves your input and exits the menus INPUT Changes the input source I Turns the power on or off All of the bottoms are touch sensitive and can be operated through simple touch with your fi...

Page 10: ...ting the TV read the following to prevent the TV from being scratched or damaged and for save transportation regardless of its type and size Avoid touching the screen at all times as this may result in damage to the screen or some of the pixels used to create images CAUTION y y It is recommended to move the TV in the box or packing material that the TV originally came in y y Before moving or lifti...

Page 11: ...TION y y Lay a foam mat or soft protective cloth on the surface to protect the screen from damage y y When attaching the stand to the TV set place the screen facing down on a cushioned table or flat surface to protect the screen from scratches CAUTION y y Lay a foam mat or soft protective cloth on the surface to protect the screen from damage y y When Detaching the stand to the TV set place the sc...

Page 12: ...PARING CAUTION y y Do not carry the TV upside down as this may cause it to fall off its stand resulting in damage or injury y y The illustration shows a general example of installation and may look different from the actual product ...

Page 13: ...at as this may result in fire or other damage CAUTION Mounting on a table 1 Lift and tilt the TV into its upright position on a table Leave a 10 cm 4 inches minimum space from the wall for proper ventilation 10 cm 10 cm 10 cm 10 cm or Disconnect the power cord first and then move or install the TV Otherwise electric shock may occur CAUTION ...

Page 14: ... mounting interface optional parts to the back of the TV When you install the TV using the wall mounting interface optional parts attach it carefully so it will not drop 1 Please Use the screw and wall mount interface in accordance with VESA Standards 2 If you use screw longer than standard the TV might be damaged internally 3 If you use improper screw the product might be damaged and drop from mo...

Page 15: ... Use an authorized LG wall mount and contact the local dealer or qualified personnel y y Do not over tighten the screws as this may cause damage to the TV and void your warranty y y Use the screws and wall mounts that meet the VESA standard Any damages or injuries by misuse or using an improper accessory are not covered by the warranty CAUTION y y Use the screws that are listed on the VESA standar...

Page 16: ...r of the TV port MAKING CONNECTIONS Connect an antenna cable or cable box to watch TV referring to the following The illustrations may differ from the actual accessories and an RF cable is optional Connect the TV to a wall antenna socket with an RF cable 75 Ω y y Use a signal splitter to use more than 2 TVs y y If the image quality is poor install a signal amplifier properly to improve the image q...

Page 17: ...on the following illustration y y Use a High Speed HDMI Cable y y High Speed HDMI Cables are tested to carry an HD signal up to 1080p and higher y y Supported HDMI Audio format Dolby Digital Up to 48kHz PCM Up to 192 kHz 32 kHz 44 1 kHz 48 kHz 88 kHz 96 kHz 176 kHz 192 kHz DTS is not supported NOTE Connecting to a HD receiver DVD VCR player or Gaming device HDMI connection DC IN HDMI IN RGB IN PC ...

Page 18: ...and the TV with the composite cable as shown on the following illustration Check to ensure the cables are matched with the corresponding colour connection NOTE Composite connection DC IN HDMI IN RGB IN PC USB IN 5 V 0 5 A 19 V VIDEO AUDIO L MONO AV IN AUDIO OUT R R L AUDIO OUT R L DVD Blu Ray HD Cable Box HD STB Gaming device Not Provided ...

Page 19: ...B flash memory external hard drive MP3 player or a USB memory card reader to the TV and access the USB menu to use various multimedia files Connecting to a USB USB IN 5 V 0 5 A or USB Not Provided or USB Not Provided 22MA33A 24MN33A 26MA33A 29MN33A 22MA33B 24MN33B 28MN30A ...

Page 20: ...e D sub 15 pin cable as shown the following illustrations To transmit an audio signal connect an optional audio cable NOTE If you do not use an optional external speaker connect the PC to the TV with the optional audio cable RGB connection DC IN HDMI IN RGB IN PC USB IN 5 V 0 5 A 19 V VIDEO AUDIO L MONO AV IN AUDIO OUT R R L Not Provided PC ...

Page 21: ...reo Connection Use to connect to an external amplifier or surround sound system External Stereo DC IN HDMI IN RGB IN PC USB IN 5 V 0 5 A 19 V VIDEO AUDIO L MONO AV IN AUDIO OUT R R L L R AUDIO IN Not Provided NOTE y y If you use an optional external audio device instead of the built in speaker set the TV speaker feature to off ...

Page 22: ...V MUTE 2 3 INPUT TIME TEXT TV 1 2 POWER Turns the TV on or off TV Returns to the TV viewing from any mode Q MENU Accesses the Quick menus PICTURE Changes the image mode SOUND Changes the sound mode INPUT Changes the input source Number buttons Enters numbers LIST Accesses the saved programme list Q VIEW Returns to the previously viewed programme FAV Accesses your favourite programme list I II Sele...

Page 23: ...ect Home Use y y Store Demo is suitable for the retail environment y y If you select Store Demo any customized settings will switch back to the default settings of Store Demo in 5 minutes 4 When the basic settings are complete press the OK NOTE y y If you do not complete the Initial setting it will appear whenever the TV turns on y y Disconnect the power cord from the power outlet when you do not ...

Page 24: ...s the OK to store it 6 When you return to the previous menu press ꕣ BACK Manually setting up programme Manual Tuning lets you manually tune and arrange the stations in whatever order you desire 1 Press SETTINGS and the Navigation buttons to scroll to SETUP 2 Press the Navigation buttons to scroll to Manual Tuning 3 Press the Navigation buttons to scroll to Storage 4 Press the Navigation buttons or...

Page 25: ...previous menu press ꕣ BACK Selecting a programme on the pro gramme list 1 Press LIST to access the programme list 2 Press the Navigation buttons to select to desired programme and press OK 3 When you return to the previous menu press LIST NOTE y y You may find some blue programmes They have been set up to be skipped by auto programming or in the programme edit mode y y Some programmes with the pro...

Page 26: ...a zoom press or and its range is from 1 to 16 NOTE y y If you enlarge or reduce an image the image may be distorted Using the input list Selecting an input source 1 Press INPUT to access the input sources The connected device displays on each input source 2 Press the Navigation buttons or input button to scroll to one of the input sources and press OK y y Image shown may differ from your TV Input ...

Page 27: ...s suddenly separated or unplugged the stored files or the USB storage device may be damaged y y Please do not connect the USB storage device which was artificially manoeuvred on the PC The device may cause the product to malfunction or fail to be played Never forget to use only a USB storage device which has normal music files image files or movie files y y Please use only a USB storage device whi...

Page 28: ...r 2 Preview Displays the thumbnail folder name of the file in the selected folder 3 Current page Total pages 4 Total number of marked files 5 Contents under the folder focused on 1 6 Available buttons on the remote control Supported file format Type Supported file format Photo JPEG Available size Baseline 64 pixel W x 64 pixel H 15360 pixel W x 8640 pixel H Progressive 64 x 64 to 1024 x 768 y y Yo...

Page 29: ...ed photo Mark All Selects all files Close Exits the Mark Mode NOTE y y Non supported files are displayed the preview image by icon only y y Abnormal files are displayed in the form of bitmap 6 The following options are available while viewing photos ꔊ 2 13 ꔋ ꔡ ꘩ Option Slide show BGM Hide Option Description Slideshow Starts or stops a slideshow with selected photos If there are no selected photos ...

Page 30: ...ack s Plays a music file t Pauses or resumes playback w Skips to the next file v Skips to the previous file or When playing When you press the button the pre vious music file will be played When you press the button the next music file will be played EXIT When you press the EXIT button only the music will be stopped and the player will go to TV viewing ꕌ or ꕍ When using the ꕌorꕍ button during play...

Page 31: ...Skips to specific points in a file during playback The time of a specific point will appear on the status bar In some files this function may not work properly Tips for using playing video files y y Some user created subtitles may not work properly y y Some special characters are not supported in subtitles y y HTML tags are not supported in subtitles y y Subtitles in languages other than the suppo...

Page 32: ... NOTE y y Only 10 000 of sync blocks can be supported within the subtitle file y y When playing a video you can adjust the Picture Size by pressing Q MENU or accessing Aspect Ratio in the PICTURE menu When you select the Set video 1 Press the Navigation buttons to scroll to make appropriate adjustments When you select the Set audio 1 Press the Navigation buttons to scroll to show the Sound Mode Au...

Page 33: ...x576 WxH pixels y y Frame rate under 30 frames sec 720x480 under 25 frames sec under 720x576 y y Video Codec MPEG 1 MPEG 2 MPEG 4 H 264 AVC DivX 3 11 DivX 4 x DivX 5 x DivX 6 Xvid 1 00 Xvid 1 01 Xvid 1 02 Xvid 1 03 Xvid 1 10 beta1 Xvid 1 10 beta2 JPEG VC1 Sorenson H 263 H 264 DivX VOD Deregistration You should deregister your device with 8 digit DivX deregistration code from your device at www div...

Page 34: ...izes the general set tings LOCK Locks or unlocks pro grammes INPUT Views the input sources with their labels USB Displays photo and play music movie content stored on your USB Customizing Settings SETUP Settings 1 Press SETTINGS and the Navigation buttons to scroll to SETUP 2 Press the Navigation buttons to scroll to the setting or option you want and press OK 3 When you return to the previous men...

Page 35: ...etting Description Picture Mode Selects one of the preset image or customizes options in each mode for the best TV screen performance You are also able to customize advanced options of each mode Mode Vivid Adjusts the video image for the retail environment by en hancing the contrast brightness colour and sharpness Standard Adjusts the image for the normal environ ment Cinema Optimizes the video im...

Page 36: ...lour Gamut Advanced Control Maximizes the utilization of colour to increase colour quality Standard Displays standard set of colours Wide Increase number of colours used Edge Enhancer Shows clearer and distinctive yet natural edges of the video Basic image options Setting Description Backlight Adjusts the brightness of the screen by controlling the LCD backlight If you decrease the brightness leve...

Page 37: ...quency range Bass Controls the softer sounds in the output When you turn up the bass it will increase the output to the lower frequency range Reset Resets the sound mode to the default setting TV Speaker Turns off the internal speaker of the TV when using an external Hi Fi system AUDIO Settings 1 Press SETTINGS and the Navigation buttons to scroll to AUDIO 2 Press the Navigation buttons to scroll ...

Page 38: ...ut sound for the left and right loudspeakers Select the sound output L R Audio signal from audio L input is sent to the left loudspeaker and audio signal from audio R input is sent to the right loudspeaker L L Audio signal from audio L input is sent to left and right loudspeakers R R Audio signal from audio R input is sent to left and right loudspeakers TIME Settings 1 Press SETTINGS and the Navig...

Page 39: ... in front of the blocked programmes The programmes can be selected but the screen blank and the audio is muted Input Block Blocks the input sources OPTION Settings 1 Press SETTINGS and the Navigation buttons to scroll to OPTION 2 Press the Navigation buttons to scroll to the setting or option you want and press OK 3 When you return to the previous menu press ꕣ BACK y y Image shown may differ from ...

Page 40: ...ish to programme 3 Press the OK button The selected page is stored as the selected page number blinking once to confirm this From now on you can select this page with the same coloured button 4 The three other coloured buttons are programmed in this way Fastext The teletext pages are colour coded along the bottom of the screen and are selected by pressing the correspond ing coloured button Page se...

Page 41: ...st or dirt on the power cord regularly y y Make sure to turn the power off and disconnect the power cord and all other cables first y y When the TV is left unattended and unused for a long time disconnect the power cord from the wall outlet to prevent possible damage from lightning or power surges CAUTION y y Do not push rub or hit the surface with your fingernail or a sharp object as this may res...

Page 42: ...stalled to to No image display and no sound is produced y y Check if the product is turned on y y Check if the power cord is connected to a wall outlet y y Check if there is a problem in the wall outlet by connecting other products The TV turns off suddenly y y Check the power control settings The power supply may be interrupted y y Check if the Auto sleep Off time feature is activated in the Time...

Page 43: ...nnector TV D Sub Analogue CVBS HDMI USB Speaker Out 5 W x 2 Power Rated Voltage 19 V 1 6 A Power Consumption On Mode 27 W typ Off Mode 0 5 W Dimensions Width x Depth x Height Weight With Stand 512 6 mm x 140 1 mm x 363 4 mm 3 2 kg Without Stand 512 6 mm x 63 1 mm x 315 6 mm 3 0 kg Environmental conditions Operating Temperature Operating Humidity 10 C to 35 C 20 to 80 Storage Temperature Storage Hu...

Page 44: ...r TV D Sub Analogue CVBS HDMI USB Speaker Out 5 W x 2 Power Rated Voltage 19 V 1 6 A Power Consumption On Mode 30 W typ Off Mode 0 5 W Dimensions Width x Depth x Height Weight With Stand 556 5 mm x 140 1 mm x 391 mm 3 7 kg Without Stand 556 5 mm x 62 3 mm x 343 1 mm 3 5 kg Environmental conditions Operating Temperature Operating Humidity 10 C to 35 C 20 to 80 Storage Temperature Storage Humidity 1...

Page 45: ...ctor TV D Sub analogue CVBS HDMI USB Speaker Out 5 W x 2 Power Rated Voltage 19 V 2 0 A Power Consumption On Mode 35 W typ Off Mode 0 5 W Dimensions Width x Depth x Height Weight With Stand 620 4 mm x 162 1 mm x 432 2 mm 4 2 kg Without Stand 620 4 mm x 58 8 mm x 380 5 mm 3 9 kg Environmental conditions Operating Temperature Operating Humidity 10 C to 35 C 20 to 80 Storage Temperature Storage Humid...

Page 46: ...put Connector TV D Sub analogue CVBS HDMI USB Speaker Out 5 W x 2 Power Rated Voltage 19 V 2 0 A Power Consumption On Mode 35 W typ Off Mode 0 5 W Dimensions Width x Depth x Height Weight With Stand 645 3 mm x 182 1 mm x 447 9 mm 5 1 kg Without Stand 645 3 mm x 78 7 mm x 401 6 mm 4 7 kg Environmental conditions Operating Temperature Operating Humidity 10 C to 35 C 20 to 80 Storage Temperature Stor...

Page 47: ...or TV D Sub Analogue CVBS HDMI USB Speaker Out 5 W x 2 Power Rated Voltage 19 V 2 4 A Power Consumption On Mode 40 W typ Off Mode 0 5 W Dimensions Width x Depth x Height Weight With Stand 668 6 mm x 182 1 mm x 457 mm 5 7 kg Without Stand 668 6 mm x 81 9 mm x 405 5 mm 5 4 kg Environmental conditions Operating Temperature Operating Humidity 10 C to 35 C 20 to 80 Storage Temperature Storage Humidity ...

Page 48: ...onor ADS 40SG 19 2 19032G ADS 40FSG 19 19032GPG ADS 40FSG 19 19032GPCU APD DA 32B19 26MA33A Lien Chang LCAP16B E LCAP16B A LCAP25B LG Innotek PSAB L205B PSAB L205C PSAB L204B APD DA 40E19 29MN33A LG Innotek PSAB L101A Lite On PA 1650 64 28MN30A Lien Chang LCAP16B E LCAP16B A LCAP25B LG Innotek PSAB L205B PSAB L205C PSAB L204B APD DA 40E19 ...

Page 49: ...V 01 to 71 Vietnam Malaysia Television System PAL SECAM B G D K PAL I NTSC M Programme Coverage BG VHF UHF 1 to 69 CATV 01 to 47 I VHF UHF 1 to 69 CATV 01 to 47 DK VHF UHF 1 to 69 CATV 01 to 47 M VHF UHF 2 to 78 CATV 01 to 71 Iran Algeria Tunisia Digital model Television System PAL SECAM B G D K PAL I NTSC M Programme Coverage BG VHF UHF 1 to 69 CATV 01 to 47 I VHF UHF 1 to 69 CATV 01 to 47 DK VHF...

Page 50: ... 59 790 HDMI DTV supported mode Resolution Horizontal Frequency kHz Vertical Frequency Hz 720 480 31 469 31 500 59 940 60 720 576 31 250 50 1280 720 37 500 44 960 45 50 59 940 60 1920 1080 33 720 33 750 28 125 26 970 27 33 716 33 750 56 250 67 430 67 500 59 940 60 50 23 970 24 29 976 30 50 59 940 60 NOTE The optimal display resolution is 1366 X 768 60 Hz The optimal timing in each mode is vertical...

Page 51: ...s before using the product Keep the Owner s Manual CD in an acces sible place for future reference The model and serial number of the TV is located on the back and one side of the TV Record it below should you ever need serv ice MODEL SERIAL ...

Reviews: