background image

28

ENG

ENGLISH

CUSTOMIZING TV SETTINGS

CUSTOMIZING TV SETTINGS

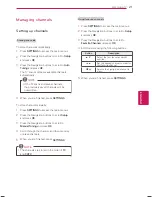
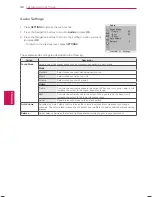
Accessing Main Menus

1

  Press 

SETTINGS

 to access the main menus.

2

  Press the Navigation buttons to scroll to one of the following menus and press 

OK

.

3

  Press the Navigation buttons to scroll to the setting or option you want and press 

OK

.

4

  When you are finis hed, press 

EXIT

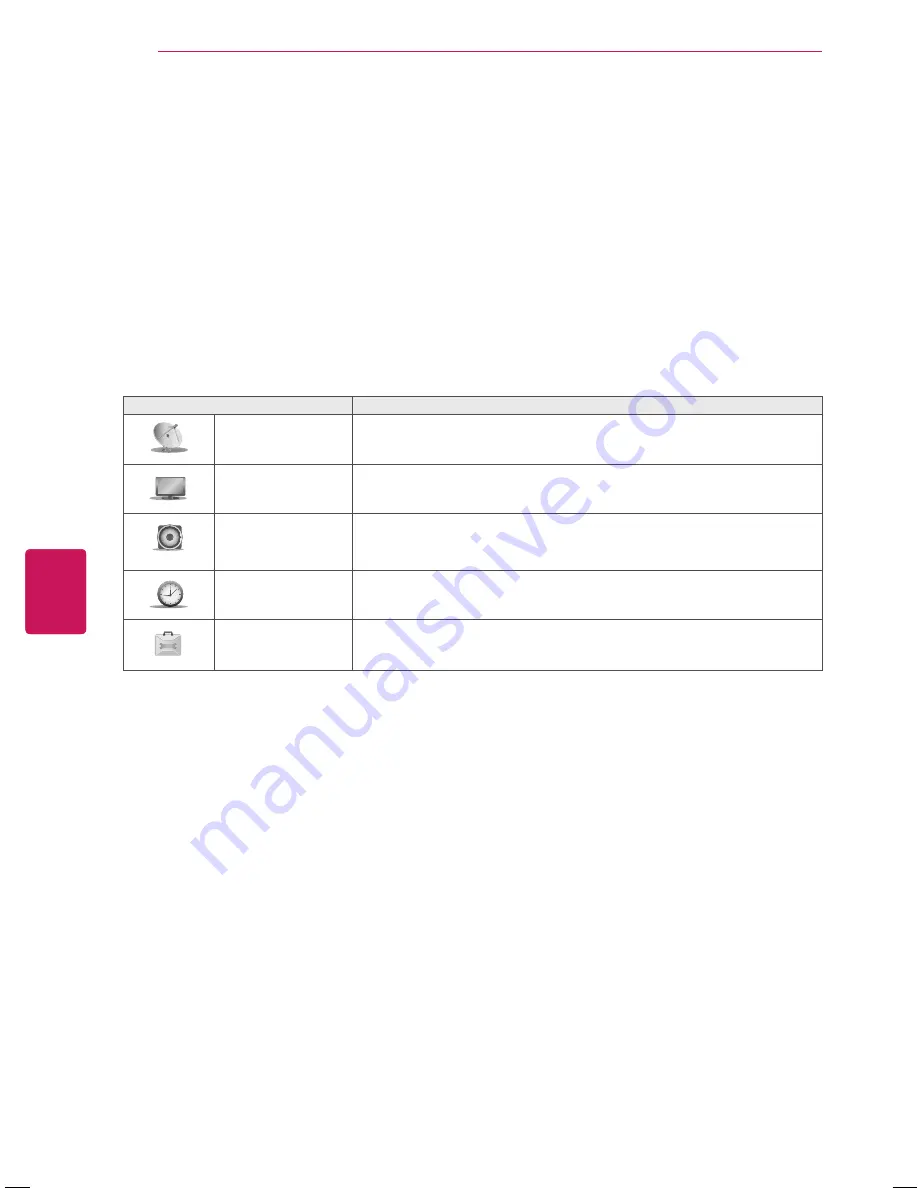
Menu

Description

?


Setup

Sets up and edit channels.

?


Picture

Adjusts the image size, quality, or effect.

?


Audio

Adjusts the sound quality, effect, or volume level.

?


Time

Sets the time, date, or Timer feature.

?


Option

Customizes the general settings. 

Summary of Contents for 22CS410

Page 1: ...www lg com Please read this manual carefully before operating your set and retain it for future reference P NO MFL67559702 1205 REV00 OWNER S MANUAL LCD TV 22CS410 26CS410 32CS410 ...

Page 2: ...HE RISK OF FIRE AND ELECTRIC SHOCK DO NOT EXPOSE THIS PRODUCT TO RAIN OR MOISTURE y y Do not use this apparatus near water y y Clean only with a dry cloth y y Do not block any ventilation openings Install in accordance with the manufacturer s instructions y y Do not install near any heat sources such as radiators heat registers stoves or other apparatus including amplifiers that produce heat y y D...

Page 3: ...n Anti moisture material is harmful if swallowed If swallowed by mistake force the patient to vomit and visit the nearest hospital Additionally vinyl packing can cause suffocation Keep it out of the reach of children y y CAUTION concerning the Power Cord Can differ by country It is recommended that appliances be placed upon a dedicated circuit that is a single outlet circuit which powers only that...

Page 4: ...is not disconnected from the AC power source even if the unit is turned off y y Do not attempt to modify this product in any way without written authorization from LG Electronics Unauthorized modification could void the user s authority to operate this product y y ANTENNAS Outdoor antenna grounding Can differ by country If an outdoor antenna is installed follow the precautions below An outdoor ant...

Page 5: ...x million pixels In a very few cases you could see fine dots on the screen while you re viewing the TV Those dots are deactivated pixels and do not affect the performance and reliability of the TV y y Generated Sound Cracking noise A cracking noise that occurs when watching or turning off the TV is generated by plastic thermal contraction due to temperature and humidity This noise is common for pr...

Page 6: ...PL MPL and other open source licenses that is contained in this product please visit http opensource lge com In addition to the source code all referred license terms warranty disclaimers and copyright notices are available for download LG Electronics will also provide open source code to you on CD ROM for a charge covering the cost of performing such distribution such as the cost of media shippin...

Page 7: ...spect ratio 23 Using the input list 23 Locking the buttons on the TV Child Lock 24 ENTERTAINMENT 24 Connecting USB storage devices 25 Browsing files 26 Viewing Photos 27 Listening to music 28 CUSTOMIZING TV SETTINGS 28 Accessing Main Menus 29 Customizing Settings 29 Setup Settings 30 Picture Settings 32 Audio Settings 33 Time Settings 33 Option Settings 34 MAKING CONNECTIONS 34 Connecting to an an...

Page 8: ...and 18 mm 0 7 inches width y y Use an extension cable that supports USB 2 0 if the USB cable or USB memory stick does not fit into your TV s USB port B A A B A 10 mm 0 39 inches B 18 mm 0 7 inches NOTE y y Do not use any unapproved items to ensure the safety and product life span y y Any damages or injuries by using unapproved items are not covered by the warranty y y In case of some model the thi...

Page 9: ...CS410 For 26 32CS410 Desk mount Screw 1 EA See p 14 Stand Screws 2 EA P4 x 16 See p 12 Stand Screws 8 EA M4 x 20 See p 13 For 26CS410 For 32CS410 For 22CS410 Protection cover See p 17 Protection cover See p 17 Stand Body Stand Base See p 12 For 26CS410 For 32CS410 Stand Body Stand Base See p 13 Stand Body Stand Base See p 13 ...

Page 10: ...ed channels 1 Intelligent sensor Adjusts the image quality and brightness based on the surrounding environment 2 All of the buttons are touch sensitive and can be operated through simple touch with your finger USB IN OK SETTINGS INPUT COMPONENT IN VIDEO Y L R PB PR AUDIO VIDEO L MONO AUDIO R AV IN SERVICE ONLY IN L AUDIO OUT R ANTENNA IN Screen Speakers Touch buttons2 Rear Connection panel See p 3...

Page 11: ...Before moving or lifting the TV disconnect the power cord and all cables y y When holding the TV the screen should face away from you to avoid damage y y Hold the top and bottom of the TV frame firmly Make sure not to hold the transparent part speaker or speaker grill area y y When transporting a large TV there should be at least 2 people y y When transporting the TV by hand hold the TV as shown i...

Page 12: ...nt by performing the stand attachment in reverse NOTE y y When attaching the stand to the TV set place the screen facing down on a cushioned table or flat surface to protect the screen from scratches y y Make sure that the screws are fastened completely If they are not fastened securely enough the TV may tilt forward after being installed y y Do not fasten the screws with too much force otherwise ...

Page 13: ...13 ENG ENGLISH ASSEMBLING AND PREPARING Stand Body For 26CS410 For 32CS410 M4 x 20 4 EA M4 x 20 4 EA Stand Base 1 1 2 2 3 3 M4 x 20 4 EA M4 x 20 4 EA Stand Body Stand Base ...

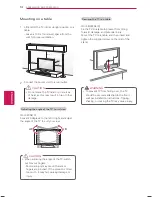
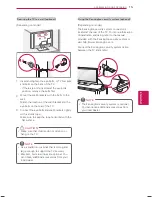
Page 14: ... adjust the angle of the TV to suit your view 20 20 y y When adjusting the angle of the TV watch out for your fingers Personal injury may occur if hands or fingers are pinched If the product is tilted too much it may fall causing damage or injury CAUTION Securing the TV to a table For 26 32CS410 Fix the TV to a table to prevent from tilting forward damage and potential injury Mount the TV on a tab...

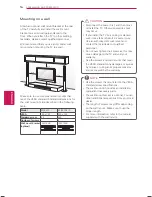
Page 15: ... to a wall optional Depending on model 1 Insert and tighten the eye bolts or TV brackets and bolts on the back of the TV If there are bolts inserted at the eye bolts position remove the bolts first 2 Mount the wall brackets with the bolts to the wall Match the location of the wall bracket and the eye bolts on the rear of the TV 3 Connect the eye bolts and wall brackets tightly with a sturdy rope M...

Page 16: ...ve or install the TV Otherwise electric shock may occur y y If you install the TV on a ceiling or slanted wall it may fall and result in severe injury Use an authorized LG wall mount and contact the local dealer or qualified personnel y y Do not over tighten the screws as this may cause damage to the TV and void your warranty y y Use the screws and wall mounts that meet the VESA standard Any damag...

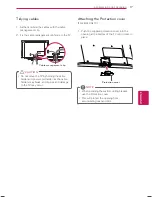
Page 17: ...cable holder and power cord holder as the cable holders may break and injuries and damage to the TV may occur CAUTION Attaching the Protection cover For 26 32 CS410 1 Push the supplied protection cover into the opening at the bottom of the TV until it locks in place Protection cover y y When installing the wall mounting bracket use the Protection cover y y This will protect the opening from accumu...

Page 18: ...he remote control CAUTION Make sure to point the remote control toward at the remote control sensor on the TV POWER TV INPUT A PROG RATIO FAV SETTINGS OK SOUND SLEEP MTS CH Q VIEW MEMORY ERASE CAPTION MUTE PICTURE EXIT VOL ꔰ POWER Turns the TV on or off INPUT See p 23 Rotates through inputs Also switches the TV on from standby TV Returns to the last TV channel A PROG See p 29 Searches for availabl...

Page 19: ...enus or options OK ꔉ Selects menus or options and confirms your input PICTURE See p 30 Selects the factory preset picture depend on the viewing environment SOUND See p 32 Selects the factory preset sound for type of program Control buttons Controls the USB compatible devices Not functional VOL Adjusts the volume level MTS Selects the MTS sound Mono Stereo or SAP MUTE Mutes all sounds SLEEP See p 3...

Page 20: ...een instructions to customize your TV settings according to your preferences Language Selects a language to display Auto Tuning Scans and saves available channels automatically 4 When the basic settings are complete press OK NOTE y y If you do not complete the Initial setting it will appear whenever the TV turns on y y Disconnect the power cord from the power outlet when you do not use the TV for ...

Page 21: ... channels automatically 1 Press SETTINGS to access the main menus 2 Press the Navigation buttons to scroll to Setup and press OK 3 Press the Navigation buttons to scroll to Auto Tuning and press OK The TV scans and saves available channels automatically NOTE y y If the TV scans and saves channels the previously saved channels will be overwritten 4 When you are finished press SETTINGS To store chan...

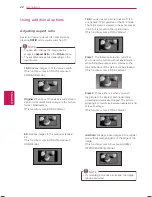
Page 22: ...9 You can view a picture format of 14 9 or a general TV programme in the 14 9 mode The 14 9 screen is viewed in the same way as in 4 3 but is moved to the up and down This function works in RF AV Mode Zoom 1 The following selection will allow you to view the picture without any alteration while filling the entire screen However the top and bottom of the picture will be cropped This function works ...

Page 23: ...D or other external devices or through a digital set top box HDMI Watches contents in a HTS or other high definition devices USB Select it when using USB depends on connector Locking the buttons on the TV Child Lock Lock the buttons on the TV to prevent any unwanted operations or accidents by children 1 Press SETTINGS to access the main menus 2 Press the Navigation buttons to scroll to Option and ...

Page 24: ...uch device is suddenly separated or unplugged the stored files or the USB storage device may be damaged y y Please do not connect the USB storage device which was artificially manoeuvred on the PC The device may cause the product to malfunction or fail to be played Never forget to use only a USB storage device which has normal music files image files y y Please use only a USB storage device which ...

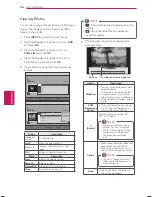
Page 25: ...xit No Description 1 Moves to the upper level folder 2 Current page Total pages 3 Contents under the current folder Tips for using USB storage devices Type Supported File Formats Photo y y JPEG y y Available size Baseline 64 pixel W x 64 pixel H 8192 pixel W x 8192 pixel H Progressive 64 pixel W x 64 pixel H 1024 pixel W x 768 pixel H It may take some time to open high resolution images in full sc...

Page 26: ...All Clears all of your selections Close Close the pop up menu y y Abnormal files are displayed using this graphic y y Non supported files are displayed using this graphic NOTE 6 The following options are available while viewing photos ꔊ 002 004 ꔋ Option Close BGM Slideshow Options Number of selected photos 000 ꔆ Option Description Slideshow y y Starts or stops a slideshow with selected photos y y ...

Page 27: ...ing the selected music files and then move to the Photo List Mark All Selects all files Unmark All Clears all of your selections Close Close the pop up menu 6 Control playback by using the following buttons Music List Page 1 1 Upper Folder ꔂ Move ꔉ Option ꔵ Change Page ꘂ Mark ꕯ Exit Title 002 mp3 003 mp3 004 mp3 001 mp3 1 06 3 07 2 21 3 43 Upper Folder Duration 0 00 3 07 Button Description ꕗ Stops...

Page 28: ...ollowing menus and press OK 3 Press the Navigation buttons to scroll to the setting or option you want and press OK 4 When you are finis hed press EXIT Menu Description Setup Sets up and edit channels Picture Adjusts the image size quality or effect Audio Adjusts the sound quality effect or volume level Time Sets the time date or Timer feature Option Customizes the general settings ...

Page 29: ...return to the previous level press SETTINGS The available channel settings are described in the following Setting Description Auto Tuning Tunes and stores all available channels through antennas or cable inputs Manual Tuning Tunes and stores the channels you want manually Option Fine Normally fine tuning is only necessary if reception is poor Favorite Channel Selects your favorite channels directl...

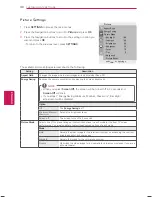
Page 30: ...t y y If you adjust Energy Saving Minimum Medium Maximum Backlight adjustment will be disabled NOTE Option Off The Energy Saving is off Minimum Medium Maximum Selects the brightness level Screen off The screen turns off in 3 seconds Picture Mode Selects one of the preset image or customizes options in each mode for the best TV screen performance You are also able to customize advanced options of e...

Page 31: ...tions Setting Description Dynamic Contrast Adjusts the contrast to keep it at the best level according to the brightness of the screen The picture is improved by making bright parts brighter and dark parts darker Dynamic Color Adjusts screen colors so that they look livelier richer and clearer This feature enhances hue saturation and luminance so that red blue and green white look more vivid Noise...

Page 32: ...to music Cinema Select when you watch movies Option Treble Controls the dominant sounds in the output When you turn up the treble it will increase the output to the higher frequency range Bass Controls the softer sounds in the output When you turn up the bass it will increase the output to the lower frequency range Reset Resets the sound mode to the default setting Auto Volume Activates the Auto V...

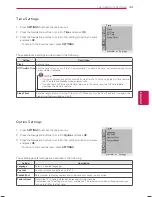
Page 33: ...eature Sleep Timer Sets the length of time until the TV to turns off When you turn the TV off and turn it on again the Sleep timer faature will be set to off Time Clock Off Time On Time Sleep Timer s ꔉ Settings Option Settings 1 Press SETTINGS to access the main menus 2 Press the Navigation buttons to scroll to Option and press OK 3 Press the Navigation buttons to scroll to the setting or option y...

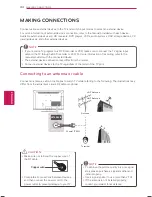
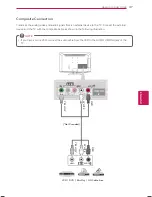
Page 34: ... device connection may differ from the model y y Connect external devices to the TV regardless of the order of the TV port NOTE ANTENNA IN Connecting to an antenna or cable Connect an antenna cable or cable box to watch TV while referring to the following The illustrations may differ from the actual items and a RF cable is optional NOTE y y To improve the picture quality in a poor signal area plea...

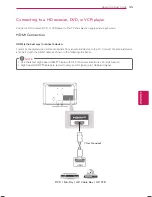
Page 35: ... a device Transmits the digital video and audio signals from an external device to the TV Connect the external device and the TV with the HDMI cable as shown in the following illustration y y Use the latest High Speed HDMI Cable with CEC Customer Electronics Control function y y High Speed HDMI Cables are tested to carry an HD signal up to 1080p and higher NOTE HDMI IN Not Provided DVD Blu Ray HD ...

Page 36: ... TV Connect the external device and the TV with the component cable as shown in the following illustration y y If cables are installed incorrectly it could case the image to display in black and white or with distorted color y y Check to ensure the cable are matched with the corresponding color connection NOTE Not Provided Not Provided DVD Blu Ray HD Cable Box GREEN GREEN BLUE BLUE RED RED RED RED...

Page 37: ...rnal device and the TV with the composite cable as shown in the following illustration y y If you have a mono VCR connect the audio cable from the VCR to the AUDIO L MONO jack of the TV NOTE VIDEO MONO AUDIO L R COMPONENT IN VIDEO Y L R PB PR AUDIO VIDEO L MONO AUDIO R AV IN VCR DVD Blu Ray HD Cable Box Not Provided YELLOW WHITE RED YELLOW WHITE RED ...

Page 38: ... card reader to the TV USB IN USB Not Provided Connecting to an audio system Use an optional external audio system instead of the built in speaker External stereo connection Use to connected either an external amplifier or surround sound system IN ANTENNAIN L AUDIO OUT R L R AUDIO IN External Stereo Not Provided Not Provided ...

Page 39: ... result in scratches on the screen and image distortions y y Do not use any chemicals such as waxes benzene alcohol thinners insecticides air fresheners lubricants as these may damage the screen s finish and cause discoloration y y Do not spray liquid onto the surface If water enters the TV it may result in fire electric shock or malfunction Power cord Remove the accumulated dust or dirt on the po...

Page 40: ... seconds and try again If the image still does not appear contact the authorized service center in your local area Cannot connect external devices y y Refer to the connect an external device The TV turns off suddenly y y Check the power control settings The power supply may be interrupted y y Check if the Auto sleep feature is activated in the Time settings Refer to the Sleep Timer y y If there is...

Page 41: ...t the brightness and contrast in the menu option No Signal appears on the screen y y Check if the signal cable is connected between the TV and products properly y y Check the selected input source by pressing INPUT Black spots appear on the screen y y Several pixels in red green white or black may appear on the screen that can attribute to the characteristics of the panel This is normal The displa...

Page 42: ...ice due to upgrade of product functions MODELS 22CS410 22CS410 MB 26CS410 26CS410 MB Dimensions W x H x D With stand 539 0 mm x 400 0 mm x 164 6 mm 663 0 mm x 483 0 mm x 197 0 mm Without stand 539 0 mm x 345 0 mm x 56 8 mm 663 0 mm x 424 0 mm x 72 8 mm Weight With stand 4 2 kg 7 4 kg Without stand 3 9 kg 6 6 kg Current Value Power consumption 0 8 A 50 W 1 0 A 100 W MODELS 32CS410 32CS410 MB Dimens...

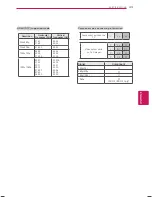
Page 43: ...00 1280x720p 44 96 45 00 37 500 59 94 60 00 50 00 1920x1080p 26 97 27 00 33 71 33 75 67 432 67 50 56 250 23 976 24 00 29 97 30 00 59 94 60 00 50 00 Component port connecting information Component ports on the TV Y PB PR Video output ports on DVD player Y PB PR Y B Y R Y Y Cb Cr Y Pb Pr Signal Component 480i 576i O 480p 576p O 720p 1080i O 1080p O 50 Hz 60 Hz only ...

Page 44: ...The model and serial number of the TV is located on the back and one side of the TV Record it below should you ever need service MODEL SERIAL ...

Reviews: