LG 21HK512D Owner'S Manual Download Page 7

7

ENGLISH

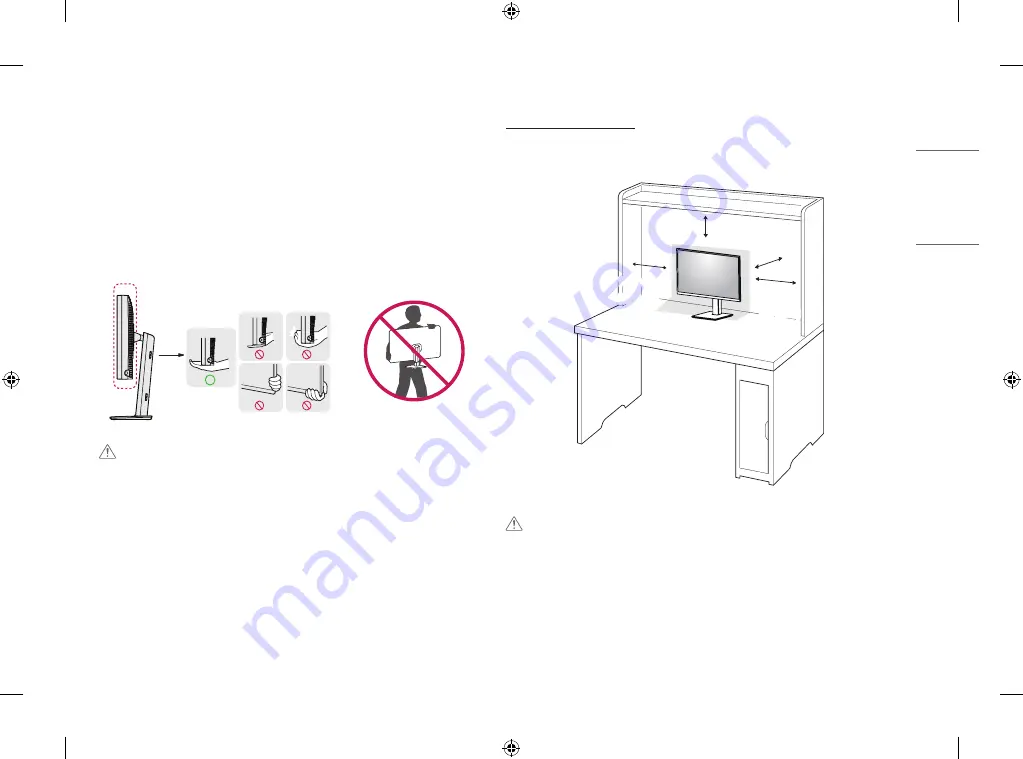
Moving and Lifting the Monitor

When moving or lifting the monitor, follow these instructions to prevent the monitor from being scratched or 
damaged and to ensure safe transportation, regardless of its shape or size.


Place the monitor in the original box or packing material before attempting to move it.


Before moving or lifting the monitor, disconnect the power cord and all other cables.


Hold the bottom and side of the monitor frame firmly. Do not hold the panel itself.


When holding the monitor, the screen should face away from you to prevent it from being scratched.


When transporting the monitor, do not expose the monitor to shock or excessive vibration.


When moving the monitor, keep it upright and never turn the monitor on its side or tilt it sideways.

 CAUTION


Avoid touching the monitor screen as much as possible.


-

This may result in damage to the screen or some of the pixels used to create images.


If you use the monitor panel without the stand base, its OSD Control Knob may cause the monitor to become 
unstable and fall, resulting in damage to the monitor or human injury. In addition, this may cause the OSD 
Control Knob to malfunction.

Installing on a Table


Lift the monitor and place it on the table in an upright position. Place the monitor at least 100 mm (3.9 
inches) away from the wall to ensure sufficient ventilation.

100 mm
(3.9 inches)

100 mm
(3.9 inches)

100 mm
(3.9 inches)

100 mm
(3.9 inches)

 CAUTION


Unplug the power cord before moving or installing the monitor. There is risk of electric shock.


Make sure to use the power cord that is provided in the product package and connect it to a grounded power 
outlet.


If you need another power cord, please contact your local dealer or the nearest retail store.

Summary of Contents for 21HK512D

Page 1: ...nual carefully before operating your set and retain it for future reference 21HK512D www lg com Copyright 2019 LG Electronics Inc All Rights Reserved OWNER S MANUAL MEDICAL MONITOR MFL71428803 2008 REV02 Printed in Taiwan ...

Page 2: ...fforce Thecleanercouldcauseseriousdamageifitleaksinsidethemonitorwhilecleaning Thedisplaycouldbedamaged soonlycleanthepartsofthemonitorotherthanthescreen sLCDpanel Donotusebenzene thinner acidsoralkalinecleanersorothersuchsolvents Cleaningguidelinesfordisplaysmustonlybecarriedoutbymedicalprofessionals doctorsornurses and mustnotbehandledbypatients CONTENTS ON CLEANING 2 ASSEMBLY AND PREPARING 3 IN...

Page 3: ...ofaccessoriesshownbelow Unauthorizedcomponents cancausedamageandmalfunctiontotheproduct Component Standard DisplayPort Cable UL Impedance100ohm DVI D Cable UL Impedance100ohm Power Cord US ApprovedUSsafetyregulation Others Approvedcountrysafetyregulation NOTE Thecomponentsmaylookdifferentfromthoseillustratedhere Withoutpriornotice allproductinformationandspecificationscontainedinthismanualaresubje...

Page 4: ... Indicator LED Status Operation Description Green Normaloperation Orange Nosignal Powersaving LightOrange Powersavingwhenpeopleleave LEDoff Poweroff NOTE Undernormaloperation PowerLEDIndicatorwillbeoffafter20secondsinordernottoaffecttheimage readingqualityindarkroom TobringbackthePowerLEDIndicator presstheOSDControlKnoborswitchdisplaycondition ...

Page 5: ...rttoanexternalstoragedevice itiscompatiblewithFAT32only Fortechnicianuseonly 3 RJ45 ForsendingcalibrationreporttoatargetPCandsynchronizewithtimeserver Fortechnician useonly 4 DisplayPort20pin DigitalConnection 5 Dual LinkDVI D DigitalConnection 6 ACpowerinput ForoperationwithACpower 7 Equipotential terminal Connecttootherequipment spotentialequalizationconductor 8 ACswitch ForoperationwithACpower ...

Page 6: ...thepowercordtothemonitorandtheotherendtothepoweroutlet 5 TheACswitchonthebackofthemonitormustbeturnedon ThenturnonthemonitorwiththeOSD ControlKnob 6 Forfurtheradjustments refertotheOSDsectionofthismanual NOTE Incorrectcableconnectionsmayresultinirregularoperation damagedisplayquality componentsofLCD moduleand orshortenthemodule slife PleaserefertoCautionof AssemblyAndPreparing sectionforpropersele...

Page 7: ...itssideortiltitsideways CAUTION Avoidtouchingthemonitorscreenasmuchaspossible Thismayresultindamagetothescreenorsomeofthepixelsusedtocreateimages Ifyouusethemonitorpanelwithoutthestandbase itsOSDControlKnobmaycausethemonitortobecome unstableandfall resultingindamagetothemonitororhumaninjury Inaddition thismaycausetheOSD ControlKnobtomalfunction Installing on aTable Liftthemonitorandplaceitonthetab...

Page 8: ...forwardorbackwardfrom 5 to25 foracomfortableviewing experience WARNING Toavoidinjurytothefingerswhenadjustingthescreen donotholdthelowerpartofthemonitor sframeas illustratedbelow Becarefulnottotouchorpressthescreenareawhenadjustingtheangleofthemonitor Swivel stand Swivel45degreesandadjusttheangleoftheMonitorsettosuityourview Pivot Feature Thepivotfeatureallowsthemonitortorotate90degreesclockwiseor...

Page 9: ...toruptothemaximumheight 2 Adjusttheangleofthemonitorinthedirectionofthearrowasshowninthefigure 3 Rotatethemonitorclockwiseorcounter clockwiseasshowninthefigure 4 Completetheinstallationbyrotatingthemonitor90 asshowninthefigure ...

Page 10: ...rddriversmayusedifferentsettingsforthe screenpivotkeyormaynotsupportthepivotkeyatall Windowsoperatingsystemscreenpivotshortcutkey 0 Ctrl Alt keyboardupkey 90 Ctrl Alt keyboardleftkey 180 Ctrl Alt keyboarddownkey 270 Ctrl Alt keyboardrightkey WARNING Takecarewhenrotatingthemonitorifthecableisconnected Toavoidinjurytoyourfingers donotputthembetweenthescreenandthestandbasewhenturningthe monitor sscre...

Page 11: ...TheOSDControlKnobisamulti functionaldevicelocatedbehindthePowerLEDIndicatorontherightsideof thefrontbezel Ithasthreemovements rotateupward rotatedownwardandpressinwardasabutton PowerOn Off PresstheOSDControlKnobtopowertheunitonfromtheoffstage theLEDisoff Toturnthepoweroff presstheOSDControlKnob andholdforatleast3seconduntiltheLEDturnsoff OSDControl Whilethemonitorison greenLEDandimageonthescreen P...

Page 12: ...htnessto400cd m2 10 500 Adjustbrightnessto500cd m2 10 600 Adjustbrightnessto600cd m2 10 Off Stop ALS andenable Brightness Auto Autoselect ALS accordingambientlightdetectedbyAmbientsensor Brightness Adjustthebacklightofthefullscreenbytherangefrom0to100 Contrast Adjustthecontrastforthedisplayimagebytherangefrom0to100 ColorTemp 6500K SetColortempto6500K 7500K SetColortempto7500K 9300K SetColortempto9...

Page 13: ...2 GammaDICOM SetGammacurveformedicalstandard DIN6868 157 GammaUser SetGammacurveforusermode LightBox Fullscreeninwhite Info Info Description SystemInformation ShowModelname FirmwareVersion GPUVersion MonitorSN H Freq V Freq LifeTime IP ALS LUX NOTE InformationofLUXisonlyforreference Forqualityassurancetest pleaseusestandardequipment ...

Page 14: ...orizontalandverticalpositionofOSDMenu OSDTimer 10sec SetOSDdisplaytimearound10seconds 20sec SetOSDdisplaytimearound20seconds 30sec SetOSDdisplaytimearound30seconds 45sec SetOSDdisplaytimearound45seconds 60sec SetOSDdisplaytimearound60seconds 120sec SetOSDdisplaytimearound120seconds OSDLock Yes Select Yes toenablelock No LongpressOSDControlKnobinlock OSDTransparency SettransparencyofOSDMenu ...

Page 15: ...omUp Original Keepimageinnormalresolution Full Scaleuptheresolutionto2048x1536 2XScale Scaleupthespecificpartofimage SelfCalibration Yes EnablemonitortestluminanceandcalibrateDICOMwithcolortemperatureaccordingtoOSDsetting No Exitthispage Cal Date NOTE Show Cal Date inwhich SelfCalibration isdone The Cal Date willbebasedonthedatethatisshownintheOSDmenu itcanbesyncedtotherealtime dateviainternet RJ4...

Page 16: ...anthirtyminutes Thescreenhasdefectivepixels Thescreenhasdefectivepixels e g slightlylightordark ThisisduetothecharacteristicsofthepanelitselfandnottheLCDproduct Imageisunstable unfocusedorswimmingisapparent Signalcableshouldbecompletelyattachedtothecomputer Checkthemonitorandyourdisplaycardwithrespecttocompatibilityandrecommendedsignaltimings Ifyourtextisgarbled changethevideomodetonon interlacean...

Page 17: ...2115mm Resolution MaxResolution 2048x1536 60Hz RecommendedResolution VideoSignal HorizontalFrequency 63kHz 96kHz VerticalFrequency 50Hz 75Hz InputConnector Equipotentialterminal PowerSource PowerRating 100 240V 50 60Hz 1 2 0 5A Powerconsumption Max 85W EnvironmentalConditions OperatingConditions Temperature 0 Cto40 C 32 Fto104 F Humidity 0 to80 Pressure 540hPato1060hPa StoringConditions Temperatur...

Page 18: ...g 15 4 lbs MedicalSpecifications Classificationbyprotectiontypeagainst ElectricShock Class equipment Modeofoperation ContinuousOperation EnvironmentofUse Thisequipmentisnotsuitableforuseinthepresenceofflammableanestheticoroxygen TheOperatingModeofPowerConsumptionismeasuredwithLGEteststandard FullWhitepattern Maximumresolution ThePowerConsumptionlevelcanbedifferentbyoperatingconditionandmonitorsett...

Page 19: ...1024 108 63 96 60 0 VESA V V 1600x1200 162 75 00 60 0 VESA V V 1920x1080 148 5 67 50 60 0 VESA V V 1920x1200 193 6 74 60 60 0 VESA V V 2048x1536 260 96 71 60 0 V V NOTE Modesnotlistedinthetablemaynotbesupported Foroptimalresolution werecommendyoutochooseamodelistedintheabovetable Supported Graphic Card List Vendor Graphic Card ...

Page 20: ...ice Model SerialNo WARNING ThisequipmentiscompliantwithClassAofCISPR32 Inaresidentialenvironmentthisequipment maycauseradiointerference Supplier s Declaration of Conformity TradeName LG ResponsibleParty LGElectronicsUSA Inc Address 111SylvanAvenue NorthBuilding EnglewoodCliffs NJ07632 E mail lg environmental lge com ...

Reviews: