background image

21

MAKING CONNECTIONS 

ENGLISH

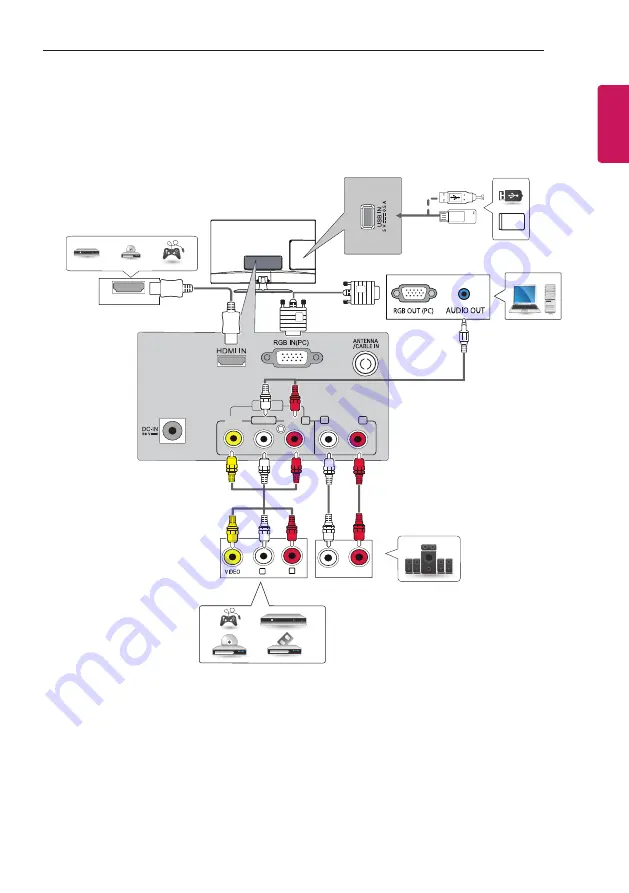
(Only 29MT45A)

HDMI OUT

AUDIO OUT R

L

 VIDEO

AUDIO

R

L/MONO

AV IN

AUDIO OUT

R

L

L                      R

AUDIO IN

USB port supports 0.5A electric current. If you need more electric current in case of HDD, use the 

separate power adaptor.

DVD / Blu-Ray / HD Cable Box / 

HD STB / Gaming device / VCR

DVD / Blu-Ray / 

HD Cable Box / 

HD STB / Gaming device

PC

USB / HDD

1

External Stereo

Summary of Contents for 20MT45A-PT

Page 1: ...OWNER S MANUAL LED TV Please read this manual carefully before operating your TV and retain it for future reference LG LED TV applies LCD screen with LED backlights MT44 MT45 www lg com ...

Page 2: ...ing photos 32 Listening to music 33 Viewing movies 35 DivX VOD Guide 36 CUSTOMIZING TV SETTING 36 Accessing main menus 37 Customizing Settings 37 SETUP Settings 37 PICTURE Settings 40 AUDIO Settings 42 TIME Settings 42 OPTION Settings 43 LOCK Settings 44 TELETEXT 44 Switch On Off 44 Simple Text 44 Page selection 44 Programming a colour button in LIST mode 44 Fastext 44 Page selection 45 Special Te...

Page 3: ...d device that has passed rigorous testing to verify that it plays DivX video Visit divx com for more information and software tools to convert your files into DivX videos ABOUT DIVX VIDEO ON DEMAND This DivX Certified device must be registered in order to play purchased DivX Video on Demand VOD movies To obtain your registration code locate the DivX VOD section in your device setup menu Go to vod ...

Page 4: ...uct box for the following items If there are any missing accessories contact the local dealer where you purchased your product The illustrations in this manual may differ from the actual product and accessories y y Do not use any pirated items to ensure the safety and product life span y y Any damages or injuries by using pirated items are not covered by the manufacturer s warranty y y Some models...

Page 5: ...ing on model See p 20 21 or Power Cord See p 15 AC DC Adapter See p 15 AC DC Adapter Depending on model See p 15 Stand Base Only MT44 See p 12 Stand Base Only 22 24 28MT45 See p 11 Stand Base Only 29MT45 See p 11 Stand Body Only 29MT45 See p 11 13 Stand Screws 2 EA M4 x L16 Only 29MT45 See p 12 14 Depending on model ...

Page 6: ...e power is turned on Remote Control Sensor Power Button Button Description MODE Selects the mode Programme Volume INPUT Programme Scrolls through the saved programmes Volume Adjusts the volume level INPUT Changes the input source Adjusts the mode button level y y Local keys work on Power Programme Volume and INPUT only NOTE Screen Speakers ...

Page 7: ...rned off place your finger on the joystick button and press it once and release it Power Off When the TV is turned on place your finger on the joystick button and press it once for a few seconds and release it Howerver if the Menu button is on the screen pressing and holding the joystick button will let you exit the Menu Volume Control If you place your finger over the joystick button and move it ...

Page 8: ...oystick button first you can not adjust the volume level and saved programmes NOTE Adjusting the Menu When the TV is turned on press the joystick button one time You can adjust the Menu items moving the joystick button up down left or right TV Off Turns the power off Settings Accesses the main menu Close Clears on screen displays and returns to TV viewing Input List Changes the input source ...

Page 9: ...All of the buttons are touch sensitive and can be operated through simple touch with your finger NOTE Touch buttons Description Scrolls through the saved programmes Adjusts the volume level OK Selects the highlighted menu option or confirms an input SETTINGS Accesses the main menus or saves your input and exits the menus INPUT Changes the input source Turns the power on or off Screen ...

Page 10: ...ct the power cord and all cables y y When holding the TV the screen should face away from you to prevent the screen from scratches y y Hold the top and bottom of the TV frame firmly Make sure not to hold the transparent part speaker or speaker grill area y y When transporting the TV do not expose the TV to jolts or excessive vibration y y When transporting the TV keep the TV upright never turn the...

Page 11: ... shown may differ from your TV Attaching the Stand y y When attaching the stand to the TV set place the screen facing down on a cushioned table or flat surface to protect the screen from scratches CAUTION 22 24 28MT45 1 Stand Base 2 29MT45 1 2 Stand Body Locker ...

Page 12: ...GLISH ENGLISH 3 2EA M4 x L16 y y If you don t fasten the screw tightly TV will fall down and get damaged y y Tighten the screws firmly to prevent the TV from tilting forward Do not over tighten NOTE 4 Stand Base MT44 1 Stand Base 2 ...

Page 13: ...e stand to the TV set place the screen facing down on a cushioned table or flat surface to protect the screen from scratches CAUTION 22 24 28MT45 1 Stand Base y y Lift up the latch at the bottom of the stand base and detach the stand base from the TV NOTE 2 29MT45 1 2 Stand Base ...

Page 14: ...he stand base from the TV NOTE 2 Stand Base y y Do not carry the TV upside down by holding the stand body or stand base as this may cause it to fall off resulting in damage or injury y y The illustration shows a general example of installation and may look different from the actual product CAUTION Stand Base Stand Body ...

Page 15: ...entilation 10 cm 10 cm 10 cm 10 cm 2 Connect the AC DC Adapter and Power Cord to a wall outlet DC IN 19V DC IN 19V or AC DC Adapter AC DC Adapter y y Do not place the TV near or on sources of heat as this may result in fire or other damage y y Please be sure to connect the TV to the AC DC power adapter before connecting the TV s power plug to a wall power outlet CAUTION ...

Page 16: ...n com Connect the Kensington security system cable between the TV and a table y y The Kensington security system is optional You can obtain additional accessories from most electronics stores NOTE Adjusting the angle of the TV to suit view y y Image shown may differ from your TV Tilt from 20 to 5 degrees up or down to adjust the angle of the TV to suit your view Only 29MT45 Front Rear 20 5 y y Whe...

Page 17: ...all mount interface in accordance with VESA Standards 2 If you use screw longer than standard the TV might be damaged internally 3 If you use improper screw the product might be damaged and drop from mounted position In this case LG Electronics is not responsible for it 4 VESA compatible only with respect to screw mounting interface dimensions and mounting screw specifications 5 Please use VESA st...

Page 18: ...s or injuries by misuse or using an improper accessory are not covered by the manufacturer s warranty y y Screw length from outer surface of back cover should be under 8mm Wall mount Pad Back Cover Standard screw M4 x L10 Wall mount Pad Back Cover Max 8mm CAUTION y y Use the screws that are listed on the VESA standard screw specifications y y The wall mount kit includes an installation manual and ...

Page 19: ... manual provided with the connected device y y Refer to the external equipment s manual for operating instructions y y If you connect a gaming device to the TV use the cable supplied with the gaming device y y In PC mode there may be noise associated with the resolution vertical pattern contrast or brightness If noise is present change the PC output to another resolution change the refresh rate to...

Page 20: ...2 24 28MT45A VIDEO AUDIO R L MONO AV IN AUDIO OUT R L HDMI OUT VIDEO AUDIO R L MONO AV IN AUDIO OUT R L AUDIO OUT R L L R AUDIO IN VIDEO AUDIO R L MONO AV IN AUDIO OUT R L 1 USB port supports 0 5A electric current If you need more electric current in case of HDD use the separate power adaptor PC DVD Blu Ray HD Cable Box HD STB Gaming device DVD Blu Ray HD Cable Box HD STB Gaming device VCR Externa...

Page 21: ...MONO AV IN AUDIO OUT R L L R AUDIO IN 1 USB port supports 0 5A electric current If you need more electric current in case of HDD use the separate power adaptor DVD Blu Ray HD Cable Box HD STB Gaming device VCR DVD Blu Ray HD Cable Box HD STB Gaming device PC USB HDD1 External Stereo ...

Page 22: ...mode SOUND Changes the sound mode INPUT Changes the input source Number buttons Enters numbers LIST Accesses the saved programme list Q VIEW Returns to the previously viewed programme Adjusts the volume level FAV Accesses your favourite programme list I II Selects the sound output MUTE Mutes all sounds ꕌPꕍ Scrolls through the saved programmes ꕌPAGEꕍ Moves to the previous or next screen 1 TELETEXT ...

Page 23: ...e Use y y Store Demo is suitable for the retail environment y y If you select Store Demo any customized settings will switch back to the default settings of Store Demo in 5 minutes NOTE 4 When the basic settings are complete press the OK y y If you do not complete the Initial setting it will appear whenever the TV turns on y y Disconnect the power cord from the power outlet when you do not use the...

Page 24: ...and start Searching 13 Press the OK to store it 14 When you return to the previous menu press ꕣ BACK y y To store another programme repeat steps 3 to 13 NOTE Assigning a station name You can assign a station name with five characters to each programme number 1 Press SETTINGS and the Navigation buttons to scroll to SETUP 2 Press the Navigation buttons to scroll to Manual Tuning 3 Press the Navigati...

Page 25: ...tton twice The selected programme is deleted all the following programmes are shifted up one position Yellow button Moves a programme Press the Yellow button again to release this function Blue button Selects a programme number to be skipped Press the Blue button again to release the skipped programme 4 When you return to the previous menu press ꕣ BACK Selecting a programme on the programme list 1...

Page 26: ...ises at the edge of the original signal NOTE Original When your TV receives a wide screen signal it will automatically change to the picture format broadcasted 4 3 4 3 16 9 16 9 4 3 Resizes images to the previous standard 4 3 14 9 You can view a picture format of 14 9 or a general TV programme in the 14 9 mode The 14 9 screen is viewed in the same way as in 4 3 but is moved to the up and down Zoom...

Page 27: ...e Navigation buttons or input button to scroll to one of the Input sources and press OK y y Image shown may differ from your TV Input List Exit AV RGB PC HDMI TV Input source Description AV Watch video from a VCR or other external devices RGB PC View a PC display on the screen HDMI Watch video from a HTS or other high definition devices TV Watch TV over the air and cable broadcast ...

Page 28: ...n automatic recognition programme may not be recognized y y A USB storage device which uses its own driver may not be recognized y y The recognition speed of a USB storage device may depend on each device y y Please do not turn off the TV or unplug the USB device when the connected USB storage device is working When such device is suddenly separated or unplugged the stored files or the USB storage...

Page 29: ... press OK PHOTO LIST MUSIC LIST MOVIE LIST PHOTO LIST Page1 1 No Marked USB Device Free Space 4 GB Drive A Up Folder KY103 09 15 2014 GUU JPG KY101 04 03 2014 KY104 10 12 2014 KY102 09 03 2014 KY105 11 27 2014 GUU 11 27 2014 JMJ005 11 27 2014 3872x2592 2604KB JMJ002 11 27 2014 JMJ006 11 27 2014 JMJ003 11 27 2014 JMJ007 11 27 2014 Up Folder JMJ004 11 27 2014 JMJ008 11 27 2014 ꔂ Move ꔉ PopUp Menu ꔵ ...

Page 30: ... files Close Exits the Mark Mode y y Non supported files are displayed the preview image by icon only y y Abnormal files are displayed in the form of bitmap NOTE Supported file format Type Supported file format Photo JPEG Available size Baseline 64 pixel W x 64 pixel H 15360 pixel W x 8640 pixel H Progressive 64 x 64 to 1024 x 768 y y You can play JPEG files only y y Non supported files are displa...

Page 31: ...resolution of the rotated width is larger than the supported resolution size NOTE Hide Hides the option window To display the options press OK Q MENU options for photo list 1 Press Q MENU A pop up window will appears 2 Press the Navigation buttons to scroll to Set photo view and press OK 3 Press the Navigation buttons to scroll to one of the following options and press OK Set photo view Option Des...

Page 32: ...All Selects all files Close Exits the Mark Mode 6 Control playback by using the following buttons Button Description r Stops playback s Plays a music file t Pauses or resumes playback w Skips to the next file v Skips to the previous file or When playing When you press the button the previous music file will be played When you press the button the next music file will be played EXIT When you press ...

Page 33: ...ed file or enters the mark mode ꕌPꕍ Moves to the previous or next page FAV Enters the mark mode Menu Description Play Play the selected movie file Once a movie file finishes playing the next selected one will be played automatically Mark All Mark all movie files on the screen Close Exit the Mark Mode 6 Control playback by using the following buttons ꔋ 00 22 05 ꘩ Option 02 10 Button Description r S...

Page 34: ...o codec is not supported y y A movie file more than 30 GB in file size is not supported for playback The file size limit is dependent on the encoding environment y y A DivX movie file and its subtitle file must be located in the same folder y y A video file name and its subtitle file name must be identical for it to be displayed y y Playing a video via a USB connection that doesn t support high sp...

Page 35: ...esolution under 1920 x 1080 WxH pixels y y Frame rate under 30 frames sec y y Video Codec MPEG 1 MPEG 2 MPEG 4 H 264 AVC DivX 3 11 DivX 4 x DivX 5 x DivX 6 Xvid 1 00 Xvid 1 01 Xvid 1 02 Xvid 1 03 Xvid 1 10 beta1 Xvid 1 10 beta2 JPEG VC1 Sorenson H 263 H 264 NOTE When you select the Set audio See p 40 1 Press the Navigation buttons to scroll to show the Sound Mode Auto Volume Balance 2 Press the Na...

Page 36: ...ivx com Continue with registration Yes No 6 When you are finished press EXIT When you return to the previous menu press ꕣ BACK CUSTOMIZING TV SETTING y y Image shown may differ from your TV Accessing main menus 1 Press SETTINGS to access the main menus 2 Press the Navigation buttons to scroll to one of the following menus and press OK 3 Press Navigation buttons to scroll to the setting or option y...

Page 37: ...E 2 Press the Navigation buttons to scroll to the setting or option you want and press OK 3 When you return to the previous menu press ꕣ BACK y y Image shown may differ from your TV OK Move PICTURE Aspect Ratio 16 9 ꕊ Energy Saving Off Picture Mode Standard Backlight 70 Contrast 90 Brightness 50 Sharpness 70 Colour 60 Tint 0 R G Colour Temperature 0 W C Advanced Control Reset Screen RGB PC Move OK...

Page 38: ...after the auto configuration Reset Restores the options to the default setting Setting Description Picture Mode Selects one of the preset image or customizes options in each mode for the best TV screen performance You are also able to customize advanced options of each mode Mode Vivid Adjusts the video image for the retail environment by enhancing the contrast brightness colour and sharpness Stand...

Page 39: ... Restores the options of each mode to the factory default Advanced image options Depending on model Setting Description Dynamic Contrast Adjusts the contrast to keep it at the best level according to the brightness of the screen The picture is improved by making bright parts brighter and dark parts darker Dynamic Colour Adjusts screen colours so that they look livelier richer and clearer This feat...

Page 40: ...ng Setting Description Auto Volume Activates the Auto Volume feature to keep the volume level consistent whenever you change programmes The volume level may not be consistent due to different signal conditions of broadcasting stations Balance Adjust balance between the left and right speakers according to your room environment Setting Description Sound Mode Selects one of the preset sound modes or...

Page 41: ...dspeakers DUAL I I I Sends a separate language to each loudspeaker Nicam Reception If the TV is equipped with a receiver for NICAM reception high quality NICAM Near Instantaneous Companding Audio Multiplex digital sound can be received Sound output can be selected according to the type of broadcast received 1 When NICAM mono is received you can select NICAM MONO or FM MONO 2 When NICAM stereo is r...

Page 42: ...atures to the same time the Off time feature overrides the On time feature NOTE Sleep Timer Sets the length of time until the TV to turns off When you turn the TV off and turn it on again the Sleep timer feature will be set to off OPTION Settings 1 Press SETTINGS and the Navigation buttons to scroll to OPTION 2 Press the Navigation buttons to scroll to the setting or option you want and press OK 3...

Page 43: ...ssword Block Programme Input Block Move OK The available lock settings are described in the following Setting Description Lock System Activates or deactivates the lock system Set Password Changes the 4 digit password The default PIN is 0 0 0 0 Block Programme Blocks the programmes that contain inappropriate contents for children by pressing the Blue button The Lock icon appears in front of the blo...

Page 44: ...st complete the three digit number and then re enter the correct page number 2 The ꕌPꕍ button can be used to select the preceding or following page Programming a colour button in LIST mode If the TV is in SIMPLE text or FASTEXT mode press the LIST button to switch to LIST mode Four teletext page numbers of your choice can be colour coded and easily selected by pressing the corresponding coloured b...

Page 45: ...t page consists of 2 or more sub pages The number of sub pages and the sub page displayed is usually shown on the screen below the time When this menu is selected the stop symbol is displayed at the top lefthand corner of the screen and the automatic page change is inactive Reveal Select this menu to display concealed information such as solutions to riddles or puzzles Update Displays the TV pictu...

Page 46: ... the screen and image distortions y y Do not use any chemicals such as waxes benzene alcohol thinners insecticides air fresheners lubricants as these may damage the screen s finish and cause discolorations y y Do not spray liquid onto the surface If water enters the TV it may result in fire electric shock or malfunction y y Do not use any chemicals as this may deteriorate the surface CAUTION Power...

Page 47: ...ce center in your local area Cannot connect external devices y y Refer to the Other Connections and connect an external device The TV turns off suddenly y y Check the power control settings The power supply may be interrupted y y Check if the Sleep Timer or Off Time feature is activated in the TIME settings y y If there is no signal while the TV is on the TV will turn off automatically after 15 mi...

Page 48: ... the brightness and contrast in the menu option No Signal appears on the screen y y Check if the signal cable is connected between the TV and products properly y y Check the selected input source by pressing INPUT Black spots appear on the screen y y Several pixels in red green white or black may appear on the screen that can attribute to the characteristics of the panel y y This is normal The dis...

Page 49: ...LCAP25A LCAP25B Manufacturer Honor Model ADS 40FSG 19 19032GPG ADS 40FSG 19 19032GPCU ADS 40SG 19 2 19032G Manufacturer APD Model WA 32C19FI DA 32F19 DA 32B19 MODELS 28MT45A 29MT45A Dimensions W x H x D With stand mm 641 5 x 445 2 x 175 0 668 6 x 472 4 x 223 5 Without stand mm 641 5 x 396 1 x 57 5 668 6 x 410 5 x 65 8 Weight With stand kg 4 6 5 9 Without stand kg 4 4 5 3 Power requirement 19 V 1 6...

Page 50: ...ufacturer Lien Chang Model LCAP16B E LCAP16B A LCAP25B Manufacturer LG Innotek Model PSAB L205B PSAB L205C PSAB L204B Manufacturer APD Model WA 40D19FI DA 40I19 DA 40E19 Environment condition Operating Temperature 10 C to 35 C Operating Humidity 20 to 80 Storage Temperature 10 C to 60 C Storage Humidity 5 to 90 Analogue TV Depending on Country Television System PAL SECAM B G D K PAL I NTSC M PAL B...

Page 51: ...ly 24MT44 45 28MT45 29MT45 Resolution Horizontal Frequency kHz Vertical Frequency Hz 640 x 480 31 469 59 940 800 x 600 37 879 60 317 1024 x 768 48 363 60 1280 x 720 47 770 59 850 1152 x 864 54 340 60 050 1366 x 768 47 710 59 790 y y The optimal display resolution is 1366 X 768 60 Hz y y The optimal timing in each mode is vertical frequency 60 Hz NOTE HDMI DTV supported mode Resolution Horizontal F...

Page 52: ...ns before using the product Keep the Owner s Manual CD in an accessible place for future reference The model and serial number of the TV is located on the back and one side of the TV Record it below should you ever need service MODEL SERIAL ...

Reviews: