98
Using the PC
Using the PC
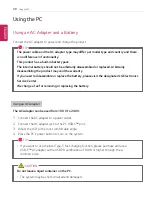
Using an AC Adapter and a Battery
Connect the AC adapter to power and charge the product.
TIP
The power cable and the AC adapter type may differ per model type and country and there
is no difference in functionality.
This product has a built-in battery pack.
The internal battery should not be arbitrarily disassembled or replaced. Arbitrarily
disassembling the product may void the warranty.
If you need to disassemble or replace the battery, please visit the designated LG Electronics
Service Center.
We charge a fee for removing or replacing the battery.
Using an AC Adapter
The AC Adapter can be used from 100 V to 240 V.
1
Connect the AC adapter to a power outlet.
2
Connect the AC adapter jack to the PC USB-C
™
port.
3
Adjust the LCD to the most comfortable angle.
4
Press the PC's power button to turn on the system.
TIP
•
If you want to use the Intel Type-C fast-charging function, please purchase and use a
USB-C
™
AC adapter with a USB PD certification of 80 W or higher through the e-
commerce site.
CAUTION
Do not leave a liquid container on the PC.
•
The system may be short-circuited and damaged.
ENGLISH
Summary of Contents for 14Z90P Series
Page 22: ...22 Instruction Safety Information Regulatory Notices ENGLISH ...
Page 23: ...Instruction Safety Information 23 ENGLISH ...
Page 24: ...24 Instruction Safety Information ENGLISH ...
Page 25: ...Instruction Safety Information 25 ENGLISH ...
Page 26: ...26 Instruction Safety Information ENGLISH ...
Page 27: ...Instruction Safety Information 27 ENGLISH ...
Page 28: ...28 Instruction Safety Information ENGLISH ...
Page 29: ...Instruction Safety Information 29 ENGLISH ...
Page 30: ...30 Instruction Safety Information ENGLISH ...
Page 31: ...Instruction Safety Information 31 ENGLISH ...
Page 32: ...32 Instruction Safety Information ENGLISH ...
Page 33: ...Instruction Safety Information 33 ENGLISH ...
Page 34: ...34 Instruction Safety Information ENGLISH ...
Page 35: ...Instruction Safety Information 35 ENGLISH ...
Page 36: ...36 Instruction Safety Information ENGLISH ...
Page 37: ...Instruction Safety Information 37 ENGLISH ...
Page 38: ...38 Instruction Safety Information ENGLISH ...
Page 39: ...Instruction Safety Information 39 ENGLISH ...
Page 40: ...40 Instruction Safety Information ENGLISH ...
Page 41: ...Instruction Safety Information 41 ENGLISH ...
Page 42: ...42 Instruction Safety Information ENGLISH ...
Page 43: ...Instruction Safety Information 43 ENGLISH ...
Page 44: ...44 Instruction Safety Information ENGLISH ...
Page 45: ...Instruction Safety Information 45 ENGLISH ...
Page 46: ...46 Instruction Safety Information ENGLISH ...
Page 47: ...Instruction Safety Information 47 ENGLISH ...
Page 48: ...48 Instruction Safety Information ENGLISH ...
Page 49: ...Instruction Safety Information 49 ENGLISH ...
Page 50: ...50 Instruction Safety Information ENGLISH ...
Page 51: ...Instruction Safety Information 51 ENGLISH ...
Page 52: ...52 Instruction Safety Information ENGLISH ...
Page 53: ...Instruction Safety Information 53 ENGLISH ...
Page 54: ...54 Instruction Safety Information ENGLISH ...
Page 55: ...Instruction Safety Information 55 ENGLISH ...
Page 56: ...56 Instruction Safety Information ENGLISH ...
Page 57: ...Instruction Safety Information 57 ENGLISH ...
Page 58: ...58 Instruction Safety Information ENGLISH ...
Page 59: ...Instruction Safety Information 59 ENGLISH ...
Page 60: ...60 Instruction Safety Information ENGLISH ...
Page 73: ...Using Windows 10 73 3 The selected app is added to the Start menu or taskbar ENGLISH ...
Page 76: ...76 Using Windows 10 3 Click the New Desktop tile ENGLISH ...
Page 78: ...78 Using Windows 10 6 The screen is toggled to the selected app or desktop ENGLISH ...
Page 85: ...Using Windows 10 85 ENGLISH ...
Page 135: ...Using the PC 135 2 When the Settings screen appears select Devices ENGLISH ...
Page 139: ...Using the PC 139 2 Connect the wired LAN cable to the LAN port ENGLISH ...
Page 141: ...Using the PC 141 4 Select Network Internet Status Change adapter options ENGLISH ...
Page 142: ...142 Using the PC 5 Right click Ethernet and select the Properties menu ENGLISH ...
Page 147: ...Using the PC 147 3 Select the Access Point you want to connect to and press Connect ENGLISH ...
Page 160: ...160 Using Software 1 Select the All List Update needed menu item ENGLISH ...
Page 165: ...Using Software 165 1 Press the icon on the taskbar ENGLISH ...
Page 190: ...190 Using Software ENGLISH ...
Page 192: ...192 Using Software 3 Press OK to complete the setup ENGLISH ...
Page 196: ...196 Restoring the System 1 Select Keep my files ENGLISH ...
Page 199: ...Restoring the System 199 1 Select Remove everything ENGLISH ...
Page 226: ...226 Setup and Upgrade 3 Boots using the selected device ENGLISH ...
Page 228: ...228 Setup and Upgrade 2 Select System Display ENGLISH ...
Page 235: ...FAQ 235 2 Select System Display ENGLISH ...
Page 240: ...240 FAQ 1 Select Keep my files ENGLISH ...
Page 243: ...FAQ 243 1 Select Remove everything ENGLISH ...
Page 251: ...FAQ 251 3 Select the Access Point you want to connect to and press Connect ENGLISH ...


