Page 5
The drip tray should be filled with a layer of either an approved ‘fat catch’
material or sand to soak up dripping fats and oils during cooking. Flat drip
trays can also be lined with foil before adding fat catch material.
LGCL30SSBL
PREHEATING
Light the burners as previously directed, turn to low and allow the bbq
to preheat for 2-5 minutes. Adjust control to Grillstream position marked
or optimum cooking temperature, the hood must be closed while doing this.
EXCEEDING 250 Degrees CAN DAMAGE THE BBQ AND VOID YOUR WARRANTY
PREPARE THE COOKING SURFACE
It is preferable to apply a light coat of cooking oil using a long handled
brush to the cooking surface prior to lighting each time. The oil will keep
the food from sticking to the cooking surface. Also see CAST IRON COOKING
SURFACES in the maintenance section below for ongoing maintenance
instructions.
Note:
The heat distribution plates disperses the heat from the burners.
This results in a uniform heat zone beneath the cooking grill.
Exceeding 250 C can damage the bbq and void your warranty.
MAINTENANCE OF YOUR BBQ
PROTECTION
Keep your bbq beneath a weather cover and out of the rain. Proper
care and maintenance will keep your bbq in top operating condition
and prolong its life.
CLEANING THE COOKING SURFACES
Allow your bbq to continue burning for 5 minutes after cooking has
ceased, which will burn off excess fats and juices etc. that may block
the flame ports of the burners. To keep your bbq ready for the next time,
turn the burners to
off
then take a long handled brush and brush the
cooking surface to remove excess oils and food scraps. Be careful as
surfaces are hot. Protect your hands by using an oven mitt to hold the
brush.
Allow to cool before washing in a warm soapy solution. Ensure that
any dried fat/food deposits are cleaned off both the grills after EVERY
cooking session. Rinse off with clean water and dry before returning
to bbq.
CAST IRON COOKING SURFACES (on specific models)
Cast Iron requires curing/seasoning after each use if possible or on a regular
basis. After cleaning as above, lightly coat the grills and griddle top and
bottom with cooking oil, either with a brush or aerosol spray. Replace all the
cooking surfaces back into the barbecue, light the burners and turn them to
low for at least 15 minutes. Your cooking surfaces are now seasoned.
Note: Curing/seasoning cast iron will help to slow corrosion.
CLEANING THE FLAME TAMERS
Periodically wash in a warm soapy solution. Use a wire brush to remove
stubborn burnt on cooking residue if necessary. Dry thoroughly before
re-installing to the bbq body.
CLEANING THE BBQ BODY
The body of the bbq should be cleaned regularly dependant on the use
and type of food cooked. Use warm soapy solution.
CLEANING THE DRIP TRAY
- IMPORTANT - the drip tray should be cleaned on a regular basis.
If this is ignored, a build up of fats and greases may cause a fire in the bbq
- More frequent cleaning may be necessary as usage demands
- FAT FIRES ARE NOT COVERED BY WARRANTY
CLEANING THE BURNERS
Occasionally after long cooking sessions, excess fats, juices and
marinades can clog the burners. If so, remove the burners (see
removing burners section) for cleaning.
- Clean by washing in a warm, soapy solution
- Ensure that all burner ports are free from obstruction
- Rinse in water, dry and return to bbq
- Light immediately to prevent rust and corrosion
- Brush lightly with cooking oil if bbq is not used for an extended period
FIRST USE AFTER LONG PERIODS
At the start of each bbq season or before using after a long period
of time:
- Read this operation manual again thoroughly
- Check all gas valve orifices, burner tubes and connections for
obstructions
- Check that all burners are in their correct positions
- Check to see if the gas cylinder is full
- Check for gas leaks using a soapy water solution
- Set burner controls to
off
and connect gas supply
- Ensure all grills are clean before use
FIRST TIME USE OF BBQ
- Before using the bbq for the first time, it should be first wiped with a
mild soap and water solution to remove any dust
-Make sure your BBQ is on a solid level surface
- Dry cooking surface and apply a light coating of cooking oil
- Light the barbecue and leave burning for 30 minutes on the
low
position, with hood up. This is to burn off any residual oils or foreign
matter on the grills.
FAT COLLECTION
Using the drip tray
Summary of Contents for LGSGM45BL
Page 11: ...Page 11 STEP 1 Fittings for this step M4x12 Screw X 4 22 20 15 LGCL30SSBL ...
Page 12: ...Page 12 STEP 2 Fittings for this step M4x12 Screw X 2 LGCL30SSBL ...
Page 13: ...Page 13 STEP 3 Fittings for this step M4x12 Screw X 4 16 LGCL30SSBL ...
Page 14: ...Page 14 STEP 4 22 24 20 LGCL30SSBL ...
Page 15: ...Page 15 STEP 5 23 21 24 LGCL30SSBL ...
Page 16: ...Page 16 STEP 6 Fittings for this step M6x12 Screw X 8 19 LGCL30SSBL ...
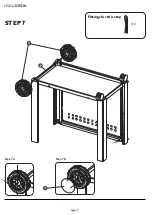
Page 17: ...Page 17 Step 7A Step 7B STEP 7 Fittings for this step 25 27 26 X 2 LGCL30SSBL ...
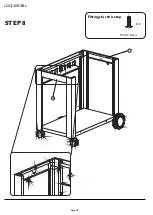
Page 18: ...Page 18 STEP 8 Fittings for this step 18 17 M4X12 Screw X 4 LGCL30SSBL ...
Page 19: ...Page 19 STEP 9 Fittings for this step M6X12 Screw X 10 M6 Washer X 4 14 LGCL30SSBL ...
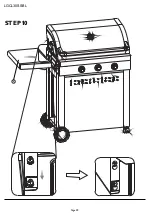
Page 20: ...Page 20 STEP 10 4 LGCL30SSBL ...
Page 21: ...Page 21 STEP 11 Fittings for this step M4x8 Screw Silver X 1 LGCL30SSBL ...
Page 22: ...Page 22 STEP 12 5 LGCL30SSBL ...
Page 23: ...Page 23 STEP 13 Fittings for this step M4x8 Screw Silver X 1 LGCL30SSBL ...
Page 24: ...Page 24 STEP 14 28 LGCL30SSBL ...
Page 26: ...Page 26 LGCL30SSBL ...

