background image

9

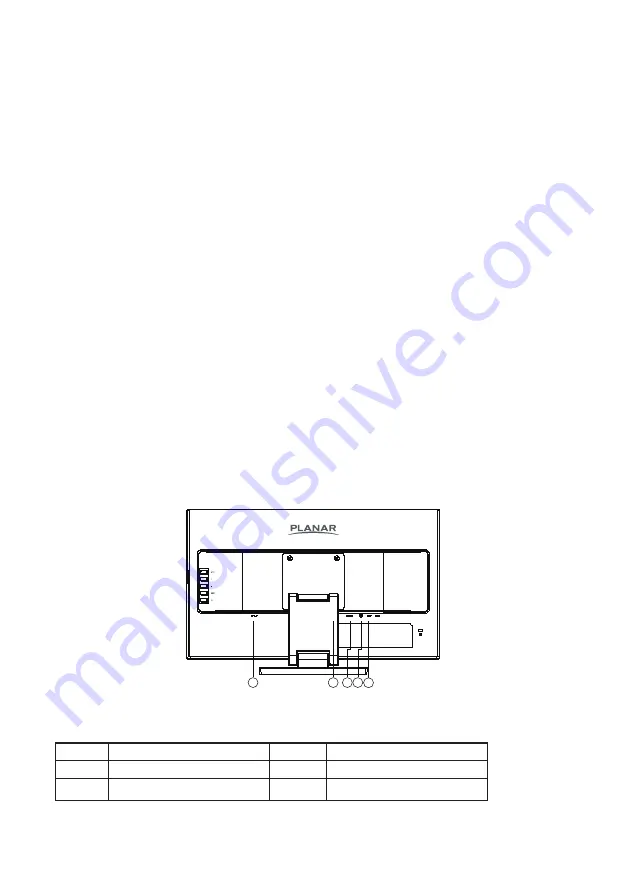
CONTROLS AND CONNECTORS

POWER CORD 

Power Source:

1.  Make sure that the power cord is the correct type required in your area. 
2.  This monitor has an internal universal power supply that allows operation in either 

100/120V AC or 220/240V AC voltage area (No user adjustment is required.) 

3.  Connect the AC-power cord into the monitor’s power input socket, The AC-power cord 

may be connected to either a wall power outlet or the power outlet socket on your PC, 
depending on the type of power cord supplied with your monitor. 

SIGNAL CABLE 

Connecting the Signal Cable : 

Plug one end of the signal cable to the  LCD monitor and the 

other end to a computer or a video source.  

USB Cable – A to B

The USB Cable – A to B – must be connected from the monitor to the computer for the touch 
screen to operate.
Connecting the USB Cable: Plug one end of the cable to the monitor – USB Cable (upstream) 
slot - and the other end to a USB port on the computer. Refer to page 17 for Calibration and 
Reset Instructions.

Caution: 

If the AC outlet is not grounded (with three holes), install the proper grounding adapter 

(not supplied).

1

5

4

3

2

Figure 2     Connecting  Cables 

1.

Power Cable

4.

Audio cable

2.

HDMI Cable

5.

USB Cable 

3.

D-SUB Cable

Summary of Contents for PLANAR PCT2435

Page 1: ...PCT2435 Touch LED LCD Monitor...

Page 2: ...ghts are reserved No part of this document may be reproduced translated to another language or stored in a retrieval system or transmitted by any means electronic mechanical photocopying recording or...

Page 3: ...CONNECTORS 9 ADJUSTING THE VIEWING ANGLE 10 OPERATING INSTRUCTIONS 11 GENERAL INSTRUCTIONS 11 FRONT PANEL CONTROL 12 HOW TO ADJUST A SETTING 13 ADJUSTING THE PICTURE 14 PLUG AND PLAY 16 TECHNICAL SUPP...

Page 4: ...or relocate the receiving antenna 2 Increase the separation between the equipment and receiver 3 Connect the equipment into an outlet on a circuit different from that to which the receiver is connecte...

Page 5: ...he manufacturer and follow the kit instructions Slots and openings in the back and bottom of the cabinet are provided for ventilation To ensure reliable operation of the monitor and to protect it from...

Page 6: ...efer all servicing to qualified service personnel To ensure satisfactory operation use the monitor only with UL listed computers which have appropriate configured receptacles marked between 100 240V A...

Page 7: ...the image or turning off the Power Switch for hours When the screen becomes black or flashing or cannot illuminate any more contact your dealer or service center to replace parts Don t repair the scr...

Page 8: ...s below may lead to physical harm 1 Lay the monitor flat on an even surface display facing up 2 Remove Styrofoam 3 Remove the orange strap 4 Remove the bag PACKAGE LIST The product package should incl...

Page 9: ...8 ADJUSTING THE HEIGHT The monitor s height may be adjusted from 4 96in to 14in 126 19mm to 355 11mm...

Page 10: ...ied with your monitor SIGNAL CABLE Connecting the Signal Cable Plug one end of the signal cable to the LCD monitor and the other end to a computer or a video source USB Cable A to B The USB Cable A to...

Page 11: ...preference Hold the stand so you do not topple the monitor when you change the monitor s angle You are able to adjust the monitor s angle from 5 to 90 5 9 0 Figure 3 NOTES Do not touch the screen when...

Page 12: ...he monitor See Figure 4 By changing these settings the picture can be adjusted to your personal preferences The power cord should be connected Connect the video cable from the monitor to the video car...

Page 13: ...ess continuously to select the input source indicated in the message bar Press Menu Enter button to change to the selected source Auto configure hot key VGA input only When the OSD is OFF press and ho...

Page 14: ...button to activate it If the function selected has a sub menu press or again to navigate through the sub menu functions Once the desired function is highlighted press MENU button to activate it 3 Pres...

Page 15: ...Brightness 60 Contrast 50 Brightness Contrast Grayed Movie Brightness 80 Contrast 50 Brightness Contrast Grayed Sports Brightness 100 Contrast 50 Brightness Contrast Grayed DCR Dynamic contrast ratio...

Page 16: ...duction VIDEO Ideal for watching videos 30 reduction WEB BROWSING Ideal for web browsing 50 reduction READING Ideal for reading 70 reduction LOW LIGHT Ideal for low ambient lighting environments OSD S...

Page 17: ...ng a time out period will automatically switch to an OFF mode This reduces the monitor s internal power supply consumption After the video input signal is restored full power is restored and the displ...

Page 18: ...computer Inspect monitor s video cable and make sure none of the pins are bent Make sure computer is operational by hitting the CAPS LOCK key on the keyboard while observing the CAPS LOCK LED The LED...

Page 19: ...if you use the USB touch screen interface No additional software driver is required Calibration is a simple process and can be invoked by running Tablet PC Settings from Control Panel and clicking th...

Page 20: ...he picture has horizontal disturbances in light picture For FOCUS and CLOCK adjustment use dot pattern or win 95 98 2000 ME XP Win 7 shut down mode pattern ERROR MESSAGE POSSIBLE SOLUTION NO SIGNAL 1...

Page 21: ...170MHz Max Resolution 1920X1080 60Hz Plug Play VESA DDC2BTM Power Consumption ON Mode 28W TYP OFF Mode 0 5W Input Connector D Sub 15 pin HDMI Input Video Signal Analog 0 7Vp p Standard 75 Positive Di...

Page 22: ...0 x 600 48 077 72 188 800 x 600 46 875 75 Mac SVGA 832 x 624 49 72 74 55 XGA 1024 x 768 48 363 60 004 1024 x 768 56 476 70 069 1024 x 768 60 023 75 029 WXGA 1280 x 960 59 642 59 882 XGA 1152 x 864 74...

Page 23: ...1 15 15 Pin Color Display Signal Cable PIN NO DESCRIPTION PIN NO DESCRIPTION 1 Red 9 5V 2 Green 10 Detect Cable 3 Blue 11 Ground 4 Ground 12 DDC Serial Data 5 Ground 13 H Sync 6 R Ground 14 V Sync 7 G...

Page 24: ...Data 2 11 TMDS Clock Shield 2 TMDS Data 2 Shield 12 TMDS Clock 3 TMDS Data 2 13 CEC 4 TMDS Data 1 14 N C 5 TMDS Data 1 Shield 15 DDC SCL 6 TMDS Data 1 16 DDC CLK 7 TMDS Data 0 17 DDC CEC Ground 8 TMDS...

Page 25: ...sconnect the power cord 2 Remove the plastic covers from the back of the display 3 Remove the four screws attaching the base screw dimension M4 x 12mm 4 Attach the mounting bracket from the VESA compa...

Page 26: ...t http www planar com support for operations manuals touch screen drivers warranty information and access to Planar s Technical Library for online troubleshooting To speak with Planar Customer Support...

Page 27: ...26...

Page 28: ...Q41G24M193503A PN 020 1349 00A...

Reviews: