Lexmark XC4240 Quick Reference Download Page 3

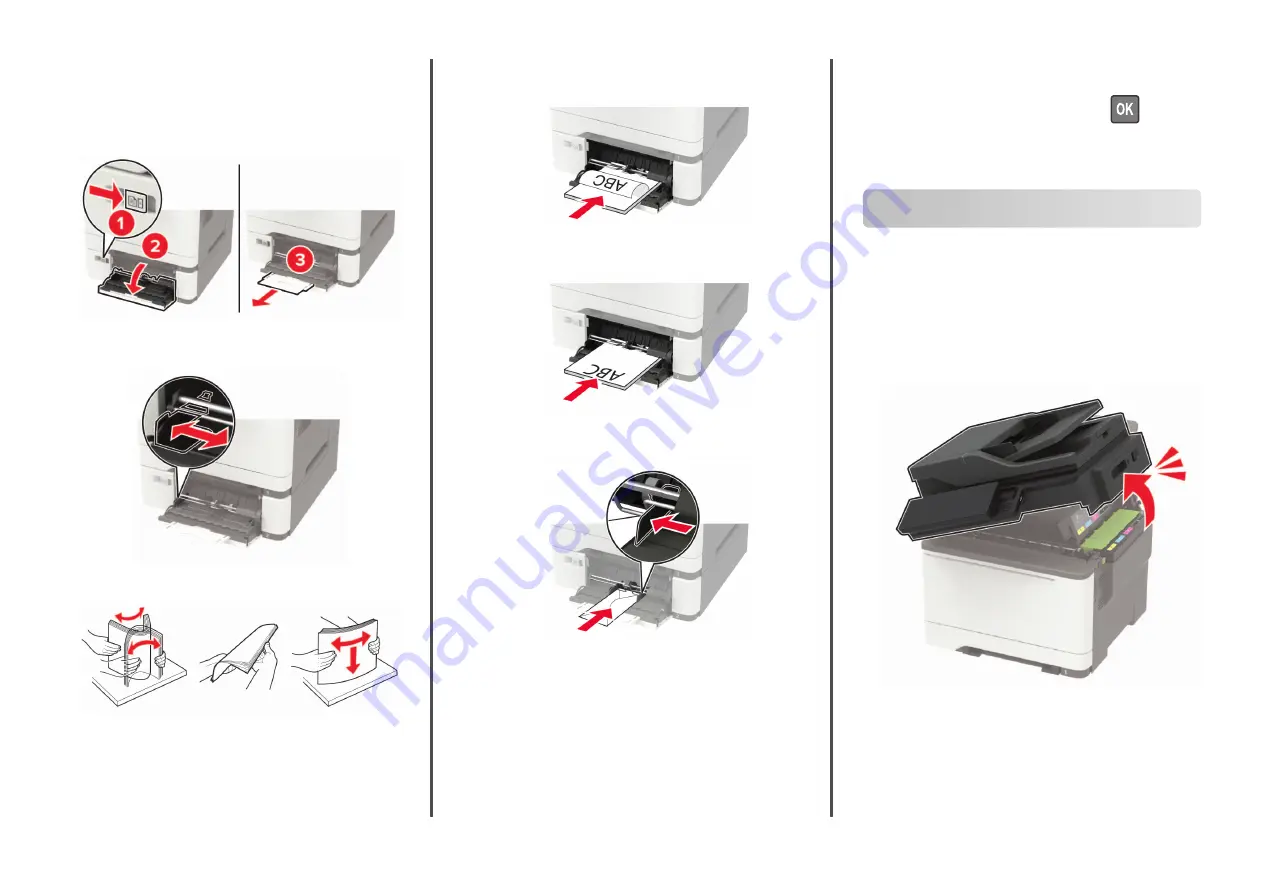
Loading the multipurpose feeder

1

Open the multipurpose feeder.

Note: 

The multipurpose feeder is available only in some

printer models.

2

Adjust the guide to match the size of the paper that you are
loading.

3

Flex, fan, and align the paper edges before loading.

4

Load paper with the printable side facedown.

Load letterhead with the printable side facedown and the
top edge entering the printer first for one

sided printing.

Load letterhead with the printable side faceup and the top
edge entering the printer last for two

sided printing.

Load envelopes with the flap side up and against the right
side of the paper guide.

Warning—Potential Damage: 

Do not use envelopes with

stamps, clasps, snaps, windows, coated linings, or
self

stick adhesives.

5

From the control panel, set the paper size and paper type to
match the paper loaded.

Setting the paper size and type

1

From the control panel, navigate to:

Settings

 > 

Paper

 > 

Tray Configuration

 > 

Paper Size/Type

 >

select a paper source

For non-touch-screen printer models, press 

 to navigate

through the settings.

2

Set the paper size and type.

Maintaining the printer

Replacing a toner cartridge

1

Open door B.

Warning—Potential Damage: 

To prevent damage from

electrostatic discharge, touch any exposed metal frame of
the printer before accessing or touching interior areas of the
printer.


3

Summary of Contents for XC4240

Page 1: ...ettings 4 Fax the document Using the computer For Windows users 1 From the document that you are trying to fax open the Print dialog 2 Select the printer and then click Properties Preferences Options or Setup 3 Click Fax Enable fax and then enter the recipient number 4 If necessary configure other fax settings 5 Fax the document For Macintosh users 1 With a document open choose File Print 2 Select ...

Page 2: ...elect the print job configure the settings Print For other print jobs navigate to Held jobs select your user name select the print job configure the settings Print Loading paper Loading trays CAUTION TIPPING HAZARD To reduce the risk of equipment instability load each tray separately Keep all other trays closed until needed 1 Remove the tray Note To avoid paper jams do not remove trays while the pri...

Page 3: ...he flap side up and against the right side of the paper guide Warning Potential Damage Do not use envelopes with stamps clasps snaps windows coated linings or self stick adhesives 5 From the control panel set the paper size and paper type to match the paper loaded Setting the paper size and type 1 From the control panel navigate to Settings Paper Tray Configuration Paper Size Type select a paper sou...

Page 4: ...d toner cartridge 3 Unpack the new toner cartridge 4 Insert the new toner cartridge 5 Close door B Cleaning the scanner 1 Open the scanner cover 2 Using a damp soft lint free cloth wipe the following areas ADF glass 4 ...

Page 5: ...her ADF glass inside door C then continue with the following steps 4 Open door C 5 Using a damp soft lint free cloth wipe the following areas ADF glass pad in door C ADF glass in door C 6 Close the door Clearing jams Avoiding jams Load paper properly Make sure that the paper lies flat in the tray 5 ...

Page 6: ...re loading Do not use paper that has been cut or trimmed by hand Do not mix paper sizes weights or types in the same tray Make sure that the paper size and type are set correctly on the computer or printer control panel Store paper according to manufacturer recommendations Identifying jam locations Notes When Jam Assist is set to On the printer flushes blank pages or pages with partial prints after...

Page 7: ...urface to cool before touching it Warning Potential Damage To prevent damage from electrostatic discharge touch any exposed metal frame of the printer before accessing or touching interior areas of the printer 2 Remove the jammed paper Note Make sure that all paper fragments are removed 3 Open the fuser access door and then remove the jammed paper Note Make sure that all paper fragments are remove...

Page 8: ... any exposed metal frame of the printer before accessing or touching interior areas of the printer 2 Remove the jammed paper Note Make sure that all paper fragments are removed 3 Close door A Paper jam in the standard bin 1 Open door B and then remove the jammed paper Warning Potential Damage To prevent damage from electrostatic discharge touch any exposed metal frame of the printer before accessi...

Page 9: ...printer might be hot To reduce the risk of injury from a hot component allow the surface to cool before touching it 3 Open the fuser access door and then remove the jammed paper Note Make sure that all paper fragments are removed 4 Close doors A and B 9 ...

Page 10: ...aper jam in the manual feeder 1 Remove the tray 2 Remove the jammed paper Note Make sure that all paper fragments are removed 3 Insert the tray Paper jam in door C 1 Remove all original documents from the ADF tray 2 Open door C Warning Potential Damage To prevent damage from electrostatic discharge touch any exposed metal frame of the printer before accessing or touching interior areas of the prin...

Reviews: