Lexmark X860 Maintenance Manual Download Page 9

6

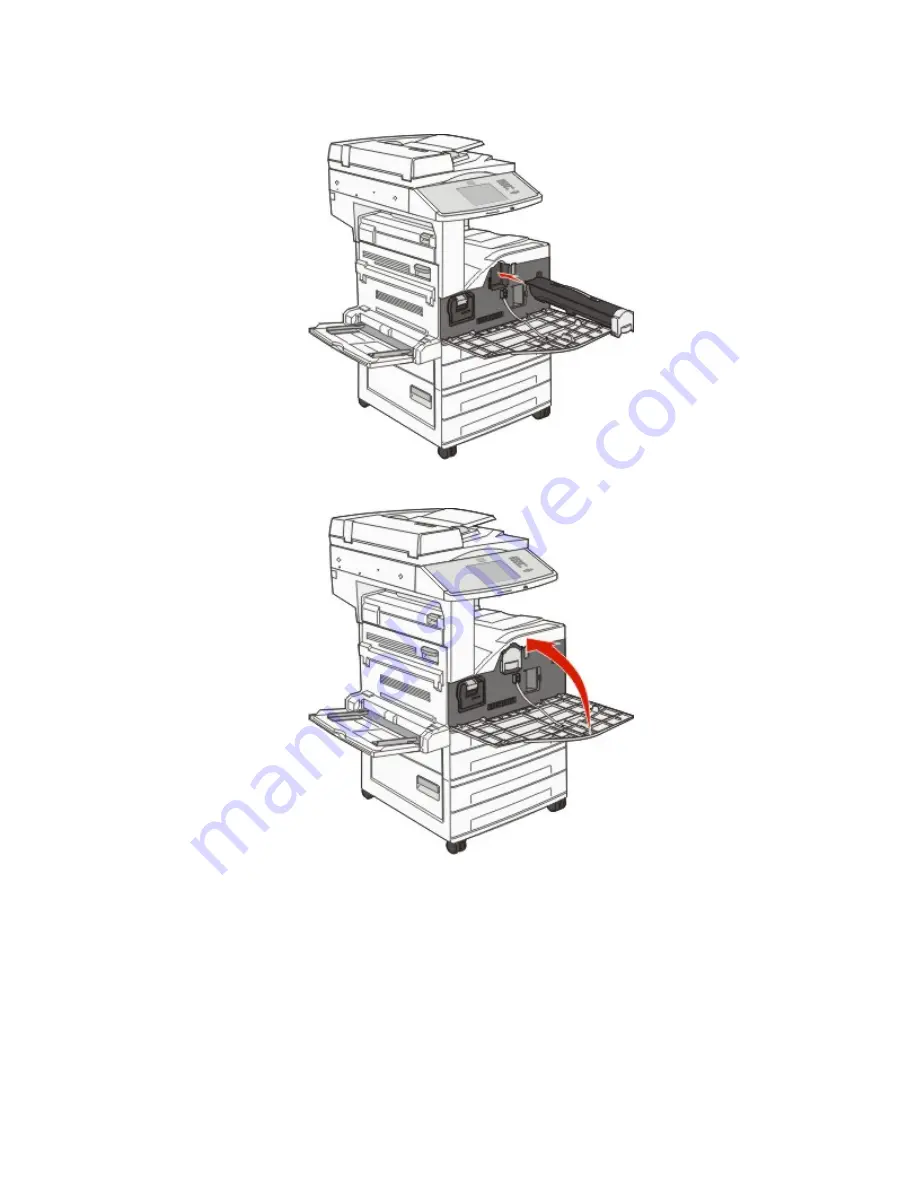
Insert the new cartridge into the printer. Push the toner cartridge in as far as it will go. The cartridge clicks into 

place when correctly installed.

7

Close the front door.

Replacing the photoconductor

You can determine approximately how full the photoconductor is by printing the printer settings configuration sheet. 

This helps you decide when you might need to order replacement supplies.
To ensure print quality and to avoid damage to the printer, the printer stops operating after the photoconductor has 

reached a maximum of 60,000 pages. The printer automatically notifies you before the photoconductor reaches this 

point.

Maintaining the printer

9

Summary of Contents for X860

Page 1: ...X860de X862de X864de Maintenance Guide August 2011 www lexmark com ...

Page 2: ...inter control panel 5 Checking the status of supplies from a network computer 5 Ordering supplies 6 Ordering toner cartridges 6 Ordering a photoconductor kit 6 Ordering a maintenance kit 6 Ordering staple cartridges 7 Ordering a cleaning kit 7 Replacing supplies 7 Replacing the toner cartridge 7 Replacing the photoconductor 9 Moving the printer 14 Before moving the printer 14 Moving the printer to...

Page 3: ...aper from the standard exit bin 3 Dampen a clean lint free cloth with water Warning Potential Damage Do not use household cleaners or detergents as they may damage the finish of the printer 4 Wipe only the outside of the printer making sure to include the standard exit bin Warning Potential Damage Using a damp cloth to clean the interior may cause damage to your printer 5 Make sure the standard ex...

Page 4: ...e the areas shown and let them dry 4 Close the scanner cover Adjusting scanner registration Scanner Registration is a process to align the scan area with the paper location To manually adjust the scanner registration 1 Turn the printer off 2 Clean the scanner glass and backing material 3 Hold down and until the progress bar appears 4 Release the buttons The printer performs a power on sequence and...

Page 5: ... that will help you conserve toner and paper If you need to print several copies you can conserve supplies by printing the first copy and checking it for accuracy before printing the remaining copies Checking the status of supplies A message appears on the display when a replacement supply item is needed or when maintenance is required Checking the status of supplies from the printer control panel...

Page 6: ... number For printer s High Yield Toner Cartridge X860H21G X860 X862 X864 Ordering a photoconductor kit When Replace Photoconductor message appears order a new photoconductor kit Part name Part number For printer s Photoconductor Kit X860H22G X860 X862 X864 Ordering a maintenance kit When 80 Routine maintenance needed appears order a maintenance kit The maintenance kit contains all the items necess...

Page 7: ...25A0013 Ordering a cleaning kit Use the wet and dry wipes from the cleaning kit to clean the scanner glass and touch screen Part name Part number Cleaning kit wet and dry wipes 40X0392 Replacing supplies Replacing the toner cartridge When 88 Cartridge low 88 yy Replace cartridge or 88 Replace cartridge to continue appears or when print becomes faded 1 Turn the printer off 2 Open the front door Mai...

Page 8: ...Damage When replacing a toner cartridge do not leave the new cartridge exposed to direct light for an extended period of time Extended light exposure can cause print quality problems 5 Firmly shake the cartridge side to side several times to redistribute the toner Maintaining the printer 8 ...

Page 9: ...oximately how full the photoconductor is by printing the printer settings configuration sheet This helps you decide when you might need to order replacement supplies To ensure print quality and to avoid damage to the printer the printer stops operating after the photoconductor has reached a maximum of 60 000 pages The printer automatically notifies you before the photoconductor reaches this point ...

Page 10: ... printer may continue to function properly after the photoconductor has reached its official end of life print quality significantly decreases To replace the photoconductor 1 Turn the printer off 2 Open the front door Note The photoconductor cannot be pulled out if Side Door A is closed Maintaining the printer 10 ...

Page 11: ...3 Lower Side Door A 4 Pull the photoconductor out of the printer Place the photoconductor on a flat clean surface 5 Unpack the new photoconductor Maintaining the printer 11 ...

Page 12: ...6 Align and insert the end of the photoconductor 7 Remove the tape from the top of the photoconductor Maintaining the printer 12 ...

Page 13: ...8 Push the photoconductor as far as it will go The photoconductor clicks into place when correctly installed 9 Close Side Door A Maintaining the printer 13 ...

Page 14: ...d clears the Replace Photoconductor warnings The printer returns to the Ready state Moving the printer Before moving the printer CAUTION POTENTIAL INJURY The printer weight is greater than 55kg 121 lbs and requires at least four persons or a properly rated mechanical handling system to move it safely Maintaining the printer 14 ...

Page 15: ...nd then unplug the power cord from the wall outlet Disconnect all cords and cables from the printer before moving it Remove all printer options before moving the printer Warning Potential Damage Damage to the printer caused by improper moving is not covered by the printer warranty Removing the optional trays 1 Remove the printer tray 2 Remove the two thumbscrews and save them Maintaining the print...

Page 16: ...3 Place the tray into the printer 4 Remove the cable cover Maintaining the printer 16 ...

Page 17: ...5 Disconnect the optional drawer connector 6 Attach the cable cover 7 Lift the printer off the trays Maintaining the printer 17 ...

Page 18: ... surface able to support the full footprint of the printer Any cart used to move the options must have a surface able to support the dimensions of the options Keep the printer in an upright position Avoid severe jarring movements Shipping the printer When shipping the printer use the original packaging or call the place of purchase for a relocation kit Maintaining the printer 18 ...

Reviews: