background image

CAUTION:

The inside of the printer might be 
hot.

5

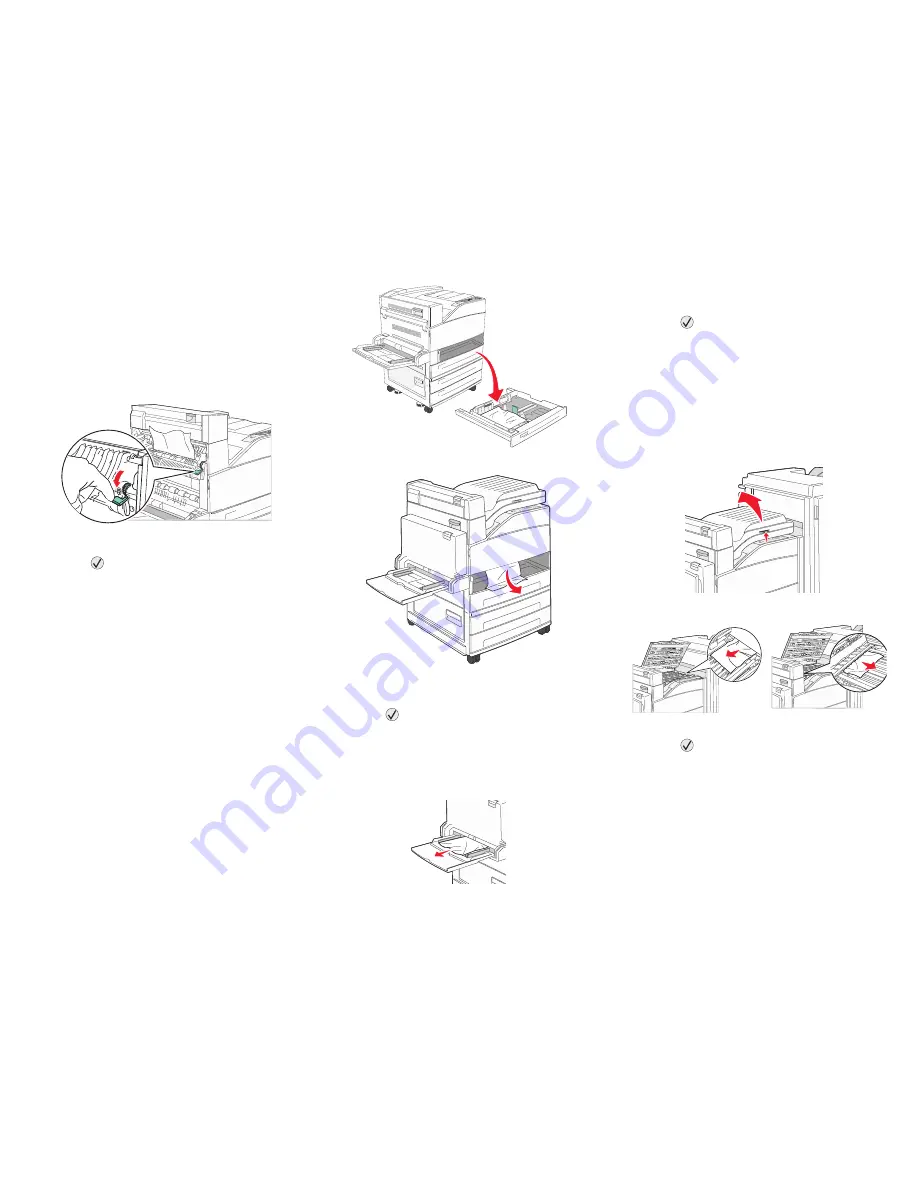
Pull the print media up.

Warning:

If the print media does not move 
immediately when you pull, stop 
pulling. Pull the green lever to make 
it easier to remove the media. Make 
sure all paper fragments are 
removed.

6

Close Door A.

7

Press .

24x Paper Jam Check Tray <x>

Paper jams in these areas can occur on the incline 
surface of a tray or across more than one tray. To 
clear these areas:

1

Open the tray. If necessary, remove the tray 
from the printer.

2

Remove the media from the printer tray slot.

3

Remove any crumpled paper from the tray.

4

Insert the tray into the printer.

5

Press .

250 Paper Jam Check MP Feeder

1

Remove the paper from the multipurpose 
feeder.

2

Flex, fan, and restack the media, and place it 
into the multipurpose feeder.

3

Load the print media.

4

Slide the side guide toward the inside of the tray 
until it lightly rests against the edge of the 
media.

5

Press .

28x Paper Jam Check Finisher

There are three areas associated with the finisher. 
Follow the appropriate instructions to clear a jam in 
the finisher.

Clearing Area F

1

Lift the bridge unit assembly door.

2

Remove the jammed media.

3

Close the door.

4

Press .

Summary of Contents for W840

Page 1: ...int media Clearing Jams Understanding jam messages 200 201 and 202 Paper Jam Check Door A 1 Open Door A by pushing the release latch and lowering the door CAUTION The inside of the printer might be hot 2 Pull the print media up and toward you 3 Close Door A 4 Press 203 Paper Jam Check Areas A E 1 Open Door A by pushing the release latch and lowering the door CAUTION The inside of the printer might...

Page 2: ... pushing the release latch and lowering the door CAUTION The inside of the printer might be hot 5 Open Door E by pushing the release latch and lowering the door 6 Pull the print media up 7 Close Door E 8 Close Door A 9 Press 231 Paper Jam Check A D 1 Open Door D by the duplex rear door 2 Remove the jammed media 3 Close Door D 4 Open Door A by pushing the release latch and lowering the door ...

Page 3: ...printer 2 Remove the media from the printer tray slot 3 Remove any crumpled paper from the tray 4 Insert the tray into the printer 5 Press 250 Paper Jam Check MP Feeder 1 Remove the paper from the multipurpose feeder 2 Flex fan and restack the media and place it into the multipurpose feeder 3 Load the print media 4 Slide the side guide toward the inside of the tray until it lightly rests against t...

Page 4: ... the jammed media 3 Close the door 4 Press Clearing the 2000 sheet high capacity feeder Tray 5 1 If necessary close the multipurpose feeder 2 Slide the high capacity feeder away from the printer 3 Raise the top door and lift the jam access cover 4 Remove the jammed paper 5 Close the jam access cover and top door 6 Slide the feeder firmly against the printer 7 Press ...

Page 5: ...onfigured with a 2000 sheet high capacity feeder slide the feeder away from the printer 2 Open Door C 3 Remove the jammed media 4 Close Door C 5 Slide the feeder firmly against the printer 6 Press Clearing staple jams A Staples Empty or Misfed message indicates staples are jammed in the stapler 1 Check that the machine stops operations and open Door G front door of the finisher 2 Hold the lever on...

Page 6: ...le guard 6 Look through the clear covering on the bottom of the cartridge holder to make sure no staples are jammed in the entry throat 7 Press down on the staple guard until it snaps securely into place 8 Push the cartridge holder firmly into the stapler until the holder clicks into place 9 Close Door G Priming Stapler appears on the operator panel display Priming ensures the stapler is functioni...

Reviews: