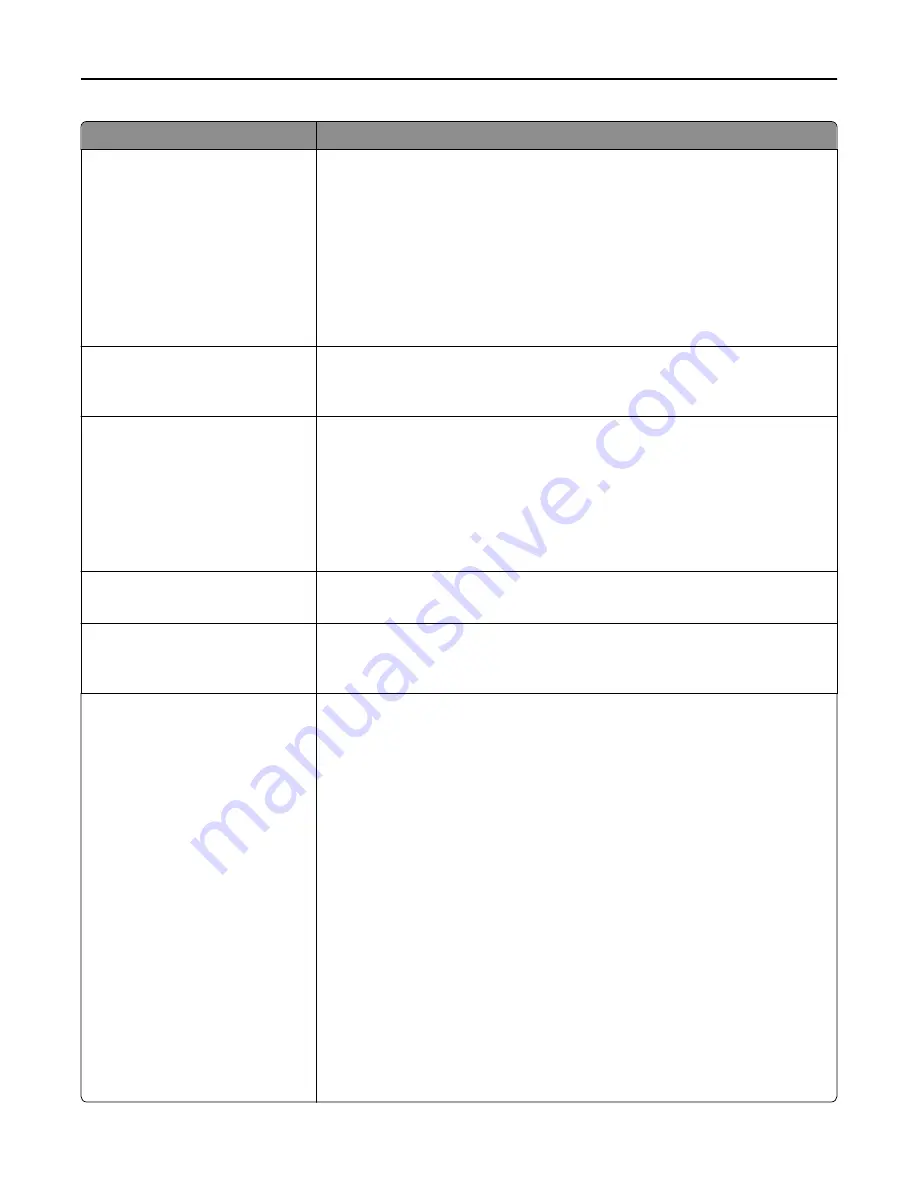
Lexmark MX410 Series User Manual Download Page 173

Use

To

Content Source

Black/White Laser
Color Laser
Inkjet
Photo/Film
Magazine
Newspaper
Press
Other

Specify how the original document was produced.

Note: 

Black/White Laser is the factory default setting.

Color

Off
On

Specify whether the printer captures and transmits content in color.

Note: 

On is the factory default setting.

Resolution

75 dpi
150 dpi
200 dpi
300 dpi
400 dpi
600 dpi

Specify the resolution of the scan in dots per inch.

Note: 

150 dpi is the factory default setting.

Darkness

1–9

Lighten or darken the output.

Note: 

5 is the factory default setting.

Orientation

Portrait
Landscape

Specify the orientation of the scanned image.

Note: 

Portrait is the factory default setting.

Original Size

Letter
Legal
Executive
Folio
Statement
Oficio (Mexico)
Universal
Auto Size Sense
Mixed Sizes
A4
A5
A6
JIS B5
Custom Scan Size [x]
Book Original
Business Card
3 x 5 in.
4 x 6 in.

Specify the size of the original document.

Note: 

Letter is the U.S. factory default setting. A4 is the international factory

default setting.

Understanding the printer menus

173

Summary of Contents for MX410 Series

Page 1: ...MX410 and MX510 Series User s Guide September 2014 www lexmark com Machine type s 7015 Model s 470 630 670 675...

Page 2: ...en buttons 16 Setting up and using the home screen applications 18 Finding the IP address of the computer 18 Finding the IP address of the printer 18 Accessing the Embedded Web Server 18 Customizing t...

Page 3: ...and other held jobs 75 Printing information pages 77 Canceling a print job 78 Copying 79 Making copies 79 Copying photos 80 Copying on specialty media 80 Customizing copy settings 81 Placing informati...

Page 4: ...ts menu 139 Security menu 148 Settings menu 151 Help menu 197 Saving money and the environment 199 Saving paper and toner 199 Saving energy 200 Recycling 202 Securing the printer 204 Statement of Vola...

Page 5: ...20y xx 224 x page jam open rear door 20y xx 227 x page jam clear standard bin 20y xx 228 x page jam remove tray 1 to clear duplex 23y xx 229 x page jam open tray x 24y xx 230 x page jam clear manual...

Page 6: ...Power consumption 302 Index 315 Contents 6...

Page 7: ...sses the guidelines for selecting print media to avoid the possibility of harmful emissions CAUTION HOT SURFACE The inside of the printer might be hot To reduce the risk of injury from a hot component...

Page 8: ...guidelines to avoid personal injury or printer damage Turn the printer off using the power switch and then unplug the power cord from the electrical outlet Disconnect all cords and cables from the pri...

Page 9: ...network Caring for and maintaining the printer Troubleshooting and solving problems User s Guide and Quick Reference Guide The guides are available at http support lexmark com Note These guides are al...

Page 10: ...ies and regions See the printed warranty that came with this printer Selecting a location for the printer CAUTION POTENTIAL INJURY The printer weight is greater than 18 kg 40 lb and requires two or mo...

Page 11: ...ut options If you purchased a multifunction printer MFP that scans copies and faxes then you may need additional furniture For more information see www lexmark com multifunctionprinters CAUTION POTENT...

Page 12: ...er stop 10 Standard bin Understanding the basic functions of the scanner Make quick copies or set the printer to perform specific copy jobs Send a fax using the printer control panel Send a fax to mul...

Page 13: ...to 50 sheets of plain paper into the ADF tray Scan sizes from 105 x 148 mm 4 1 x 5 8 inches wide to 216 x 368 mm 8 5 x 14 5 inches long Scan media weights from 52 to 120 g m2 14 32 lb Do not load post...

Page 14: ...leep mode Press any hard button Open a door or cover Send a print job from the computer Perform a power on reset with the main power switch 7 Stop or Cancel button Stop all printer activity 8 Submit b...

Page 15: ...or scanning to open the menu screen or respond to messages Note Your home screen may vary depending on your home screen customization settings administrative setup and active embedded solutions 1 2 3...

Page 16: ...ffects a function then this icon appears and the red indicator light blinks Warning If an error condition occurs then this icon appears Printer IP address Example 123 123 123 123 The IP address of you...

Page 17: ...wn 4 Accept button Save a setting 5 Cancel button Cancel an action or a selection Return to the previous screen Touch To Return to the home screen Open a context sensitive Help dialog on the printer c...

Page 18: ...d to a network or to a print server You can find the printer IP address From the top left corner of the printer home screen From the TCP IP section in the Network Ports menu By printing a network setu...

Page 19: ...le page For more information see Setting up Card Copy on page 21 Fax Scan a document and then send it to a fax number For more information see Faxing on page 98 Forms and Favorites Quickly find and pr...

Page 20: ...rom the printer home screen Note The printer must have permission to access the network folder FTP site or Web site where the bookmark is stored From the computer where the bookmark is stored use shar...

Page 21: ...print when the application is used Default contrast setting Specify a setting to increase or decrease the level of contrast when a copy of the scanned card is printed Select Best for Content if you wa...

Page 22: ...y periods such as 123 123 123 123 2 Click Settings Apps Apps Management Multi Send 3 From the Profiles section click Add and then customize the settings Notes See the mouse over help beside each field...

Page 23: ...tion are correct type the correct IP address of the host computer where the specified destination is located For more information on obtaining the IP address of the host computer see Finding the IP ad...

Page 24: ...on file for one or multiple applications For one application a Navigate to Settings Apps Apps Management select an application Configure b Export or import the configuration file Notes If a JVM Out of...

Page 25: ...ny cables going into the printer Available internal options Memory card DDR3 DIMM Flash memory Fonts Firmware cards Forms Barcode Prescribe IPDS Printcryption Printer hard disk1 LexmarkTM Internal Sol...

Page 26: ...attached to the printer then turn them off as well and unplug any cables going into the printer 1 Open the controller board access door 2 Open the controller board shield using the green handle 2 1 3...

Page 27: ...evices attached to the printer then turn them off as well and unplug any cables going into the printer Warning Potential Damage Controller board electronic components are easily damaged by static elec...

Page 28: ...until it clicks into place 5 Close the controller board shield and then the controller board access door Note When the printer software and any hardware options are installed you may need to manually...

Page 29: ...nter Warning Potential Damage Controller board electronic components are easily damaged by static electricity Touch a metal surface on the printer before touching any controller board electronic compo...

Page 30: ...supports one optional Lexmark Internal Solutions Port ISP Note This task requires a flat head screwdriver CAUTION SHOCK HAZARD If you are accessing the controller board or installing optional hardware...

Page 31: ...ouching any controller board electronic components or connectors 1 Open the controller board access door 2 Lightly press the stop on the left side of the access door and then slide the access door to...

Page 32: ...er 4 Screws to attach the ISP metal bracket to the printer cage 5 Plastic bracket 6 Long ISP cable 4 Place the plastic bracket inside the ISP exterior cover until it clicks into place 5 Slide and push...

Page 33: ...6 Secure the ISP solution to the plastic bracket using the long screw 7 Tighten the two screws on the end of the ISP solution Additional printer setup 33...

Page 34: ...Attach the white plug of the ISP solution interface cable into the white receptacle on the ISP 9 Attach the ISP exterior cover at an angle by inserting the left hinges first Additional printer setup 3...

Page 35: ...10 Lower the rest of the cover and then slide the cover to the right 11 Run the ISP cable through the controller board shield Additional printer setup 35...

Page 36: ...able into the blue receptacle on the controller board Note If you have installed a printer hard disk then you need to remove it For more information see Removing a printer hard disk on page 40 To rein...

Page 37: ...ectrical outlet before continuing If you have any other devices attached to the printer then turn them off as well and unplug any cables going into the printer Warning Potential Damage Controller boar...

Page 38: ...ad screwdriver loosen the screws b Insert the plug of the printer hard disk interface cable into the receptacle of the controller board Note The plug and the receptacle are color coded blue Additional...

Page 39: ...ws 4 Close the controller board shield and then close the controller board access door Note When the printer software and any hardware options are installed you may need to manually add the options in...

Page 40: ...uires a flat head screwdriver 2 Loosen the screws that connect the printer hard disk to the controller board bracket 3 Unplug the printer hard disk interface cable from the receptacle in the controlle...

Page 41: ...r stand Optional 250 or 550 sheet tray Printer For more information on installing a printer stand optional 250 or 550 sheet tray or spacer see the setup sheet that came with the option Installing opti...

Page 42: ...m the base 4 Remove any packing material from inside the tray 5 Insert the tray into the base 6 Place the tray near the printer 7 Align the printer with the tray and then slowly lower the printer into...

Page 43: ...manually add the options in the printer driver to make them available for print jobs For more information see Adding available options in the print driver on page 45 To uninstall the optional trays s...

Page 44: ...lfunction can occur Use the To 1 Printer power cord socket Connect the printer to a properly grounded electrical outlet 2 Power switch Turn the printer on or off 3 Ethernet port Connect the printer to...

Page 45: ...Search charm type run and then navigate to Run type control printers OK In Windows 7 or earlier a Click or click Start and then click Run b Type control printers c Press Enter or click OK 2 Select the...

Page 46: ...to identify your printer on the network You can choose to use the default printer nickname or assign a name that is easier for you to remember You will need an Ethernet cable to connect the printer t...

Page 47: ...ch the wireless utility of the computer network adapter and then look for the network name If you cannot find the SSID or the security information for your network then see the documentation that came...

Page 48: ...network adapter Using the Push Button Configuration method 1 From the printer control panel navigate to Network Ports Network x Network x Setup Wireless Wireless ConnectionSetup Wi Fi Protected Setup...

Page 49: ...5 Turn off the printer and then disconnect the Ethernet cable Then wait for at least five seconds and then turn the printer back on 6 To verify if your printer is connected to the network print a netw...

Page 50: ...this page to verify that all printer options are installed correctly If an option you installed is not listed then it is not installed correctly Remove the option and then install it again Network set...

Page 51: ...e printer menus Notes The smallest supported Universal size is 76 2 x 76 2 mm 3 x 3 inches The largest supported Universal size is 215 9 x 359 92 mm 8 5 x 14 17 inches 1 From the home screen navigate...

Page 52: ...2 Squeeze and then slide the width guide tab to the correct position for the size of the paper you are loading 1 LT R LG L E X E C A 4 B 5 A 5 2 Loading paper and specialty media 52...

Page 53: ...guide extends beyond the base leaving the paper exposed to dust To protect the paper from dust you can purchase a dust cover separately For more information contact customer support If you are loadin...

Page 54: ...4 Flex the sheets back and forth to loosen them and then fan them Do not fold or crease the paper Straighten the edges on a level surface 5 Load the paper stack Loading paper and specialty media 54...

Page 55: ...d printing load letterhead faceup with the bottom edge of the sheet toward the front of the tray Make sure the paper is below the maximum paper fill indicator located on the side of the width guide 6...

Page 56: ...erent paper sizes and types or specialty media such as card stock transparencies paper labels and envelopes You can also use it for single page print jobs on letterhead 1 Open the multipurpose feeder...

Page 57: ...a for loading Flexsheetsofpaperbackandforthtoloosenthem andthenfanthem Donotfoldorcreasethepaper Straighten the edges on a level surface Hold transparencies by the edges Flex the stack of transparenci...

Page 58: ...ose feeder Make sure the paper or specialty media is below the maximum paper fill indicator located on the paper guides Overfilling may cause paper jams Load paper transparencies and card stock with t...

Page 59: ...gainst the edge of the paper so that the last few sheets of paper remain in place Load letterhead faceup with the top edge entering the printer first For two sided duplex printing load letterhead face...

Page 60: ...ss on the printer home screen The IP address appears as four sets of numbers separated by periods such as 123 123 123 123 If you are using a proxy server then temporarily disable it to load the Web pa...

Page 61: ...Menu Custom Names 2 Select a custom name and then type a custom paper type name 3 Touch 4 Touch Custom Types and then verify that the new custom paper type name has replaced the custom name Assigning...

Page 62: ...s View the printer IP address on the printer home screen The IP address appears as four sets of numbers separated by periods such as 123 123 123 123 If you are using a proxy server then temporarily di...

Page 63: ...is set to Rough in the Paper menu then transparencies can be printed at a temperature up to 195 C 383 F Avoid getting fingerprints on the transparencies to prevent print quality problems Before loadi...

Page 64: ...te the printer and the cartridge with adhesive and could void the printer and toner cartridge warranties Do not use labels with exposed adhesive Do not print within 1 mm 0 04 inch of the edge of the l...

Page 65: ...problems Curl can occur after thepaperpassesthrough theprinter whereit is exposed to high temperatures Storing paperunwrapped inhot humid cold or dry conditions even in the trays can contribute to pap...

Page 66: ...inks designed for use in xerographic copiers The ink must be able to withstand temperatures up to 230 C 446 F without melting or releasing hazardous emissions Use inks that are not affected by the res...

Page 67: ...rages purchasing paper from suppliers who demonstrate their commitment to sustainable forestry practices Lexmark does not endorse specific suppliers although a converter s product list for special app...

Page 68: ...nd flat Supported paper sizes types and weights Supported paper sizes Paper size and dimension Standard 250 sheet tray Optional 250 or 550 sheet tray Multipurpose feeder ADF Scanner glass Duplex print...

Page 69: ...X X X 9 Envelope 98 4 x 226 1 mm 3 875 x 8 9 in X X X X 10 Envelope 104 8 x 241 3 mm 4 12 x 9 5 in X X X X 1 Paper is supported only if the paper size setting is set to Universal 2 Paper is supported...

Page 70: ...aper is supported in MX410de printer model only if the width is at least 215 9 mm 8 5 in and the length is at least 296 9 mm 11 7 in 5 Paper is supported in MX410de printer model only if the length is...

Page 71: ...vy paper Rough Cotton X Custom Type x 1 One sided paper labels designed for laser printers are supported for occasional use We recommend printing only up to 20 pages of paper labels per month Vinyl ph...

Page 72: ...ded 2 Send the print job For Windows users a With a document open click File Print b Click Properties Preferences Options or Setup c Adjust the settings if necessary d Click OK Print For Macintosh use...

Page 73: ...2 Click Settings Print Settings Quality Menu Toner Darkness 3 Adjust the setting and then click Submit Using the printer control panel 1 From the home screen navigate to Settings Print Settings Quali...

Page 74: ...ing or writing from the memory device Loss of data can occur 2 From the printer control panel touch the document you want to print 3 Touch the arrows to get a preview of the document 4 Use or to speci...

Page 75: ...pe Use To Max Invalid PIN Limit the number of times an invalid PIN can be entered Note When the limit is reached the print jobs for that user name and PIN are deleted Confidential Job Expiration Holdp...

Page 76: ...y after printing Repeat and Reserve jobs are held in the printer until you delete them For Windows users 1 With a document open click File Print 2 Click Properties Preferences Options or Setup 3 Click...

Page 77: ...erver then temporarily disable it to load the Web page correctly 2 Click Settings Security Confidential Print Setup 3 Modify the settings Set a maximum number of PIN entry attempts When a user exceeds...

Page 78: ...s on the keypad then touch Resume to return to the home screen Canceling a print job from the computer For Windows users 1 Open the printers folder and then select your printer 2 From the print queue...

Page 79: ...oto paper or thin media such as magazine clippings into the ADF tray Place these items on the scanner glass The ADF indicator light comes on when the paper is loaded properly 2 If you are loading a do...

Page 80: ...ome screen navigate to Copy Content Photo 3 From the Content Source menu select the appropriate setting that best matches the original photo 4 Touch Copy It Note If you have more photos to copy then p...

Page 81: ...rst into the multipurpose feeder 5 Select the size of the letterhead and then touch Letterhead Copy It Customizing copy settings Copying to a different size 1 Load an original document faceup short ed...

Page 82: ...or thin media such as magazine clippings into the ADF tray Place these items on the scanner glass The ADF indicator light comes on when the paper is loaded properly 2 If you are loading a document int...

Page 83: ...oad an original document faceup short edge first into the ADF tray or facedown on the scanner glass Notes Do not load postcards photos small items transparencies photo paper or thin media such as maga...

Page 84: ...inter Magazine The original document is from a magazine Press The original document was printed using a printing press Black White Laser The original document was printed using a mono laser printer Ph...

Page 85: ...1 1 1 2 2 2 then the separator sheets are added to the end of the copy job For more information see Collating copies on page 84 4 Select one of the following Between Copies Between Jobs Between Pages...

Page 86: ...Header Footer 4 Select Header or Footer and then touch 5 Select where you want to insert the header or footer then select a text option and then touch 6 Select where you want to print the header or f...

Page 87: ...ize that matches the original document To copy an original document that contains mixed paper sizes with the same width touch Mixed Sizes To set the printer to automatically detect the size of the ori...

Page 88: ...This option lets you set the number of copies to be printed Content This option lets you set the original document type and source Select from the following content types Graphics The original documen...

Page 89: ...se also removes whatever is within the area selected leaving nothing on that portion of the scan Overlay This option lets you create a watermark or message that overlays the content of your copy You c...

Page 90: ...Edge Shadow Detail Sharpness and Temperature settings before you copy the document Create Booklet This option lets you create a sequence of printed and collated pages that when folded forms a booklet...

Page 91: ...are using a proxy server then temporarily disable it to load the Web page correctly 2 Click Settings E mail FTP Settings E mail Settings 3 Enter the appropriate information and then click Submit Creat...

Page 92: ...the shortcut name is incorrect then touch Cancel and then reenter the information Notes The shortcut name appears in the E mail Shortcuts icon on the printer home screen You can use the shortcut when...

Page 93: ...thin media such as magazine clippings into the ADF tray Place these items on the scanner glass The ADF indicator light comes on when the paper is loaded properly 2 If you are loading a document into...

Page 94: ...mes on when the paper is loaded properly 2 If you are loading a document into the ADF tray then adjust the paper guides 3 From the home screen navigate to E mail Recipient s type the e mail address 4...

Page 95: ...an scan an original document that contains mixed paper sizes letter and legal size pages Darkness This option lets you adjust how light or dark your scanned documents are in relation to the original d...

Page 96: ...ent is from a magazine Newspaper The original document is from a newspaper Other The original document was printed using an alternate or unknown printer Photo Film The original document is a photo fro...

Page 97: ...dge Edge Erase also removes whatever is within the area selected leaving nothing on that portion of the scan Advanced Imaging Thisoptionletsyouadjust theBackgroundRemoval ColorBalance ColorDropout Con...

Page 98: ...ure during a lightning storm Do not set up this product or make any electrical or cabling connections such as the fax feature power cord or telephone during a lightning storm Notes The following conne...

Page 99: ...ation Using the printer control panel for fax setup When the printer is turned on for the first time a series of start up screens appear If the printer has fax capabilities then the Fax Name and Fax N...

Page 100: ...ection Scenario 1 Standard telephone line Setup 1 Printer is connected to a dedicated fax line To connect 1 Connect one end of the telephone cable that came with the printer to the port of the printer...

Page 101: ...p on any number of rings that you want Setup 2 Printer is sharing the line with an answering machine Connected to the same telephone wall jack PHONE LINE To connect 1 Connect one end of the telephone...

Page 102: ...calls two rings after the answering machine For example if the answering machine picks up calls after four rings then set the printer to pick up after six rings This way the answering machine picks up...

Page 103: ...n make sure that you set the correct ring pattern for the printer Otherwise the printer does not receive faxes even if you have set it to receive faxes automatically If you have only one telephone num...

Page 104: ...alog devices fax machine telephone answering machine in your network Interference causes noise and static on the telephone failed and poor quality faxes for the printer and slow Internet connection on...

Page 105: ...e that the phone port on the VoIP adapter is active plug an analog telephone into the phone port and then listen for a dial tone If you hear a dial tone then the port is active If you need two phone p...

Page 106: ...port of the printer Notes To make sure that the telephone port on the cable modem is active plug an analog telephone into the telephone port and then listen for a dial tone If you hear a dial tone th...

Page 107: ...e analog telephone wall jack 3 Connect your analog telephone to the port of the printer Scenario 5 Countries or regions with different telephone wall jacks and plugs Some countries or regions may have...

Page 108: ...egion may not come with your printer and you may need to purchase it separately There may be an adapter plug installed in the port of the printer If you are using a telephone adapter or a facility tha...

Page 109: ...e wall jack 3 If you want to connect another device telephone or answering machine to the same wall jack and if the device has a non RJ 11 connector then connect it directly to the telephone adapter N...

Page 110: ...ll jack in Germany The German wall jack has two kinds of ports The N ports are for fax machines modems and answering machines The F port is for telephones N F N Connect the printer to any of the N por...

Page 111: ...w these steps to connect the equipment 1 Connect one end of the telephone cable that came with the printer to the printer LINE port 2 Connect the other end of the telephone cable to an active analog t...

Page 112: ...adjust for daylight saving time 1 Open a Web browser and then type the printer IP address in the address field Notes View the printer IP address on the printer home screen The IP address appears as fo...

Page 113: ...numbers 4 If necessary configure other fax settings 5 Apply the changes and then send the fax job Notes The fax option is available only with the PostScript driver or the Universal Fax Driver For more...

Page 114: ...ADF tray then adjust the paper guides 3 From the home screen navigate to Fax type the name of the recipient Note You can only search for one name at a time 4 Touch the name of the recipient and then...

Page 115: ...enter the fax number Notes To create a multiple number shortcut enter the fax numbers for the group Separate each fax number in the group with a semicolon 4 Assign a shortcut number Note If you enter...

Page 116: ...the ADF tray Place these items on the scanner glass The ADF indicator light comes on when the paper is loaded properly 2 If you are loading a document into the ADF tray then adjust the paper guides 3...

Page 117: ...mory 1 On the home screen touch Cancel Jobs The Cancel Jobs screen appears 2 Touch the job or jobs you want to cancel Only three jobs appear on the screen touch the down arrow until the job you want a...

Page 118: ...f you are using a proxy server then temporarily disable it to load the Web page correctly 2 Click Settings Fax Settings 3 From the Fax Forwarding menu select Print Print and Forward or Forward 4 From...

Page 119: ...300 dpi Use this when faxing documents with fine details Ultra fine 600 dpi Use this when faxing documents with pictures or photos Darkness This option lets you adjust how light or dark the faxes are...

Page 120: ...e This option lets you remove smudges or any mark around the edges of a document You can remove an equal area around all four sides of the paper or you can pick a particular edge Edge Erase also remov...

Page 121: ...ed network folders have been established on the network the setup process for the application involves installing and configuring the application on the appropriate printer using its Embedded Web Serv...

Page 122: ...FTP address You can use the printer to send scanned documents to an FTP address in a number of ways You can type the FTP address use a shortcut number or use the address book You can also use the Mult...

Page 123: ...can Profile 3 Select your scan settings and then click Next 4 Select a location on your computer where you want to save the scan image 5 Type a scan name and then a user name Note The scan name is the...

Page 124: ...or facedown on the scanner glass Notes Do not load postcards photos small items transparencies photo paper or thin media such as magazine clippings into the ADF tray Place these items on the scanner g...

Page 125: ...or compressed file TIFF Use to create multiple files or a single file If Multi page TIFF is turned off in the Settings menu then TIFF saves one page in each file The file size is usually larger than a...

Page 126: ...ets you view the first page of the image before it is included in the file When the first page is scanned the scanning is paused and a preview image appears Note This option appears only when a format...

Page 127: ...iscellaneousSecuritySettings Confidential Print Menu Erase Temporary Data Files Security Audit Log Set Date and Time Settings Help Manage Shortcuts Option Card Menu3 General Settings Copy Settings Fax...

Page 128: ...To Tray x Size A4 A5 A6 JIS B5 Letter Legal Executive Oficio Mexico Folio Statement Universal 7 3 4 Envelope 9 Envelope 10 Envelope DL Envelope C5 Envelope B5 Envelope Other Envelope Specify the pape...

Page 129: ...automatic tray linking Multipurpose Feeder Size A4 A5 A6 JIS B5 Letter Legal Executive Oficio Mexico Folio Statement Universal 7 3 4 Envelope 9 Envelope 10 Envelope DL Envelope C5 Envelope B5 Envelope...

Page 130: ...ain Paper is the factory default setting From the Paper menu set Configure to Cassette for Multipurpose Feeder Type to appear as a menu Manual Paper Size A4 A5 A6 JIS B5 Letter Legal Executive Oficio...

Page 131: ...elope is the U S factory default setting DL Envelope is the international factory default setting Manual Envelope Type Envelope Rough Envelope Custom Type x Specify the envelope type being manually lo...

Page 132: ...e card stock loaded Notes Normal is the factory default setting The options appear only if card stock is supported Transparency Texture Smooth Normal Rough Specify the relative texture of the transpar...

Page 133: ...aper loaded Note Normal is the factory default setting Heavy Texture Smooth Normal Rough Specify the relative texture of the paper loaded Note Normal is the factory default setting Rough Cotton Textur...

Page 134: ...he envelope loaded Note Normal is the factory default setting Rough Envelope Weight Light Normal Heavy Specify the relative weight of the rough envelope loaded Note Normal is the factory default setti...

Page 135: ...r all print jobs that specify Letterhead as the paper type Preprinted Loading Duplex Off Determine and set two sided printing for all print jobs that specify Preprinted as the paper type Colored Loadi...

Page 136: ...diatypewitha factory defaultCustom Type x name or a user defined custom name created in the Embedded Web Server or MarkVisionTM Professional The user defined name appears instead of Custom Type x Note...

Page 137: ...216 mm Set the portrait width Notes If the width exceeds the maximum then the printer uses the maximum width allowed 8 5 inches is the US factory default setting You can increase the width in 0 01 inc...

Page 138: ...ning information about configured shortcuts Fax Job Log Print a report containing information about the last 200 completed faxes Notes This menu item appears only when Enable Job Log is set to On in t...

Page 139: ...Auto list of available network cards Notes Auto is the factory default setting This menu item appears only when an optional network card is installed Standard Network or Network x menu Note Only acti...

Page 140: ...ory in the printer the size of the other link buffers and whether Resource Save is set to On or Off To increase the maximum size range for the Network Buffer disable or reduce the size of the parallel...

Page 141: ...dapter Network Address UAA LAA View the network addresses Job Timeout 0 10 225 seconds Set the amount of time it takes for a network print job to be canceled Notes 90 seconds is the factory default se...

Page 142: ...setting Enable FTP TFTP Yes No Enablethebuilt inFTP server which letsyou sendfilestotheprinterusing FileTransfer Protocol Note Yes is the factory default setting Enable HTTP Server Yes No Enable the...

Page 143: ...is available only in printers connected to an Ethernet network and printers with a wireless network adapter attached To access the menu navigate to either of the following Network Ports Standard Netwo...

Page 144: ...encryption method for the wireless network AppleTalk menu To access the menu navigate to either of the following Network Ports Standard Network Standard Network Setup AppleTalk Network Ports Network x...

Page 145: ...nter to perform the special processing required for bidirectional communication following the conventions defined by the NPA protocol Notes Auto is the factory default setting Auto sets the printer to...

Page 146: ...lable only when the printer is attached to an external print server through the USB port ENA Netmask yyy yyy yyy yyy Set the netmask information for an external print server Note This menu is availabl...

Page 147: ...e No authentication required is the factory default setting Device Initiated E mail None Use Device SMTP Credentials Specify what credentials will be used when communicating to the SMTP server Notes N...

Page 148: ...ettings range from 1 900 seconds 30 seconds is the factory default setting Remote Login Timeout specifies how long a remote interface remains idle before automatically logging the user off Settings ra...

Page 149: ...ly in use by the file system All permanent data on the printer hard disk are preserved such as downloaded fonts macros and held jobs Note This menu appears only when a formatted working printer hard d...

Page 150: ...to send logs to the remote syslog server 4 is the factory default setting If the security audit log is activated then the severity value of each event is recorded 4 is the factory default setting Set...

Page 151: ...f the supplies on the control panel Embedded Web Server menu settings and device statistics reports Note Show estimates is the factory default setting Eco Mode Off Energy Energy Paper Paper Minimize t...

Page 152: ...ese Japanese Custom Key x Specify a language and custom key information for the display keyboard Paper Sizes US Metric Specify the unit of measurement for paper sizes Notes US is the factory default s...

Page 153: ...IP Address is the factory default setting for Left side Date Time is the factory default setting for Right side Displayed Information continued Black Toner Customize the displayed information for Blac...

Page 154: ...s Fax Fax Shortcuts E mail E mail Shortcuts FTP FTP Shortcuts Search Held Jobs Held Jobs USB Drive Profiles and Apps Bookmarks Jobs by User Forms and Favorites Card Copy Scan to Network MyShortcut Cha...

Page 155: ...etting If On is selected then Allow Custom Job Scans can be enabled for specific jobs Scanner Jam Recovery Job Level Page Level Specify how a scanned job should be reloaded if a paper jam occurs in th...

Page 156: ...nt a job with the display turned off Note Display on when printing is the factory default setting Timeouts Hibernate Timeout Disabled 20 minutes 1 3 hours 6 hours 1 3 days 1 2 weeks 1 month Set the am...

Page 157: ...bs that require unavailable resources and continues to print other jobs in the print queue Notes 30 is the factory default setting This menu item appears only when a hard disk is installed Error Recov...

Page 158: ...efault setting Press and Hold Sleep Button Do Nothing Sleep Hibernate Determinehowtheprinter whileinidlestate reactstoa longpress of the Sleep button Note Do Nothing is the factory default setting Fac...

Page 159: ...ting is selected when using a one sided original document for a one sided copy job Paper Saver Off 2 up Portrait 4 up Portrait 2 up Landscape 4 up Landscape Copy two or four sheets of a document on on...

Page 160: ...tory default setting Transparency Separators On Off Place a sheet of paper between transparencies Note On is the factory default setting Separator Sheets Off Between Copies Between Jobs Between Pages...

Page 161: ...etting Custom Overlay Specify the custom overlay text Allow priority copies On Off Allow interruption of a print job to copy a page or document Note On is the factory default setting Custom Job scanni...

Page 162: ...age of the original document Note Off is the factory default setting Shadow Detail 4 to 4 Adjust the amount of shadow detail visible on a copy Note 0 is the factory default setting Adjust ADF Skew Aut...

Page 163: ...the numeric keypad to go directly to this setting Memory Use All receive Mostly receive Equal Mostly send All send Define the allocation of non volatile memory between sending and receiving fax jobs...

Page 164: ...page Notes Off by default is the factory default setting for Fax Cover Page Off is the factory default setting for all other menu items Fax Send Settings Use To Resolution Standard Fine 200 dpi Super...

Page 165: ...wo sided scanning Note Off is the factory default setting Content Type Text Graphics Text Photo Photo Specify the content of the original document Note Text is the factory default setting Content Sour...

Page 166: ...Shortcut On Off Save fax numbers as shortcuts in the printer Note On is the factory default setting Dial Mode Tone Pulse Specify the dialing sound Note Tone is the factory default setting Max Speed 2...

Page 167: ...the factory default setting Negative Image Off On Create a negative image of the original document Note Off is the factory default setting Shadow Detail 4 to 4 Adjust the amount of shadow detail visib...

Page 168: ...c unavailable resources Note None is the factory default setting Rings to Answer 1 25 Specify the number of rings before answering an incoming fax job Note 3 is the factory default setting Auto Answer...

Page 169: ...14400 33600 Specify the maximum speed in baud at which faxes are received Note 33600 is the factory default setting Fax Forwarding Print Print and Forward Forward Enable forwarding of received faxes...

Page 170: ...g Print Never Print on Error Enable printing of a received error log Note Print Never is the factory default setting Auto Print Logs On Off Enable automatic printing of fax logs Notes On is the factor...

Page 171: ...ingle or Triple Rings Only Double or Triple Rings Only Specify ring patterns when the printer is answering calls Note All Rings is the factory default setting E mail Settings menu Use To E mail Server...

Page 172: ...PDF pdf is the factory default setting PDF Settings PDF Version 1 2 1 7 A 1a A 1b PDF Compression Normal High Secure PDF Off On Searchable PDF Off On Configure the PDF settings Notes 1 5 is the factor...

Page 173: ...dots per inch Note 150 dpi is the factory default setting Darkness 1 9 Lighten or darken the output Note 5 is the factory default setting Orientation Portrait Landscape Specify the orientation of the...

Page 174: ...ote Attachment is the factory default setting Use Multi Page Tiff On Off Provide a choice between single page TIFF files and multiple page TIFF files For a multiple page scan to e mail job either one...

Page 175: ...Color Dropout Color Dropout None Red Green Blue Default Red Threshold 0 255 Default Green Threshold 0 255 Default Blue Threshold 0 255 Specifywhichcolor todropandtoadjustthedropoutsettingforeach colo...

Page 176: ...0 is the factory default setting Use cc bcc Off On Enable the use of the cc and bcc fields Note Off is the factory default setting FTP Settings menu Use To Format PDF pdf TIFF tif JPEG jpg XPS xps RT...

Page 177: ...ault setting Color Off On Specify whether the printer captures and transmits content in color Note On is the factory default setting Resolution 75 dpi 150 dpi 200 dpi 300 dpi 400 dpi 600 dpi Specify t...

Page 178: ...size but the quality of the image is lessened 90 provides the best image quality but the file size is very large Text Default 5 90 Set the quality of the text in relation to the file size and quality...

Page 179: ...t setting File Name Type a base file name Custom Job Scanning On Off Copy a document that contains mixed paper sizes into a single scan job Note Off is the factory default setting Scan Preview On Off...

Page 180: ...document Note Off is the factory default setting Shadow Detail 4 to 4 Adjust the amount of shadow detail visible on a scanned image Note 0 is the factory default setting Adjust ADF Skew Auto Off On C...

Page 181: ...Off is the factory default setting for Secure PDF and Searchable PDF Secure PDF requires you to enter your password twice Content Type Text Graphics Text Photo Photo Specify the content of the origin...

Page 182: ...size of the original document Note Letter is the U S factory default setting A4 is the international factory default setting Sides Duplex Off Long edge Short edge Specify the orientation of the origin...

Page 183: ...that contains mixed paper sizes Note Off is the factory default setting Scan Preview On Off Specify whether a preview appears on the display for scan jobs Notes Off is the factory default setting Thi...

Page 184: ...unt of sharpness on a scanned image Note 3 is the factory default setting Temperature 4 to 4 Specify warm or cool outputs Cool values generate a bluer output than the default while warm values generat...

Page 185: ...ultiple page images Notes Horizontal is the factory default setting Positioning depends on the number of page images and whether they are in portrait or in landscape orientation Separator Sheets Off B...

Page 186: ...ed Languages English French German Spanish Italian Portugues Danish Dutch Norwegian Swedish Finnish Hungarian Polish Set the language or languages that the OCR can recognize For each language select f...

Page 187: ...ndary This affects only pages printed using a PCL 5e interpreter This has no effect on pages printed using the PCL XL or PostScript interpreter Download Target RAM Flash Disk Set the storage location...

Page 188: ...y default setting Collate 1 1 1 2 2 2 1 2 3 1 2 3 Stack the pages of a print job in sequence when printing multiple copies Note 1 2 3 1 2 3 is the factory default setting Separator Sheets Off Between...

Page 189: ...tation of a multiple page document Note Auto is the factory default setting Paper Saver Border None Solid Print a border on each page image Note None is the factory default setting Quality menu Use To...

Page 190: ...enu Note This menu item appears only when a printer hard disk is installed Make sure that the hard disk is not read write or write protected Use To Job Accounting Log Off On Set if the printer creates...

Page 191: ...sponds when disk usage reaches the maximum limit 100MB Note None is the factory default setting URL to Post Logs Set where the printer posts job accounting logs E mail to Send Logs Specify the e mail...

Page 192: ...turn to the main Utilities menu for touch screen printer models When selected in non touch screen printer models Do Not Delete sets the printer to return to the originating screen after the deletion A...

Page 193: ...perly Make sure the flash memory option or printer hard disk is not read write write or password protected Job Buffer Size must not be set to 100 PCL Emul menu Use To Font Source Resident Disk Downloa...

Page 194: ...space characters per inch cpi This can be increased or decreased in 0 01 cpi increments For non scalable monospaced fonts the pitch appears on the display but cannot be changed PCL Emulation Settings...

Page 195: ...None 0 199 Configure the printer to work with printer software or programs that use different source assignments for trays drawers and feeders Notes Off is the factory default setting None ignores the...

Page 196: ...s Zapf Chancery NewSansMTCS NewSansMTCT New SansMTJA NewSansMTKO Set the default font for HTML documents Note The Times font is used in HTML documents that do not specify a font Use To Font Size 1 255...

Page 197: ...ing Anchor Top Left Best Fit Anchor Center Fit Height Width Fit Height Fit Width Scale the image to fit the selected paper size Notes Best Fit is the factory default setting When Auto Fit is set to On...

Page 198: ...ning the cause of repeating print quality defects and lists settings that can be used to adjust print quality Information Guide Provides help in locating additional information Supplies Guide Provides...

Page 199: ...g suggestions such as printing on both sides of the paper and printing multiple pages on one side of a single sheet of paper For information on how you can quickly save paper and energy using one prin...

Page 200: ...t settings for all settings associated with Eco Mode Off supports the performance specifications of the printer Energy Reduce energy use especially when the printer is idle Printer engine motors do no...

Page 201: ...te is an ultra low power saving mode Notes Three days is the default amount of time before the printer enters Hibernate mode Make sure to wake the printer from Hibernate mode before sending a print jo...

Page 202: ...cal recycling center Contact your local recycling center to determine the items they accept Recycling Lexmark packaging Lexmarkcontinuallystrivestominimizepackaging Lesspackaging helpstoensurethatLexm...

Page 203: ...me with your printer or cartridge and use the prepaid shipping label You can also do the following 1 Go to www lexmark com recycle 2 From the Toner Cartridges section select your country or region 3 F...

Page 204: ...er is being moved to a different department or location The printer is being serviced by someone from outside your organization The printer is being removed from your premises for service The printer...

Page 205: ...ard disk memory Notes Some printer models may not have a printer hard disk installed Configuring Erase Temporary Data Files in the printer menus lets you remove residual confidential material left by...

Page 206: ...rity Menu only when a formatted non defective printer hard disk is installed 3 From the Disk encryption menu select Enable Notes Enabling disk encryption will erase the contents of the printer hard di...

Page 207: ...ty environments it may be necessary to take additional steps to make sure that confidential data stored in the printer cannot be accessed by unauthorized persons For more information visit the Lexmark...

Page 208: ...ION SHOCK HAZARD To avoid the risk of electrical shock when cleaning the exterior of the printer unplug the power cord from the electrical outlet and disconnect all cables from the printer before proc...

Page 209: ...or scanned images 1 Slightly dampen a soft lint free cloth or paper towel with water 2 Open the scanner cover 3 Clean all the areas shown and then let them dry 1 White underside of the scanner cover...

Page 210: ...on the estimate Until an adequate print history is obtained on the printer initial estimates assume future supplies consumption based on the International Organization for Standardization test methods...

Page 211: ...tra High Yield Toner Cartridge 603X For Latin America includes Puerto Rico and Mexico Toner Cartridge 604 High Yield Toner Cartridge 604H Extra High Yield Toner Cartridge 604X For Africa Middle East C...

Page 212: ...y Contact your service representative to replace the maintenance kit Maintenance kit Part number 100 V maintenance kit 40X9146 110 V maintenance kit 40X9135 220 V maintenance kit 40X9136 This is avail...

Page 213: ...ton on the right side of the printer and then open the front door 2 1 2 Pull the toner cartridge out using the handle 3 Unpack the toner cartridge and then remove all packing materials 4 Shake the new...

Page 214: ...the printer Warning Potential Damage Do not expose the imaging unit to direct light for more than 10 minutes Extended exposure to light may cause print quality problems 6 Close the front door Replacin...

Page 215: ...ke it 5 Remove all packing materials from the imaging unit Warning Potential Damage Do not expose the imaging unit to direct light for more than 10 minutes Extended exposure to light may cause print q...

Page 216: ...de rails of the imaging unit with the arrows on the side rails inside the printer 7 Insert the toner cartridge into the printer by aligning the side rails of the cartridge with the arrows on the side...

Page 217: ...ur fingers are not under the printer when you set it down Before setting up the printer make sure there is adequate clearance around it Use only the power cord provided with this product or the manufa...

Page 218: ...display would work on a printer control panel Setting up e mail alerts Configuretheprintertosendyoue mailalertswhen thesuppliesaregettingloworwhenthepaperneedstobechanged or added or when there is a...

Page 219: ...IP address on the printer home screen The IP address appears as four sets of numbers separated by periods such as 123 123 123 123 If you are using a proxy server then temporarily disable it to load th...

Page 220: ...the Wipe All Settings option For more information see Erasing non volatile memory on page 205 Warning Potential Damage Restoring factory defaults returns most printer settings to the original factory...

Page 221: ...jam Doing so could permanently damage the fuser Avoiding jams Load paper properly Make sure paper lies flat in the tray Correct loading of paper Incorrect loading of paper Do not remove a tray while t...

Page 222: ...bent or curled paper Flex fan and straighten paper before loading it Do not use paper that has been cut or trimmed by hand Do not mix paper sizes weights or types in the same tray Make sure the paper...

Page 223: ...n x page jam clear standard bin 20y xx Remove the jammed paper 3 Front door x page jam open front door 20y xx Open the front door then remove the toner cartridge and imaging unit and then the jammed p...

Page 224: ...he printer might be hot To reduce the risk of injury from a hot component allow the surface to cool before touching it 1 Press the button on the right side of the printer and then open the front door...

Page 225: ...ect the quality of future print jobs 4 Place the imaging unit aside on a flat smooth surface Warning Potential Damage Do not expose the imaging unit to direct light for more than 10 minutes Extended e...

Page 226: ...rails of the unit with the arrows on the side rails inside the printer and then insert the imaging unit into the printer 8 Insert the toner cartridge by aligning the side rails of the cartridge with t...

Page 227: ...20y xx 1 Open the front door to loosen the jammed paper in the rear door 2 1 2 Gently pull down the rear door CAUTION HOT SURFACE The inside of the printer might be hot To reduce the risk of injury f...

Page 228: ...select Next Clear the jam press OK x page jam clear standard bin 20y xx 1 Firmly grasp the jammed paper on each side and then gently pull it out Note Make sure all paper fragments are removed 2 From...

Page 229: ...of injury from a hot component allow the surface to cool before touching it 1 Pull the tray completely out of the printer 2 Locate the blue lever and then pull it down to release the jam 3 Firmly gra...

Page 230: ...ect Next Clear the jam press OK x page jam open tray x 24y xx 1 Pull the tray completely out of the printer Note The message on the printer display indicates the tray where the jammed paper is located...

Page 231: ...r the jam press OK x page jam clear manual feeder 25y xx 1 From the multipurpose feeder firmly grasp the jammed paper on each side and then gently pull it out Note Make sure all paper fragments are re...

Page 232: ...h screen printer models select Next Clear the jam press OK x page jam open automatic feeder top cover 28y xx 1 Remove all original documents from the ADF tray Note The message is cleared when the page...

Page 233: ...then load the original documents into the ADF and then adjust the paper guide 6 From the printer control panel touch to clear the message and continue printing For non touch screen printer models sele...

Page 234: ...on the printer control panel to clear the message and continue printing For non touch screen printer models press to confirm Change paper source to custom string load paper orientation Try one or more...

Page 235: ...n from automatic feeder to continue scanning from the ADF immediately after the last successful scan job Select Scan from flatbed to continue scanning from the scanner glass immediately after the last...

Page 236: ...trol panel select Continue to ignore the message and continue printing For non touch screen printer models press to confirm Cancel the current print job Disk must be formatted for use in this device F...

Page 237: ...printer control panel select Continue to clear the message For non touch screen printer models press to confirm Complete the Analog Fax Setup If the message appears again after completing the setup th...

Page 238: ...type are specified in the Paper menu on the printer control panel Make sure that the paper size is correctly set For example if Multipurpose Feeder Size is set to Universal then make sure the paper i...

Page 239: ...s selected then the printer automatically overrides the request and then prints from an automatically selected tray Cancel the current job Load manual feeder with custom type name paper orientation Tr...

Page 240: ...aper source Cancel the current job Load paper source with custom type name paper orientation Try one or more of the following Load the tray or feeder with the correct size and type of paper To use the...

Page 241: ...nue to clear the message and continue printing For non touch screen printer models press to confirm Maintenance kit nearly low 80 xy For more information visit the Lexmarksupport Web site at http supp...

Page 242: ...alog phone line connected to modem fax is disabled Connect the printer to an analog phone line Non Lexmark supply type see User s Guide 33 xy Note The supply type can be toner cartridge or imaging uni...

Page 243: ...r the message and continue printing For non touch screen printer models press to confirm For more information visit http support lexmark com or contact customer support Reinstall missing or unresponsi...

Page 244: ...the previous scan job For non touch screen printer models press to confirm Replace cartridge 0 estimated pages remain 88 xy Replace the toner cartridge to clear the message and continue printing For m...

Page 245: ...feeder to continue scanning from the ADF immediately after the last successful scan job For non touch screen printer models press to confirm Select Scan from flatbed to continue scanning from the scan...

Page 246: ...o not want any print jobs to be restored For non touch screen printer models press to confirm Scanner automatic feeder cover open Close the ADF cover Scanner disabled by admin 840 01 Print without the...

Page 247: ...jobs were not restored From the printer control panel select Continue to delete the specified job For non touch screen printer models press to confirm Note Held jobs that are not restored stay in the...

Page 248: ...l outlet 5 Turn the printer back on Unformatted flash detected 53 Try one or more of the following From the printer control select Continue to stop the defragmentation and continue printing For non to...

Page 249: ...pment work Unplug the other electrical equipment and then turn on the printer If the printer does not work then reconnect the other electrical equipment Go to step 5 Step 5 Check if the cables connect...

Page 250: ...printer Step 10 Check if you have selected the correct port settings in the printer driver Are the port settings correct Go to step 11 Use correct printer driver settings Step 11 Check the installed...

Page 251: ...e if the internal option is listed in the Installed Features list Is the internal option listed in the menu settings page Go to step 4 Reinstall the internal option Step 4 a Check if the internal opti...

Page 252: ...the paper size indicators on the tray If you are printing on custom size paper then make sure that the paper guides rest against the edges of the paper Make sure the paper is below the maximum paper f...

Page 253: ...he Installed Options list Is the USB or parallel interface card listed in the Installed Options list Go to step 2 Check if you have a supported USB or parallel interface card Note A USB or parallel in...

Page 254: ...The problem is solved Step 2 a Load paper from a fresh package Note Paper absorbs moisture due to high humidity Store paper in its original wrapper until you use it b Resend the print job Do paper jam...

Page 255: ...may contain a formatting error or invalid data Delete the print job and then send it again For PDF files generate a new PDF and then print it again If you are printing from the Internet then the print...

Page 256: ...The problem is solved Step 4 Check if the flash drive is supported For more information on tested and approved USB flash drives see Supported flash drives and file types on page 74 Does the error mess...

Page 257: ...the paper type b Resend the print job Did the job print from the correct tray or on the correct paper The problem is solved Go to step 4 Step 4 a Check if the trays are not linked b Resend the print j...

Page 258: ...is solved Go to step 2 Step 2 a Open the document you want to print in Adobe Acrobat b Click File Print Advanced Print As Image OK OK Do the files print The problem is solved Contact customer support...

Page 259: ...ter is plugged in and turned on and if Ready appears on the printer display b Resend the print job Do the jobs print The problem is solved Go to step 3 Step 3 Ifanerrormessageappearsontheprinterdispla...

Page 260: ...ote Disabling Eco Mode or Quiet Mode may increase the consumption of energy or supplies or both Did the job print The problem is solved Go to step 2 Step 2 Reduce the number and size of fonts the numb...

Page 261: ...from the Paper Size Type menu Action Yes No Step 1 a Open the trays and then check if they contain paper of the same size and type Check if the paper guides are in the correct positions for the size o...

Page 262: ...the printer control panel navigate to Reports Print Fonts 2 Touch PCL Fonts or PostScript Fonts b Use a font that is supported by the printer or install the font that you want to use For more informa...

Page 263: ...match the paper loaded in the tray Change the paper loaded in the tray to match the paper size specified in the tray settings Step 3 a Depending on your operating system specify the paper size from Pr...

Page 264: ...ressed images still appear The problem is solved Contact customer support Gray background on prints ABCDE ABCDE ABCDE Leading edge Trailing edge Action Yes No Step 1 Check if Allow Background Removal...

Page 265: ...og b Resend the print job Did the background disappear from the prints The problem is solved Contact customer support Horizontal voids appear on prints Leading edge Trailing edge Action Yes No Step 1...

Page 266: ...ontal voids appear on prints Contact customer support The problem is solved Incorrect margins on prints ABCD ABCD ABCD Action Yes No Step 1 a Move the width and length guides in the tray to the correc...

Page 267: ...er type and weight match the type and weight of the paper in the tray Go to step 3 Specify the paper type and weight from the tray settings to match the paper loaded in the tray Step 3 a Depending on...

Page 268: ...r type and weight from Printing Preferences or from the Print dialog b Resend the print job Do print irregularities still appear Go to step 4 The problem is solved Step 4 Check if the paper loaded in...

Page 269: ...Specify the paper type texture and weight from the tray settings to match the paper loaded in the tray Change the paper loaded in the tray to match the paper type texture and weight specified in the t...

Page 270: ...etoner darkness Note 8 is the factory default setting b Resend the print job Is the print still too light Go to step 2 The problem is solved Step 2 From the printer control panel set the paper type te...

Page 271: ...o to step 6 The problem is solved Step 6 a Redistribute the toner in the imaging unit 1 Remove the toner cartridge and then the imaging unit 2 Firmly shake the imaging unit Warning Potential Damage Do...

Page 272: ...ep 2 The problem is solved Step 2 a Redistribute the toner in the imaging unit 1 Remove the toner cartridge and then the imaging unit 2 Firmly shake the imaging unit Warning Potential Damage Do not ex...

Page 273: ...tomer support The problem is solved Repeating defects appear on prints Action Yes No Step 1 Measure the distance between the defects Check for a distance between the defects that equals 97 mm 3 82 in...

Page 274: ...in the tray Is the tray set to the type and weight of the paper loaded Go to step 3 Change the paper loaded in the tray to match the paper type and weight specified in the tray settings Step 3 a Depe...

Page 275: ...y or feeder from Printing Preferences or the Print dialog b Resend the print job Do streaked horizontal lines appear on prints Go to step 2 The problem is solved Step 2 From the printer control panel...

Page 276: ...es appear on prints ABCDE ABCDE ABCDE Leading edge Trailing edge Action Yes No Step 1 a Depending on your operating system specify the paper type texture and weight from Printing Preferences or from t...

Page 277: ...job Do streaked vertical lines appear on prints Go to step 5 The problem is solved Step 5 Replace the imaging unit and then resend the print job Do streaked vertical lines appear on prints Contact cus...

Page 278: ...m is solved Toner specks appear on prints Action Yes No Replace the imaging unit and then resend the print job Do toner specks appear on prints Contact customer support The problem is solved Transpare...

Page 279: ...ob Do vertical voids appear on prints Go to step 2 The problem is solved Step 2 a From the printer control panel set the paper type and weight in the Paper menu to match the paper loaded in the tray b...

Page 280: ...blems Copier does not respond on page 280 Partial document or photo copies on page 281 Poor copy quality on page 281 Scanner unit does not close on page 283 Copier does not respond Action Yes No Step...

Page 281: ...ith paper that matches the paper size setting Step 3 a Specify the paper size Depending on your operating system specify the paper size in Printing Preferences or the Print dialog b Resend the print j...

Page 282: ...From the Copy screen check if the Content Type and Content Source settings are correct for the document being scanned Are the Content Type and Content Source settings correct for the document being sc...

Page 283: ...heck if there are no obstructions between the scanner unit and the printer a Lift the scanner unit b Remove any obstruction that keeps the scanner unit open c Lower the scanner unit Did the scanner un...

Page 284: ...on the display Is there an error or status message on the display Cleartheerrororstatus message Go to step 2 Step 2 Check if the power cord is plugged into the printer and a properly grounded electric...

Page 285: ...R interface port on an ISDN terminal adapter For more information and to request an R interface port contact your ISDN provider If you are using DSL then connect to a DSL filter or router that will s...

Page 286: ...contact your telephone company Note If you want to use both voice mail and the printer then consider adding a second telephone line for the printer b Try sending or receiving a fax Can you send or re...

Page 287: ...ntact customer support Can send but not receive faxes Action Yes No Step 1 Check the tray or feeder If empty then load paper in the tray or feeder Can you receive faxes The problem is solved Go to ste...

Page 288: ...rn off the printer and then turn it back on The Select your language screen appears on the printer display c Select a language and then touch d Select a country or region and then touch Next e Select...

Page 289: ...c In the Max Speed menu click one of the following 2400 4800 9600 14400 33600 d Click Submit and then resend the fax Is the fax print quality satisfactory The problem is solved Go to step 3 Step 3 Rep...

Page 290: ...the printer and the print server secure Contact customer support Tighten the cable connections Partial document or photo scans Action Yes No Check the placement of the document or photo Make sure the...

Page 291: ...factory Go to step 6 See Print quality problems on page 262 Step 6 Check the scan settings FromtheScanscreen makesuretheContentTypeandContentSource settings are correct for the document being scanned...

Page 292: ...heck box in the destination configuration settings Scanner unit does not close Action Yes No Check if there are obstructions in the scanner unit a Lift the scanner unit b Remove any obstruction keepin...

Page 293: ...cal outlet Step 4 Check if the electrical outlet is turned off by a switch or breaker Is the electrical outlet turned off by a switch or breaker Turn on the switch or reset the breaker Go to step 5 St...

Page 294: ...four sets of numbers separated by periods such as 123 123 123 123 b Click Settings Apps Apps Management System tab Log c From the Filter menu select an application status d From the Application menu...

Page 295: ...s is Connected Note If the status is Not Connected then the connection may be intermittent or the network cable may be defective Contact your system support person for a solution and then print anothe...

Page 296: ...rary of manuals support documentation drivers and other downloads to help you solve common problems E mail You can send an e mail to the Lexmark team describing your problem A service representative w...

Page 297: ...operates Any reference to a product program or service is not intended to state or imply that only that product program or service may be used Any functionally equivalent product program or service th...

Page 298: ...otype Corporation plc Antique Olive Monsieur Marcel OLIVE Apple Chancery Apple Computer Inc Arial The Monotype Corporation plc CG Times Based on Times New Roman under license from The Monotype Corpora...

Page 299: ...the following measures Reorient or relocate the receiving antenna Increase the separation between the equipment and receiver Connect the equipment into an outlet on a circuit different from that to w...

Page 300: ...We encourage the recycling of our products If you have further questions about recycling options visit the Lexmark Web site at www lexmark com for your local sales office phone number India E Waste n...

Page 301: ...ments of DHHS 21 CFR Chapter I Subchapter J for Class I 1 laser products and elsewhere is certified as a Class I laser product conforming to the requirements of IEC 60825 1 Class I laser products are...

Page 302: ...g laserstr ling n r kassettene tas ut og sperren er satt ut av spill Unng eksponering for laserstr len NIEBEZPIECZE STWO niewidzialne promieniowanie laserowe podczas usuwania kaset i blokady Nale y un...

Page 303: ...odes Using the Sleep Hibernate button Factory default Hibernate Timeout for this product in all countries or regions 3 days The amount of time the printer waits after a job is printed before it enters...

Page 304: ...declaration of conformity to the requirements of the Directives is available upon request from the Authorized Representative This product satisfies the Class B limits of EN 55022 and safety requireme...

Page 305: ...n public service commission or corporation commission for information If your home has specially wired alarm equipment connected to the telephone line ensure the installation of this equipment does no...

Page 306: ...r s Laboratories un autre laboratoire agr detypeNRTL NationallyRecognizedTesting Laboratory ouunorganismedecertificationagr dans votrer gion ou pays Ceci pr vient tout endommagement de l quipement cau...

Page 307: ...s ein schweizerischer Billing Tone Filter zur Z hlzeichen bertragung Lexmark Teilenummer 80D1877 f r jede Leitung installiert werden ber die in der Schweiz Zeitsteuertakte bertragen werden Die Verwend...

Page 308: ...of 20 cm 8 inches must be maintained between the antenna and any persons for this device to satisfy the RF exposure requirements of the FCC and other regulatory agencies Industry Canada Canada This d...

Page 309: ...de cet quipement radio doit veiller ce que l antenne soit implant e et dirig e de mani re n mettre aucun champ HF d passant les limites fix es pour l ensemble de la population par Sant Canada Reportez...

Page 310: ...al and electronic equipment Compliance is indicated by the CE marking Operation is allowed in all EU and EFTA countries but is restricted to indoor use only The manufacturer of this product is Lexmark...

Page 311: ...iski Ar o Lexmark International Inc deklar ka is izstr d jums atbilst Direkt vas 1999 5 EK b tiskaj m pras b m un citiem ar to saist tajiem noteikumiem Lietuvi iuo Lexmark International Inc deklaruoja...

Page 312: ...nths later provided that the warranty period for any supplies and for any maintenance items included with the printer shall end earlier if it or its original contents are substantially used up deplete...

Page 313: ...ND WHETHER EXPRESS OR IMPLIED WITH RESPECT TO THIS PRODUCT AND SPECIFICALLY DISCLAIM THE IMPLIED WARRANTIES OR CONDITIONS OF MERCHANTABILITY FITNESS FOR A PARTICULAR PURPOSE AND SATISFACTORY QUALITY A...

Page 314: ...d in the product or service The use of this product or service is subject to the reasonable non discriminatory terms in the Intellectual Property Rights IPR Disclosure ofCerticomCorp atthe IETFfor Add...

Page 315: ...ter control panel 78 canceling an e mail 94 cannot open Embedded Web Server 294 Card Copy setting up 21 card stock loading multipurpose feeder 56 tips 64 Cartridge low 88 xy 234 Cartridge nearly low 8...

Page 316: ...ing an overlay message 86 adjusting quality 83 canceling a copy job 87 collating copies 84 different paper sizes 82 enlarging 83 inserting a header or footer 86 multiple pages on one sheet 85 on both...

Page 317: ...ding USB hub Remove hub 236 Ethernet network preparing to set up for Ethernet printing 46 Ethernet port 44 Ethernet setup preparing for an 46 exporting a configuration using the Embedded Web Server 24...

Page 318: ...ess creating shortcuts using the printer control panel 122 FTP options 124 FTP address scanning to using a shortcut number 122 using the printer control panel 122 FTP options FTP address 124 FTP Setti...

Page 319: ...ng the optional tray 51 loading the standard tray 51 M maintenance kit ordering 212 Maintenance kit low 80 xy 241 Maintenance kit nearly low 80 xy 241 Maintenance kit very low x estimated pages remain...

Page 320: ...rinted forms 66 recycled 66 saving 85 selecting 66 storing 68 unacceptable 66 Universal size setting 51 using recycled 199 paper feed troubleshooting message remains after jam is cleared 254 paper jam...

Page 321: ...x page jam clear manual feeder 25y xx 231 x page jam clear standard bin 20y xx 228 x page jam open automatic feeder top cover 28y xx 232 x page jam open front door 20y xx 224 x page jam open rear door...

Page 322: ...0 02 246 Scanner jam remove all originals from the scanner 2yy xx 246 Scanner jam remove jammed originals from the scanner 2yy xx 246 Serial option x error 54 247 SMTP server not set up Contact system...

Page 323: ...puter setting up 124 Scan to Network setting up 22 using 121 scan troubleshooting cannot scan from a computer 290 partial document or photo scans 290 scan job was not successful 291 scanner unit does...

Page 324: ...us 210 checking from printer control panel 210 checking using the Embedded Web Server 210 conserving 199 storing 212 using genuine Lexmark 210 using recycled paper 199 supplies ordering ADF separator...

Page 325: ...hooting printer options internal option is not detected 251 Internal Solutions Port 251 tray problems 252 USB parallel interface card 253 troubleshooting printing printing slows down 258 troubleshooti...

Reviews: