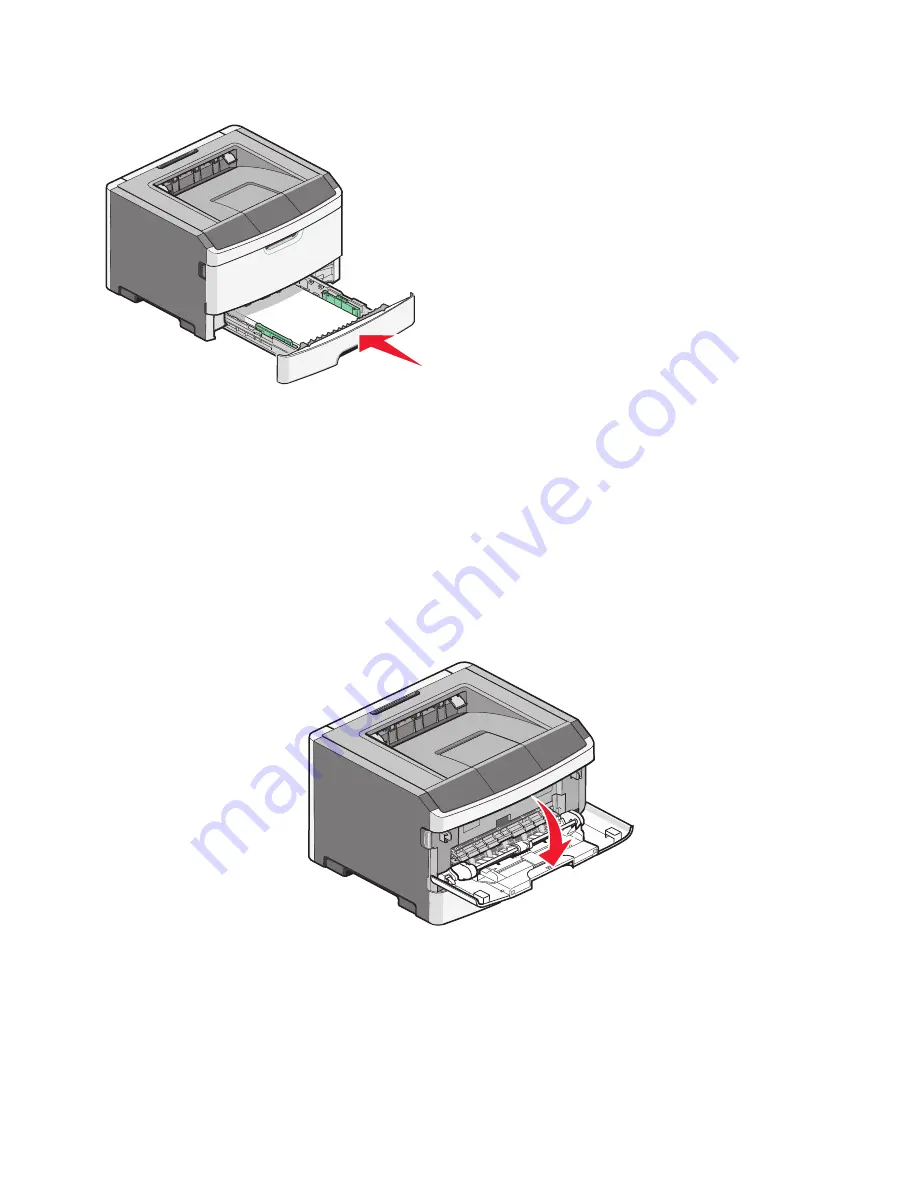
Lexmark E360 User Manual Download Page 36

6

Insert the tray.

7

If the paper type you loaded differs from the type that was previously loaded in the tray, then change the Paper
Size/Type setting from the printer control panel Paper menu.

Using the multipurpose feeder

You may want to use the multipurpose feeder when you print on different sizes and types of papers or specialty media,
such as card stock, transparencies, paper labels, and envelopes. You may also want to use the multipurpose feeder for
single

page print jobs on letterhead or on other specialty media you do not keep in a tray.

Opening the multipurpose feeder

1

Grasp the handle, and pull the multipurpose feeder door down.

Loading paper and specialty media

36

Summary of Contents for E360

Page 1: ...Lexmark E360d and E360dn Series User s Guide August 2011 www lexmark com Machine type s 4513 Model s 420 430 ...

Page 2: ... Attaching cables 22 Verifying printer setup 23 Setting up the printer software 23 Minimizing your printer s environmental impact 26 Saving paper and toner 26 Saving energy 27 Recycling 29 Loading paper and specialty media 31 Setting the paper size and type 31 Configuring Universal paper settings 31 Loading trays 32 Using the multipurpose feeder 36 Paper tray capacities 41 Linking and unlinking tr...

Page 3: ...omputer 82 Ordering supplies 83 Replacing supplies 84 Moving the printer 88 Administrative support 89 Finding advanced networking and administrator information 89 Using the Embedded Web Server 89 Checking the virtual display 89 Checking the device status 89 Viewing reports 90 Setting up e mail alerts 90 Configuring supply notifications 90 Copying printer settings to other printers 91 Restoring the...

Page 4: ... Solving basic printer problems 110 Printer control panel display is blank or displays only diamonds 110 Solving printing problems 111 Solving option problems 113 Solving paper feed problems 114 Solving print quality problems 116 Embedded Web Server does not open 125 Contacting Customer Support 126 Notices 127 Product information 127 Edition notice 127 Power consumption 131 Index 141 Contents 4 ...

Page 5: ... of the printer to lift it off the optional drawer Use only the power cord provided with this product or the manufacturer s authorized replacement CAUTION SHOCK HAZARD If you are accessing the system board or installing optional hardware or memory devices sometime after setting up the printer then turn the printer off and unplug the power cord from the wall outlet before continuing If you have any...

Page 6: ...ning storm Do not set up this product or make any electrical or cabling connections such as the fax feature power cord or telephone during a lightning storm See the product User s Guide for additional safety information SAVE THESE INSTRUCTIONS Safety information 6 ...

Page 7: ...cting the printer Installing the printer software Setup documentation The setup documentation came withthe printer and is also available on theLexmark Web site at http support lexmark com Additional setup and instructions for using the printer Selecting and storing paper and specialty media Loading paper Performing printing depending on your printer model Configuring printer settings Viewing and p...

Page 8: ...Store where purchased Warranty information Warranty information varies by country or region In the US See the Statement of Limited Warranty included with this printer or at http support lexmark com Rest of the world See the printed warranty that came with your printer Selecting a location for the printer When selecting a location for the printer leave enough room to open trays covers and doors If ...

Page 9: ...ght side 200 mm 8 in 3 Front 300 mm 12 in 4 Left side 12 7 mm 0 5 in 5 Top 300 mm 12 in Printer configurations Basic model The following illustration shows the printer front with its basic features or parts Learning about the printer 9 ...

Page 10: ...tandard exit bin 4 Printer control panel 5 System board door 6 Standard 250 sheet tray Tray 1 7 Multipurpose feeder door 8 Front door The following illustration shows the printer back with its basic features or parts Learning about the printer 10 ...

Page 11: ...ear door 2 Ethernet port Note The Ethernet port is a feature on network models only 3 USB port 4 Parallel port 5 Printer power cord socket 6 Power switch 7 Locking device port Learning about the printer 11 ...

Page 12: ...t tray Tray 1 7 Optional 250 or 550 sheet drawer Tray 2 8 Multipurpose feeder door 9 Front door Using the standard exit bin and paper stop Thestandard exitbin holds up to 150 sheets of20lb paper It collects print jobs facedown The standard exit bin includes a paper stop that keeps paper from sliding out the front ofthe bin as itstacks The paper stop also aids in neater stacking of the paper Learni...

Page 13: ... Notes Do not leave the paper stop in the open position if you are printing on transparencies Doing so may cause creases in the transparencies When moving the printer to another location make sure the paper stop is closed Learning about the printer 13 ...

Page 14: ...mory cards Printer memory Flash memory Fonts Accessing the system board to install internal options CAUTION SHOCK HAZARD If you are accessing the system board or installing optional hardware or memory devices sometime after setting up the printer then turn the printer off and unplug the power cord from the wall outlet before continuing If you have any other devices attached to the printer then tur...

Page 15: ...r memory devices sometime after setting up the printer then turn the printer off and unplug the power cord from the wall outlet before continuing If you have any other devices attached to the printer then turn them off as well and unplug any cables going into the printer Warning Potential Damage System board electronic components are easily damaged by static electricity Touch a metal surface on th...

Page 16: ...card 4 Align the memory card with its connector on the system board 5 Push open the latches on both ends of the memory connector Warning Potential Damage Memory cards are easily damaged by static electricity Touch a grounded metal surface before you touch a memory card Note Memory cards designed for other printers may not work with your printer 6 Push the memory card into the connector until the l...

Page 17: ...lick or click Start and then click Run b In the Start Search or Run box type control printers c Press Enter or click OK The printers folder opens 11 Right click your printer icon 12 Click Properties 13 Click Install Options Note Memory cards designed for other printers may not work with your printer 14 Click Ask Printer 15 Click OK 16 Click OK and then close the printers folder Additional printer ...

Page 18: ...e wall outlet before continuing If you have other devices attached to the printer then turn them off as well and unplug any cables going into the printer Warning Potential Damage System board electronic components are easily damaged by static electricity Touch something metal on the printer before touching any system board electronic components or connectors 1 Open the system board door 2 Unpack t...

Page 19: ...nst the system board Be careful not to damage the connectors 5 Close the system board door Installing hardware options Installing a 250 or 550 sheet drawer CAUTION POTENTIAL INJURY The printer weight is greater than 18 kg 40 lb and requires two or more trained personnel to move it safely Additional printer setup 19 ...

Page 20: ... printer then turn the printer off and unplug the power cord from the wall outlet before continuing If you have any other devices attached to the printer then turn them off as well and unplug any cables going into the printer 1 Unpack the drawer and remove any packing material 2 Remove the tray from the support unit 1 Support unit 2 Tray 3 Remove any packing material and tape from inside the tray ...

Page 21: ...printers folder a Click or click Start and then click Run b In the Start Search or Run box type control printers c Press Enter or click OK The printers folder opens 9 Right click the icon of your printer 10 Click Properties 11 Click Install Options 12 Click Ask Printer 13 Click OK 14 Click OK and then close the printers folder Additional printer setup 21 ...

Page 22: ... Ethernet cable 2 Connect the power cord to the printer first and then to a wall outlet 1 Ethernet port 2 USB port Warning Potential Damage Do not touch the USB cable any network adapter or the printer in the area shown while actively printing A loss of data or a malfunction can occur 3 Parallel port 4 Power cord socket Additional printer setup 22 ...

Page 23: ...ched to a network print a network setup page to verify the network connection This page also provides important information that aids network printing configuration 1 Make sure the printer is on and Ready appears 2 From the printer control panel press 3 Press the arrow buttons until Reports appears and then press 4 Press the arrow buttons until Network Setup Page appears and then press After the n...

Page 24: ...and install the printer software Updating available options in the printer driver Once the printer software and any options are installed it may be necessary to manually add the options in the printer driver to make them available for print jobs For Windows users 1 Open the Printers folder a Click or click Start and then click Run b In the Start Search or Run box type control printers c Press Ente...

Page 25: ...esktop choose Go Applications 2 Double click Utilities and then double click Print Center or Printer Setup Utility 3 Select the printer and then from the Printers menu choose Show Info 4 From the pop up menu choose Installable Options 5 Add any installed hardware options and then click Apply Changes Additional printer setup 25 ...

Page 26: ...he world using chamber tests for different temperature and humidity conditions Lexmark has found no reason to discourage the use of today s recycled office papers but generally the following property guidelines apply to recycled paper Low moisture content 4 5 Suitable smoothness 100 200 Sheffield units or 140 350 Bendtsen units European Note Some much smoother papers such as premium 24 lb laser pa...

Page 27: ...jams on page 92 Saving energy Using Eco Mode Use Eco Mode to quickly select one or more ways to reduce your printer s environmental impact Note See the table for the multiple settings that change when you select an Eco Mode setting Choose To Energy Reduce energy use especially when the printer is idle Printer engine motors do not start until a job is ready to print You may notice a short delay bef...

Page 28: ...e specifications for your printer To select a Quiet Mode setting 1 From the printer control panel press 2 Press the arrow buttons until Settings appears and then press 3 Press the arrow buttons until General Settings appears and then press 4 Press the arrow buttons until Quiet Mode appears and then press 5 Select the setting you want and then press Submitting changes appears Adjusting Power Saver ...

Page 29: ... Lexmark recycling program at www lexmark com recycle Recycling Lexmark products To return Lexmark products to Lexmark for recycling 1 Visit our Web site at www lexmark com recycle 2 Find the product type you want to recycle and then select your country from the list 3 Follow the instructions on the computer screen Recycling Lexmark packaging Lexmark continually strives to minimizepackaging Lesspa...

Page 30: ...dges returned to Lexmark are either reused or demanufactured for recycling Boxes used to return the cartridges are also recycled To return Lexmark cartridges for reuse or recycling follow the instructions that came with your printer or cartridge and use the pre paid shipping label You can also 1 Visit our Web site at www lexmark com recycle 2 From the Toner Cartridges section select your country f...

Page 31: ...il the correct type appears and then press Submitting changes appears followed by Type Configuring Universal paper settings The Universal Paper Size is a user defined setting that lets you print on paper sizes that are not preset in the printer menus Set the Paper Size for the specified tray to Universal when the size you want is not available from the Paper Size menu Then specify all of the follo...

Page 32: ...al Setup menu 3 From the Universal Setup menu press the arrow buttons until Portrait Height appears and then press 4 Press the left arrow button to decrease the setting or the right arrow button to increase the setting and then press Submitting Changes appears followed by the Universal Setup menu 5 Press to return to the Ready state Specify a feed direction Short Edge is the factory default settin...

Page 33: ...ides to the correct position for the paper size you are loading For long paper like A4 or legal squeeze and slide the length guide backwards to accommodate the length of paper you are loading Loading paper and specialty media 33 ...

Page 34: ...aded in Tray 2 Note Use the size indicators on the bottom of the tray to help position the guide 3 Flex a stack of paper back and forth to loosen the sheets and then fan them Do not fold or crease the paper Straighten the edges on a level surface 4 Load the paper stack toward the back of the tray as shown with the recommended print side facedown Note The maximum fill line on the width guide indica...

Page 35: ...ll line Load letterhead with the top edge of the sheet toward the front of the tray and the design facedown 5 Squeeze and slide the guides to lightly touch the side of the stack Loading paper and specialty media 35 ...

Page 36: ...o use the multipurpose feeder when you print on different sizes and types of papers or specialty media such as card stock transparencies paper labels and envelopes You may also want to use the multipurpose feeder for single page print jobs on letterhead or on other specialty media you do not keep in a tray Opening the multipurpose feeder 1 Grasp the handle and pull the multipurpose feeder door dow...

Page 37: ...ndle and pull the extension forward 3 Grasp the handle and pull the extension so it flips forward 4 Guide the extension down gently so the multipurpose feeder is extended fully and open Loading paper and specialty media 37 ...

Page 38: ...ets of paper or paper labels back and forth to loosen them and then fan them Do not fold or crease the paper or labels Straighten the edges on a level surface Hold transparencies by the edges and then fan them Straighten the edges on a level surface Note Avoid touching the print side of the transparencies Be careful not to scratch them Loading paper and specialty media 38 ...

Page 39: ...ialty media Notes Do not force any paper into the multipurpose feeder Overfilling may cause jams Do not exceed the maximum stack height by forcing paper or specialty media under the stack height limiters which are located on the guides Load paper transparencies and card stock with the recommended print side faceup and the top edge entering the printer first For more information on loading transpar...

Page 40: ...ess are shown to illustrate the proper orientation for loading envelopes Warning Potential Damage Never use envelopes with stamps clasps snaps windows coated linings or self stick adhesives These envelopes may severely damage the printer 4 Squeeze the tab located on the right width guide to adjust the guides to lightly touch the sides of the stack Loading paper and specialty media 40 ...

Page 41: ... may be installed on the printer at a time The maximum amount of paper that can be loaded depends on whether you have an optional 250 or 550 sheet tray Vinyl pharmacy or dual sided labels are not supported Use paper labels only Single sided paper labels designed for laser printers are supported for occasional use Multipurpose feeder 50 sheets of paper 15 paper labels 10 transparencies 10 sheets of...

Page 42: ...o the specified Paper Type Paper may not be properly processed if an inaccurate Paper Type is selected Creating a custom name for a paper type If the printer is on a network you can use the Embedded Web Server to define a name other than Custom Type x for each of the custom paper types that are loaded 1 Type the printer IP address into the address field of your Web browser Note If you do not know ...

Page 43: ...nd then press to select the tray The Paper Size menu appears 6 Press the arrow buttons until the Paper Type menu appears 7 Press 8 Press the arrow buttons until Custom Type x or another custom name appears and then press Submitting changes appears followed by Paper Menu 9 Press and then press to return to the Ready state Loading paper and specialty media 43 ...

Page 44: ...d cold or dry conditions even in the trays can contribute to paper curling prior to printing and can cause feeding problems Smoothness Paper smoothness directly affects print quality If paper is too rough toner cannot fuse to it properly If paper is too smooth it can cause paper feeding or print quality issues Always use paper between 100 300 Sheffield points smoothness between 150 250 Sheffield p...

Page 45: ...ts Selecting paper Using appropriate paper prevents jams and helps ensure trouble free printing To help avoid jams and poor print quality Always use new undamaged paper Before loading paper know the recommended print side This information is usually indicated on the package Do not use paper paper labels or card stock that has been cut or trimmed by hand Do not mix sizes types or weights in the sam...

Page 46: ...t the closest larger listed size For information on card stock and labels see the Card Stock Label Guide Paper types and weights supported by the printer The printer engine and the duplex path support 60 90 g m2 16 24 lb paper weights The multipurpose feeder supports 60 163 g m2 16 43 lb paper weights Paper type Standard 250 sheet tray Optional 250 or 550 sheet tray Multipurpose feeder Duplex path...

Page 47: ... mm 8 3 x 11 7 in A5 148 x 210 mm 5 8 x 8 3 in X A61 105 x 148 mm 4 1 x 5 8 in X X Executive 184 x 267 mm 7 3 x 10 5 in X Folio 216 x 330 mm 8 5 x 13 in JIS B5 182 x 257 mm 7 2 x 10 1 in X Legal 216 x 356 mm 8 5 x 14 in Letter 216 x 279 mm 8 5 x 11 in Oficio Mexico 216 x 340 mm 8 5 x 13 4 in Statement 140 x 216 mm 5 5 x 8 5 in X Universal2 76 2 x 127 mm 3 x 5 in up to 216 x 356 mm 8 5 x 14 in X3 B...

Page 48: ... 225 mm 3 9 x 8 9 in X X X 10 Envelope 105 x 241 mm 4 1 x 9 5 in X X X Other Envelope 229 x 356 mm 9 x 14 in X X X 1 A6 is supported only for grain long papers 2 If a paper size you want to use is not listed configure a Universal paper size For more information see Configuring Universal paper settings on page 31 3 Universal paper size has limited support in the duplex path for paper sizes 210 x 27...

Page 49: ...te To print on a specific size or type of paper adjust the paper size or type settings to match the loaded paper or select the appropriate tray or feeder c Click OK and then click OK For Macintosh users a Customize the settings as needed in the Page Setup dialog 1 With a document open choose File Page Setup 2 Choose a paper size or create a custom size to match the loaded paper 3 Click OK b Custom...

Page 50: ... placed facedown The top edge of the sheet with the logo is placed at the front of the tray Duplex two sided printing from trays Printed letterhead design is placed faceup The top edge of the sheet with the logo is placed at the rear of the tray Manual feeder simplex printing Preprinted letterhead design is placed faceup The top edge of thesheet with the logo should enter the manual feeder first N...

Page 51: ... these settings using the Embedded Web Server or from the printer control panel Paper menu To prevent print quality problems avoid getting fingerprints on the transparencies Before loading transparencies fan the stack to prevent sheets from sticking together We recommend Lexmark part number 70X7240 for letter size transparencies and Lexmark part number 12A5010 for A4 size transparencies Tips on us...

Page 52: ...this setting using the Embedded Web Server or from the printer control panel Paper menu Labeladhesives facesheet printablestock andtopcoatscanwithstandupto25 psi 172 kPa pressurewithout delaminating oozing around the edges or releasing hazardous fumes Do not use labels with slick backing material Use full label sheets Partial sheets may cause labels to peel off during printing resulting in a jam P...

Page 53: ...ont sample list To print samples of the fonts currently available for your printer 1 Make sure the printer is on and Ready appears 2 From the printer control panel press 3 Press the arrow buttons until Reports appears and then press 4 Press the arrow buttons until Print Fonts appears and then press 5 Press the arrow buttons until PCL Fonts or PostScript Fonts appears and then press After the font ...

Page 54: ...b 2 Press to confirm the deletion The Canceling screen appears Canceling a print job from the computer For Windows users 1 Open the printers folder a Click or click Start and then click Run b In the Start Search or Run box type control printers c Press Enter or click OK The printers folder opens 2 Double click the printer icon 3 Select the job to cancel 4 From the keyboard press Delete From the Wi...

Page 55: ... to cancel 4 From the icon bar at the top of the window click the Delete icon In Mac OS X version 10 4 and earlier 1 From the Go menu choose Applications 2 Double click Utilities and then double click Printer Setup Utility or Print Center 3 Double click the printer icon 4 From the printer window select the job to cancel 5 From the icon bar at the top of the window click the Delete icon Printing 55...

Page 56: ...rint Directory Asset Report Settings Network Ports General Settings Setup Menu Finishing Menu Quality Menu Utilities Menu PostScript Menu PCL Emul Menu Active NIC Network Menu2 USB Menu Parallel Menu 1 Depending on the printer setup this menu item appears as Network Setup Page or Network x Setup Page 2 Depending on the printer setup this menu item appears as Standard Network Wireless Network or Ne...

Page 57: ...mpty the job prints using the linked tray Size Type menu Menu item Description Select Source menu Tray 1 Tray 2 MP Feeder Manual Paper Manual Env Lets you specify the installed paper size and type in the selected tray or multipurpose feeder Note Only installed trays and feeders are listed in this menu Set Size menu for Tray 1 or Tray 2 A4 A5 A6 JIS B5 Executive Folio Legal Letter Oficio Mexico Sta...

Page 58: ...lope Lets you specify the envelope size loaded in the multipurpose feeder Note 10 Envelope is the US factory default setting DL Envelope is the international factory default setting Set Type menu for Tray 1 Plain Paper Transparency Recycled Labels Bond Letterhead Preprinted Colored Paper Light Paper Heavy Paper Rough Cotton Custom Type x Lets you specify the paper type loaded in Tray 1 Notes Plain...

Page 59: ...r Heavy Paper Rough Cotton Custom Type x Lets you specify the paper type loaded in the multipurpose feeder Note Plain Paper is the factory default setting Set Type menu for Manual Env Envelope Rough Envelope Custom Type x Lets you specify the envelope type loaded in the multipurpose feeder Note Envelope is the factory default setting Configure MP menu Menu item Description Configure MP Cassette Ma...

Page 60: ... Labels Texture Smooth Normal Rough Specifies the relative texture of the labels loaded Note Normal is the factory default setting Bond Texture Smooth Normal Rough Specifies the relative texture of the bond paper loaded Note Rough is the factory default setting Envelope Texture Smooth Normal Rough Specifies the relative texture of the envelopes loaded Note Normal is the factory default setting Rou...

Page 61: ... Notes Normal is the factory default setting Settings appear only if the custom type is supported Paper Weight menu Menu item Description Plain Weight Light Normal Heavy Specifies the relative weight of the paper loaded in a specific tray Note Normal is the factory default setting Card Stock Weight Light Normal Heavy Specifies the relative weight of the card stock loaded in a specific tray Notes N...

Page 62: ...ecific tray Note Normal is the factory default setting Preprinted Weight Light Normal Heavy Specifies the relative weight of the paper loaded in a specific tray Note Normal is the factory default setting Colored Weight Light Normal Heavy Specifies the relative weight of the paper loaded in a specific tray Note Normal is the factory default setting Light Weight Light Specifies the relative weight o...

Page 63: ... setting Colored Loading Off Duplex Determines the paper loading direction for all jobs that specify Colored as the paper type Note Off is the factory default setting Light Loading Off Duplex Determines the paper loading direction for all jobs that specify Light as the paper type Note Off is the factory default setting Heavy Loading Off Duplex Determines the paper loading direction for all jobs th...

Page 64: ...order to print from that source Universal Setup menu These menu items are used to specify the height width and feed direction of the Universal Paper Size The Universal Paper Size is a user defined paper size It is listed with the other paper size settings and includes similar options such as support for duplex printing and printing multiple pages on one sheet Menu item Description Units of Measure...

Page 65: ...y the total page count alarms timeouts the printer control panel language theTCP IP address thestatusofsupplies andthestatusofthenetwork connection Device Statistics Prints a report containingprinter statistics such as supplyinformation and details about printed pages Network Setup Page Prints a report containing information about the network printer settings such as the TCP IP address information...

Page 66: ...uses PostScript emulation if PS SmartSwitch is set to On It uses the default printer language specified in the Setup menu if PS SmartSwitch is set to Off PS SmartSwitch On Off Sets the printer to automatically switch to PS emulation when a print job requires it regardless of the default printer language Notes On is the factory default setting When the Off setting is used the printer does not exami...

Page 67: ...ls USB menu Menu item Description PCL SmartSwitch On Off Sets the printer to automatically switch to PCL emulation when a print job received through a USB port requires it regardless of the default printer language Notes On is the factory default setting When the Off setting is used the printer does not examine incoming data When the Off setting is used the printer uses PostScript emulation if the...

Page 68: ...s Macintosh binary PostScript print jobs Notes Auto is the factory default setting The Off setting filters print jobs using the standard protocol The On setting processes raw binary PostScript print jobs ENA Address xxx xxx xxx xxx Sets the network address information for an external print server that is attached to the printer using a USB cable Note This menu item is available only if the printer...

Page 69: ...n It uses the default printer language specified in the Setup menu if PCL SmartSwitch is set to Off NPA Mode Auto Off Sets the printer to perform the special processing required for bidirectional communication following the conventions defined by the NPA protocol Notes Auto is the factory default setting Changing this setting automatically resets the printer Parallel Buffer Disabled Auto Sets the ...

Page 70: ...stScript print jobs Notes Auto is the factory default setting The Off setting filters print jobs using the standard protocol The On setting processes raw binary PostScript print jobs ENA Address xxx xxx xxx xxx Sets the network address netmask and gateway information for an external print server that is attached to the printer using a parallel cable Note This menu is available only if the printer ...

Page 71: ...per or specialty media Notes Off is the factory default setting Off resets the printer to its factory default settings The Energy setting minimizes the power used by the printer Performance may be affected but print quality is not Energy Paper minimizes the use of power and of paper and specialty media Paper minimizes the amount of paper and specialty media needed for a print job Performance may b...

Page 72: ... default setting Timeouts Print Timeout Disabled 1 255 Sets the amount of time in seconds the printer waits to receive an end of job message before canceling the remainder of the print job Notes 90 seconds is the factory default setting When the timer expires any partially printed page still in the printer is printed and then the printer checks to see if any new print jobs are waiting Print Timeou...

Page 73: ...rints Factory Defaults Do Not Restore Restore Now Returns the printer settings to the factory default settings Notes Do Not Restore is the factory default setting Do Not Restore keeps the user defined settings Restore Now returns all printer settings to the factory default settings except those in the Network Ports menu All downloads stored in RAM are deleted Downloads stored in flash memory are n...

Page 74: ...orary downloads such as fonts and macros stored in RAM when the printer receives a job that requires more memory than is available Notes Off is the factory default setting Off sets the printer to retain the downloads only until memory is needed Downloads are deleted in order to process print jobs The On setting retains the downloads during language changes and printer resets If the printer runs ou...

Page 75: ...ault setting The On setting stacks the print job sequentially Both settings print the entire job the number of times specified by the Copies menu setting Separator Sheets None Between Copies Between Jobs Between Pages Specifies whether blank separator sheets are inserted Notes None is the factory default setting Between Copies inserts a blank sheet between each copy of a print job if Collation is ...

Page 76: ...efault setting The printer chooses between portrait and landscape N up Border None Solid Prints a border around each page image when using N up pages sides Note None is the factory default setting Quality menu Menu item Description Print Resolution 300 dpi 600 dpi 1200 dpi 1200 Image Q 2400 Image Q Specifies the printed output resolution Note 600 dpi is the factory default setting The printer driv...

Page 77: ...ner Notes 0 is the factory default setting A negative value will darken text images and graphics A positive value will lighten them and conserve toner Contrast 0 5 Adjusts the degree of difference between levels of gray in printed output Notes 0 is the factory default setting Higher settings show more difference between levels of gray Utilities menu Menu item Description Format Flash No Yes Format...

Page 78: ...ivate is selected all data sent to the printer is printed in hexadecimal and character representation and control codes are not executed To exit Hex Trace turn the printer off or reset the printer Coverage Estimator Off On Provides an estimate of the percentage coverage of black on a page The estimate is printed on a separator page Note Off is the factory default setting PostScript menu Menu item ...

Page 79: ... 850 is the international factory default setting PCL Emulation Settings Point Size 1 00 1008 00 Changes the point size for scalable typographic fonts Notes 12 is the factory default setting Point Size refers to the height of the characters in the font One point equals approximately 1 72 of an inch Point sizes can be increased or decreased in 0 25 point increments PCL Emulation Settings Pitch 0 08...

Page 80: ...s a carriage return CR after a line feed LF control command Note Off is the factory default setting PCL Emulation Settings Auto LF after CR Off On Specifies whether the printer automatically performs a line feed LF after a carriage return CR control command Note Off is the factory default setting Tray Renumber Assign MP Feeder Off None 0 199 Assign Tray x Off None 0 199 Assign Manual Paper Off Non...

Page 81: ...Menu item Description Tray Renumber Restore Defaults Yes No Returns all tray drawer and feeder assignments to the factory default settings Understanding printer menus 81 ...

Page 82: ...amp cloth to clean the interior may cause damage to your printer 5 Make sure all areas of the printer are dry before beginning a new print job Storing supplies Choose a cool clean storage area for the printer supplies Store supplies right side up in their original packing until you are ready to use them Do not expose supplies to Direct sunlight Temperatures above 35 C 95 F High humidity above 80 S...

Page 83: ... and front to back several times to redistribute toner 3 Reinsert the cartridge and continue printing Note Repeat this procedure multiple times until the print remains faded and then replace the cartridge Recommended toner cartridges and part numbers Part name Lexmark Return Program Cartridge Regular cartridge For the US and Canada Toner cartridge E260A11A E260A21A High Yield Toner cartridge E360H...

Page 84: ...experience faded print remove the toner cartridge Firmly shakeit side to sideandfront to back severaltimesto redistribute the toner and then reinsertitand continue printing When shaking the cartridge no longer improves the print quality replace the toner cartridge Note You can check to see approximately how much toner is left in your cartridge by printing a menu settings page To replace the toner ...

Page 85: ...dge clicks into place when correctly installed 6 Close the front door Replacing the photoconductor kit The printer automatically notifies you before the photoconductor kit reaches a page maximum by showing 84 PC Kit life warning or 84 Replace PC Kit on the display You can also see the status of the photoconductor kit by printing a menu settings page When 84 PC Kit life warning or 84 Replace PC Kit...

Page 86: ...otoconductor kit and toner cartridge out of the printer as a unit by pulling on the toner cartridge handle Note The photoconductor kit and toner cartridge form a unit Place the unit on a flat clean surface 4 Press the button on the base of the photoconductor kit Pull the toner cartridge up and out using the handle Maintaining the printer 86 ...

Page 87: ...rint jobs 6 Insert the toner cartridge into the photoconductor kit by aligning the rollers on the toner cartridge with the tracks Push the toner cartridge until it clicks into place 7 Install the unit into the printer by aligning the arrows on the guides of the unit with the arrows in the printer Push the unit as far as it will go Maintaining the printer 87 ...

Page 88: ...l drawer and set it aside instead of trying to lift the drawer and printer at the same time Note Use the handholds located on both sides of the printer to lift it off the optional drawer Use only the power cord provided with this product or the manufacturer s authorized replacement Warning Potential Damage Damage to the printer caused by improper moving is not covered by the printer warranty Movin...

Page 89: ...ation CD and the Embedded Web Server Administrator s Guide on the LexmarkTM Web site at www lexmark com Checking the virtual display The virtual display works as an actual display would work on a printer control panel showing printer messages To access the Embedded Web Server type the printer IP address into the address field of your Web browser Note If you do not know the IP address of the printe...

Page 90: ...ting low or when the paper needs to be changed added or unjammed 1 Type the printer IP address into the address field of your Web browser Note If you do not know the IP address of the printer then you can View the IP address on the printer control panel in the TCP IP section under the Networks Ports menu Print a network setup page or the menu settings pages and locate the IP address in the TCP IP ...

Page 91: ...hen click Click here to submit language 4 Click Printer Settings 5 Enter the IP addresses of the source and target printers Note To add additional target printers click the Add Target IP button 6 Click Copy Printer Settings Restoring the factory default settings 1 From the printer control panel press 2 Press the arrow buttons until Settings appears and then press 3 Press the arrow buttons until Ge...

Page 92: ... tray Do not remove a tray while the printer is printing Do not load a tray while the printer is printing Load it prior to printing or wait for a prompt to load it Do not load too much paper Make sure the stack height does not exceed the indicated maximum height Make sure the guides in the tray or the multipurpose feederare properly positioned and are not pressing too tightly against the paper or ...

Page 93: ...jam prefix numbers are given in the following illustration to show where each jam occurs 24x 233 234 24x 233 234 24x 251 200 201 235 202 231 234 231 234 Understanding jam messages and locations Note To resolve any message all paper or specialty media must be cleared from the entire paper path Open doors and covers and remove trays to access jam locations The following illustration and table indica...

Page 94: ...y one or more of the following Remove Tray 1 Open the front door and then remove the photoconductor kit 202 231 Open the front door and then open the rear door 233 234 Try one or more of the following Open the front door and then open the rear door Remove Tray 1 and then depress the lever 235 Remove the jam from the standard exit bin 24x Remove Tray 2 251 Open the multipurpose feeder door Clearing...

Page 95: ... 2 Remove the jam if you see it here 3 If you do not see it open the front door and then remove the photoconductor kit and toner cartridge unit Note When the photoconductor kit and toner cartridge are together they are called a unit Clearing jams 95 ...

Page 96: ...4 Lift the flap in front of the printer and remove any jammed sheets 5 Align and insert the unit 6 Close the front door 7 Insert the tray 8 Press Clearing jams 96 ...

Page 97: ...ce the risk of injury from a hot component allow the surface to cool before touching 1 Open the front door and then remove the unit 2 Lift the flap in front of the printer and then remove any jammed sheets 3 Align and insert the unit 4 Close the front door 5 Press Clearing jams 97 ...

Page 98: ...ight be hot To reduce the risk of injury from a hot component allow the surface to cool before touching 1 Open the front door and then remove the unit 2 Lift the flap in front of the printer and then remove any jammed sheets 3 Open the rear door Clearing jams 98 ...

Page 99: ...ar door 7 Close the front door 8 Press 231 paper jam CAUTION HOT SURFACE The inside of the printer might be hot To reduce the risk of injury from a hot component allow the surface to cool before touching 1 Open the front door 2 Open the rear door Clearing jams 99 ...

Page 100: ...3 Remove the jam 4 Close the rear door 5 Close the front door 6 Press If this does not clear the jam complete the steps in 233 paper jam on page 101 Clearing jams 100 ...

Page 101: ... area 4 Insert the tray 5 Press If this does not clear the jam complete the steps in 231 paper jam on page 99 234 paper jam A single jam or multiple jams are in the duplex area of the printer when the printer is turned on To locate and remove the jammed paper complete all the steps in 231 paper jam on page 99 233 paper jam on page 101 Clearing jams 101 ...

Page 102: ...sing a size of paper not supported for duplex printing A sheet is jammed in the standard exit bin 1 To remove the jam gently pull the jammed sheet out of the standard exit bin 2 Press 24x paper jam 1 Remove the optional tray from the printer Clearing jams 102 ...

Page 103: ...4 Press 251 paper jam A sheet ofpaperor specialty media failed to feed completely from the multipurpose feeder Part ofit maystill be visible If it is visible gently pull the jammed sheet from the front of the multipurpose feeder Clearing jams 103 ...

Page 104: ...ng steps 1 Open the front door and then remove the unit 2 Lift the flap at the front ofthe printer and then remove any jammed sheets of paper that are short lengths of paper 3 Align and insert the unit 4 Close the front door 5 Press Clearing jams 104 ...

Page 105: ...ing Cancel the current job Load input src with size Try one or more of the following Load the paper tray or other source with the correct paper type and size Cancel the current job Load input src with type size Try one or more of the following Load the paper tray or other source with the correct paper type and size Cancel the current job Load manual feeder with type size Try one or more of the fol...

Page 106: ...e of the following Load the multipurpose feeder with the correct paper type and size Wait for the message to clear and then continue printing The printer manually overrides the request and then prints from an automatically selected tray Cancel the current job Remove paper from standard output bin Remove the stack of paper from the standard exit bin 30 yy Invalid refill change cartridge An unsuppor...

Page 107: ...he paper is large enough for the data being printed Cancel the current print job 35 Insufficient memory to support Resource Save feature The printer lacks sufficient memory to save settings Install additional memory or press to disable Resource Save clear the message and continue printing 37 Insufficient memory for Flash Memory Defragment operation Try one or more of the following Pressthearrowbut...

Page 108: ...lash memory Upgrade to a larger capacity flash memory Press and then press to cancel printing 53 Unformatted flash detected Try one or more of the following Press the arrow buttons until Continue appears and then press to continue printing Format the flash memory If the error message remains the flash memory may be defective and require replacing 54 Standard network software error Try one or more ...

Page 109: ...ter off 2 Unplug the power cord from the wall outlet Note Optional trays lock together when stacked Remove stacked trays one at a time from the top down 3 Remove the additional tray s 4 Connect the power cord to a properly grounded outlet 5 Turn the printer back on 59 Incompatible tray x Only options designed specifically for this printer are supported Try one or more of the following Remove the s...

Page 110: ...rotectors uninterrupted power supplies or extension cords Other electronic equipment plugged into the outlet is working The printer is turned on Check the printer power switch The printer cable is securely attached to the printer and the host computer print server option or other network device All options are properly installed The printer driver settings are correct Once you have checked each of...

Page 111: ... at www lexmark com MAKE SURE THE PRINTER IS CONNECTED TO THE NETWORK Print a network setup page and check that the status shows Connected If the status is Not Connected check the network cables and then try printing the network setup page again Contact your system support person to make sure the network is functioning correctly Copies of the printer software are also available on the Lexmark Web ...

Page 112: ...ck on to exit Hex Trace mode Tray linking does not work LOAD THE SAME SIZE AND TYPE OF PAPER IN EACH TRAY 1 Load the same size and type of paper in each tray 2 Move the paper guides to the correct positions for the paper size loaded in each tray MAKE SURE THE PAPER SIZE AND PAPER TYPE SETTINGS ARE THE SAME FOR EACH TRAY 1 Print a menu settings page and compare the settings for each tray 2 If neces...

Page 113: ...e arrow buttons until the value you want appears and then press Solving option problems Option does not operate correctly or quits after it is installed These are possible solutions Try one or more of the following RESET THE PRINTER Turn the printer off wait for about 10 seconds and then turn the printer on CHECK TO SEE IF THE OPTION IS CONNECTED TO THE PRINTER 1 Turn the printer off 2 Unplug the ...

Page 114: ...ard Memory card Make sure the memory card is securely connected to the printer system board Solving paper feed problems Paper frequently jams These are possible solutions Try one or more of the following CHECK THE PAPER Use recommended paper and other specialty media For more information see Paper and specialty media guidelines on page 44 MAKE SURE THERE IS NOT TOO MUCH PAPER IN THE TRAY OR FEEDER...

Page 115: ... does not reprint after you clear the jam In the Settings menu Jam Recovery is set to Off Set Jam Recovery to Auto or On 1 Press 2 Press the arrow buttons until Settings appears and then press 3 Press the arrow buttons until General Settings appears and then press 4 Press the arrow buttons until Print Recovery appears and then press 5 Press the arrow buttons until Jam Recovery appears and then pre...

Page 116: ... in the standard tray Load the paper stack toward the back of the tray as shown with the recommended print side facedown Notice the maximum fill line on the side of the tray to guide you Do not overfill the tray Print the print quality test pages 1 Turn the printer off 2 From the printer control panel hold down and the right arrow button while turning the printer on 3 Release the buttons when CONF...

Page 117: ... jagged or uneven edges If you are using downloaded fonts verify that the fonts are supported by the printer the host computer and the software program Clipped images These are possible solutions Try one or more of the following CHECK THE GUIDES Move the width and length guides in the tray to the correct positions for the paper size loaded CHECK THE PAPER SIZE SETTING Make sure the Paper Size sett...

Page 118: ... Darkness setting before sending the job to print Ghost images These are possible solutions Try one or more of the following THE PHOTOCONDUCTOR KIT IS DEFECTIVE Replace the photoconductor kit CHECK THE PAPER TYPE SETTING For Windows users From Print Properties make sure the Paper Type setting matches the paper loaded in the tray For Macintosh users From the Print dialog make sure the Paper Type se...

Page 119: ...g or the software program Paper curl These are possible solutions Try one or more of the following CHECK THE PAPER TYPE SETTING For Windows users From Print Properties make sure the Paper Type setting matches the paper loaded in the tray For Macintosh users From the Print dialog make sure the Paper Type setting matches the paper loaded in the tray From the printer control panel Paper menu make sur...

Page 120: ...ontrast From the printer control panel Quality menu change these settings THE PAPER HAS ABSORBED MOISTURE DUE TO HIGH HUMIDITY Load paper from a fresh package Store paper in its original wrapper until you use it CHECK THE PAPER Avoid textured paper with rough finishes CHECK THE PAPER TYPE SETTING For Windows users From Print Properties make sure the Paper Type setting matches the paper loaded in t...

Page 121: ...el Quality menu change these settings THE PAPER HAS ABSORBED MOISTURE DUE TO HIGH HUMIDITY Load paper from a fresh package Store paper in its original wrapper until you use it CHECK THE PAPER Avoid textured paper with rough finishes CHECK THE PAPER TYPE SETTING For Windows users From Print Properties make sure the Paper Type setting matches the paper loaded in the tray For Macintosh users From the...

Page 122: ...le solutions Try one or more of the following THE TONER CARTRIDGE MAY BE DEFECTIVE Replace the toner cartridge THERE IS TONER IN THE PAPER PATH Contact Customer Support Toner rubs off These are possible solutions Try one or more of the following CHECK THE PAPER TYPE SETTING Make sure the Paper Type setting matches the paper loaded in the tray CHECK THE PAPER TEXTURE SETTING Make sure the Paper Tex...

Page 123: ...nly transparencies recommended by the printer manufacturer CHECK THE PAPER TYPE SETTING Load transparencies and make sure the Paper Type setting is set to Transparency Streaked horizontal lines These are possible solutions Try one or more of the following THE TONER MAY SMEAR WHEN PAPER IS FED FROM A SPECIFIC SOURCE From Print Properties the print dialog or the printer control panel select another ...

Page 124: ...FROM A SPECIFIC SOURCE From Print Properties the Print dialog or the printer control panel select another tray or feeder to feed paper for the job THE TONER CARTRIDGE IS DEFECTIVE Replace the toner cartridge MAKE SURE THE PAPER PATH IS CLEAR Paper could be caught between the photoconductor kit and the fuser Check the paper path around the fuser area Warning Potential Damage Do not touch the photoc...

Page 125: ...or feeder MAKE SURE THE TONER IS DISTRIBUTED EVENLY IN THE TONER CARTRIDGE Remove the toner cartridge and shake it from side to side to redistribute the toner to extend the life of the cartridge and then reinstall it THE TONER CARTRIDGE MAY BE DEFECTIVE OR LOW ON TONER Replace the used toner cartridge with a new one Embedded Web Server does not open These are possible solutions Try one or more of ...

Page 126: ...ady taken to find a solution You need to know your printer model type and serial number For more information see the label on the inside top front cover of the printer The serial number is also listed on the menu settings page In the U S or Canada call 1 800 539 6275 For other countries or regions visit the Lexmark Web site at http support lexmark com Troubleshooting 126 ...

Page 127: ... or the programs described may be made at any time References in this publication to products programs or services do not imply that the manufacturer intends to make these available in all countries in which it operates Any reference to a product program or service is not intended to state or imply that only that product program or service may be used Any functionally equivalent product program or...

Page 128: ...in a residential installation This equipment generates uses and can radiate radio frequency energy and if not installed and used in accordance with the instructions may cause harmful interference to radio communications However there is no guarantee that interference will not occur in a particular installation If this equipment does cause harmful interference to radio or television reception which...

Page 129: ...are subject to change See www lexmark com for current values Waste from Electrical and Electronic Equipment WEEE directive The WEEE logo signifies specific recycling programs and procedures for electronic products in countries ofthe European Union We encourage the recycling of our products If you have further questions about recycling options visit the Lexmark Web site at www lexmark com for your ...

Page 130: ... 16 C 32 C 60 F 90 F Shipping and storage temperature 20 C 40 C 4 F 104 F Laser notice The printer is certified in the U S to conform to the requirements of DHHS 21 CFR Subchapter J for Class I 1 laser products and elsewhere is certified as a Class I laser product conforming to the requirements of IEC 60825 1 Class I laser products are not considered to be hazardous The printer contains internally...

Page 131: ... scanning hard copy documents NA Ready The product is waiting for a print job 12 Power Saver The product is in energy saving mode 11 Off The product is plugged into a wall outlet but the power switch is turned off NA The power consumption levels listed in the previous table represent time averaged measurements Instantaneous power draws may be substantially higher than the average Values are subjec...

Page 132: ...y usage Industry Canada compliance statement This Class B digital apparatus meets all requirements of the Canadian Interference Causing Equipment Standard ICES 003 Avis de conformité aux normes de l industrie du Canada Cet appareil numérique de classe B est conforme aux exigences de la norme canadienne relative aux équipements pouvant causer des interférences NMB 003 Regulatory notices for wireles...

Page 133: ...ne antenne de gain supérieur est strictement interdite Pour empêcher toute interférence radio au service faisant l objet d une licence cet appareil doit être utilisé à l intérieur et loin des fenêtres afin de garantir une protection optimale Si le matériel ou son antenne d émission est installé à l extérieur il doit faire l objet d une licence L installateur de cet équipement radio doit veiller à ...

Page 134: ...Gerät in Übereinstimmung mit den grundlegenden Anforderungen und den übrigen einschlägigen Bestimmungen der Richtlinie 1999 5 EG befindet Ελληνική ΜΕ ΤΗΝ ΠΑΡΟΥΣΑ Η LEXMARK INTERNATIONAL INC ΔΗΛΩΝΕΙ ΟΤΙ ΑΥΤΟ ΤΟ ΠΡΟΪΟΝ ΣΥΜΜΟΡΦΩΝΕΤΑΙ ΠΡΟΣ ΤΙΣ ΟΥΣΙΩΔΕΙΣ ΑΠΑΙΤΗΣΕΙΣ ΚΑΙ ΤΙΣ ΛΟΙΠΕΣ ΣΧΕΤΙΚΕΣ ΔΙΑΤΑΞΕΙΣ ΤΗΣ ΟΔΗΓΙΑΣ 1999 5 ΕΚ English Hereby Lexmark International Inc declares that this type of equipment is in...

Page 135: ...né ustanovenia smernice 1999 5 ES Slovensko Lexmark International Inc izjavlja da je ta izdelek v skladu z bistvenimi zahtevami in ostalimi relevantnimi določili direktive 1999 5 ES Svenska Härmed intygar Lexmark International Inc att denna produkt står i överensstämmelse med de väsentliga egenskapskrav och övriga relevanta bestämmelser som framgår av direktiv 1999 5 EG Statement of Limited Warran...

Page 136: ...ms data andremovablestorage media unless directed otherwise by Lexmark For further explanation of your warranty alternatives and the nearest Lexmark authorized servicer in your area contact Lexmark on the World Wide Web at http support lexmark com Remote technical support is provided for this product throughout its warranty period For products no longer covered by a Lexmark warranty technical supp...

Page 137: ...IMITED WARRANTY AND LICENSE AGREEMENT PLEASE READ CAREFULLY BEFORE USING THIS PRODUCT BY USING THIS PRODUCT YOU AGREE TO BE BOUND BY ALL THE TERMS AND CONDITIONS OF THIS SOFTWARE LIMITED WARRANTY AND LICENSE AGREEMENT IF YOU DO NOT AGREE WITH THE TERMS OF THIS SOFTWARE LIMITED WARRANTY AND LICENSE AGREEMENT PROMPTLY RETURN THE PRODUCT UNUSED AND REQUEST A REFUND OF THE AMOUNT YOU PAID IF YOU ARE I...

Page 138: ...DAMAGES INCLUDING BUT NOT LIMITED TO LOST PROFITS OR REVENUES LOST SAVINGS INTERRUPTION OF USE OR ANY LOSS OF INACCURACY IN OR DAMAGE TO DATA OR RECORDS FOR CLAIMS OF THIRD PARTIES OR DAMAGETO REAL OR TANGIBLEPROPERTY FOR LOSS OF PRIVACY ARISING OUT OR IN ANY WAY RELATED TO THE USE OF OR INABILITY TO USE THE SOFTWARE PROGRAM OR OTHERWISE IN CONNECTION WITH ANY PROVISION OF THIS SOFTWARE LICENSE AG...

Page 139: ...e engineering reverse assembly or reverse compilation You may not decrypt the Software Program unless necessary for the legitimate Use of the Software Program 9 ADDITIONAL SOFTWARE This License Agreement applies to updates or supplements to the original Software Program provided by Lexmark unless Lexmark provides other terms along with the update or supplement 10 TERM This License Agreement is eff...

Page 140: ...reement including any addendum or amendment to this License Agreement that is included with the Software Program is the entire agreement between you and Lexmark relating to the Software Program Except as otherwise provided for herein these terms and conditions supersede all prior or contemporaneous oral or written communications proposals and representations with respect to the Software Program or...

Page 141: ...Server 89 checking virtual display on Embedded Web Server 89 cleaning exterior of the printer 82 Close front door 105 configurations printer 9 Configure MP menu 59 configuring multiple printers 91 configuring supply notifications 90 conservation settings Eco Mode 27 Power Saver 28 Quiet Mode 28 conserving supplies 26 contacting Customer Support 126 control panel printer factory defaults restoring ...

Page 142: ...ys 32 M memory card installing 15 troubleshooting 114 menu settings loading on multiple printers 91 menu settings page printing 23 menus Configure MP 59 Custom Types 64 Default Source 57 diagram of 56 Finishing 74 General Settings 71 Network 66 Paper Loading 63 Paper Texture 60 Paper Weight 61 parallel 69 PCL Emul 79 PostScript 78 Quality 76 Reports 65 Setup 73 Size Type 57 Universal Setup 64 USB ...

Page 143: ... shipping 88 printer control panel factory defaults restoring 91 printer messages 30 yy Invalid refill change cartridge 106 31 yy Replace defective or missing cartridge 106 32 yy Cartridge part number unsupported by device 106 32 yy Replace unsupported cartridge 107 34 Short paper 107 35 Insufficient memory to support Resource Save feature 107 37 Insufficient memory for Flash Memory Defragment ope...

Page 144: ...upport 126 solving basic printer problems 110 troubleshooting display display is blank 110 display shows only diamonds 110 troubleshooting paper feed message remains after jam is cleared 115 page that jammed does not reprint 115 troubleshooting print incorrect characters print 112 incorrect margins 119 job prints from wrong tray 112 job prints on wrong paper 112 job takes longer than expected 111 ...

Reviews: