background image

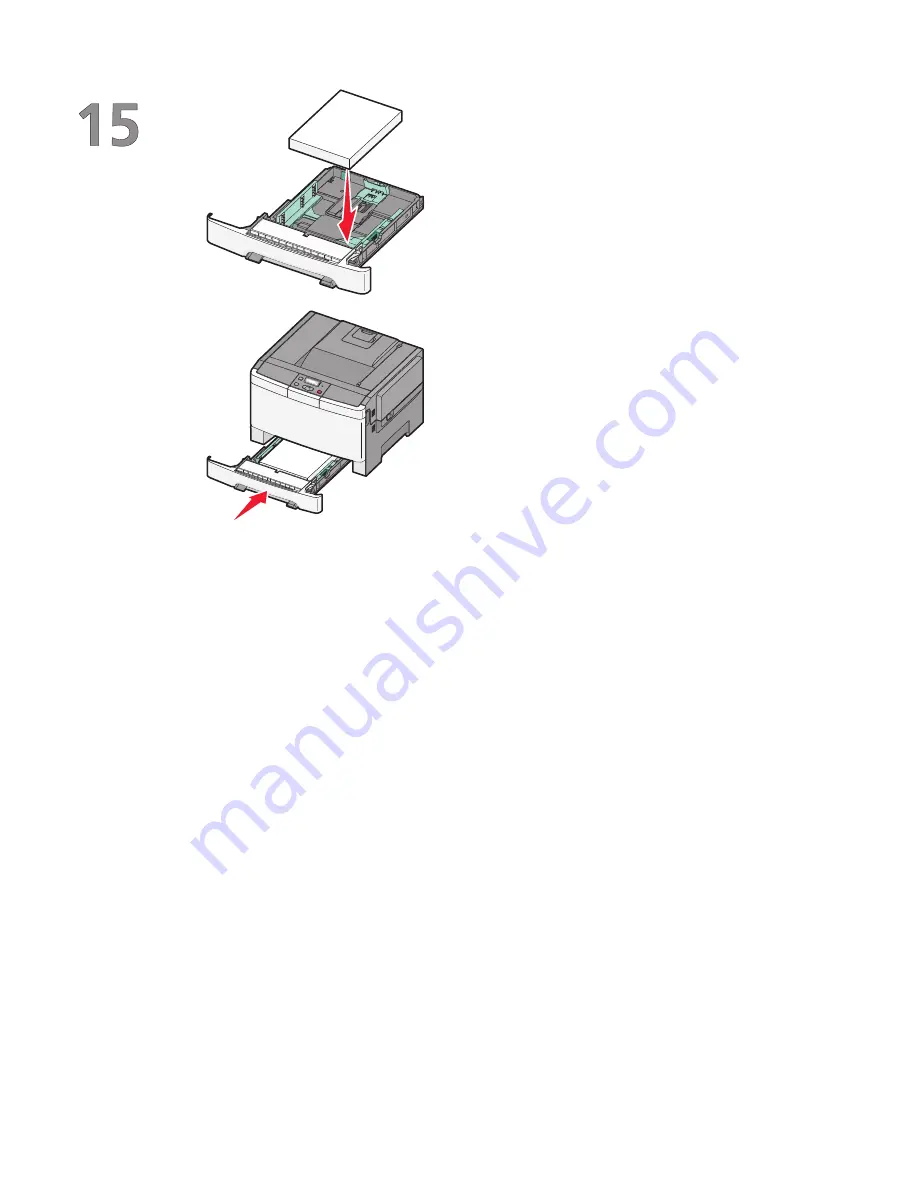
Load the paper stack with the recommended print
side faceup.

Make sure the paper guides are secure against the
edges of the paper.

Note: 

Make sure that side guides are placed tightly

against the edges of the paper so that the image is
registered properly on the page.

16

Insert the tray.

Setting up the printer

12

Summary of Contents for C544DTN - Color Laser Printer 25/25 Ppm Duplex Networkfront Pic

Page 1: ...Wireless Setup Guide 2008 Lexmark International Inc All rights reserved...

Page 2: ...warranties in certain transactions therefore this statement may not apply to you This publication could include technical inaccuracies or typographical errors Changes are periodically made to the info...

Page 3: ...he printer to a network using MAC address filtering 14 Connecting to a wireless network using Windows 16 Installing the printer on a wireless network Windows 16 Connecting to a wireless network using...

Page 4: ...4...

Page 5: ...o set up your printer Note Do not connect cables until instructed to do so 1 Set up the printer hardware 2 Decide how you want to connect the printer This guide includes three methods Wireless Wired E...

Page 6: ...exm ark c om Sept embe r 2008 21 kg 46 2 lbs Unpack the printer cables and CD 1 2 3 4 5 When the printer is set up allow clearance around it as shown 1 304 8 mm 12 0 in 2 508 mm 20 0 in 3 304 8 mm 12...

Page 7: ...ard you to open it CAUTION HOT SURFACE The inside of the printermightbehot Toreducetheriskofinjuryfrom a hot component allow the surface to cool before touching Y C M K Y C M K Open the top door Y C M...

Page 8: ...Y C M K Y C M K M Y C Y C M K Remove the toner cartridges by lifting the handles and then gently pulling away from the imaging kit Setting up the printer 8...

Page 9: ...Remove the red packing material Remove the packing rods and clips Setting up the printer 9...

Page 10: ...ge into the imaging kit by aligning the rollers on the toner cartridge with the tracks Push the toner cartridge until it clicks into place Replace the right side cover Y C M K Y C M K Close the front...

Page 11: ...t the two width guides move in unison when you move just the right width guide Squeeze the length guide tabs together as shown and then slide the length guide to the correct position for the paper siz...

Page 12: ...aceup Make sure the paper guides are secure against the edges of the paper Note Make sure that side guides are placed tightly against the edges of the paper so that the image is registered properly on...

Page 13: ...6 Connect to a wireless network using Macintosh For detailed steps see Information you will need to set up the printer on a wireless network on page 14 and Installing the printer on a wireless network...

Page 14: ...cate on the network No security If your wireless network does not use any type of security you will not have any security information Note Using an unsecured wireless network is not recommended If you...

Page 15: ...ed with the printer The MAC address appears in the following format 00 04 12 34 56 78 Note Print a network setup page if you cannot locate the printer MAC address It will appear on the network setup p...

Page 16: ...same wireless network where you want to set up the printer 1 Connect the power cable and then turn the printer on 1 2 Make sure the printer and computer are fully on and ready Do not connect the USB...

Page 17: ...ware will instruct you to disconnect the temporary USB cable so you can print wirelessly b If your printer has faxing capabilities then connect the telephone cable 8 Follow the on screen instructions...

Page 18: ...power cable and then turn the printer on 1 2 Enter the printer information 1 Access the AirPort options In Mac OS X version 10 5 a From the Apple menu choose System Preferences b Click Network c Clic...

Page 19: ...ations b From the Applications folder double click Internet Connect c From the toolbar click AirPort 7 From the Network pop up menu select your wireless network Configure your computer to use the prin...

Page 20: ...leTalk printing In Mac OS X version 10 5 1 From the Apple menu choose System Preferences 2 Click Print Fax 3 Click 4 Click AppleTalk 5 Select the printer from the list 6 Click Add In Mac OS X version...

Page 21: ...heprintershouldbewithin100feet 30meters ofthewirelessaccesspoint wirelessrouter The printer is located away from obstacles that could block the wireless signal Remove any large metal objects between t...

Page 22: ...OVE YOUR ACCESS POINT TO MINIMIZE INTERFERENCE There may be temporary interference from other devices such as microwave ovens or other appliances cordless phones baby monitors and security system came...

Page 23: ...e Using Macintosh with an AirPort base station In Mac OS X version 10 5 1 From the menu bar click Apple menu System Preferences 2 Click Network 3 Click AirPort The SSID of the network the computer is...

Page 24: ...ccess point is using Wireless Equivalent Privacy WEP security the WEP key should be Exactly 10 or 26 hexadecimal characters Hexadecimal characters are A F a f and 0 9 or Exactly 5 or 13 ASCII characte...

Page 25: ...ave the ability to connect to your local network and to a VPN at the same time the system support person for the VPN must enable split tunneling Be aware that some organizations will not allow split t...

Page 26: ...key A valid WPA pre shared key must be From 8 to 63 ASCII characters ASCII characters in a WPA pre shared key are case sensitive or Exactly 64 hexadecimal characters Hexadecimal characters are A F a...

Page 27: ...he printer and or the computer closer to the access point Add another access point if wireless coverage is necessary in a new area THE WIRELESS NETWORK IS NOT FUNCTIONING Confirm that the network equi...

Page 28: ...dding another access point can help resolve this issue Configuretheprinterforthenetwork manuallyenteringallnetworkinformation Theprintermayworkproperly after it is configured for the network Try turni...

Page 29: ...ware firewall is installed on the computer try temporarily disabling it Check to see if you can print with the firewall disabled Re enable the firewall and continue to troubleshoot Update any non Micr...

Page 30: ...ate available from the manufacturer Refer to the documentation that came with your firewall for instructions on how to do this Ifprogramsrequestfirewallaccesswhen youinstalltheprinterortrytoprint make...

Page 31: ...a click In Windows XP and earlier click Start 2 Click All Programs or Programs and then select the printer program folder from the list 3 Click Wireless Setup Utility Note If the Wireless Setup Utilit...

Page 32: ...Click Agree 4 Click Suggested 5 Click Local Attach 6 Connect the installation cable to a USB port on the computer and the USB port on the back of the printer 2 1 7 Connect the power cable to the print...

Page 33: ...inter and to an active Ethernet port on the network 2 1 Make sure the computer you are using to configure the printer is attached to a working network port on the same network as the printer 7 Connect...

Page 34: ...during some methods of installation internal wireless print server A device that lets computers and printers talk to each other over a network without cables IP Internet Protocol address The network...

Page 35: ...te with the computer at much higher speeds than parallel cables USB port A small rectangular port on the back of the computer that connects the peripheral devices using a USB cable and lets them commu...

Page 36: ...inter 5 T troubleshooting wireless network 21 troubleshooting wireless network printer does not show up in printer selection list during installation Windows 30 printer cannot connect to wireless netw...

Reviews: