Lexmark 40N9050 Quick Reference Download Page 6

Load letterhead with the printable side facedown and the
top edge entering the printer last for two

sided printing.

Load envelope with the flap side down and against the right
side of the paper guide.

3

Feed the paper until its leading edge gets pulled in.

Warning—Potential Damage: 

To avoid paper jams, do not

force paper into the manual feeder.

Setting the paper size and type

1

From the home screen, navigate to:

Settings

 > 

Paper

 > 

Tray Configuration

 > 

Paper Size/Type

 >

select a paper source

2

Set the paper size and type.

Connecting a mobile device to the
printer wireless network

1

Enable Wi

Fi Direct in the printer. From the home screen, touch

Settings

 > 

Network/Ports

 > 

Wireless

 > 

Enable Wi

Fi Direct

.

Notes:

The Wi

Fi Direct SSID and password are generated

automatically. To view the Wi

Fi Direct SSID and

password, go to the Wi

Fi Direct menu.

You can also change the SSID and password, if
necessary.

2

Connect your mobile device to the printer wireless network.
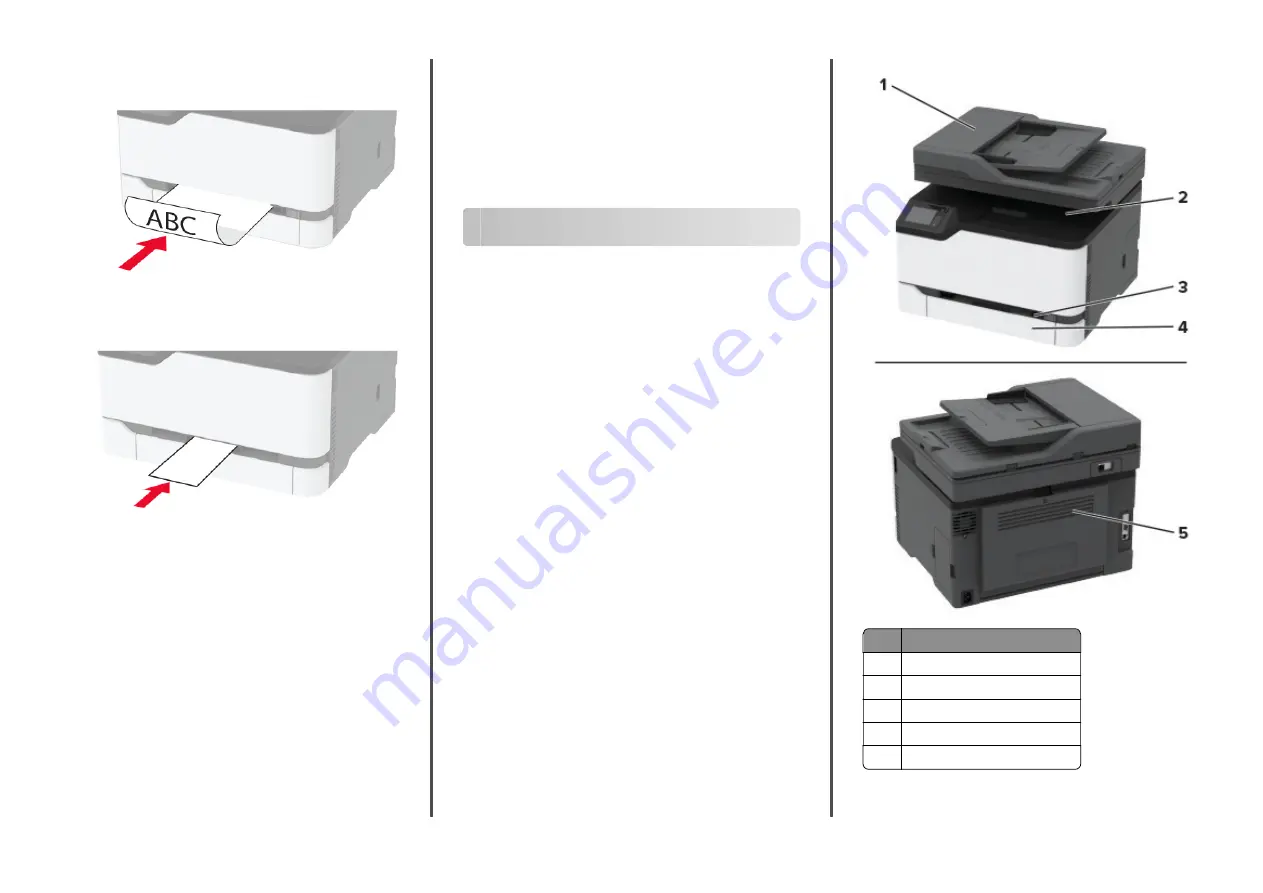
Clearing jams

Identifying jam locations

Notes:

When Jam Assist is set to On, the printer flushes blank
pages or pages with partial prints after a jammed page has
been cleared. Check your printed output for blank pages.

When Jam Recovery is set to On or Auto, the printer reprints
jammed pages.

Jam locations

1

Automatic document feeder (ADF)

2

Standard bin

3

Manual feeder

4

Tray

5

Rear door


6

Summary of Contents for 40N9050

Page 1: ...er and then click Properties Preferences Options or Setup 3 Click Fax Enable fax and then enter the recipient number 4 If necessary con gure other fax settings 5 Fax the document For Macintosh users 1...

Page 2: ...ter wireless network on page 6 1 From your mobile device launch a compatible application or select a document from your le manager 2 Depending on your mobile device do one of the following Tap Print T...

Page 3: ...ed print cartridge 4 Unpack the new print cartridge Warning Potential Damage Do not expose the underside of the print cartridge to direct light Extended exposure to light may cause print quality probl...

Page 4: ...ing a damp soft lint free cloth wipe the following areas ADF glass ADF glass pad Scanner glass Scanner glass pad 3 Close the scanner cover Loading the tray 1 Remove the tray Note To avoid paper jams d...

Page 5: ...paper jams make sure that the stack height is below the maximum paper ll indicator 4 Adjust the guides to match the size of the paper that you are loading 5 Insert the tray If necessary set the paper...

Page 6: ...twork 1 Enable Wi Fi Direct in the printer From the home screen touch Settings Network Ports Wireless Enable Wi Fi Direct Notes The Wi Fi Direct SSID and password are generated automatically To view t...

Page 7: ...CAUTION HOT SURFACE The inside of the printer might be hot To reduce the risk of injury from a hot component allow the surface to cool before touching it 5 Remove the jammed paper Note Make sure that...

Page 8: ...ON HOT SURFACE The inside of the printer might be hot To reduce the risk of injury from a hot component allow the surface to cool before touching it 2 Remove the jammed paper from any of the following...

Page 9: ...e door Paper jam in the automatic document feeder 1 Remove all original documents from the ADF tray 2 Open the ADF cover 3 Remove the jammed paper Note Make sure that all paper fragments are removed 4...

Reviews: