Lexmark 17K0000 User Manual Download Page 17


13

Understanding the paper type sensor

Your All-In-One has a paper type sensor that detects these paper types:

Plain paper

Coated paper

Glossy/photo paper

Transparencies

If you load one of these paper types, the All-In-One detects the paper type 
and automatically adjusts the paper type settings and print resolution. 

Note: Your All-In-One cannot detect the paper size. For help, 

see page 13.

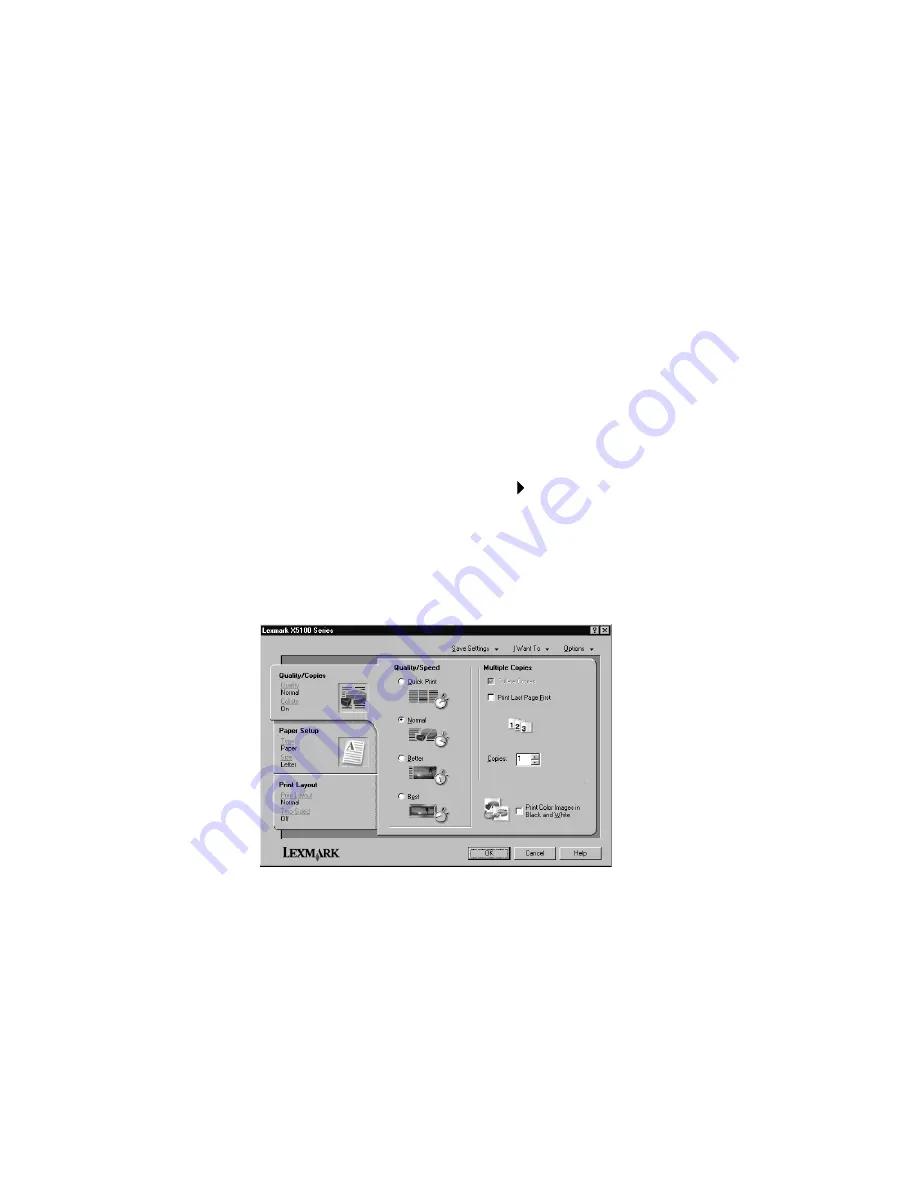
To choose the paper size:

1

With your document open, click File   Print.

2

In the Print dialog box, click PropertiesPreferencesOptions, or 
Setup (depending on your program or operating system).

The Print Properties screen appears.

3

From the Paper Setup tab, select the paper size you are using.

4

Click OK

Summary of Contents for 17K0000

Page 1: ...Lexmark X5100 All In One Series User s Guide...

Page 2: ...addressed to Lexmark International Inc Department F95 032 2 740 West New Circle Road Lexington Kentucky 40550 U S A In the United Kingdom and Eire send to Lexmark International Ltd Marketing and Serv...

Page 3: ...ng the All In One parts 2 Understanding the operator panel 3 Understanding the All In One software 8 Understanding the paper type sensor 13 Using your All In One 16 Placing your document on the scanne...

Page 4: ...ning the print cartridge nozzles 42 Wiping the print cartridge nozzles and contacts 44 Preserving the print cartridges 45 Ordering supplies 45 Troubleshooting 46 Setup troubleshooting 46 General troub...

Page 5: ...a computer to send faxes Note The computer must have an internal modem or be connected to an external one and the modem must be connected to a phone line If your All In One is attached to a computer y...

Page 6: ...One parts The table on page 3 describes each part USB cable Power supply Display Operator panel see page 3 Paper support Paper guide Paper exit tray Top cover Scanner lock underneath scanner unit Sca...

Page 7: ...All In One attached to a computer or unattached For more information see page 4 Paper exit tray Stack paper as it exits the All In One Paper guide Make sure paper feeds correctly into the All In One...

Page 8: ...Power Start Fax Start Scan Photo Copy Black Copy Copy Quality Reduce Enlarge Number of Copies Options Left arrow Right arrow Select Color Copy Photo Options E mail File Software Stop Clear Power ligh...

Page 9: ...For help see page 6 Photo Copy Begin a photo copy job using current Photo Options settings the highest quality scan and print resolutions Photo Options Select the quantity and size of photograph repri...

Page 10: ...ten or darken the copied image BLANK PAPER SIZE Specify the size of the paper loaded in the paper support BLANK PAPER TYPE Specify the type of the paper loaded in the paper support Note If you leave t...

Page 11: ...the print cartridges Clean to clean the print cartridges Self Test to print a test page POWER SAVE Select a time to begin reducing power After 10 minutes After 30 minutes the default After 60 minutes...

Page 12: ...e Available from almost every application that prints Lexmark X5100 Series Photo Editor helps you edit your photos Lexmark X5100 Series Solution Center provides maintenance and troubleshooting help Us...

Page 13: ...rint Manage photos copy them to folders print them do creative copying using the View Saved Images tab Do many other projects Using Print Properties You can change your All In One settings in Print Pr...

Page 14: ...One settings Using the Lexmark X5100 Series Photo Editor The Lexmark X5100 Series Photo Editor lets you adjust photo attributes brightness contrast and orientation of scanned images There are three wa...

Page 15: ...eries Solution Center The Lexmark X5100 Series Solution Center LSC is a guide you can refer to for All In One help and to check the current All In One status To open the LSC click Start Programs Lexma...

Page 16: ...specific troubleshooting topics Visit the support area online Maintenance Print a test page Visit the supplies area online View information about how to purchase new cartridges Clean the print cartri...

Page 17: ...pe and automatically adjusts the paper type settings and print resolution Note Your All In One cannot detect the paper size For help see page 13 To choose the paper size 1 With your document open clic...

Page 18: ...en appears 3 Click Options 4 Click Paper Type Sensor Options 5 Click Allow the paper type sensor to select paper type the default to deselect it 6 Click OK To permanently turn it off 1 Click Start Set...

Page 19: ...15 8 Click OK Note To temporarily override the paper type sensor for a particular print job specify a paper type in the GUI graphical user interface under Specialty paper...

Page 20: ...l In One Placing your document on the scanner glass 1 Open the top cover 2 Place the item you want to copy face down on the scanner glass Make sure the upper left corner of the front of the item align...

Page 21: ...elope as shown 25 sheets of labels The labels are designed for use with inkjet printers 10 sheets of card stock The card stock is designed for use with inkjet printers The thickness does not exceed 02...

Page 22: ...g you and the top of the paper feeding into the paper support 2 Squeeze and slide the paper guide to the left edge of the paper 25 iron on transfers You follow the loading instructions on the iron on...

Page 23: ...paper exit tray can hold 50 sheets of paper 10 sheets of labels 10 envelopes 10 cards 1 transparency Note To avoid smearing ink remove each transparency from the paper exit tray before the next one ex...

Page 24: ...lace the item you want to copy face down on the scanner glass Make sure the upper left corner of the front of the item aligns with the arrow at the bottom right of the scanner 4 Close the top cover 5...

Page 25: ...ist 7 Press Color Copy to create a color copy of your document or press Black Copy to create a black and white copy of your document The All In One is working when the display reads COPYING 8 After ma...

Page 26: ...ck the Lexmark X5100 Series All In One Center icon The All In One Main Page appears 6 Click Preview Now to see your scanned image 7 Select a quantity and color for your copies Note To choose a paper s...

Page 27: ...at the bottom right of the scanner 4 Close the top cover 5 Press E mail File Software The scan destination that you last selected or the factory default e mail appears 6 Press the right arrow to scro...

Page 28: ...l In One software option that lets you print multiple pages of a document on a single sheet of paper For example select 4 up to print reduced images of pages 1 through 4 on the first sheet of paper im...

Page 29: ...5 From your desktop double click the Lexmark X5100 Series All In One Center icon The All In One Main Page appears 6 Click Preview Now to see your scanned image 7 Adjust the dotted lines to fit around...

Page 30: ...screen confirm the selections and then click OK or Print depending on the program or operating system Sending a fax using the operator panel To send a fax of a scanned document 1 Make sure your All I...

Page 31: ...our desktop double click the Lexmark X5100 Series All In One Center icon The All In One Main Page appears 4 Under Creative Tasks click Fax using your computer s modem 5 Follow the instructions on the...

Page 32: ...int a banner 1 Place the stack of banner paper on the top cover and feed in the first sheet 2 Click Start Programs Lexmark X5100 Series Lexmark X5100 Series Solution Center 3 Click the How To tab 4 Un...

Page 33: ...ificate or other things using the operator panel or the computer Using the operator panel 1 Open the top cover 2 Place the item you want to copy face down on the scanner glass Make sure the upper left...

Page 34: ...ettings 8 Click Copy Now Scan a photograph and e mail it to a friend 1 Open the top cover 2 Place the photograph you want to scan face down on the scanner glass Make sure the upper left corner of the...

Page 35: ...om right of the scanner 3 Close the top cover 4 On the operator panel press Reduce Enlarge 5 Press the right arrow button until you see the option you want to select 50 Half 100 Same 200 Double Custom...

Page 36: ...g your image click Print Now Scan multiple pages or images 1 Open the top cover 2 Put the first image that you want to scan face down on the scanner glass Make sure the upper left corner of the front...

Page 37: ...lace the item you want to print as a poster face down on the scanner glass Make sure the upper left corner of the front of the item aligns with the arrow at the bottom right of the scanner 4 Close the...

Page 38: ...st the dotted lines to fit around the portion of the image you want to print 8 Click Printer Settings to select your paper size 9 Click Print Now Print repeating images Using the operator panel 1 Open...

Page 39: ...n on the scanner glass Make sure the upper left corner of the front of the item aligns with the arrow 3 From your desktop double click the Lexmark X5100 Series All In One Center icon The All In One Ma...

Page 40: ...o choose On 5 Press Select 6 Press Color Copy or Black Copy to begin copying 7 After your image prints press Stop Clear to return to Normal Quality Personalize fabric with pictures Using your computer...

Page 41: ...rk X5100 Series All In One Center icon The All In One Main Page appears 4 From the Creative Tasks area scroll to Edit and then click Edit text found in a scanned document OCR 5 Follow the instructions...

Page 42: ...or information about ordering supplies see page 45 1 Make sure the All In One is on 2 Lift the scanner unit until the scanner support keeps it open The print cartridge carrier moves and stops at the l...

Page 43: ...s 4 Remove the old cartridges Store them in an air tight container or dispose of them 5 If you are installing new cartridges remove the foam stickers and transparent tape from the bottom of the cartri...

Page 44: ...40 6 Insert the new cartridges and then snap the lids closed 7 Lift the scanner unit and push the scanner support back while lowering the scanner unit until it is completely closed...

Page 45: ...ppears is the number of the cartridge you are using press Select If it is not the number of the cartridge you are using press the right arrow button until the correct part number appears and then pres...

Page 46: ...prove print quality 1 On the operator panel press Options repeatedly until Cartridges appears 2 Press the right arrow button until Align appears and then press Select 3 Press Select An alignment page...

Page 47: ...her improve print quality try wiping the print cartridge nozzles and contacts see page 44 and then print your document again 7 If print quality has not improved try cleaning the print cartridge nozzle...

Page 48: ...ing the print cartridge nozzles dried ink may be on the nozzles or contacts To wipe the print cartridge nozzles and contacts 1 Remove the print cartridges For help see page 38 2 Dampen a clean lint fr...

Page 49: ...t Do not remove a print cartridge from the All In One except to replace clean or store it in an airtight container The print cartridges will not print correctly if left exposed for an extended period...

Page 50: ...es attached to your computer Your operating system is compatible with your All In One The Lexmark X5100 Series supports only these operating systems Note Macintosh users can click the Help button on a...

Page 51: ...ke sure Your All In One is on The scanner is unlocked You removed the stickers transparent tape and foam from the bottom of the print cartridges For help see page 39 The paper is loaded correctly You...

Page 52: ...ct paper type and size in Print Properties Preferences or in the All In One Center Fax problems If you are having trouble sending or receiving faxes make sure You have a working fax modem installed on...

Page 53: ...ass For help see page 51 Envelopes do not feed properly If regular paper feeds without problems make sure You load the envelopes correctly For help see page 16 You use an envelope size supported by th...

Page 54: ...purchasing more Random Access Memory RAM for your computer Note Photos or documents containing graphics may take longer to print than regular text Document prints poorly If your documents have any of...

Page 55: ...e in Print Properties or Preferences Note You can choose paper size from the All In One Center The paper is straight and unwrinkled You select the appropriate Quality for the paper type If you are pri...

Page 56: ...Options until Cartridges appears on the display 2 Press the right arrow button until Ink Levels appears 3 Press Select 4 Press one of the arrow buttons To check the ink level in the black cartridge ch...

Page 57: ...4 Uninstalling and reinstalling the software Copy quality is unsatisfactory The following topics can help you improve unsatisfactory print quality on your document If your document is too light or too...

Page 58: ...What is being scanned menu select Magazine Newspaper 4 Click Scan Now For copying 1 From your desktop double click the Lexmark X5100 Series All In One Center icon The All In One Main Page appears on...

Page 59: ...ars 2 Under Scan click See More Scan Settings 3 From the What is being scanned menu select anything but Photo OR 1 From your desktop double click the Lexmark X5100 Series All In One Center icon The Al...

Page 60: ...n the preview area until the size is satisfactory for your scan Edges of copied documents are cut off If you are using your All In One without it being attached to a computer and scanning a document t...

Page 61: ...he scanner bed or removing a paper jam follow these steps 1 Using both hands lift the scanner unit 2 Push and hold the scanner support back 3 Carefully lower the scanner unit until it is completely cl...

Page 62: ...cted 3 Press Select 4 On the operator panel press Reduce Enlarge repeatedly until Fit to Page appears 5 Press Select 6 On the operator panel press Options until Blank Paper Size appears 7 Press the ri...

Page 63: ...a paper jam 1 Press Power to turn the All In One off 2 Pull slowly and firmly on the paper to remove it 3 Press Power to turn the All In One back on If you cannot reach the paper because it is too far...

Page 64: ...nd then send your document to print Cover Open message The Cover open message appears when the scanner unit is open Note The operator panel buttons do not function while the scanner unit is open Lower...

Page 65: ...plies see page 45 On the computer screen An Ink Low message appears when one of your cartridges is 25 full or less When one of these messages appears you can Click OK Click the to get information abou...

Page 66: ...support is the scanner lock For help see page 2 3 Pull the scanner lock toward you to unlock the scanner 4 Using both hands lift the scanner unit 5 Push and hold the scanner support back 6 Lower the...

Page 67: ...tops at the loading position unless the All In One is busy 4 Remove the color print cartridge Message Problem Do this Black cartridge missing The black cartridge is not installed Install a black cartr...

Page 68: ...e is no error message indicated by flashing lights repeat steps 1 3 and then reinstall both print cartridges 8 Lower the scanner unit until it is completely closed If you get the error message again w...

Page 69: ...the Lexmark X5100 Series CD 5 Follow the instructions on your computer screen to install the software Other help sources If the preceding solutions do not solve the problem with your All In One Refer...

Page 70: ...es or modifications could void the user s authority to operate this equipment Note To assure compliance with FCC regulations on electromagnetic interference for a Class B computing device use a proper...

Page 71: ...AR Partner Lexmark International Inc has determined that this product meets the ENERGY STAR guidelines for energy efficiency Conventions It may help you to recognize the caution warning and note conve...

Page 72: ...nd suitably packaged to a Lexmark designated location You are responsible for loss of or damage to a product in transit to the Remarketer or the designated location When warranty service involves the...

Page 73: ...use whatsoever will be limited to the amount you paid for the product that caused the damages This limitation of liability will not apply to claims by you for bodily injury or damage to real property...

Page 74: ...ng 44 cleaning print cartridge nozzles using operator panel 43 using the LSC 43 cleaning print cartridge nozzles 42 Color Copy 5 color print cartridge part number 38 contacts wiping 44 Copy Quality 5...

Page 75: ...44 Number of Copies 5 O operator panel 3 copying with 20 scanning with 20 sending a fax 26 using 3 Optical Character Recognition OCR 37 Options 5 ordering supplies 45 P paper banner 18 card stock 17...

Page 76: ...ware 24 scanning multiple images 32 Select 5 setup 1 software 8 Lexmark All In One Center 8 Lexmark X5100 Series Photo Editor 10 Lexmark X5100 Series Solution Center 11 Print Properties 9 specialty pa...

Page 77: ...xmark and Lexmark with diamond design are trademarks of Lexmark International Inc registered in the United States and or other countries 2002 Lexmark International Inc 740 West New Circle Road Lexingt...

Reviews: