background image

Installation

Warning!

1. Please keep it away from the children.
2. Please avoid fire/high temperature/damp places for installation

.

3. Please confirm when shut off the power cord access.

Warning!

When  you  are  drilling  ,please  make  sure 
you  wear  glasses  and  dust  masks  to 
prevent the dust fly into the nose and throat 
causing unnecessary trouble

.

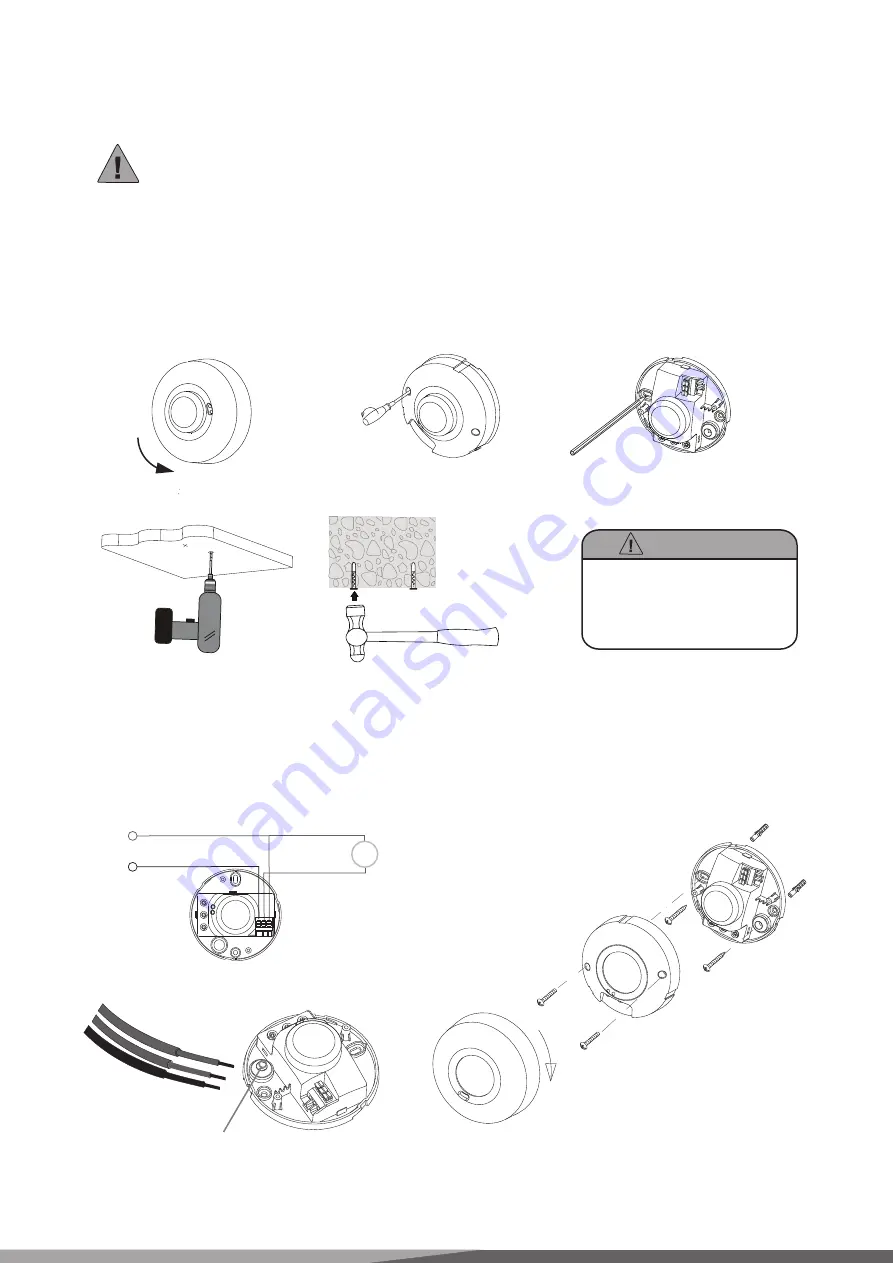
1

 Take down the top cover by turning it anti-clockwise(see fig.1), and then tighten off the two screws fixing     

       middle cover(see fig.2);
2

 Hold base against the Ceiling and mark drill holes(see fig.3),paying attention to any existing wiring in the 

Ceiling;
3

 Drill the holes, insert wall plugs (6mm dia.)(see fig.4);

4

Put the power wire and load wire through the base holes(see fig.5);

5

Screw the base into place(see fig.6);

6

Connect the mains power supply and the load wire to the connection terminal according to connection-wire 

mark.

7

Close the middle cover(see fig.6) and adjust knob to setting;

8

Fit glass shade and turn it clockwise(see fig.6).

fig.1

fig.2

fig.3

fig.4

N

L’

L

Power 110V / 220V 

L

N

Electric products

fig.6

fig.5

Connection illumination
connect N, L with power;
connect N, L’ with load


N  L'  L

base holes

www.lexing.com.cn

Summary of Contents for LX-MV-360S1

Page 1: ...ction way has the below advantages compared with other as follows 1 Non contact detection 2 Suitable for bad environment immune to temperature humidity noise air dust light 3 RF interference ability 4 Transmission power only 0 2 mW It will not harm the human body Simple installation easy wiring We use appropriative micro processing integrator not only for high sensitivity and wide range of detecti...

Page 2: ...ase against the Ceiling and mark drill holes see fig 3 paying attention to any existing wiring in the Ceiling 3 Drill the holes insert wall plugs 6mm dia see fig 4 4 Put the power wire and load wire through the base holes see fig 5 5 Screw the base into place see fig 6 6 Connect the mains power supply and the load wire to the connection terminal according to connection wire mark 7 Close the middle...

Page 3: ...also change NOTE after the light switches OFF it takes approx 1sec before it is able to start detecting movement again The light will only switch on in response to movement once this period has elapsed Light control setting The chosen light response threshold can be infinitely from approx 2 2000lux Turn it fully anti clockwise to select dusk to dawn operation at about 2 lux Turn it fully clockwise...

Page 4: ...nclosure The load work without any identifiable movement movement occurred but not identified by the sensor movement behind wall movement of a small object in immediate lamp vicinity etc Check zone setting The load will not work despite movement rapid movements are being suppressed to minimize malfunctioning the zone you have set is too small Check zone setting detection or Note please don t adjus...

Reviews: