background image

20

ENGLISH

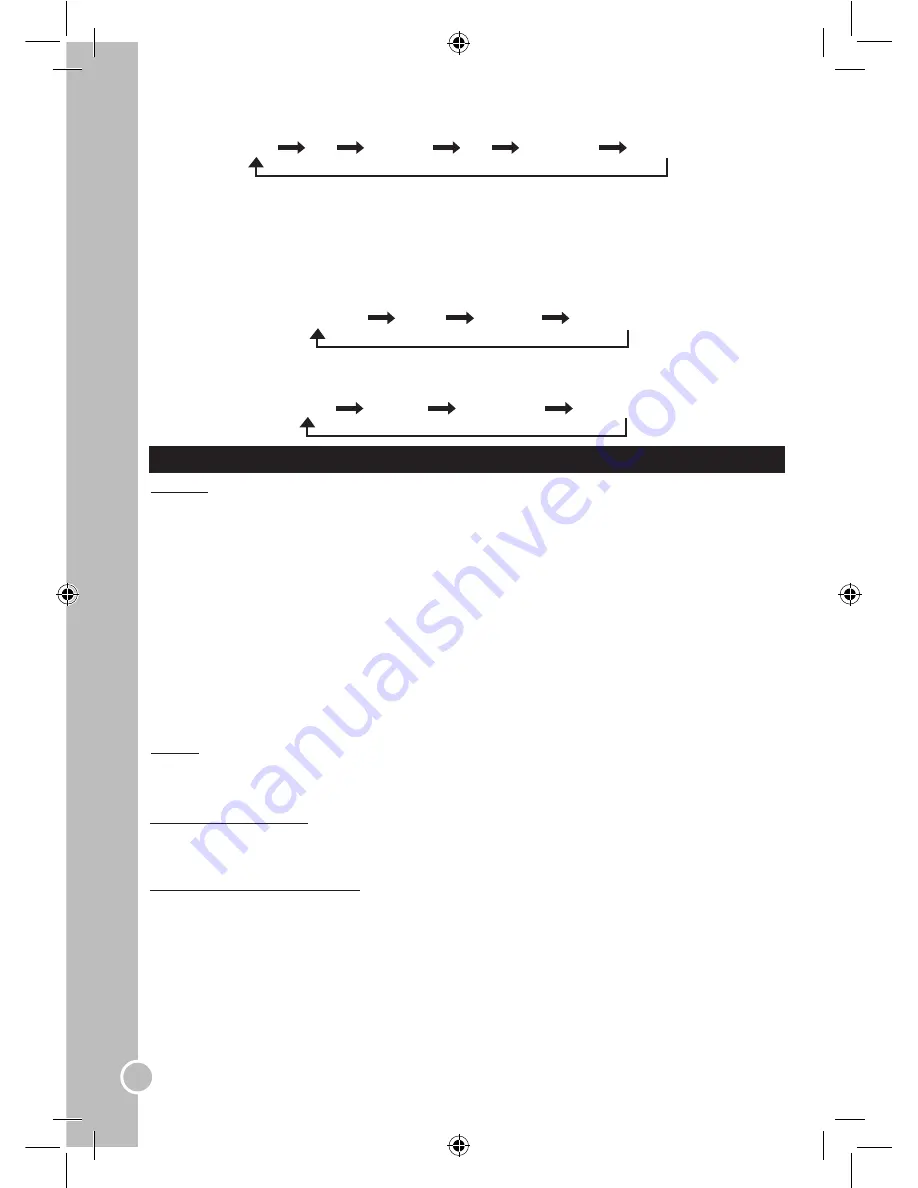
DVD 

 TV 

 SCART 

 AV 

 S-VIDEO 

 PC-RGB

Note: 

make sure all audio/video cables are connected. 

LCD settings menus

In DVD, TV, SCART, AV, S-VIDEO or PC-RGB mode, press repeatedly the 

LCD-MENU

 key to enter the 

different settings menus : “TV MENU”, “AUDIO MENU”, “VIDEO MENU”, “GENERAL MENU”, “PC MENU” 

(for detailed information, refer to the “LCD MENU” section p.20).

Image effect (PMODE key)

Press repeatedly the 

PMODE

 key on the remote control to select an image effect as below:

STANDARD 

 MILD 

 FRESH 

 PERSONAL

Audio effect (AMODE key)

Press repeatedly the 

AMODE

 key on the remote control to select a sound effect as below:

VOICE 

 MUSIC 

 THEATRE 

 PERSONAL

Input source selection (DVD/TV/SCART/AV/S-VIDEO/PC-RGB)

Press the 

INPUT

 key on the LCD screen or on the remote control to toggle between the different modes as 

below:

LCD MENU

TV Mode 

Press repeatedly the 

INPUT

 key on the LCD screen or the remote control to select “TV”. 

Video menu

1. Press repeatedly the 

LCD-MENU

 key to enter the “VIDEO MENU”.

2. Use the▲and▼ keys to select an option: “BRIGHTNESS”, “CONTRAST”, “COLOUR” or 

    “SHARPNESS”. Press the◄ and ►keys to choose the desired level (from 0 to 100).

3. When you have finished your settings, press repeatedly the 

LCD-MENU

 key to exit the menu

    Note: 

after a few seconds of inactivity, you will automatically exit the menu. 

Audio menu

1. Press repeatedly the 

LCD-MENU

 key to enter the “AUDIO MENU”.

2. Use the▲and▼keys to select an option: “VOLUME”, “BALANCE”, “AUDIO PRESET” (select an audio 

    effect between “VOICE”, “MUSIC”, “THEATRE” or “PERSONAL”), “TREBLE”, “BASS”. Press the

   ◄ and ►keys to adjust the settings.

3. When you have finished your settings, press repeatedly the 

LCD-MENU

 key to exit the menu

    Note: 

after a few seconds of inactivity, you will automatically exit the menu. 

TV Menu 

Channel

The number of the currently viewed channel is displayed on screen. Use the◄ and ►keys to change TV 

channels.

Audio system (“SYSTEM”)

Use the▲and▼keys to select the “SYSTEM” option, then press the◄ and ►keys to select the TV sound 

system (“I”, “BG” or “DK”).

Skip channel (“SKIP” and “SWAP”)

1. Use the▲and▼keys to select the “SKIP” option. This feature allows you to skip the currently viewed 

channel when you’re browsing through the programs with the CH+/CH- keys.

2. Use the◄ and ► keys to select “ON” or “OFF” and enable or disable the skip function.

OR

3. Use the▲and▼keys to select the “SWAP” option and then press the►key to display the “SWAP” menu. 

4. Use the▲, ▼, ◄ and ►keys to select the channel you want to skip.

5. Use the◄ and ►keys to select “SWAP”, then press►key to confirm and go back to the “TV MENU”.

Summary of Contents for Spider Man LCDDVD2SP

Page 1: ...Spider Man Walkie Talkies Les talkies walkies Spider Man LCDDVD2SP MODE D EMPLOI INSTRUCTION MANUAL www lexibook com...

Page 2: ......

Page 3: ...de fl che dans un triangle permettent d alerter l utilisateur de la pr sence de tension dangereuse non isol e l int rieur de l appareil ce qui constitue un risque d lectrocution ATTENTION Le point d...

Page 4: ...e broche constituent des mesures de s curit importantes visant vous prot ger Si vous ne parvenez pas ins rer compl tement la prise dans la prise lectrique murale contactez votre lectricien pour rempla...

Page 5: ...n 19 Touche RAPPEL 20 Touche MENU 21 Touches CH CH 22 Touche DISPLAY affichage 23 Touches directionnelles 24 Touche DVD SETUP r glages DVD 25 Touche AMODE mode audio 26 Touche MUTE sourdine 27 Touche...

Page 6: ...votre cran LCD en utilisant les touches situ es sur le c t droit et au dessus de l cran ou ceux de la t l commande Les terminaux sur le c t gauche fournissent toutes les connexions dont vous aurez be...

Page 7: ...ttoyants essence dissolvant liquides de pr vention antistatique ou tout autre solvant Fa tes bien attention ne pas faire tomber ou plier le disque N ins rez pas plus d un disque dans le lecteur Assure...

Page 8: ...re r p t e pour sortir du menu Note apr s quelques secondes d inactivit vous sortirez automatiquement du menu Menu audio 1 Appuyez sur la touche LCD MENU de mani re r p t e pour acc der au MENU AUDIO...

Page 9: ...e mise en veille automatique d lai entre 0 et 240 minutes INITIALISATION pour faire revenir tous les r glages aux valeurs par d faut 3 Une fois vos r glages termin s appuyez sur la touche LCD MENU de...

Page 10: ...r retourner au d but du chapitre ou de la plage pr c dent e 2 Durant la lecture appuyez sur la touche pour acc der au d but du chapitre ou de la plage suivant e Balayage Avant Arri re 1 Durant la lect...

Page 11: ...le de vue d sir Note le nombre d angles de vue d pend du disque Recherche Vous pouvez acc der directement un temps une plage un chapitre ou un titre sp cifique du disque 1 Appuyez sur la touche GOTO d...

Page 12: ...tter le menu s lectionnez QUITTER MENU et appuyez sur ENTER ou appuyez tout moment sur la touche DVD SETUP S lection de la langue du menu La langue utilis e dans ces instructions est le fran ais Vous...

Page 13: ...ctionn la s quence de lecture d placez le curseur sur l option LECTURE Lecture en utilisant les touches Appuyez sur les touches ENTER ou pour confirmer et lancer la lecture de la s quence programm e D...

Page 14: ...ez cet appareil avec un chiffon sec et souple Si les surfaces sont extr mement sales nettoyez les avec un chiffon qui a t tremp dans une solution eau et savon puis essor fermement Essuyez une nouvelle...

Page 15: ...sufficient magnitude to constitute a risk of electric shock to persons The exclamation point within an equilateral triangle is intended to alert the user to the presence of important operating and ma...

Page 16: ...e blade or the third prong is provided for your safety If the provided plug does not fit into your outlet consult an electrician for replacement of the obsolete outlet 10 Protect the power cord from b...

Page 17: ...Next key 15 Previous key 16 PROGRAM key 17 INTRO key 18 AUTO EJECT key 19 RECALL key 20 MENU key 21 CH CH keys 22 DISPLAY key 23 Direction keys 24 DVD SETUP key 25 AMODE key 26 MUTE key 27 SLOW STEP...

Page 18: ...u can use the keys on the right side and on the top of the LCD screen or the remote control s keys Use the input and output connections on the left side of the screen to connect other devices to the u...

Page 19: ...face of the disc or bend the disc A dirty disc may not play correctly If a disc becomes dirty wipe it with a soft cloth in a straight line from centre to edge Avoid exposure to direct sun light temper...

Page 20: ...settings press repeatedly the LCD MENU key to exit the menu Note after a few seconds of inactivity you will automatically exit the menu Audio menu 1 Press repeatedly the LCD MENU key to enter the AUDI...

Page 21: ...ished your settings press repeatedly the LCD MENU key to exit the menu Note after a few seconds of inactivity you will automatically exit the menu SCART AV S VIDEO modes Press repeatedly the INPUT key...

Page 22: ...ou can resume playback by pressing Playback will resume at the location where you have pressed Resume Play 3 Press twice to completely stop the disc Previous Next 1 During playback press the key to re...

Page 23: ...f angle of view depends of the disc Search You can jump to a specific time location track chapter or title 1 Press the GOTO key on the remote control 2 Use the or keys to select the chapter title or t...

Page 24: ...hen use the to select the menu options Note To exit the menu select EXIT SETUP and press ENTER or press the DVD SETUP key at any moment Selecting the OSD language The menu language used in these instr...

Page 25: ...r preference 3 After assigning the playback sequence move the highlight cursor to the PLAY option by using the keys Press the ENTER or keys to confirm and launch the sequence DVD 1 Press the PROGRAM k...

Page 26: ...for as other furniture Use a soft clean cloth moistened with plain lukewarm water to clean the exterior of the unit Use caution when cleaning and wiping the plastic parts Mild soap and a damp cloth m...

Page 27: ...EPARABLES DENTRO CONSULTAR CON PERSONAL DE UN SERVICIO CUALIFICADO El rayo con cabeza de flecha dentro de un tri ngulo equil tero sirve para alertar al usuario de la presencia de voltaje peligroso sin...

Page 28: ...para que cambie la toma de corriente porque es obsoleta 10 No pisar o doblar el cable especialmente a la altura del enchufe recept culos o en el punto de salida del aparato 11 Utilizar solamente los a...

Page 29: ...nto siguiente 15 Tecla de selecci n de elemento anterior 16 Tecla de programaci n 17 Tecla de selecci n de introducci n de canciones 18 Tecla de expulsi n autom tica de disco 19 Tecla de retorno al ca...

Page 30: ...izar el televisor podr servirse de las teclas situadas en la parte derecha y superior de la pantalla LCD as como de las teclas del mando a distancia Utilice las conexiones de entrada y salida situadas...

Page 31: ...uras extremas y a la humedad PRECAUCI N no utilizar disolventes tales como pulverizadores para discos aguarr s bencina etc para limpiar los discos Tratar los discos con cuidado Manejar los discos tom...

Page 32: ...donar autom ticamente el men Men de audio 1 Pulse reiteradamente la tecla LCD MENU para acceder al men de audio AUDIO MENU 2 Utilice las teclas de desplazamiento vertical y para seleccionar una de las...

Page 33: ...to de par metros originales permite restablecer los par metros originales configurados de f brica 3 Cuando haya finalizado de ajustar los par metros pulse reiteradamente la tecla LCD MENU para salir d...

Page 34: ...e hacia atr s 1 Durante la reproducci n del disco pulse la tecla en el mando a distancia para efectuar una b squeda hacia delante en el disco Pulse reiteradamente esta tecla para cambiar la velocidad...

Page 35: ...dos 1 Pulse la tecla GOTO acceso r pido a secciones determinadas en el mando a distancia 2 Utilice las teclas de desplazamiento horizontal o para seleccionar el cap tulo t tulo o intervalo de reproduc...

Page 36: ...to en dichas instrucciones es el ingl s Asimismo podr configurar la funci n OSD visualizaci n en pantalla en otros idiomas 1 Utilice las teclas de desplazamiento vertical y en el mando a distancia par...

Page 37: ...los n meros de las pistas que prefiera 3 Tras definir la secuencia de reproducci n utilice las teclas de desplazamiento para desplazar el cursor por el men y resaltar la opci n REPRODUCCION Pulse la...

Page 38: ...5 mm x Ancho 380 mm x Fondo 175 mm con soporte Peso neto 2 5 kg MANTENIMIENTO Para evitar riesgos de fuego o descargas el ctricas desconectar el aparato de la fuente de alimentaci n CA antes de proced...

Page 39: ...final dentro de um tri ngulo equil tero serve para alertar o utilizador da presen a de voltagem perigosa sem estar isolada dentro da estrutura do produto suficiente para constituir risco de choque el...

Page 40: ...s e um terceiro para a liga o terra O dente mais largo ou o terceiro dente existe para sua seguran a Se a ficha fornecida n o couber na sua tomada consulte um electricista para substituir a tomada obs...

Page 41: ...ot o de avan o r pido 13 Bot o de retrocesso r pido 14 Bot o Seguinte 15 Bot o Anterior 16 Bot o PROGRAM 17 Bot o INTRO 18 Bot o AUTO EJECT 19 Bot o RECALL 20 Bot o MENU 21 Bot o CH CH 22 Bot o DISPLA...

Page 42: ...or tenha em conta as condi es nas instru es de seguran a Para operar a televis o pode usar os bot es do lado direito e no topo do ecr LCD ou os bot es do telecomando Use as liga es de entrada e sa da...

Page 43: ...tiqueta virada para cima Um disco sujo pode n o ser reproduzido correctamente Se um disco ficar sujo limpe o com um pano suave em linha recta do centro para as extremidades Evite expor o disco luz dir...

Page 44: ...ndo terminar as suas configura es prima repetidamente o bot o LCD MENU para sair do menu Nota Ap s alguns segundos de inactividade sair automaticamente do menu Menu de udio 1 Prima repetidamente o bot...

Page 45: ...configura es prima repetidamente o bot o LCD MENU para sair do menu Nota Ap s alguns segundos de inactividade sair automaticamente do menu Modos SCART AV S VIDEO Prima repetidamente o bot o INPUT no...

Page 46: ...ntinua no local onde premiu o bot o Continuar a reprodu o 3 Prima duas vezes o bot o para parar completamente o disco Anterior Seguinte 1 Durante a reprodu o prima o bot o para voltar ao in cio do cap...

Page 47: ...fico faixa cap tulo ou t tulo 1 Prima o bot o GOTO no telecomando 2 Use os bot es ou para escolher o cap tulo t tulo ou tempo 3 Use os bot es dos n meros para inserir o cap tulo desejado n mero do t t...

Page 48: ...rece no ecr A l ngua do menu usada nestas instru es o ingl s Tamb m pode configurar a l ngua OSD que aparece no ecr para outras l nguas 1 Use os bot es e no telecomando para real ar IDIOMA OSD e prima...

Page 49: ...a de reprodu o mova o cursor real ado para a op o REPRODUCAO usando os bot es Prima os bot es ENTER ou para confirmar e iniciar a sequ ncia DVD 1 Prima o bot o PROGRAM no telecomando A tabela da sequ...

Page 50: ...um pano do p e cuidado como se de outra pe a de mobili rio se tratasse Use um pano suave e limpo ligeiramente embebido em gua t pida para limpar o exterior da unidade Tenha cuidado quando limpar e pa...

Page 51: ...nza di voltaggi pericolosi non isolati all interno del corpo del prodotto che potrebbero risultare di intensit tale da costituire un rischio di scossa elettrica per le persone Il punto esclamativo all...

Page 52: ...i per la vostra sicurezza Se la spina in dotazione non adatta alla vostra presa a muro rivolgersi ad un elettricista per la sostituzione della presa obsoleta 10 Proteggere il cavo di alimentazione per...

Page 53: ...asto AUTO EJECT 19 Tasto richiama RECALL 20 Tasto MENU 21 Tasti CH CH 22 Tasto DISPLAY 23 Tasti direzionali 24 Tasto DVD SETUP 25 Tasto AMODE 26 Tasto MUTE 27 Tasto SLOW STEP 28 Tasto AUDIO 29 Tasto v...

Page 54: ...ete utilizzare i tasti sul lato destro e sopra lo schermo LCD o i tasti del telecomando Usare le connessioni di ingresso e uscita sul lato sinistro dello schermo per collegare altri dispositivi all un...

Page 55: ...hetta rivolta verso l alto Un disco sporco potrebbe non essere riprodotto adeguatamente Se un disco si dovesse sporcare passarlo con un panno morbido in linea retta dal centro verso i bordi del disco...

Page 56: ...ioni premere ripetutamente il tasto LCD MENU per uscire dal menu Nota dopo alcuni secondi di inattivit si esce automaticamente dal menu Menu Audio 1 Premere ripetutamente il tasto LCD MENU per acceder...

Page 57: ...definite 3 Terminate le impostazioni premere ripetutamente il tasto LCD MENU per uscire dal menu Nota dopo alcuni secondi di inattivit si esce automaticamente dal menu Modalit SCART AV S VIDEO Premere...

Page 58: ...to premuto Resume Play 3 Premere due volte per fermare completamente il disco Precedente Successivo 1 Durante l ascolto visione premere il tasto per tornare all inizio del capitolo o traccia precedent...

Page 59: ...angoli di visualizzazione dipende dal disco Ricerca Si pu passare ad un ora traccia capitolo o titolo specifici 1 Premere il tasto GOTO sul telecomando 2 Usare i tasti o per selezionare capitolo titol...

Page 60: ...a nelle istruzioni l inglese Potete anche cambiare la lingua sullo schermo in altre lingue 1 Usare i tasti e sul telecomando per evidenziare LINGUA OSD quindi premere 2 Usare i tasti e sul telecomando...

Page 61: ...back muovere il cursore di evidenziazione sull opzione RIPRODUZIONE usando i tasti Premere i tasti ENTER o per confermare e lanciare la sequenza DVD 1 Premere il tasto PROGRAM sul telecomando Sullo sc...

Page 62: ...no per spolverare cos come gli altri mobili Servirsi di un panno morbido e pulito inumidito con acqua tiepida per pulire l esterno dell apparecchio Prestare attenzione al momento di pulire e strofinar...

Page 63: ...or warnen dass im Produktgeh use unisolierte gef hrliche elektrische Spannung vorhanden sein kann deren Menge ausreicht um bei Menschen einen elektrischen Schock auszul sen Das Ausrufezeichen innerhal...

Page 64: ...e passt sollten Sie einen Techniker rufen um die Steckdose wechseln zu lassen 10 Stromversorgungskabel m ssen so gelegt sein dass man nicht darauf treten kann oder dass sie in St pseln Steckdosen oder...

Page 65: ...Pause Taste 12 Schnellvorlauf Taste 13 Schnellr cklauf Taste 14 Weiter Taste 15 Zur ck Taste 16 PROGRAM Taste 17 INTRO Taste 18 AUTO EJECT Automatischer Auswurf Taste 19 Abruf Taste 20 MENU Taste 21 C...

Page 66: ...es LCD Bildschirms oder den Tasten auf der Fernbedienung k nnen Sie den Fernseher bedienen Schlie en Sie ber die Eingangs und Ausgangs buchsen auf der linken Seite des Bildschirms andere Ger te an den...

Page 67: ...schmutzige Disc kann evtl nicht richtig abgespielt werden Daher eine schmutzige Disc mit einem weichen Tuch von der Mitte bis zur Kante geradlinig abwischen Vermeiden Sie direkte Sonneneinstrahlung ex...

Page 68: ...derholt die LCD MENU Taste um das Men zu verlassen Hinweis Wenn f r einige Sekunden keine Eingabe erfolgt wird das Men automatisch beendet Audio Men 1 Dr cken Sie wiederholt die LCD MENU Taste um das...

Page 69: ...3 Wenn Sie Ihre Einstellungen vorgenommen haben dr cken Sie wiederholt die LCD MENU Taste um das Men zu verlassen Hinweis Wenn f r einige Sekunden keine Eingabe erfolgt wird das Men automatisch beende...

Page 70: ...hen Zur ck Weiter 1 Dr cken Sie w hrend der Wiedergabe die Taste um zum Anfang des vorherigen Kapitels oder Titels zur ckzukehren 2 Dr cken Sie w hrend der Wiedergabe die Taste um zum Anfang des n chs...

Page 71: ...gt von der Disc ab Suche Sie k nnen zu einer bestimmten Stelle Zeitposition einem Song Kapitel oder Titel springen 1 Dr cken Sie die GOTO Taste auf der Fernbedienung 2 W hlen Sie mit der oder Taste da...

Page 72: ...rache ausw hlen Die Sprache in dieser Bedienungsanleitung ist Deutsch Sie k nnen die Bildschirmanzeige auch in anderen Sprachen anzeigen lassen 1 Markieren Sie mit den und Tasten auf der Fernbedienung...

Page 73: ...en Cursor auf die Option WIEDERGABE mit Hilfe der Tasten Dr cken Sie die ENTER oder die Taste um zu best tigen und die Reihenfolge wiederzugeben DVD 1 Dr cken Sie die PROGRAM Taste auf der Fernbedienu...

Page 74: ...h gereinigt werden und sollte so wie ein M belst ck behandelt werden Verwenden Sie ein weiches sauberes mit klarem lauwarmem Wasser getr nktes Tuch um das u ere Ihres Ger ts zu reinigen Seien Sie vors...

Page 75: ...LAAT REPARATIES UITVOEREN DOOR GEKWALIFICEERD PERSONEEL De bliksemstraal in een gelijkbenige driehoek wijst de gebruiker op niet ge soleerde gevaarlijke spanningen binnen de behuizing die een elektri...

Page 76: ...everde stekker niet in uw stopcontact past neem dan contact op met een elektricien ter vervanging 10 Zorg dat er niet over het netsnoer gelopen kan worden of dat deze niet bekneld kan raken met name i...

Page 77: ...4 Next volgende knop 15 Previous vorige knop 16 PROGRAM PROGRAMMA knop 17 INTRO knop 18 AUTO EJECT AUTO UITWERPEN knop 19 RECALL HERINNERING knop 20 MENU knop 21 CH CH knop 22 DISPLAY knop 23 Richting...

Page 78: ...n kunt u de toetsen op de rechterzijde en aan de bovenkant van het LCD scherm gebruiken of ook de toetsen op de afstandsbediening Gebruik de invoer en uitvoerverbindingen aan de linkerzijde van het sc...

Page 79: ...d afgespeeld worden Als een schijf vuil is kunt u deze schoonmaken met een zachte doek Wrijf van het midden naar de buitenkant Voorkom directe blootstelling aan zonlicht extreme temperaturen en vocht...

Page 80: ...oltooid zijn drukt u herhaaldelijk op de LCD MENU knop om het menu te verlaten Opmerking na enkele seconden inactiviteit zult u automatisch het menu verlaten Audiomenu 1 Druk herhaaldelijk op de LCD M...

Page 81: ...et de instellingen drukt u herhaaldelijk op de LCD MENU knop om het menu te verlaten Opmerking na enkele seconden inactiviteit zult u automatisch het menu verlaten SCART AV S VIDEO modi Druk herhaalde...

Page 82: ...rukt heeft Afspelen hervatten 3 Druk tweemaal op om de cd te stoppen Previous Next Vorige Volgende 1 Tijdens het afspelen drukt u op de knop om terug te keren naar het begin van het vorige hoofdstuk o...

Page 83: ...te selecteren Opmerking het aantal hoeken hangt af van de cd Search Zoeken U kunt springen naar een specifiek tijdstip nummer hoofdstuk of titel 1 Druk op de GOTO GA NAAR knop op de afstandsbediening...

Page 84: ...avetaal selecteren De menutaal die gebruikt wordt in deze instructies is Engels U kunt ook de OSD weergave van de taal op het scherm in een andere taal instellen 1 Gebruik de en knoppen op de afstands...

Page 85: ...speelreeks beweegt u de cursor naar de WEERGAVE optie door gebruik te maken van de knoppen Druk op de ENTER of knop om de reeks te bevestigen en te starten DVD 1 Druk op de PROGRAM knop op de afstands...

Page 86: ...pcontact voordat u het apparaat schoonmaakt De afwerking van uw apparaat kan schoongemaakt worden met een stofdoek en behandeld worden als andere meubelstukken Gebruik een zachte doek licht bevochtigd...

Page 87: ...atisfaisant Please feel free to leave your comments here Vous pouvez pr sent utiliser l espace suivant pour nous donner vos remarques Find all our new products Retrouvez toute notre actualit http www...

Page 88: ...LEXIBOOK S A Mon avis compte 2 avenue de Scandinavie 91953 Courtaboeuf Cedex FRANCE Affranchir ici...

Reviews: