background image

95

5-8 How to update Insyde BIOS

Under DOS Mode
STEP 1.  Prepare a bootable disc. 
               (Storage device could be USB FDD or USB pen drive.)
STEP 2.  Copy utility program and latest BIOS to your bootable disc. 
                You may download it from our website.
STEP 4.  (Here take 3I380C as an example, please enter your motherboard’s name) 
                Insert your bootable disc into X: (X could be C:, A: or others. 
                It depends on which type of storage device you use. )

Start the computer and type 
X:\H2OFFT-D.EXE 3I380CA2.ROM –BIOS -ALL
3I380CA2.ROM is the 

fi

 le name of the latest BIOS. 

It may be 3I380CA1.ROM or 3I380CA2.ROM, etc. 
Please leave one space between .ROM & -BIOS -ALL
By Bay Trail series mainboard, please type
X:\H2OFFT-D.EXE 3I380CA2.ROM –BIOS -ALL
 

 -BIOS  : Flash BIOS region


 -ALL   : Flash all

STEP 5.  Press ENTER and the BIOS will be updated,       
               Computer will restart automatically.

Summary of Contents for 3I380A

Page 1: ...MT s 2 x LAN HDMI Audio USB COM PCIe mini card All In One Intel Bay Trail I E3815 E3845 Single Core 1 46 GHz Quad Core 1 91 GHz CPU 2 x Intel GbE LAN 2 x PCIe mini card slots VGA HDMI Audio SATA USB...

Page 2: ...JUMPERS 2 8 JUMPER SETTING DESCRIPTION 2 9 COMS DATA CLEAR 2 10 JSC2 COM2 RS422 RS485 SELECT 2 11 COM PORT PIN9 SELECT RI SIGNAL OR VOLTAGE SOURCE 2 12 JVL1 LCD PANEL POWER SELECT CHAPTER 3 CONNECTIO...

Page 3: ...7 CONSOLE REDIRECTION 4 6 8 ACPI TABLE FETURES CONTROL 4 7 SECURITY 4 8 POWER 4 9 BOOT 4 9 1 LEGACY 4 10 EXIT 4 11 DEVICE MANAGER 4 11 1 SIO FINTEK8180U 4 11 2 SIO FINTEK81216D DG CHAPTER 5 DRIVER IN...

Page 4: ...5 7 1 TXE INSTALL FOR WIN8 WIN8 1 5 7 2 TXE INSTALL FOR WIN7 5 8 HOW TO UPDATE INSYDE BIOS APPENDIX A POWER CONSUMPTION TEST APPENDIX B RESOLUTION LIST APPENDIX C CPC CAR POWER CONTROL 91 93 95 96 98...

Page 5: ...eeps the rights in the subject to change the contents of this manual without prior notices in order to improve the function design performance quality and reliability The author assumes no responsibil...

Page 6: ...ase deal with heat dissipation properly when buying single MB set 9 Please avoid approaching the heat sink area to prevent users from being scalded with fanless products 12 It is important to install...

Page 7: ...U if you change modify any parts of the CPU cooler 6 Please wear wrist strap and attach it to a metal part of the system unit before handling a component You can also touch an object which is ground c...

Page 8: ...3 2 1 3 1 2 3 Photo 1 Insert Unplug...

Page 9: ...up to 2560 x 1600 single dual channel 18 24 bit LVDS 3I380CW and HDMI 1080p Besides 3I380A CW has Intel LAN chipset with 10 100 1000 Mbps Ethernet for seamless broadband connectivity With the Wake On...

Page 10: ...ex1 or mSATA Gen II Auto detect and USB interface 6 Support up to 2 SATA ports mSATA SATA Connector 7 Hardware digital Input Output 8 x DI 8 x DO Hardware Watch Dog Timer 0 255 sec programmable 8 DC 1...

Page 11: ...ce 9 Audio Amplifier 2 channel Class D Audio Amplifier 2 57W Ch Typ into a 4 Load 1 46 W Ch Typ into a 8 Load 10 WDT DIO Hardware digital Input Output 8 x DI 8 x DO Hardware Watch Dog Timer 0 255 sec...

Page 12: ...7 1 3 Installing the SO DIMM OEM 1 Align the SO DIMM with the connector at a 45 degree angle 2 Press the SO DIMM into the connector until you hear a click...

Page 13: ...designed to ensure the correct insertion If you feel resistance check t h e connectors golden finger direction and realign the card 2 Make sure the retaining clips on two sides of the slot lock onto...

Page 14: ...9 1 3 1 1 Removing the SO DIMM OEM 1 Release the SO DIMM by pulling outward the two retaining clips and the SO DIMM pops up slightly 2 Lift the SO DIMM out of its connector carefully...

Page 15: ...10 1 Unscrew the screw on the board 3 Gently push down the Mini Card and screw the screw back 2 Plug in the Mini Card in a 45 angle 1 4 Directions for installing the Mini Card...

Page 16: ...001 2187 0400 Manual LF M B 3I380A CW 1 5 6G6003 7330 0100 Power Cable LF L 9cm 2 0 1 4 DC JK 1 The packing list above is for the users who purchase single motherboard The users who purchase the board...

Page 17: ...ap before handling the 3I380A CW for harmlessly discharge any static electricity through the strap 2 Please use anti static pad to put any components parts or tools on the pad whenever you work on the...

Page 18: ...any visible damage on the board DO NOT CONTINUE TO INSTALL THIS BOARD CONTACT THE DEALER YOU PURCHASED THIS BOARD FROM IMMEDIATELY 4 Check your optional parts i e DDR CF etc all necessary jumpers sett...

Page 19: ...4 103 UEA3119C 4FB1 4F 8 4 8 4 16 33 76 61 63 73 78 95 32 114 82 59 13 79 88 0 0 2 99 35 43 137 18 146 98 32 102 95 14 92 98 32 102 0 2 99 137 18 146 3 07 3 07 0 83 82 11 38 41 6 100 89 14 2 94 39 87...

Page 20: ...CU5 CO1 CKM1 FAN1 CPO2 CPI11 CPI3 CPI13 CPI12 HDMI1 BAT1 JSB1 JVL1 CU12 CU8 CL1 CL2 CG1 CAL1 CAR1 CA1 CA2 LVDS1 CPP1 SODIMM1 OEM CU4 Bottom side CU3 Bottom side CC5 CC4 SIM1 MPCE2 MPCE1 JVC3 CC3 CC6 C...

Page 21: ...CFP1 CPO1 CT1 CU7 CU6 CU5 CO1 CKM1 FAN1 CPI11 CPI3 CPI13 HDMI1 BAT1 JSB1 JVL1 CU12 CU8 CL1 CL2 CG1 CAL1 CAR1 CA1 CA2 LVDS1 CPP1 SODIMM1 OEM CC5 CC4 SIM1 MPCE2 MPCE1 JVC3 CC3 CC6 CC1 CC2 JSC2 JVC1 CIO2...

Page 22: ...17 2 5 1 Bottom Side Diagram 3I380A CW BACK Panel 3I380A CW ottom Side Diagram 3I380A CW CU3 SATA1 CU4 HDMI VGA USB USB USB USB LAN2 LAN1 Mic In Line Out...

Page 23: ...emory DS SS Accept Max 8GB This motherboard provides one 204 pin Small Outline Dual In line Memory Module SODIMM socket for memory expansion available maximum to of 2GB 4GB 8GB DDR3L SDRAM DDR3L clock...

Page 24: ...ring two pins A jumper is OFF as an open circuit without the plastic cap Some jumpers have three pins labeled 1 2 and 3 You could connect either pin 1 and 2 or 2 and 3 The below figure 2 2 shows the e...

Page 25: ...2 Normal Clear Setting A battery must be used to retain the motherboard configuration in CMOS RAM Close Pin1 and pin 2 of JSB1 to store the CMOS data To clear the CMOS follow the procedures below 1 Tu...

Page 26: ...Note 1 Note Attention Check Device Power in spec 2 If want to use 5V 12V need check system power design spec JSC2 JVC1 JVC3 Normal RI Signal RS485 5V 12V JSC2 Description 1 2 RS422 3 4 RS485 JVC1 3 D...

Page 27: ...22 2 12 JVL1 LCD panel power select Note Attention Check Device Power in spec JVL1 Description 1 2 5V 2 3 3 3V JVL1 1 1 3 3 2 2 5V 3 3V...

Page 28: ...phone jack CA2 Mic in phone jack CAL1 Amplifier Line out Left channel 2pin 2 0mm wafer 3I380CW CAR1 Amplifier Line out Right channel 2pin 2 0mm wafer 3I380CW CC1 CC2 CC3 CC4 CC5 CC6 COM 2x5pin 2 0mm...

Page 29: ...ATX connector CPI3 DC IN Internal Connector 1x2 pin 2 0mm Red Wafer Option CPI12 DC IN Internal Connector 1x4 pin 2 0mm Red Wafer CPI13 DC IN Internal Connector 1x5 pin 2 0mm Wafer Option PIN NO Descr...

Page 30: ...switch to DC out voltage 12V so DC in need stable 12V input CPO1 12V 5V DC voltage output 4pin 2 00mm Black Wafer PIN NO Description 1 5V 2 GND 3 GND 4 12V CPO1 BAT1 pin1 Note 1 When board without Ad...

Page 31: ...tton pin 2 Power button GND 3 Reset pin 4 Reset GND 5 Power LED 6 Power LED 7 HDD LED 8 HDD LED 9 LAN LED 10 LAN LED FAN1 CPU FAN connector 3pin 2 5mm wafer FAN connectors PIN NO Description 1 GND 2 1...

Page 32: ...3 BLUE 8 GND 13 H SYNC 4 NC 9 NC 14 V SYNC 5 GND 10 GND 15 DDC CLOCK CG1 HDMI1 HDMI1 HDMI Connector Type A PIN NO Description PIN NO Description 1 TMDS DATA2 2 GND 3 TMDS DATA2 4 TMDS DATA1 5 GND 6 T...

Page 33: ...GND 7 eDP TX1 8 GND 9 eDP TX2 10 GND 11 eDP TX2 12 GND 13 eDP TX3 14 LCD Power 15 eDP TX3 16 LCD Power 17 eDP AUX 18 LCD Power 19 eDP AUX 20 eDP HPD Note 1 All signal from CPU DDI1 interface 2 LCD Pow...

Page 34: ...22 LCD 5V or 3 3V 23 Channel 1 DATA2 24 Channel 1 CLK 25 Channel 1 DATA2 26 Channel 1 CLK 27 Channel 1 DATA1 28 Channel 1 DATA0 29 Channel 1 DATA1 30 Channel 1 DATA0 Note 1 LVDS interface support 18 2...

Page 35: ...screen 2x5 pin 2 0mm wafer USB interface For 8 wire type pin define For 4 wire type pin define PIN NO Description PIN NO Description 1 Bottom 2 Bottom Sense 3 Top Sense 4 Top 5 Right 6 Right Sense 7...

Page 36: ...cription GND Line OUT L NC NC Line OUT R PIN NO 1 2 3 4 5 Description GND Mic IN NC NC Mic IN CAR1 CAL1 pin1 Note 1 Touch controller use USB port 4 2 57 W Ch Typ into a 4 Load 1 46 W Ch Typ into a 8 L...

Page 37: ...C2 CC1 pin1 10 10 pin1 pin1 pin1 3 8 I O Interface RS232 mode ports 2x5pin 2 0mm Wafer COM ports COM1 COM6 from super I O PIN NO Description PIN NO Description 1 DCD 2 RXD 3 TXD 4 DTR 5 GND 6 DSR 7 RT...

Page 38: ...ption 1 DI 0 2 DO 3 3 DI 1 4 DO 2 5 DI 2 6 DO 1 7 DI 3 8 DO 0 9 GND 10 5V 3 9 Digital Input Output Note 1 DI pin default pull up 10K to 5V 2 If use need isolate circuit to control external device 3 F7...

Page 39: ...low Current IOL 10mA Min VOL 0 4V Output High Current IOH 10mA Min VOH 2 4V Watch Dog Time value 0 255 sec The system will be issued reset When WDT is enable the hardware start down counter to zero Th...

Page 40: ...ble button to test WDT function 3 Press the Disable button to disable WDT 4 Check the Enable Loop box and press Enable to do WDT loop test 5 Press Install WDT to set the system to autorun this applica...

Page 41: ...ROL 0x00 This is setting low pulse output this Write_Byte F75111_INTERNAL_ADDR GPIO3X_PULSE_WIDTH_CONTROL 0x01 This selects the pulse width to 1mS this Write_Byte F75111_INTERNAL_ADDR GPIO3X_CONTROL_M...

Page 42: ...GPIO1X_INPUT_DATA byteGPIO1X Get value from GPIO1X this Read_Byte F75111_INTERNAL_ADDR GPIO3X_INPUT_DATA byteGPIO3X Get value from GPIO3X byteGPIO1X byteGPIO1X 0xF0 Mask unuseful value byteGPIO3X byte...

Page 43: ...d info lexwiki index php IO_Device F75111_VB6 3 9 2 IO Device F75111 VB6 under Windows A Function Enable WDT timer Key in the value by seconds then system will reboot after value which you key in in l...

Page 44: ...Call WriteI2CByte H36 H0 End Function Function SetDOValue dovalue As Integer Call WriteI2CByte H23 H0 Call WriteI2CByte H20 HFF Call WriteI2CByte H2B HFF Call WriteI2CByte H21 dovalue End Function Fun...

Page 45: ...oad and install the Code Block with command apt get install codeblocks Open an exist project F75111 cbp in Code Blocks click the compile button add an option pkg config libs gtk 2 0 gthread 2 0 in Pro...

Page 46: ...if there s disable signal received resent Enable WDT signal for a loop to prevent from reboot p s IO function In file SMBus c Initial internal F75111 Introduction void SMBusIoWrite BYTE byteOffset BY...

Page 47: ...output pin BYTE F75111 InterDigitalInput BYTE byteGPIO1X 0 BYTE byteGPIO3X 0 BYTE byteData 0 this Read_Byte F75111_INTERNAL_ADDR GPIO1X_INPUT_DATA byteGPIO1X Get value from GPIO1X this Read_Byte F7511...

Page 48: ...DDR WDT_TIMER_RANGE byteTimer set WatchDog range and timer WriteByte F75111_INTERNAL_ADDR WDT_CONFIGURATION WDT_TIMEOUT_FLAG WDT_ENABLE WDT_PULSE WDT_PSWIDTH_100MS Enable WatchDog Setting WatchDog con...

Page 49: ...ription 5V KB DAT KB CLK GND MS DAT MS CLK 2 CL1 CL2 LAN Giga 100Mb RJ45 Jack RJ45 LAN Connector LED define Giga 100MB Connector 3 12 LAN Interface Back side con RED LED GREEN LED YELLOW LED Indicate...

Page 50: ...USB DATA 4 GND PIN NO Description PIN NO Description 1 5V 5 USB3 0 RX 2 USB 2 0 D 6 USB3 0 RX 7 GND 3 USB 2 0 D 8 USB3 0 TX 4 GND 9 USB3 0 TX Note 1 USB 3 0 and USB 2 0 single connector Note 1 Attenti...

Page 51: ...e PIN NO Description 1 GND 2 DATA TX 3 DATA TX 4 GND 5 DATA RX 6 DATA RX 7 GND Note 1 SATA1 support SATA 2 0 spec update 3Gb sec 2 CPO1 provide SATA HDD power 12V GND 5V Note 1 On board SSD for OEM op...

Page 52: ...6 GND 27 GND 28 1 5V 29 GND 30 SMB CLK 31 PCIe TX mSATA TX 32 SMB DATA 33 PCIe TX mSATA TX 34 GND 35 GND 36 USB DATA 37 GND 38 USB DATA 39 3 3V 40 GND 41 3 3V 42 NC 43 NC 44 NC 45 NC 46 NC 47 NC 48 1...

Page 53: ...iption PIN NO Description 1 Vcc 1 GND 2 RST 2 NC 3 CLK 3 DATA 4 RUF 4 RUF Note 1 MPCE2 Pin 8 10 12 14 16 for SIM1 card reader use Note SODIM1 SO DIMM DDR3L 1 35V DRAM Socket 3 16 SIM Socket 3 17 SODIM...

Page 54: ...280 x 800 18bit 7 1366 x 768 18bit 8 800 x 600 24bit 9 1024 x 768 24bit 10 1280 x 800 24bit 11 1366 x 768 24bit 12 1280 x 1024 48bit 13 1440 x 900 48bit 14 1600 x 1200 48bit 15 1920 x 1080 48bit 3I380...

Page 55: ...tor of system stability and of ensuring your system performance at best In the BIOS Setup main menu you can see several options We will explain these options in the following pages First let us see th...

Page 56: ...on of the function keys you may use here Press left right to select screen Press up down to choose in the main menu the option you want to confirm or to modify Press Enter to select Press or F5 F6 key...

Page 57: ...User can press the right or left arrow key on the keyboard to switch from menu bar The selected one is highlighted 4 3 General Help 4 4 Menu Bars There are six menu bars on top of BIOS screen Press F1...

Page 58: ...rmation Highlight the item and then use the or and numerical keyboard keys to select the value you want in each item Set the Time Please use Tab to switch between data elements Set the Date Please use...

Page 59: ...ation Please refer section 4 6 2 PCI Express Configuration Please refer section 4 6 4 Video Configuration Please refer section 4 6 5 Thermal Configuration Please refer section 4 6 6 SATA Configuration...

Page 60: ...55 4 6 1 Boot Configuration Select Power on state for Numlock default is ON Numlock...

Page 61: ...56 4 6 2 PCI Express Configuration PCIe 1 2 3 4 configuration settings...

Page 62: ...57 4 6 2 1 PCI Express Root Port 1 2 3 4 The optional settings are Enabled default Disabled Control the PCI Express Root Port...

Page 63: ...58 4 6 2 2 PCIE Port 1 2 3 4 Speed The optional settings are Gen1 default Gen2 Select PCI Express port speed...

Page 64: ...59 The optional settings are Disabled default Enabled Select PCIE TXE ROM support 4 6 2 3 PCIE Port 1 2 3 4 Option ROM...

Page 65: ...60 4 6 3 USB Configuration Mode of operation of xHCI controller The optional settings are Best Auto default Enabled Disabled XHCI Mode...

Page 66: ...ported are below 640 x 480 18bit 800 x 600 18bit 1024 x 768 18bit default 800 x 480 18bit 1024 x 600 18bit 1280 x 800 18bit 1366 x 768 18bit 800 x 600 24bit 1024 x 768 24bit 1280 x 800 24bit 1366 x 76...

Page 67: ...ed fixed graphics memory size used by the internal graphics device The optional settings are 64 default 96 128 160 192 224 256 288 320 352 384 416 448 480 512MB Use this item to select DVMT 5 0 total...

Page 68: ...Point the point in which the OS will shutdown the system Critical Trip point is the shutdown temperature the default value is 110 The CPU frequency will auto reduce when cpu temperature arrived to pas...

Page 69: ...e default AHCI Mode Indicates the maximum speed the SATA controller can support The optional settings Gen1 Gen2 default SATA Controller Chipset SATA Mode SATA Speed Legacy IDE or Native IDE MODE The o...

Page 70: ...sole Redirection The optional settings are Enabled Disabled default The optional settings are 115200 default 57600 38400 19200 9600 4800 2400 1200 The optional settings are 8 Bits default 7 Bits The o...

Page 71: ...FF Stop Bits Flow Control 4 6 8 ACPI Table Fetures Control Select ACPI sleep state the system will enter when the SUSPEND button is pressed The optional settings DSDT ACPI S3 Suspend to RAM Enabled or...

Page 72: ...1 Select Supervisor Password The screen then pops up an Create New Password dialog 2 Enter your desired password that is no less than 3 characters and no more than 10 characters 3 Hit Enter key to sub...

Page 73: ...I power management Enable wake up event occurs The optional settings Enabled Disabled default Instant OFF default The system will be turn off directly when push the power button Delay 4 sec The system...

Page 74: ...EFI boot type default is Dual boot type The optional settings are Enabled default Disabled Determine EFI device first or legacy device first The optional settings EFI device first Legacy device first...

Page 75: ...70 4 9 1 Legacy Select Normal Boot option priority or Advance Boot option priority The optional settings Normal default Advance Normal Boot Menu...

Page 76: ...71 Setting the boot type priority The default settings is 1 USB drive 2 Hard Disk Drive 3 CD DVD ROM drive 4 Others Boot Type Order...

Page 77: ...changes but doesn t restart This item allows user restart the system but no saving the changes Use this item to restore the optimal default for all the setup options Use this item to cancel all the s...

Page 78: ...se press the key F10 when bootup to go into the Device Manager menu 4 11 Device Manager Please refer section 4 11 1 Please refer section 4 11 2 Serial Port 1 2 Configuration Serial Port 3 4 5 6 Config...

Page 79: ...er IO device The optional settings are IO 3F8h IRQ 4 default IO 3E8h IRQ 3 4 IO 2E8h IRQ 3 4 IO 2F8h IRQ 3 4 Use this item to select an optimal setting for super IO device The optional settings are IO...

Page 80: ...ot after a power failure or interrupt occurs Keep state Restores the system to the status before power failure or interrupt occurred default Always on Leaves the computer in the power on state Always...

Page 81: ...ult Disabled Use this item to select an optimal setting for super IO device The optional settings are IO 3E8h IRQ 10 default IO 2F8h IRQ 3 4 5 6 7 10 11 IO 2E8h IRQ 3 4 5 6 7 10 11 IO 3F8h IRQ 3 4 5 6...

Page 82: ...7 10 11 Serial Port 4 Base IO Address Interrupt Serial Mode Use this item to select an optimal setting for super IO device The optional settings are IO 4F8h IRQ 10 default IO 2F8h IRQ 3 4 5 6 7 10 11...

Page 83: ...detect software SYSTEM INSTALL 1 Auto Detect Main board and OS to AUTOMATIC DRIVER INSTALLATION menu 2 Browse DVD to view the contents of the DVD 3 Exit to exit SYSTEM INSTALL menu Insert the DVD int...

Page 84: ...4 xHCI Install Intel USB 3 0 xHCI driver FOR Win 7 only 5 HD Audio Install HD Audio Codec driver 6 MBI Install MBI driver FOR Win 8 8 1 only 7 LAN To the LAN driver Readme file 8 TXE Patch Install In...

Page 85: ...Driver example for WIN8 64bit 1 At the AUTOMATIC DRIVER INSTALLATION menu screen click INF 3 At the License Agreement screen click Yes 2 At the Intel Chipset Device Software screen click Next 4 At the...

Page 86: ...Finish to restart computer NOTE SYSTEM INSTALL will auto detect file path For Windows 7 64 32 bit X driver INTEL BAY INF WIN7 infinst_autol exe For Windows 8 8 1 32 64 bit X driver INTEL BAY INF WIN_...

Page 87: ...iver example for WIN8 64bit 1 At the AUTOMATIC DRIVER INSTALLATION menu screen click VGA 3 At the License Agreement screen Click Yes 2 At the Welcome to the Setup Program screen Click Next 4 At the Re...

Page 88: ...ill auto detect file path For Windows 7 32 bit X driver INTEL BAY VGA WIN_7_32 Setup exe For Windows 7 64 bit X driver INTEL BAY VGA WIN_7_64 Setup exe For Windows 8 Windows 8 1 32 bit X driver INTEL...

Page 89: ...Driver FOR Windows 7 only 1 At the AUTOMATIC DRIVER INSTALLATION menu screen click Serial IO 3 At the License Agreement screen Click Yes 4 At the Setup type screen select complete and Click Next 2 At...

Page 90: ...ect file path For Windows 7 32 bit X driver INTEL BAY SERIALIO WIN7_32Bit msi For Windows 7 64 bit X driver INTEL BAY SERIALIO Win7_64Bit msi 5 At the Ready to install the program screen Click Install...

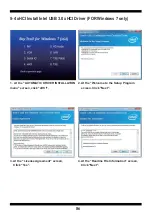
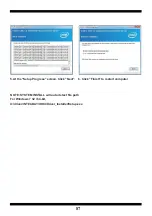
Page 91: ...Driver FOR Windows 7 only 1 At the AUTOMATIC DRIVER INSTALLATION menu screen click xHCI 3 At the License Agreement screen Click Yes 2 At the Welcome to the Setup Program screen Click Next 4 At the Rea...

Page 92: ...7 5 At the Setup Progress screen Click Next 6 Click Finish to restart computer NOTE SYSTEM INSTALL will auto detect file path For Windows 7 32 64 bit X driver INTEL BAY XHCI Driver_Installer Setup exe...

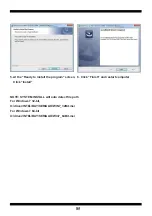
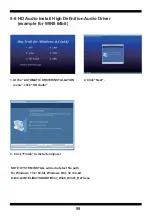
Page 93: ...WIN8 64bit 1 At the AUTOMATIC DRIVER INSTALLATION menu click HD Audio 3 Click Finish to restart computer 2 Click Next NOTE SYSTEM INSTALL will auto detect file path For Windows 7 32 64 bit Windows 8...

Page 94: ...Driver FOR Win 8 8 1 only 1 At the AUTOMATIC DRIVER INSTALLATION menu click HD Audio 3 At the License Agreement screen Click Yes 2 At the Welcome to the Setup Program screen Click Next 4 At the Setup...

Page 95: ...90 5 Click Finish to restart computer NOTE SYSTEM INSTALL will auto detect file path For Windows 8 8 1 32 64 bit X driver INTEL BAY MBI Setup exe...

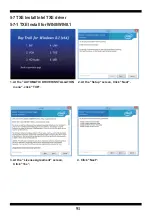
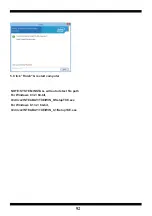
Page 96: ...TXE Install Intel TXE driver 5 7 1 TXE Install for WIN8 WIN8 1 1 At the AUTOMATIC DRIVER INSTALLATION menu click TXE 3 At the License Agreement screen Click Yes 2 At the Setup screen Click Next 4 Clic...

Page 97: ...k Finish restart computer NOTE SYSTEM INSTALL will auto detect file path For Windows 8 32 64 bit X driver INTEL BAY TXE WIN_8 SetupTXE exe For Windows 8 1 32 64 bit X driver INTEL BAY TXE WIN_8 1 Setu...

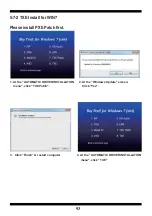
Page 98: ...WIN7 Please install PXE Patch first 1 At the AUTOMATIC DRIVER INSTALLATION menu click TXE Patch 3 Click Finish restart computer 2 At the Windows Update screen Click Yes 4 At the AUTOMATIC DRIVER INST...

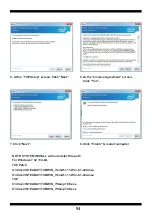
Page 99: ...rt computer 7 Click Next NOTE SYSTEM INSTALL will auto detect file path For Windows 7 32 64 bit TXE Patch X driver INTEL BAY TXE WIN_7 kmdf 1 11 Win 6 1 x86 msu X driver INTEL BAY TXE WIN_7 kmdf 1 11...

Page 100: ...sert your bootable disc into X X could be C A or others It depends on which type of storage device you use Start the computer and type X H2OFFT D EXE 3I380CA2 ROM BIOS ALL 3I380CA2 ROM is the file nam...

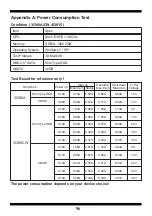
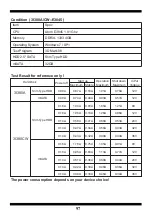
Page 101: ...53A 0 38A 0 57A 0 49A 24V 24V 0 14A 0 43A 0 32A 0 48A 0 40A 32V 32V 0 14A 0 40A 0 31A 0 44A 0 37A 36V 36V 0 16A 1 08A 0 81A 1 19A 0 94A 0 17A 0 85A 0 67A 0 93A 0 74A 0 14A 0 47A 0 38A 0 51A 0 41A 0 14...

Page 102: ...A 12V 0 09A 0 74A 0 46A 0 93A 0 57A 12V 0 16A 1 34A 0 93A 1 65A 1 21A 9V 9V 0 18A 1 08A 0 74A 1 26A 0 96A 12V 12V 0 14A 0 58A 0 41A 0 68A 0 53A 24V 24V 0 14A 0 47A 0 34A 0 58A 0 43A 32V 32V 0 14A 0 43...

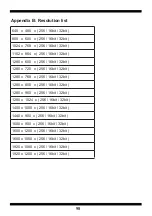
Page 103: ...16bit 32bit 1280 x 768 x 256 16bit 32bit 1280 x 800 x 256 16bit 32bit 1280 x 960 x 256 16bit 32bit 1280 x 1024 x 256 16bit 32bit 1400 x 1050 x 256 16bit 32bit 1440 x 900 x 256 16bit 32bit 1600 x 900 x...

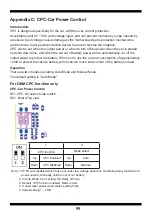
Page 104: ...ry power will be automatically cut off the output power to protect the battery When not in use the current consumption of approximately 2mA to protect the vehicle battery will not be too much load cur...

Page 105: ...etected low battery voltage conditions After the motherboard shutdown CPC default set value of the Main Power Off delay by five seconds after the main power board off If you close more than 10 minutes...

Page 106: ...off the MB via PW cable in the setting time There are 18 options as OS delay off setting 0sec 5sec 10sec 15sec 20sec 30sec 45sec 1min 3min 5min 10min 15min 30min 45min 1hour 2hour 3hour The default se...

Page 107: ...the ignition is at ACC or key plug out 3 When the battery is Under voltage CPC constantly monitors the setting low voltage of battery 10 times 10 minutes CPC will set out the alarm via CPC AP After 10...

Page 108: ...OFF 0 3sec ON 0 3sec OFF 1sec ON 1sec OFF 1sec CPC LED is being implemented various stages of delay LED will be action When finished LED would not operate Car Power Control CPC application Introducti...

Page 109: ...detects very minute Number 5 The operating Mode you used Number 6 The battery type currently you used with 12V or 24V Number 7 To Start monitoring the battery capacity Set the delay time which CPC tur...

Page 110: ...asic setting section the initial value is read from users Press this button to set when finish selecting what you want to set in CPC basic setting section Monitor the battery capacity when user boot t...

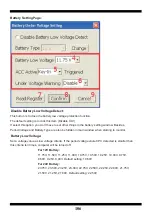
Page 111: ...n in main window when starting to monitor Set a voltage value as low voltage criteria If the period voltage vaule CPC detected is smaller than this criteria ten times computer will be turned off For 1...

Page 112: ...e battery under voltage while Key in Key out To start monitoring the battery under voltage while Key out Choose if it pop up the alarm window when the battery is under voltage Read the setting of batt...

Reviews: