background image

26

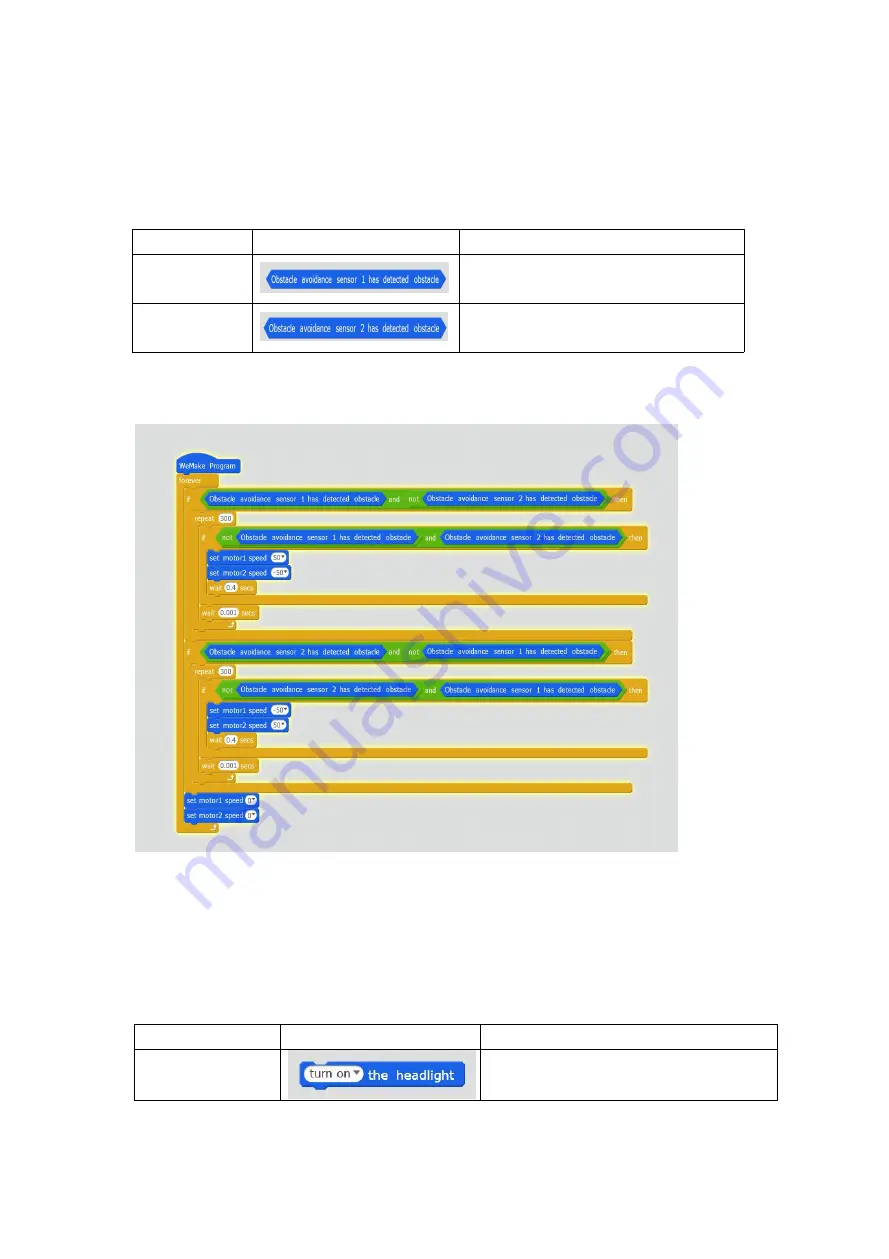
5.Gesture control

In this episode, we will continue to use obstacle avoidance sensors to

achieve new gameplay!

Software Command

Script Type Command

Comment

Robots

Gets the status of the No.1

obstacle avoidance sensor

Robots

Gets the status of the No.2

obstacle avoidance sensor

Creat a target:

Using 2 obstacle avoidance sensors at the top of the

Qbot to determine the direction of movement of the object ahead, so as to

make a left or right turn

6.illuminate the night

LED hardware principle:

There are two large LED lights with 1cm

diameter on the Qbot. We can control the situation of lights(off/ on) by

programming

Software Command:

Script Type

Command

Comment

Robots

Turn on or off the Headlight.

Create a target:

Qbot travels along the black track which has been

marked . When traveling to the designated section, 2 LED lights of Qbot

Summary of Contents for Qbot

Page 1: ...1 Qbot Robot Car Kit User Manual...

Page 2: ...le Infrared Remote Control Free Mobile APP for Arduino Product Parameters Net Weight About 0 308 pounds Material fiberglass Bluetooth module support Package Dimensions 9 8 x 6 2 x 2 4 inches Product l...

Page 3: ...ction introduction 4 Components 5 Assembly 7 Introduction of WeMake software 10 1 Install the driver 13 2 Install firmware 16 Infrared remote control 19 Use Mobile phone APP to control the Qbot 20 Tec...

Page 4: ...ny other robot products that need to be built for a long time the whole assembly process of Qbot only takes 2 minutes so that you are no longer bothered by the tedious assembly The holes in the robot...

Page 5: ...5 Components Name of Component Picture Quantity Upper Plate 1 Motor Driven board 1 Ultrasonic sensor 1 Infrared remote controller 1 Copper columns and screws Several Lithium battery 2...

Page 6: ...6 Flat Cable 1 Charger 1...

Page 7: ...7 Assembly Assembly steps Step 1 We can fix 3 copper pillars onto control board...

Page 8: ...8 Step 2 Then use wires to connect two board and put lithium battery onto the motor board Step 3 Use screws to join two board together control board and motor board...

Page 9: ...9 Step 4 Fix ultrasonic module to the right position There are two rows of serial ports you need to insert the ultrasonic sensor into the back row You can also refer to the tutorial video...

Page 10: ...WeMake s simple operability makes it possible for everyone to build their own intelligent robots without having to learn esoteric electronic knowledge 2 How to install WeMake on your computer You can...

Page 11: ...11 The installer is now ready to install WeMake into your computer Click install to continue with this installer if you want to review or change the settings please click back...

Page 12: ...alling WeMake into your computer please wait The WeMake installation wizard finishes The installer has installed WeMake into your computer this application can be run by selecting the installed shortc...

Page 13: ...am QBot How to connect Qbot to WeMake First we need to connect Qbot to computer with mini USB cable and open WeMake software Install the driver Uses the WeMake at the first time you should install the...

Page 14: ...14 Open the driver installation interface Waiting for installation...

Page 15: ...ext select the corresponding COM port in Menu Boards Qbot Click COM6 to display Connected Different computers may have different ports don t choose COM1 you can open the DeviceManager expand Ports COM...

Page 16: ...ol If you use the first way to control the Qbot you can control it directly by the Infrared remote control because the default state of Qbot that the firmware we have installed If you use the second w...

Page 17: ...17 Then click the Upload to Ardunio...

Page 18: ...18 When it appears Upload finish you can start controlling your Qbot with moile phone...

Page 19: ...ftware Command Script Type Command Comment Robot Module To determine whether a button on the infrared remote controller has been pressed or not Robot Module To determine whether a button on the infrar...

Page 20: ...ile phone APP to control the Qbot First turn on the switch of the Qbot Then open the Qbot APP that have been download on your mobile phone After connecting the Bluetooth you can start controlling your...

Page 21: ...21 If the connection fails restart the APP and reconnect several times...

Page 22: ...s Get the distance measured by ultrasonic module Robots The playing tone is 1 8 of the C4 beat Create a target Ultrasonic detects the distance automatically the closer the distance is the higher the a...

Page 23: ...ment Robots Get the status of Edge sensor 1 Robots Get the status of Edge sensor 2 Create a Target Our map is a large black runway and Qbot can be placed inside the runway After turning on the switch...

Page 24: ...obots Get the distance measured by the ultrasonic wave Create a Target The ultrasonic sensor measures the distance between the Qbot and the obstacle If the distance is less than 15 cm Qbot will move b...

Page 25: ...er away and finally disappear If there is an obstacle the infrared encounters an obstacle which is reflected to the sensor receiver The sensor detects this signal and it will know there is an obstacle...

Page 26: ...dance sensors at the top of the Qbot to determine the direction of movement of the object ahead so as to make a left or right turn 6 illuminate the night LED hardware principle There are two large LED...

Page 27: ...LED lights turn off 7 Parking automatically In this episode we use edge sensor to achieve new gameplay Software Command Script Type Command Comment Robots Get the status of Edge sensor 1 Robots Get th...

Page 28: ...D light is composed of a red LED lamp bead a green LED lamp bead and a blue LED lamp bead Software Command Script Type Command Comment Robots Set the color of the RGB light all select the light which...

Page 29: ...l show you how our Qbot play this fantastic game Create a Target The Qbot has expanded holes and is compatible with the structure bracket of the Lego blocks You can expand the mechanical structure of...

Page 30: ...s Get the status of the No 1 obstacle avoidance sensor Create a target Using 2 obstacle avoidance sensors at the top of the Qbot combined with an ultrasonic sensor the Qbot avoids obstacle and goes ou...

Page 31: ...31 obstacle based on the time it takes to send and receive the ultrasonic wave...

Page 32: ...deo tutorial if the problem still can not be solved please feel free to contact us by email at support lewansoul com Please visit the following link or scan the QR codes to get related instructions an...

Reviews: