background image


26 


15.2.


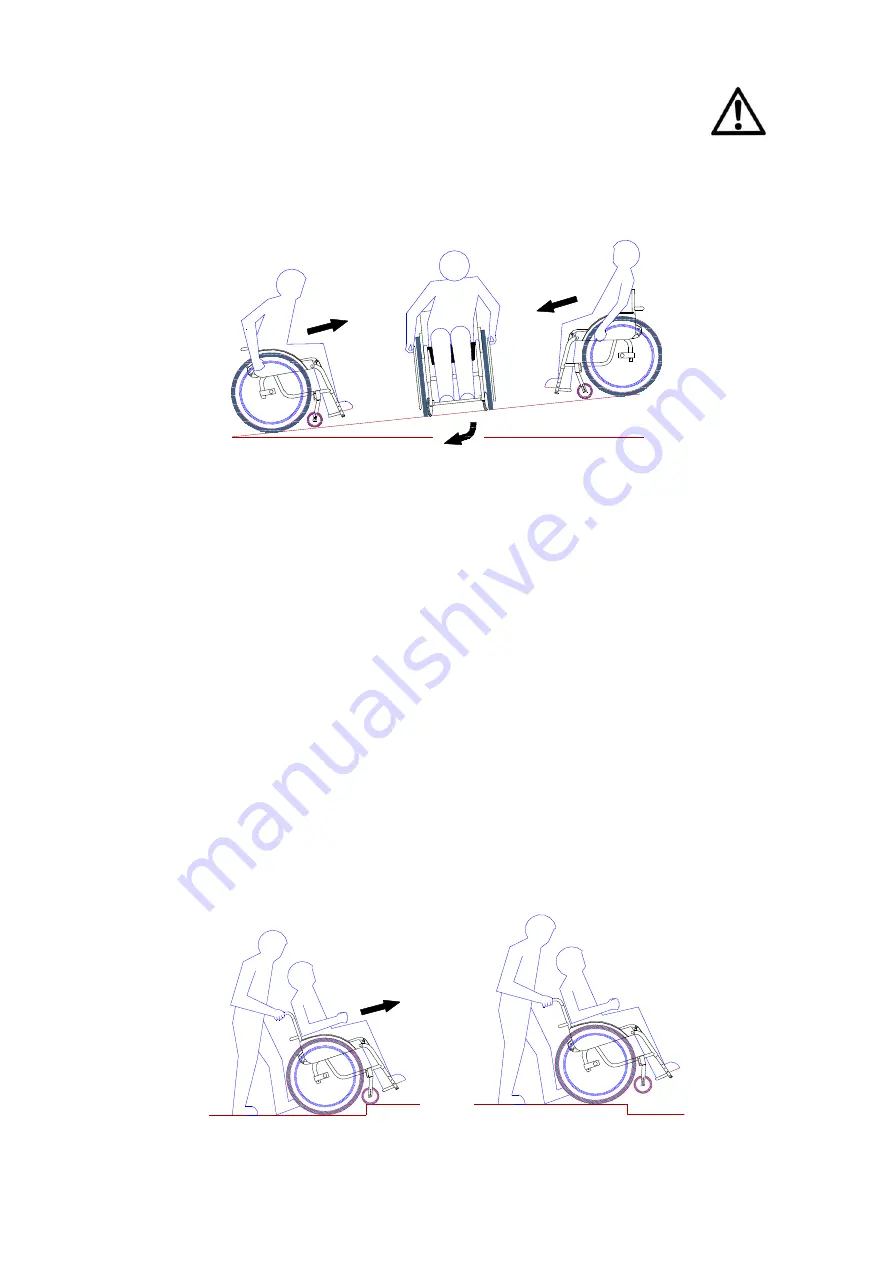
Gradients


Bear in mind that, when turning around on a steep hill, you will pass through a crosswise 

position first before the turn is completed. Whilst in the crosswise position, there is a 
risk of slipping sideways down the hill. Both you and any assisting person should be 

aware of this risk and counter steer accordingly. 


As a safety precaution, always ask a person to accompany you when manoeuvring down 

a slope. Bear in mind that slowing the wheelchair using the hand rims generates a great 
deal of heat between hands and the hand rim itself and can lead to burns on the palms 

of  the  hands.  Therefore  proceed  cautiously  when  braking  manually  and,  most 
importantly,  when  travelling  downhill,  never  go  faster  than  walking  pace.  Leaning 

backward improves stability and increases rear wheel downforce, thus also improving 

braking efficiency. 

15.3.


Climbing obstacles 

Any obstacle, such as a curb or threshold, should be viewed as a potential source of 
danger. This is due, in part, to the very short wheelbase of the wheelchair. To climb an 

obstacle, ask an accompanying person for assistance. 
Should you wish to negotiate such an obstacle with the help of an accompanying person 
they  should  not  attempt  to  lift  the  wheelchair  completely.    It  is  important  that  they 

make sure that the rear wheels stay in contact with the floor all the time. 
To overcome an obstacle (e.g. driving over a curb), first tilt the wheelchair just enough 

to lift the front wheels. Slowly lower the front wheels onto the obstacle and then push 

the wheel chair on until the large wheels are resting against the edge of the obstacle. 
Finally move the chair onto or over the obstacle. 


Summary of Contents for Compact-easy LCEV

Page 1: ...elchair This is a type approved medical device Alterations to the construction or electronics will void the warranty and the product liability In case of difficulty please contact Manufacturer Agent LEVO AG ANGLIKERSTRASSE 20 TEL 41 0 56 618 44 11 OFFICE LEVO CH SWITZERLAND CH 5610 WOHLEN FAX 41 0 56 618 44 10 WWW LEVO CH LEVO AG Anglikerstrasse 20 CH 5610 Wohlen Tel 41 0 56 618 44 11 office levo ...

Page 2: ... 13 8 1 Rear wheels 13 8 2 Seat inclination 13 8 3 Position of the rear wheels 13 8 4 Position of the front wheels 14 8 5 Backrest inclination 14 8 6 Armrests 14 8 7 Footrest 15 8 8 The calf heel strap 17 8 9 Seat cushion 17 8 10 Backrest and Seat Upholstery 17 8 11 Chest Belt 17 9 Adjustments for sitting and standing position 18 10 Safety Information for Standing 20 11 Brakes 21 11 1 Adjusting th...

Page 3: ...sfer sideways 28 15 7 Detachable components 29 16 Transport 30 16 1 Transport in a motor vehicle wheelchair only 30 16 2 Transport in a motor vehicle user in wheelchair 30 16 3 Public transport of the wheelchair wheelchair only 30 17 Components 31 17 1 Batteries 31 17 2 Recharging the batteries 31 17 3 Gas springs 32 17 4 Quick release axles 32 17 5 Rear wheels 32 17 6 Front wheels 33 18 Maintenan...

Page 4: ...1 General operation 37 23 2 Stand up mechanism 37 24 Version Management 38 LEVO strongly recommends that wheelchair users a fully acquaint themselves with the instructions for their device b always have access to 3rd party assistance in case of emergency IMPORTANT Contact your dealer distributor or LEVO AG if you have a visual impairment ...

Page 5: ... physical therapist to confirm that there are no contraindications such as contractures orthostatic hypotension osteoporosis or other conditions present In the case of strong or sudden spasms cramps or similar conditions it is necessary that the user is allowed to stand only under the supervision of an accompanying attendant or caregiver As a LEVO customer you have the opportunity to make a valuab...

Page 6: ...the LEVO LCEV Optimal biomechanics in all sitting and standing positions up to 86 Continuous rising in all positions between sitting and standing Manual stand up unit operation on the armrest or by remote control Absolutely safe standing thanks to 6 contact points on the ground Medical and therapeutic benefits by regularly standing as agreed with your specialist Excellent handling characteristics ...

Page 7: ...7 ...

Page 8: ...8 3 EC Declaration of Conformity ...

Page 9: ... LCEV L XL 50 57 Serial No 715895 2014 Serial No 715895 Year of Production 2014 Color platinum Color Platin Max Load Max user 120kg max User Weight 120kg Max gradient Max save slope 11 max save slope unmoved direction downhill 11 Tyre pressure 6 7 5bar Recommended pressure range of pneumatic tires min 6 0 bar 7 5bar Please note that the chair identification is also shown on the warranty card This ...

Page 10: ... so can result in serious injury and or damage to the wheelchair Symbol of a wheelchair which is not used as a seat in a motor vehicle or to transport in a motor vehicle Please contact your retailer about available equipment Symbol of a wheelchair which is equipped and certified as a seat in a motor vehicle or for transportation in a motor vehicle Symbol signalling a danger of trapping body parts ...

Page 11: ...g elevation or descent Especially take care of the sections between the seat and the mainframe to avoid any kind of injury The LEVO LCEV must be driven to level and solid ground before elevating the user to a standing position Caution risk of tipping over The brakes of the LEVO LCEV must be activated before elevating to a standing position Caution risk of tipping over The standing function should ...

Page 12: ...ir should be cleaned and dried frequently The resistance to ignition of materials and assemblies are as follows Plastic parts according to UL 94 V0 Upholstery according to EN 1021 2 Please note that strong electromagnetic fields can cause interference with the control or operation of the standing actuator function Please note that all product safety information can be obtained on our website from ...

Page 13: ...he settings for the wheel diameter The quick release axle enables the user to dismount and remount the rear wheels easily 8 2 Seat inclination The standard pre set angle of inclination is approx 5 to the rear By altering the height of the axle holder it is possible to re set the backrest angle between 2 and 8 to the rear To ensure these alterations do not compromise safety in the standing position...

Page 14: ...ckrest cannot be adjusted in angle 8 6 Armrests Adjust the height of the armrest moving the backrest connector together with the armrest joints along the backrest tubes up or down see photo left The height of the armrests is fully adjustable Take off the backrest upholstery Take off the velcro straps above the armrest joints to adjust the armrests higher or the ones below the armrest joints to adj...

Page 15: ...on as well as for the standing position The footrest is set according to the details given in the original order form and can be adjusted within the limits of those settings Contact your LEVO dealer regarding any adjustments There is a choice of 5 different heights for mounting the footrest The 5 different positions of height to which the footrest can be adjusted Unscrew the four oval head screws ...

Page 16: ...ngle is set as standard at 14 to the floor With the footrest in the lowest possible setting an angle of 4 is the only practicable variation as the footrest otherwise touches the ground before the leg supports which reduces the standing stability With the second lowest setting the only variations are 4 and 14 for the same reasons For all higher footrest settings there are three angle variations pos...

Page 17: ...ased by use of Velcro fasteners and should be as tight as possible Depending on the height of the cushioning it may be necessary to loosen the upholstery to be able to lower the cushioning down between the two seat supports Depending of the seat depth you may need to add or remove one or more Velcro straps When adjusting the seat depth please ensure that the flap of the backrest upholstery covers ...

Page 18: ...ioned positions please do not hesitate to contact your local LEVO dealer Seat depth correct Seat depth too long Seat depth too short Knee support attachment Screw aligned with the center of the knees Knee support attachment screw beyond the centre of the knees Knee support attachment screw behind the centre of the knees Ankle knee hip joint straight Knee joint overstretched Incomplete stretching o...

Page 19: ...shion for pressure relief in seated position Backrest cushion or solid back for more comfort or stability Seat cushion Back cushion Spine physiological Legs straight High pressure Hyper lordosis Seat cushion Pelvis tilt incomplete hip extension Hyper extended spine Back cushion ...

Page 20: ...attendant To insure standing stability and avoid risk the LEVO LCEV must be located on flat and level surfaces with the brakes engaged Be certain to check for objects which would prevent the legrests from reaching the ground simultaneously preventing solid contact Damage may occur if the standing system is operated without a person in the chair The chair is engineered so that the client s weight a...

Page 21: ...1 1 Adjusting the brakes The wheelchair should be unoccupied when dismantling the brakes Secure the wheelchair in such a way as to prevent it moving when the brakes are removed Release the brake as much as possible Release the cylinder screw on the brake itself see figure on the left Adjust the position of the brake and leave a gap of approx 15mm between the brake shaft and the tyre then tighten t...

Page 22: ...standing up Attach the two eyes of the knee support to the double head screws on either side of the wheelchair see figure on the left below Centre the knee support in front of each knee using the Velcro fasteners then pull it until it is sitting firmly in place just below not right on the knee cap and not too tight figure above right 12 2 Chest strap The chest strap holds the upper body in place M...

Page 23: ...23 Note You might need an assistant when adjusting the chest strap It is difficult to adjust on your own Once both the knee support and chest strap are fitted correctly you are ready to stand up ...

Page 24: ...g immediately the moment you release the button the motor shuts off The motor shuts off automatically as soon as you reach the uppermost standing position The leg support will automatically set itself on the ground to provide optimal stability Please note that your wheelchair can be exposed to electromagnetic fields that can cause interference with the control or operation of the standing actuator...

Page 25: ...hair to tip over backwards The situation mentioned above intensifies when using different rear wheel positions to achieve greater seat inclination by too vigorously engaging the drive wheel in the forwards direction or by using a cushion for elevated seating Please note that the weight of personal belongings e g bags can have a major effect on the centre of gravity of your wheel chair which may le...

Page 26: ...lking pace Leaning backward improves stability and increases rear wheel downforce thus also improving braking efficiency 15 3 Climbing obstacles Any obstacle such as a curb or threshold should be viewed as a potential source of danger This is due in part to the very short wheelbase of the wheelchair To climb an obstacle ask an accompanying person for assistance Should you wish to negotiate such an...

Page 27: ... the wheelchair to tip over backwards when attempting to overcome an obstacle Do not hesitate to ask for help at any time 15 4 Activating the Brakes When using the wheelchair in situations where increased stability is particularly important the brakes must be activated This is especially important when standing up transferring into your wheelchair or when you want to transfer yourself from the whe...

Page 28: ...g backwards It is also advisable to draw as near as possible to the object before attempting to pick it up 15 6 Transfer sideways Drive as close as possible to the object you wish to transfer to Make sure that the brakes of the wheelchair are tightened Flip up the footrest of the wheelchair and put your feet on the ground Lift the armrest on the side you are transferring to Transfer yourself in yo...

Page 29: ... 7 kg 1x ca 1 0 kg 1 battery control unit 1x ca 2 5 kg 1x ca 2 5 kg Please take care not to trap any clothing or parts of the body in the joints of the wheelchair as you are folding the backrest You should only occupy the wheelchair once it has been fully reassembled with all detachable components securely fixed in place Always make sure that the rear wheels have been securely fixed and cannot get...

Page 30: ...owing correct equipment is installed and restraints for fixation are ready for use The chair has to be equipped and reinforced with the Tie down transportation kit 32 070 050x that can be ordered at LEVO AG through your LEVO distributor The chair has to be secured by using solely a restraint system which has been tested and passed the ISO 10542 2 standards The occupant has to be safely secured by ...

Page 31: ...s may damage the charge cycle To recharge the batteries unplug the control cable from the armrest and plug the charger plug from the charger into the control cable and the charger into the mains see figure below Remote control optional To recharge the batteries plug the charger plug from the charger into the side of the control panel and the charger itself into the mains see figure on the right be...

Page 32: ...and re mount the rear wheels of your LEVO LCEV quickly thus reducing significantly the volume and weight of the wheelchair When removing a wheel the wheelchair must be unoccupied The wheelchair should be supported in a way that it cannot tip over nor roll away after removing the wheel Press the release button in the center of the wheel then pull off or re mount the wheel Having mounted the wheel p...

Page 33: ... a threshold low level an acoustic signal will sound during operation Please immediately go into sitting position and charge the batteries immediately to full power Check the control switch or remote control every day to assure the operation moves the actuator without any delay In case of irregularities please go into sitting position and notify your dealer Check the tire pressure every week If ne...

Page 34: ... For your chair the dealer should provide a service card in which all details of necessary maintaining or repairs are noted The following general functional check should be made before and after maintenance Function of the armrest switch or remote control and cabling Function of actuator and gas springs Function of the charging unit green LED light Braking effect when driving uphill Inclination 8 ...

Page 35: ...t picture below left To remove the bolts press the button in the centre of the bolt and pull out of the backrest joint on either side Fold down the backrest forward picture right 20 2 Storage for more than 4 months The LEVO LCEV is essentially maintenance free and the user must only pay attention to keeping it clean If the wheelchair is stored for more than 4 months or exceeds the recommended main...

Page 36: ...on 15 15 Break effectiveness uphill 8 Break effectiveness downhill 11 Seat plane angle 0 8 Effective seat depth 290 mm 540 mm Effective seat width 350 mm 500 mm Seat surface height at front edge 480 mm 570 mm Backrest angle 0 8 Backrest height 310 mm 560 mm Footrest to seat distance 360 mm 560 mm Leg to seat surface angle 80 100 Armrest to seat distance 140 mm 220 mm Main wheel diameter 560 mm 22 ...

Page 37: ...lso be necessary Wheelchair tips over backwards too easily Have a technician check and if need be adjust the rear wheel axle mounting front fork mounting etc Attach anti tip rollers see accessories Brakes don t brake effectively Have a technician check the inflation and wear of the rear wheels and adjust the brake mounts as necessary 23 2 Stand up mechanism Fault Rectification Mechanism works only...

Page 38: ...anagement Version Nr Date Description Release 1 0 2020 03 12 Documents separated JC 1 1 2021 01 27 Updated for EU 745 2017 JC 1 2 2021 05 20 MDR Adjustments HB 1 3 2021 06 30 EU Single Registration Number SRN H Bögli ...

Reviews: