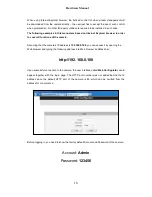
LevelOne FCS-5053 User Manual Download Page 17


Hardware Manual 


17 

Access the Camera 

Now that the camera and the PC are both having their unique IP addresses and are under the 

same network segment, it is possible to use the Web browser of the PC to access the camera. 


You can use 

any of the browsers

 to access the camera, however, the full functionality is 

provided only for 

Microsoft Internet Explorer


The browser functionality comparison: 


Functionality 

Internet Explorer 

Other browsers 

Live Video 

Yes 

Yes

*


Live Video Area Resizable 

Yes 

No 

PTZ Control 

Yes 

Yes 

Capture the snapshot 

Yes 

Yes 

Video  overlay  based  configuration  (Motion 

Detection regions, Privacy Mask regions) 

Yes 

No 

All the other configurations 

Yes 

Yes 


When  using  non-Internet  Explorer  browsers,  free  third-party  software  plug-ins  must  be 

installed  to  the  PC  first  to  be  able  to  get  the  live  video  feed  from  the  camera.  Check  the 

firmware version of the camera to determine which plug-in is necessary: 

Firwmware Version 

Required Plug-In 

CFA-V6.

04

.xx-xx or older 

Basic VLC Media Player (

http://www.videolan.org

CFA-V6.

05

.xx-xx or newer 

QuickTime (

http://www.apple.com/quicktime/download/


The  camera  firmware  version  can  be  found  on  the 

FW  Version

  column  of  the  IP  utility  or 

access the 

Setup

 page of the Web Configurator (see page 19). 


Disclaimer  Notice:

  The  camera  manufacturer  does  not  guarantee  the  compatibility  of  its 

cameras  with  VLC  player  or  QuickTime 

–  since  these  are  third  party  softwares.  The  third 

parties have the right to modify their utility any time which might affect the compatibility. In such 

cases, please use Internet Explorer browser instead. 


Summary of Contents for FCS-5053

Page 1: ...Fixed Network Camera Hardware User Manual FCS 5053 Ver 2013 12 24...

Page 2: ...Camera 8 Using the Bundled Bracket 8 Basic Connections 11 Connecting a Single Camera 11 Connecting Multiple Cameras 12 Accessing the Camera 13 Configure the IP Addresses 13 Using DHCP Server to Assig...

Page 3: ...to service this video device yourself as opening or removing covers may expose you to dangerous voltage or other hazards Refer all servicing to qualified service personnel Trademarks All names used i...

Page 4: ...the equipment off and on the user is encouraged to try to correct the interference by one or more of the following measures Reorient or relocate the receiving antenna Increase the separation between t...

Page 5: ...onnel Damage Requiring service Disconnect this video product from the power supply immediately and refer servicing to qualified service personnel under the following conditions 1 When the power supply...

Page 6: ...are manual contains the following models FCS 5053 Fixed Network Camera 3 Megapixel Outdoor PoE 802 3af Day Night IR LEDs Package Contents Camera Sunshield Lens Focus Tuner Hexagon Screw Kit Sunshield...

Page 7: ...et Port Connects to the network and power source See Basic Connections on page 11 for more instructions 2 Reset Button Press and hold the Reset button for 5 seconds to reset the camera to its default...

Page 8: ...the three 3 screw holes using the bracket plate included in the package NOTE Depending on the surface where you will install the camera it may be necessary to drill the holes and use the supplied scre...

Page 9: ...of the two 2 holes on top of the camera to mount the bracket to the ceiling First remove the pre installed screw nut using a wrench not included in the package Below is an example of this type of inst...

Page 10: ...T5 CAT5e CAT6 ordinary Ethernet cables are only designed for indoor use and may deteriorate quickly when exposed to outdoor elements Exterior grade Ethernet cables are waterproof and do not require a...

Page 11: ...a using one Ethernet cable Follow the procedures below 1 Connect the camera to the PoE injector using an Ethernet cable 2 Connect the PoE injector to the network and an AC power source 3 Connect a PC...

Page 12: ...network and an AC power source 3 Connect a PC to the same network Network AC Power Source PoE Switch Power Cable Ethernet Cable Ethernet Cable Data Cameras Ethernet Cables Data Power 4 After making t...

Page 13: ...er running then you do not need to configure the IP addresses at all both the camera and the PC would request a unique IP address from DHCP server automatically In such case the camera will immediatel...

Page 14: ...are tool that can not only discover the cameras but also list lots of valuable information such as IP and MAC addresses serial numbers firmware versions etc and allows quick configuration of multiple...

Page 15: ...nd it does not detect any DHCP services it will automatically assign itself a default IP 192 168 0 100 Whereas the default port number would be 80 In order to access that camera the IP address of the...

Page 16: ...ty With the procedure shown above all the cameras will have unique IP addresses starting from 192 168 0 101 In case there are 20 cameras selected the last one of the cameras would have the IP 192 168...

Page 17: ...nternet Explorer browsers free third party software plug ins must be installed to the PC first to be able to get the live video feed from the camera Check the firmware version of the camera to determi...

Page 18: ...f the camera Assuming that the camera s IP address is 192 168 0 100 you can access it by opening the Web browser and typing the following address into Web browser s address bar http 192 168 0 100 Upon...

Page 19: ...Hardware Manual 19 To check the firmware version through the Web Configurator access the Setup page and click System System Info For further operations please refer to the Firmware User Manual 1 2 3...

Page 20: ...nt Cover with Sticker Design 3 Front Cover with Tabs Detach the front cover using an adhesive tape or a suction cup not included in the package Pull the plastic tab to detach the front cover Use plier...

Page 21: ...s based on the live view of the camera see Accessing the Camera on page 13 to view the camera 5 When done attach the front cover and the front cover ring CAUTION The front cover and front cover ring m...

Page 22: ...installed outdoors attach the sunshield to protect the lens from all types of weather and lighting conditions 1 Loosely secure the supplied screws and washers to attach the sunshield 2 Slide to adjust...

Page 23: ...r NOTE A cable is connected inside the camera do not abruptly pull the back cover 2 Press and hold the Reset button for 5 seconds to reset the camera 3 When done ensure the rubber seal is aligned and...

Reviews: