54
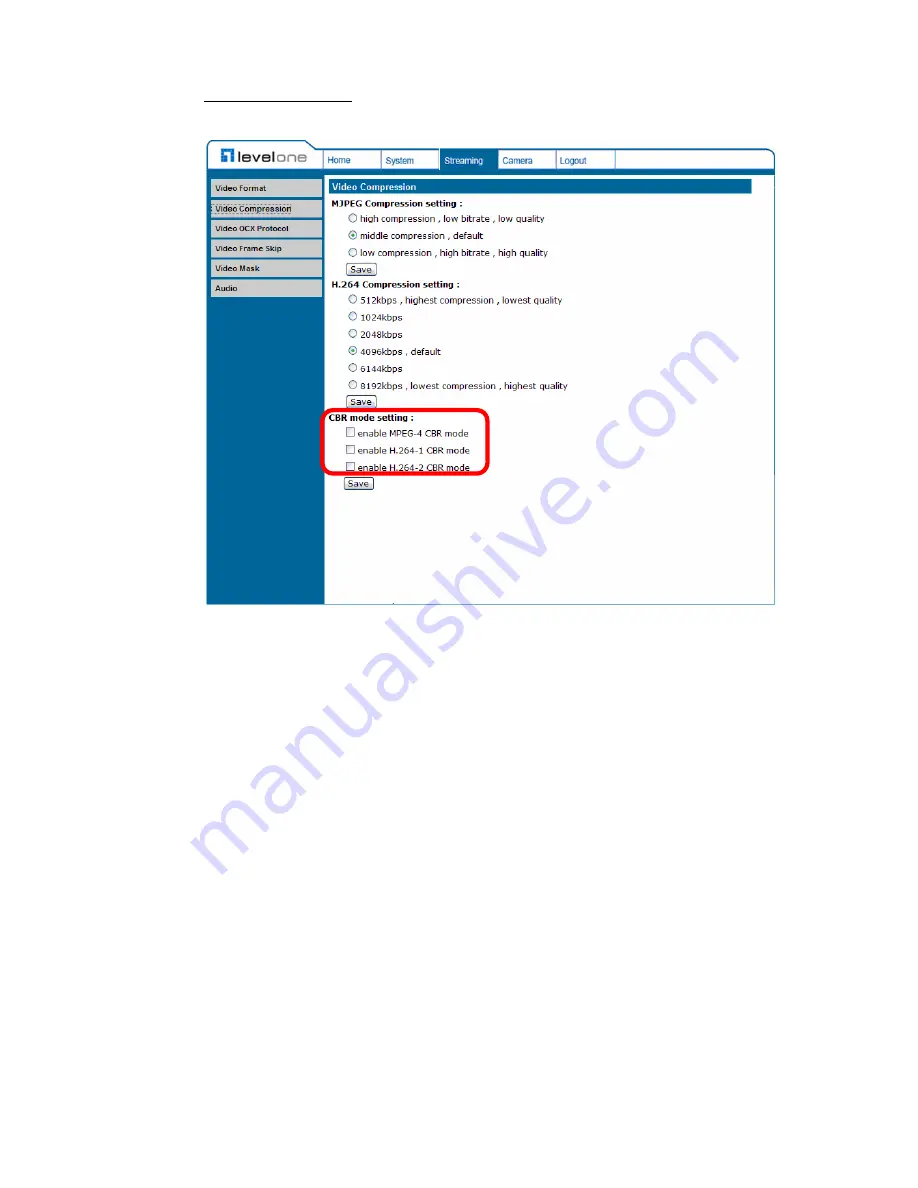
CBR Mode Setting
The CBR (Constant Bit Rate) mode could be the preferred bit rage mode if the
bandwidth available is limited. It is important to take account of image quality
while choosing to use CBR mode.
Page 1: ...FCS 3071 2 Megapixel PoE Dome Network Camera User Manual Ver1 3...
Page 2: ...0 4 3 2 Security 21 4 3 3 Network 24 4 3 4 DDNS 29 4 3 5 Mail 30 4 3 6 FTP 31 4 3 7 Motion Detection 32 4 3 8 Storage Management 36 4 3 9 Recording 38 4 3 10 File Location 39 4 3 11 View Log File 40 4...
Page 3: ...t Setting 62 4 5 6 Saturation Setting 62 4 5 7 Hue Setting 63 4 5 8 TV System Setup 63 4 6 Logout 64 Appendix A Technical Specifications 65 Appendix B Internet Security Settings 67 Appendix C DC Viewe...
Page 4: ...ating in railway vehicles the FCS 3071 is an economical mobile surveillance solution with high reliability and rugged performance The FCS 3071 utilizes PoE Power over Ethernet allowing it to be operat...
Page 5: ...g Rubber Washers 3 Baseplate Rugged Camera only Security Torx Quick Guide CD 1 3 Camera Overview Designation Description 1 Reset Button Restore to default setting press the button with a proper tool 2...
Page 6: ...5 Dimensions...
Page 7: ...tium R M 2 16 GHz or Intel R CoreTM 2 Duo 2 0 GHz 2 2 GB RAM or more Operating System Windows VISTA or Windows XP Web Browser Microsoft Internet Explorer 6 0 or later Network Card 10Base T 10 Mbps or...
Page 8: ...Search Step 3 Click Device Search again and all the finding IP devices will be listed in the page as shown in the figure below The IP Camera s default IP address is 192 168 0 250 Step 4 Double click...
Page 9: ...TE ID and password are case sensitive NOTE It is strongly advised that administrator s password be altered for the security concerns Refer to section 5 3 2 Security for further details Additionally us...
Page 10: ...g device list click on the IP Camera that you would like to change its network property On the selected item right click and select Network Setup Meanwhile record the IP Camera s MAC address for futur...
Page 11: ...ice Search button to search all the devices Then select the IP Camera with the correct MAC address Double click on the IP Camera and the login window will come out Step 5 Enter User name and Password...
Page 12: ...us monitoring and video recording for multiple Network Cameras Please install the recording software then launch the program to add the Network Camera to the Channel list For detailed information abou...
Page 13: ...y Settings to continue the process The Information Bar just below the URL bar may come out and ask for permission to install the ActiveX Control for displaying video in browser see the figure below Ri...
Page 14: ...era and authorize user s access to the camera User refers to whoever has access to the camera with limited authority i e entering Home and Camera setting pages Image and Focus Adjustment The image dis...
Page 15: ...14 Step 2 Loosen the focus fixed screw and rotate the lens counter clockwise to adjust focus loosen the tilt fixed screw and adjust the camera s tilt angle...
Page 16: ...In this chapter information about main page introduction system related settings and camera settings will be described in detail For further information about CMS software please refer to IP CamSecure...
Page 17: ...ated settings etc Further details will be interpreted in section System Related Settings Streaming setting The administrator can modify video resolution and rotate type and select audio compression mo...
Page 18: ...ary depending on the camera model Screen Size Adjustment Image display size can be adjusted to x1 2 and full screen Digital Zoom Control In the full screen mode users can implement digital PTZ by rota...
Page 19: ...on for further details Video Streaming Pause Restart button pause restart Press the stop button to disable video streaming the live video will be displayed as black Press the restart button to show th...
Page 20: ...Settings The figure below shows all categories under the System tab Each category in the left column will be explained in the following sections NOTE The System configuration page is only accessible...
Page 21: ...entered here will display in the alarm message Time Zone Select the time zone you are in from the drop down menu Enable Daylight Saving Time To enable DST please check the item and then specify time...
Page 22: ...d Then select an update interval from the drop down menu For further information about NTP please see the web site www ntp org 4 3 2 Security Click the category Security and the page is shown as the f...
Page 23: ...lows the appointed User to change camera parameters on the Camera Setting page Talk Listen Talk and Listen functions allow the appointed user in the local site PC site communicating with for instance...
Page 24: ...23...
Page 25: ...matically DHCP The camera s default setting is Use fixed IP address Please refer to the previous section Accessing Camera for logging in with the default IP address If select Get IP address automatica...
Page 26: ...ank and change the setting ex 192 168 7 254 Press Save to confirm the new setting When using static IP address to login to the IP Camera users can access it either through Device Search software see A...
Page 27: ...on the Save button to complete the setting Advanced Web Server port The default web server port is 80 Once the port is changed the user must be notified the change for the connection to be successful...
Page 28: ...nP Setting Enable UPnP When the UPnP is enable whenever the IP Camera is presented to the LAN the icon of the connected IP Cameras will appear in My Network Places to allow for direct access as shown...
Page 29: ...for UPnP component installation procedure Enable UPnP port forwarding When the UPnP port forwarding is enabled the IP Camera is allowed to open the web server port on the router automatically NOTE To...
Page 30: ...e using a dynamic IP address to be associated to a static domain name so others can connect to it by name Enable DDNS Check the item to enable DDNS Provider Select one DDNS host from the provider list...
Page 31: ...r sending e mail messages between servers SMTP is a relatively simple text based protocol where one or more recipients of a message are specified and the message text is transferred The configuration...
Page 32: ...File Transfer Protocol FTP site when motion is detected Users can assign alarm message to up to two FTP sites The FTP setting page is shown below Enter the FTP details which include server server por...
Page 33: ...The Motion Detection Window is for defining the motion detection area To change the size of the Motion Detection Window move the mouse cursor to the edge of the frame and draw it outward inward Movin...
Page 34: ...Detection You will be able to turn on off Motion Detection in System section Default setting is Off Motion Detection Setting Users could adjust various parameters of Motion Detection in this section S...
Page 35: ...predefined type of alarm output to enable alarm relay output when motion is detected NOTE This option is excluded in the Compact IP Dome Camera Record stream to SD Card Select this item and the Motion...
Page 36: ...ted event images will be sent to the appointed e mail address NOTE Make sure SMTP or FTP configuration has been completed See section Mail and FTP for further details File Name The uploaded image s fi...
Page 37: ...ding starts Device information When users insert the Micro SD SDHC card the card information such as the memory capacity and status will be shown at Device Information section Device setting Press the...
Page 38: ...name and date order NOTE The capital letter A M R appears in the very beginning of name denotes the sort of the recording A stands for Alarm M stands for Motion R stands for regular recording Download...
Page 39: ...Recording Two types of schedule mode are offered Always and Time Frame setting Users can setup the time frame to fit the recording schedule or choose Always to activate Micro SD SDHC Card Recording al...
Page 40: ...napshots and live video recording The default setting is C Once confirm the setting press Save and all the snapshots and recording will be saved in the designate location NOTE Please make sure the sel...
Page 41: ...40 4 3 11 View Log File Click on the link to view the system log file The content of the file provides useful information about configuration and connections after system boot up...
Page 42: ...login information and privileges see Security View User Login Information All the users in the network will be listed in the User information zone as shown below As the figure below shows User root I...
Page 43: ...he page and the Administrator can view each user s privileges As the figure above shows User 1 1 0 1 1 1 0 1 I O access Camera control Talk Listen see Security Therefore it denotes the user is granted...
Page 44: ...43 4 3 13 View Parameters Click on this item to view the entire system s parameter setting...
Page 45: ...P Camera to factory default setting if needed Set Default Click on the Set Default button to recall the factory default settings Then the system will restart in 30 seconds NOTE The IP address will be...
Page 46: ...45 4 3 15 Software Version The current software version is displayed in the software version page which is shown as the figure below...
Page 47: ...Software upgrade can be carried out in the Software Upgrade page as shown below NOTE Make sure the upgrade software file is available before carrying out software upgrade The procedure of software upg...
Page 48: ...Step 2 Pull down the upgrade binary file list and select the file you want to upgrade in this case select userland jffs2 Step 3 Press Upgrade The system will first check whether the upgrade file exis...
Page 49: ...rowser Step 5 Click Control Panel and then double click Add or Remove Programs In the Currently install programs list select DCViewer and click the button Remove to uninstall the existing DC Viewer St...
Page 50: ...ng configuration file to the IP Camera Export Users can save the system settings by exporting the configuration file bin to a specified location for future use Press the Export button and the popup Fi...
Page 51: ...Press the tab Streaming in the top of the page and the configurable video and audio items will display in the left column In Streaming the Administrator can configure specific video resolution video c...
Page 52: ...select the items to display data including date time text on the live video pane The maximum length of the string is 20 alphanumeric characters Click Save to confirm the Text Overlay setting Video Rot...
Page 53: ...tated horizontally 180 Degree Selecting 180 Degree will make the image 180 counter clockwise inversed Click Save to confirm the setting GOV Settings Users can set the GOV length to determine the frame...
Page 54: ...lect a proper MJPEG H 264 compression mode in the video compression page see the figure below depending on the application Users can also decide whether to display compression information on the Home...
Page 55: ...CBR Mode Setting The CBR Constant Bit Rate mode could be the preferred bit rage mode if the bandwidth available is limited It is important to take account of image quality while choosing to use CBR mo...
Page 56: ...working users can select the Multicast mode The page is shown as follows Video OCX protocol setting options include RTP over UDP RTP over RTSP TCP RTSP over HTTP MJPEG over HTTP Select a mode accordin...
Page 57: ...if necessary The setting page is shown as below Video Frame Skip options include No skipping default Frame skipping at 5 frame internal Frame skipping at 10 frame internal Frame skipping to 15 frame i...
Page 58: ...pane at the right side Use the mouse to drag and drop to adjust the mask s size and place it on the target zone NOTE It is suggested to set the Video Mask twice bigger than the object Cancel a Mask Un...
Page 59: ...ansparent 4 4 6 Audio Mode and Bit Rate Settings The audio setting page is show as below In the Audio page the Administrator can select one transmission mode and audio bit rate Transmission Mode Simpl...
Page 60: ...24 kbps G 726 32 kbps G 726 40 kbps G 726 uLAW G 711 and ALAW G 711 Both uLAW and ALAW signify 64 kbps but in different compression formats Higher bit rate will let higher audio quality and require bi...
Page 61: ...fied as follows Full Auto Mode In this mode the camera s Shutter Speed IRIS and AGC Auto Gain Control control circuits work together automatically to get consistent video output level The shutter spee...
Page 62: ...00 Household Lighting 2 500 to 3 000 75 watt Bulb 2 820 Candle Flame 1 200 to 1 500 Auto Mode The Auto Balance White mode is suitable for environment with light source having color temperature in the...
Page 63: ...ing the sharpness level can make the image looked sharper especially enhance the object s edge Press SET to confirm the new setting 4 5 5 Contrast Setting Camera image contrast level is adjustable ple...
Page 64: ...7 Hue Setting Camera image hue level is adjustable please select ranging from 12 to 13 Press SET to confirm the new setting 4 5 8 TV System Setup Select the video format that matches the present TV s...
Page 65: ...64 4 6 Logout Press the tab Logout in the top of the page and the login window will pop up This enables login with another user name...
Page 66: ...Full HD 15 fps Brightness Manual Exposure Auto Manual Sharpness Manual Contrast Manual White Balance Auto Manual Saturation Manual Hue Manual Digital Zoom Support Motion detection On Off Privacy Mask...
Page 67: ...66 Power Source PoE Power Consumption 3 8W Regulatory CE FCC RoHS Compliant Dimension 117 x 50 mm 4 6 x 2 0 Inches Weight 180 g 0 40 lbs...
Page 68: ...her set Internet security level to default or change ActiveX controls and plug ins settings Internet Security Level Default Step 1 Start the Internet Explorer IE Step 2 Select Tools from the main menu...
Page 69: ...rowser window and open a new one later when accessing the IP Camera ActiveX Controls and Plug ins Settings Step 1 3 Refer to the previous section above Step 4 Down the page press Custom Level see the...
Page 70: ...nload signed ActiveX controls 4 Download using ActiveX controls 5 Initialize and script ActiveX not marked as safe 6 Run ActiveX controls and plug ins 7 Script ActiveX controls marked safe for scripti...
Page 71: ...Procedure The procedure of DC Viewer software download is specified as follows Step 1 In the DC Viewer installation page click Next for starting installing Step 2 Setup starts Please wait for a while...
Page 72: ...1 Step 3 Click Finish to close the DC Viewer installation page Then the IP Camera s Home page will display as follows NOTE Please note that the function buttons will vary depending on the camera model...
Page 73: ...ts Please follow the instructions below to install UPnP components Step 1 Go to Start click on Control Panel and then double click Add or Remove Programs Step 2 Click on Add Remove Windows Components...
Page 74: ...elect Networking Services from the Components list in the Windows Components Wizard window and then click Details Step 4 Select UPnP User Interface in the Networking Services subcomponents list and th...
Page 75: ...74 Step 5 Click Next in the Windows Components Wizard page Step 6 Click Finish to complete installation...