LevelOne FCS-1150 User Manual Download Page 12

  Hardware Manual 

12 


Connecting the DI/DO and Audio Devices (Optional) 

Depending on your surveillance needs, you may connect digital input / output or audio input / 

output devices to your camera. The camera comes with one (1) terminal block for both digital and 

audio input/output devices. 


How to Connect DI/DO Devices 

Digital Input (DI) devices can be used to notify the camera about an activity in the camera site. DI 

can be triggers of events. For example, you can connect a “panic button” to the camera; as such 

when the panic button is pressed, the alarm signal will be sent through the camera. Other 

common DI device applications are emergency button, smoke detector, passive infrared sensor, 

etc. 

Digital Output (DO) devices are external devices that are activated by the camera upon an event 

inside the camera. For example, you can connect an “alarm horn” to the camera; as such when 

an event occurs inside the camera (e.g. detected intruder), the alarm horn will sound. Other 

common DO device applications are motion-triggered lights, electric fence, magnetic door locks, 

etc. 


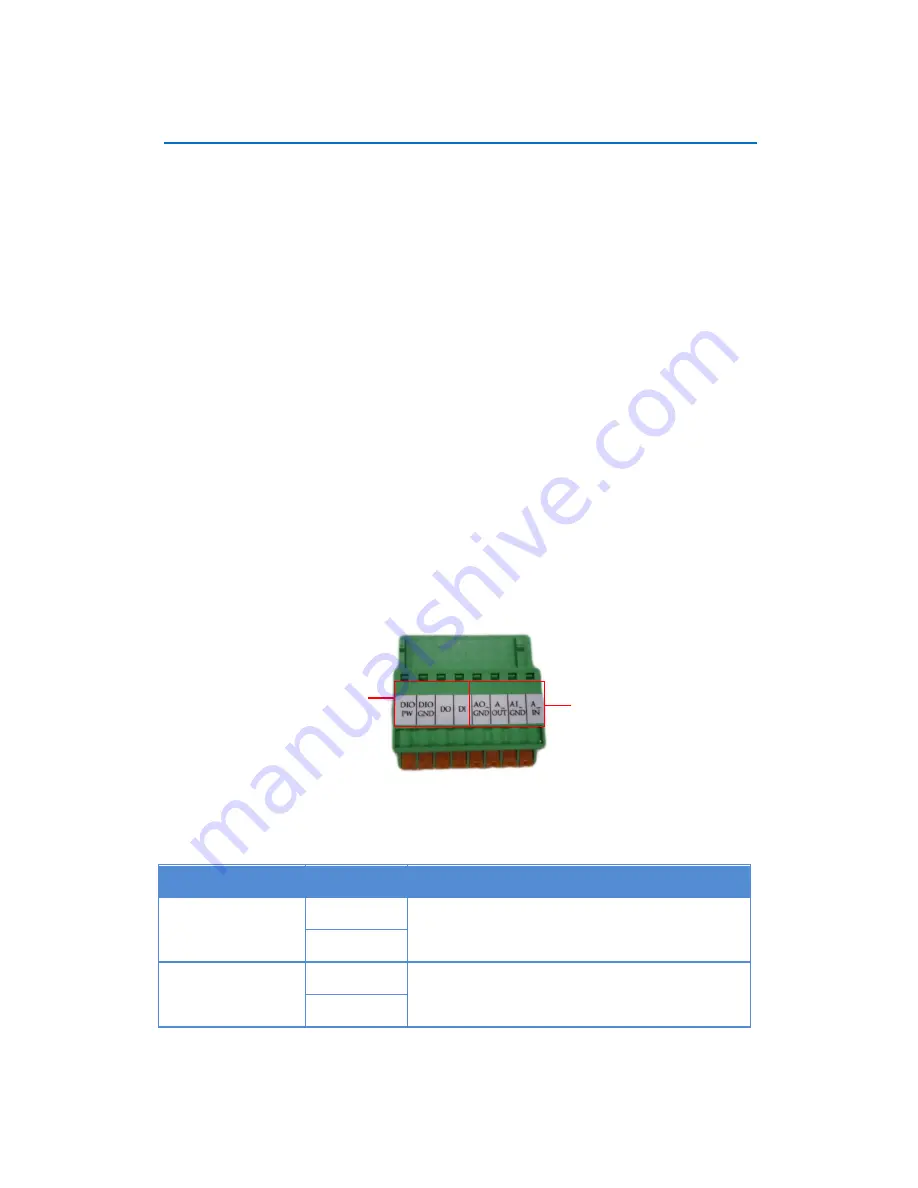
Press and hold the orange tab as you insert the wire through the pin slot, then release the orange 

tab to secure the wire. 


To connect digital input / output devices (DI/DO), map the pins to one of the pin combinations 

below: 


Device 

Pin 

Mapping Instructions 

Digital Output (DO) 

DIO PW 

Connect the wires of the output device to 

DIO


PW


and 

DO

DO 

Digital Input (DI) 

DIO GND 

Connect the wires of the input device to 

DIO


GND


and 

DI

DI 


For Audio Use 

For DI/DO Use 

Summary of Contents for FCS-1150

Page 1: ...Zoom Network Camera Hardware User Manual FCS 1150 FCS 1160 Ver 2014 05 27...

Page 2: ...Audio Devices Optional 12 How to Connect DI DO Devices 12 How to Connect Audio Devices 15 Connecting a Serial Device Optional 16 Indoor Installation Procedures 18 Step 1 Mount the Indoor Bracket 18 St...

Page 3: ...Hardware Manual 3 Accessing the Camera 24 Configure the IPAddresses 24 Access the Camera 27...

Page 4: ...to service this video device yourself as opening or removing covers may expose you to dangerous voltage or other hazards Refer all servicing to qualified service personnel Trademarks All names used i...

Page 5: ...the equipment off and on the user is encouraged to try to correct the interference by one or more of the following measures Reorient or relocate the receiving antenna Increase the separation between t...

Page 6: ...rsonnel under the following conditions 1 When the power supply cord or plug is damaged 2 If liquid has been spilled or objects have fallen into the video product 3 If the inner parts of video product...

Page 7: ...802 3af Day Night 12x WDR FCS 1150 Zoom Network Camera 3 Megapixel PoE 802 3af Day Night 12x WDR From the installation perspective these models are very similar therefore one manual is used for all of...

Page 8: ...event triggering alarm notifications etc See Connecting the DI DO and Audio Devices Optional on page 12 for more information 3 DC 12V Power Input In case the camera is connected to a non PoE Power ove...

Page 9: ...off 5 Power LED The Power LED turns on when the camera is powered on and the system is running 6 Ethernet Port Connects to a network using a standard Ethernet cable 7 Serial Port This port connects t...

Page 10: ...hese devices however is optional Connecting a Power Adapter Optional In case of using a non PoE switch or your PoE switch has limited power supply you can purchase a power adapter and directly connect...

Page 11: ...other to the GND pin 4 Tighten the screws of the 12V pin and the GND pins to secure the wire connection 5 Set the prepared power adapter for connection later Below is an example of a power adapter wi...

Page 12: ...ctor passive infrared sensor etc Digital Output DO devices are external devices that are activated by the camera upon an event inside the camera For example you can connect an alarm horn to the camera...

Page 13: ...Transistor Open Collector Voltage Current 24V DC 50mA Typical Connection Based on these specifications if the DI device has a voltage of 0V 30V or the DO device has a voltage of 24V 50mA then the cam...

Page 14: ...ate relay please refer to its specifications and make sure they match the above design The triggering circuit voltage has to be around 12V DC and the switch controlled circuit voltage has to match the...

Page 15: ...ange tab to secure the wire To connect audio devices map the pins to one of the pin combinations below Device Pin Mapping Instructions Audio Output AO AO_GND Connect the wires of the audio output devi...

Page 16: ...your camera using the supplied terminal block according to one of the tables below Via RS 485 Connection Terminal Block Wire Mapping Pin Number Label Camera Pin PT Scanner Pin 1 TX TX TX 2 TX TX TX 3...

Page 17: ...LAIMER The manufacturer will not be responsible for any damage caused by improper wiring 2 Connect a ground wire to one of the GND terminal pin to complete the connection For more information on conne...

Page 18: ...stallation guide included in the bracket to install the camera NOTE Some pictures in this documentation may slightly differ from the actual camera or accessories Step 1 Mount the Indoor Bracket NOTE B...

Page 19: ...ocedures apply when attaching the mounting bracket on the top side 1 If necessary insert a memory card into the memory card slot of the camera with the metal contacts facing down Push until the card c...

Page 20: ...Hardware Manual 20 4 Tighten the hand knob until the camera is secured to the bracket 5 Adjust the camera angle 6 Tighten the knurled knob to fix the camera position...

Page 21: ...pter to the camera See Before Installation on page 10 for more information 3 Connect the other end of the network cable to a switch or injector Then connect the switch or injector to a network PC and...

Page 22: ...Hardware Manual 22 Step 4 Access the Camera Live View See Accessing the Camera on page 24 for more information on how to access the Live View of the camera...

Page 23: ...emory Card Insert a memory card into the card slot with the metallic contacts facing down the camera Push the card until it clicks into place How to Remove the Memory Card In case there is a need to r...

Page 24: ...er running then you do not need to configure the IP addresses at all both the camera and the PC would request a unique IP address from DHCP server automatically In such case the camera will immediatel...

Page 25: ...at can not only discover the cameras but also list lots of valuable information such as IP and MAC addresses serial numbers firmware versions etc and allows quick configuration of multiple devices at...

Page 26: ...and it does not detect any DHCP services it will automatically assign itself a default IP 192 168 0 100 Whereas the default port number would be 80 In order to access that camera the IP address of the...

Page 27: ...ed the last one of the cameras would have the IP 192 168 0 120 Later by pressing the Refresh button of the IP Utility you will be able to see the list of cameras with their new IP addresses Please not...

Page 28: ...Required Plug In Safari QuickTime http www apple com quicktime download Other non Internet Explorer browsers Basic VLC Media Player http www videolan org Disclaimer Notice The camera manufacturer doe...

Page 29: ...g address into Web browser s address bar http 192 168 0 100 Upon successful connection to the camera the user interface called Web Configurator would appear together with the login page The HTTP port...

Page 30: ...Hardware Manual 30 To check the firmware version through the Web Configurator access the Setup page and click System System Info For further operations please refer to the Firmware User Manual 1 2 3...

Reviews: