Letus 35 Elite User Manual Download Page 7

Letus35 Elite User Guide

5

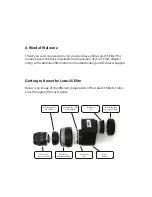
Attaching The Lens Mount And Lens :

E.  

Using the Allen Wrench Tool included with 

1. 

your package, loosen the three (3) screws 

located  at  the  very  front  of  your  Letus35 

Elite 35mm DOF Adapter.

Insert the lens mount into the front tube 

2. 

of the unit.  Make sure to seat the mount 

flush against the tube.

Tighten the three (3) set screws to firmly 

3. 

lock the Lens Mount in place.

Now, attach the appropriate Lens to your 

4. 

Lens Mount.

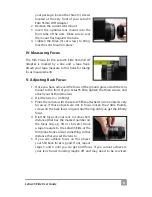
Powering Up The Letus35 Elite:

F.  

Open the battery cover located on the side 

1. 

of  your Letus35 Elite 35mm DOF Adapter.

Insert 2 New AA Batteries.

2. 

Replace the Battery Cover.

3. 

Turn  on  the  Letus35  Elite  35mm  DOF 

4. 

Adapter  by  pressing  the  red  LED  button 

on the back.  When in operating mode, the 

LED will glow Red.

Happy Shooting:

G.  

You may want to readjust white balance for 


»

your camera according to taste.  Do so by 

following normal operations for your cam-

era to manually white balance.

Happy Shooting!    


»

Changing The Lens Mounts: 

III.  

The Letus35 Elite 35mm DOF adapter will allow you 

to use different lens types for your project. Each 

lens type will require a unique lens mount. Here 

are the steps to swap in/out the lens mounts:

Using the Allen Wrench tool included with 

1. 

Summary of Contents for 35 Elite

Page 1: ......

Page 2: ...ional information on Troubleshooting and Technical Support 35mm Lens user provided Back Focus Adjustment Ring Condenser Lens Prism Casing Interchangeable Lens Mount Ground Glass GG GG Holder Achromat...

Page 3: ...Connecting The Letus35 Elite To The Camera E 3 Aligning The Adapter F 3 Focusing The Camera Lens To The Ground Glass G 4 Attaching The Lens Mount And Lens H 5 Powering Up The Letus35 Elite I 5 Happy S...

Page 4: ...X 200 kit etc Allen wrench Optional Accessories B Support Bracket Rod Support System this system includes the support bracket Rod Extensions Custom case Additional lens mounts for different types of l...

Page 5: ...r with LED Easy alignment Fully Enclosed batteries secured by tough magnets for ease of replace ment in the field Extreme Durability Professional Look Casing milled from Solid Alumi num and finished i...

Page 6: ...s D Point the adapter Without a Lens at 1 tached toward a well illuminated surface white wall sheet of paper and by using your Camera s IRIS ADJUSMENT or DIAL until the Ground Glass GG Grain Pattern a...

Page 7: ...r located on the side 1 of your Letus35 Elite 35mm DOF Adapter Insert 2 New AA Batteries 2 Replace the Battery Cover 3 Turn on the Letus35 Elite 35mm DOF 4 Adapter by pressing the red LED button on th...

Page 8: ...e lens 1 mount to the front of your Letus35 Elite tighten the three screws and attach your SLR cinema lens Dial the lens to infinity 2 Point the camera with the Letus35 Elite attached to some objects...

Page 9: ...the tube back on If not continue to step 3 Clean the top surface of the condenser 3 the glass right below the ground glass If the speck goes away you are done clean ing put the tube back on If not con...

Page 10: ...ched to the battery compartment Lift the prism up by using the index finger 11 and the thumb Clean the prism with lens cleaning solu 12 tion and put it back Put the rubber wedge back 13 Put the enclos...

Page 11: ...anship defects and to perform its function in accord with Letus Corporation specifications for a period of thirty 30 days from its date of shipment or its original remaining Warranty period whichever...

Page 12: ...the 30 day pe riod will not be credited and will only be returned to the customer at the customer s expense All returns must be shipped freight prepaid with the RMA number displayed on the outside of...

Page 13: ...Letus35 Elite User Guide 11 Notes IX...

Page 14: ...Letus35 Elite User Guide 12...

Page 15: ...Focusing Aid...

Page 16: ...Copyright 2008 Letus Corporation Letus35 Elite User Guide version 1 0 0...

Reviews: