- 5 -
Emptying the waste collector
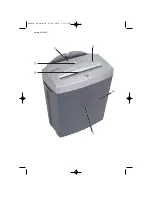
The waste collector
has a capacity
of 17 Liters.
• Remove the plug from the wall socket.
• Empty the waste collector
at regular
intervals. At the latest when the
viewing window
of the waste
collector
is blocked by shredded
material.
• Remove paper waste from the waste
collector
before you start to shred
CD’s or credit cards.
• Dispose of the waste material in an
environmentally responsible manner.
Notice regarding overheating of the
appliance:
The appliance will switch off automati-
cally if it overheats.
• In these cases, remove the power plug
from the socket.
• Empty the waste collector if the
shredded material accumulated to
block the viewing window
• Permit the appliance to cool down.
• Replace the power plug into the socket.
• Switch the appliance on, in that
you push the switch
into the
position
(ON/AUTO).
Technical Data
Mains voltage:
220-240V ~ 50Hz
Rated current:
1,45 A
Protection class:
II
Continuous
operating time:
3 Minutes
Shredding method: Crosscut,
4x23mm particles
Working width:
225 mm
Collection bin:
17 Litres
Depth of slot complies with DIN EN 294
Cleaning
Danger! Always remove the power
plug before cleaning the appliance.
• Empty the waste collector
regularly.
At the latest when the viewing win-
dow
of the waste collector
is
blocked by shredded material.
• Clean the cutting head
and the
waste collector
with a lightly moi-
stened cloth and, if appropriate, with
a mild detergent.
• Remove any residual materials in the
cutter openings
+
with a suitable
object. Always make sure that the ap-
pliance is unplugged prior to cleaning!
Warning! The cutters in the appliance
are very sharp!
Disposal
Do not dispose of the appliance
in your normal domestic waste.
Dispose of the appliance through a regi-
stered specialist disposal firm or through
your community waste disposal depart-
ment. Observe the currently applicable
regulations. In case of doubt, contact
your local waste disposal facility.
Warranty and Service
The warranty conditions and the service
address can be found on the warranty slip.
Kompernaß GmbH
Burgstrasse 21
D-44867 Bochum
www.kompernass.com
Lervia
KH 4404
KH4404_IB_UK.qxd 01.08.2006 13:37 Uhr Seite 5


