background image

Menu 

Temperature 

Time 


Roast 


200 


25 mins 

French Fries 

(non- 

precooked) 


230


25 mins 


Bake 


180


20 mins 


Stir-fry 


200


10 mins 


Grill 


190


15 mins 


    BBQ 


200


12 mins 


SETTING THE TIMER AND THE TEMPERATURE: 

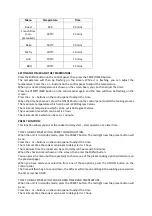
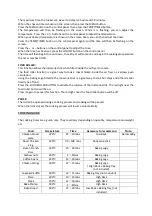
Press the MENU button on the control panel, then press the TEMP/TIMER button.  

The  temperature  will  then  be  flashing  on  the  screen.  While  it  is  flashing,  you  can  adjust  the 

temperature. Press the + or – buttons on the control panel to adjust the temperature.  

When your desired temperature is shown on the screen been, you can then adjust the timer.  

Press the TEMP/TIMER button on the control panel again and the time will then be flashing on the 

screen. 

Press the + or – buttons on the control panel to adjust the time.  

When the time has been set, press the ON/OFF button on the control panel to start the cooking process. 

The maximum temperature which can be set is 230 Degrees Celsius. 

The minimum temperature which can be set is 50 Degrees Celsius. 

The maximum time which can be set is 1 hour. 

The minimum time which can be set is 1 minute. 


PRESET FUNCTION: 

This function allows you to set the cooker to delay start – start operation at a later time. 


TO SET A DELAY START WITH A PRESET COOKING OPTION: 

When the unit is in standby mode, press the PRESET button. The red light near the preset button will 

be on. 

Press the + or – buttons on the control panel to adjust the time.  

The minimum time the cooker can be set to delay start is 1 hour. 

The maximum time the cooker can be set to delay is 9 hours and 59 minutes. 

When the chosen time is shown on the screen, then press the MENU button. 

You can press the menu button repeatedly to choose one of the preset cooking options (details are on 

the previous page). 

When you have made your selection from one of those options, press the ON/OFF button on the 

control panel. 

The time will then begin to count down, the airfryer will come on and begin the cooking process when 

the timer reaches 00:00. 


TO SET A DELAY START WITH YOUR DESIRED TIMER AND TEMPERATURE: 

When the unit is in standby mode, press the PRESET button. The red light near the preset button will 

be on. 

Press the + or – buttons on the control panel to adjust the time.  

The minimum time the cooker can be set to delay start is 1 hour. 

Summary of Contents for Healthy Choice AF1100

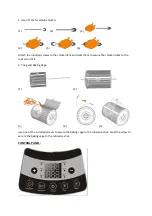
Page 1: ...Model AF1100 BATCH NUMBER PR3759 PLEASE READ AND RETAIN THESE INSTRUCTIONS FOR FUTURE REFERENCE ...

Page 2: ...tion to your kitchen benchtop Healthy eating doesn t have to be boring pave your own path with a new way to prepare delicious food at just the turn of a switch IMPORTANT SAFEGUARDS When using electrical appliances basic safety precautions should always be followed including the following 1 Read instructions carefully before use 2 Do not touch hot surfaces Use the handles on the appliance and oven ...

Page 3: ...in use 19 This appliance is not designed to be used by people including children with a physical sensory or mental impairment or people without knowledge or experience unless they are supervised or given prior instructions concerning the use of the appliance by someone responsible for their safety Children must be supervised to ensure that they do not play with the appliance SHORT CORD INSTRUCTION...

Page 4: ... Time setting Range 1 60 min Capacity 10L CONSTRUCTION AND FEATURES 1 Control Panel 2 Lid Handle 3 Heat emission hole Louver 4 Transparent Cover 5 Heating Fan 6 Fixed Switch 7 Spindle Hole 8 The Base 9 Cold plate spray Teflon 10 High Low dual Rack 11 Tong 12 Baking Cage 13 Spindle 14 Chicken Fork ...

Page 5: ...g the lid the cooking process must be stopped Please press down on the Fixed Switch as illustrated above to unlock the lid The steam coming out of the air fryer will be hot and may cause burns Proceed with care when opening the unit Warning Before use remove the paper holder from inside the unit ...

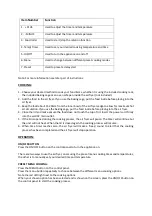
Page 6: ...en wings pizza etc Legs are long ways down when placed in the unit Baking cage Suitable for food like French fries and those need rotating even heating Chicken Fork Suitable for a whole chickenn or lamb leg HOW TO USE THE ACCESSORIES When handling the heated accessories and food please use tongs provided and if necessary use oven mitts Please pay attention to the temperature of the inner pot Take ...

Page 7: ...he chicken fork and twist them to secure the chicken forks to the rotisserie stick 2 Tong and Baking Cage 1 2 3 4 5 Use one of the included screws to secure the baking cage to the rotisserie stick Twist the screw to secure the baking cage to the rotisserie stick CONTROL PANEL ...

Page 8: ...fore placing into the air fryer 4 Close the lid and make ensure the food dose not touch the top of lid Insert the power cord firmly into the wall AC main outlet 5 If the lid is opened during the cooking process the air fryer will pause The timer will continue but the unit will not heat When the lid is closed again the cooking process will resume 6 When time timer reaches zero the air fryer will ma...

Page 9: ...n be set is 1 minute PRESET FUNCTION This function allows you to set the cooker to delay start start operation at a later time TO SET A DELAY START WITH A PRESET COOKING OPTION When the unit is in standby mode press the PRESET button The red light near the preset button will be on Press the or buttons on the control panel to adjust the time The minimum time the cooker can be set to delay start is ...

Page 10: ...he air fryer as is allows even circulation Using the baking cage fitted to the rotisserie stick is a great way to cook hot chips and other smaller fried type of food Press the FOOD ROLLER BUTTON to activate the rotation of the rotisserie stick The red light near the food roller button will be on Press it again to cancel this function The red light near the food roller button will be off PAUSE The ...

Page 11: ...f inch of water with mild liquid detergent Close the head lid Set the temperature to 60 set the timer for 15 minutes and allow residue to soften as it heats Unplug and cool completely before continuing to clean 3 To clean fan cover unplug the appliance and cool completely Wipe top of fan cover with a soapy damp cloth or sponge to remove any grease CAUTION 1 Never immerse cord or plug into water or...

Reviews: