


TURNTABLE OPERATION:
1. Rotate the on/Off Volume Knob to turn on the power.
2. Press the Phono/AUX/BT button to set the unit to Phono mode.
3. Set the Speed Switch accordingly.
4. Place the record on the turntable. Use the 45 RPM Adapter if necessary.
5. Remove the stylus protector from the stylus assembly.
Note: To avoid stylus damage, make certain the included stylus protector is in place
whenever the turntable is being moved or cleaned.
6. Release the tonearm Hold down Clip.
Note: When the turntable is not in use, remember to lock back hold down clip.
7. Use the Tonearm Lever to lift the tonearm.
8. Gently move the tonearm over the record where play is desired to begin. Set the Tonearm
Lever back to the down position, the tonearm will descend slowly onto the record and begin
to playback.
9. When the record is finished playing or to suspend the playback, use the Tonearm Lever
again to raise the tonearm and return it to the Tonearm Rest. Release the lever to lower the
tonearm back to its rest.
10. Lock the Tonearm Clip to secure the tonearm.
PLATTER AUTO STOP:
If the Auto-stop Switch is set to ON position, the platter will stop spinning automatically
when the record plays to the end. In some rare occasion, if the turntable stops playing
before the end of the record, set the switch to OFF position the turntable should overcome
this issue.
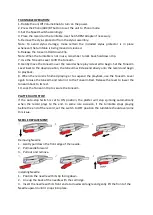
NEEDLE REPLACEMENT:
Removing Needle
1. Gently pull down the front edge of the needle.
2. Pull needle forward.
3. Pull out and remove.
Installing Needle
1. Position the needle with its tip facing down.
2. Line up the back of the needle with the cartridge.
3. Insert the needle with its front end at a downward angle and gently lift the front of the
Needle upward until it snaps into place.