


8
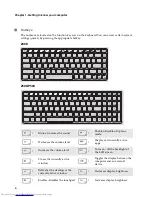
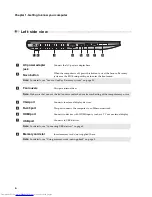
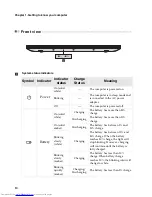
Chapter 1. Getting to know your computer
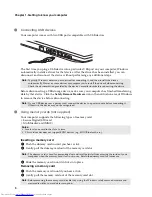
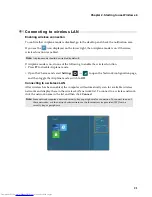
Connecting USB devices
Your computer comes with two USB ports compatible with USB devices.
The first time you plug a USB device into a particular USB port on your computer, Windows
automatically installs a driver for that device. After the driver has been installed, you can
disconnect and reconnect the device without performing any additional steps.
Before disconnecting a USB storage device, make sure your computer has finished transferring
data by that device. Click the
Safely Remove Hardware
icon in the notification area of Windows
to remove the device before disconnecting.
Using memory cards (not supplied)
Your computer supports the following types of memory card:
• Secure Digital (SD) card
• MultiMediaCard (MMC)
Inserting a memory card
1
Push the dummy card in until you hear a click.
2
Gently pull the dummy card out of the memory card slot.
3
Slide the memory card in until it clicks into place.
Removing a memory card
1
Push the memory card in until you hear a click.
2
Gently pull the memory card out of the memory card slot.
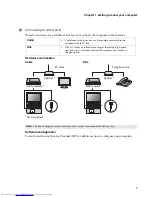
Note:
Typically, Windows detects a new device after connecting it, and then installs the driver
automatically. However, some devices may require you to install the driver before connecting.
Check the documentation provided by the device’s manufacturer before connecting the device.
Note:
If your USB device uses a power cord, connect the device to a power source before connecting it.
Otherwise, the device may not be recognized.
Notes:
•
Insert
only
one card in the slot at a time.
•
This card reader does not support SDIO devices (e.g., SDIO Bluetooth, etc.).
Note:
The dummy card is used for preventing dust and small particles from entering the inside of your
computer when the memory card slot is not in use. Retain the dummy card for future use.
Note:
Before removing the memory card, disable it by using the Windows safely remove hardware and
eject media utility to avoid data corruption.
Summary of Contents for Z500 Touch
Page 4: ......
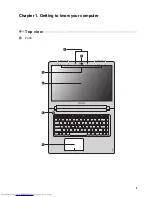
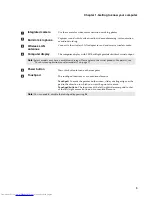
Page 5: ...1 Chapter 1 Getting to know your computer Top view Z400 1 2 3 4 5 6 ...
Page 34: ......
Page 35: ...V1 1_en US Lenovo China 2012 ...