• Read the Safety information, see “Safety” on page v.
• Read the “Installation guidelines” on page 38.
• Read “Handling static-sensitive devices” on page 39.
To replace damaged or contaminated thermal grease on the microprocessor and heat sink, complete the
following steps:
1. Place the heat sink on a clean work surface.
2. Remove the cleaning pad from its package and unfold it completely.
3. Use the cleaning pad to wipe the thermal grease from the bottom of the heat sink.
Note:
Make sure that all of the thermal grease is removed.
4. Use a clean area of the cleaning pad to wipe the thermal grease from the microprocessor; then, dispose
of the cleaning pad after all of the thermal grease is removed.
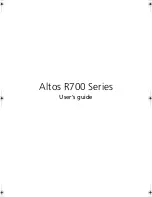
Microprocessor
0.02 mL of thermal
grease
5. Use the thermal-grease syringe to place 9 uniformly spaced dots of 0.02 mL each on the top of
the microprocessor. The outermost dots must be within approximately 5 mm of the edge of the
microprocessor; this is to ensure uniform distribution of the grease.
Note:
If the grease is properly applied, approximately half of the grease will remain in the syringe.
6. Install the heat sink onto the microprocessor as described in “Replacing a microprocessor and heat
Removing the microprocessor and memory expansion tray assembly
Use this information to remove the microprocessor and memory expansion tray assembly.
To remove the microprocessor and memory expansion tray, complete the following steps:
Step 1.
Read the safety information and installation guidelines, see “Safety” on page v and “Installation
guidelines” on page 38.
Step 2.
Turn off the server (see “Turning off the server” on page 23) and all attached peripheral devices.
Disconnect all power cords; then, disconnect all external cables as necessary to replace the device.
Step 3.
If the server has been installed in a rack, slide the server out from the rack enclosure.
Step 4.
Remove the top cover (see “Removing the server top cover” on page 216).
Step 5.
If power supply 2 is installed, slide it out of the power supply bay slightly.
292
Lenovo System x3750 M4 Installation and Service Guide
Summary of Contents for System x3750 M4
Page 1: ...Lenovo System x3750 M4 Installation and Service Guide Machine Type 8753 ...
Page 6: ...iv Lenovo System x3750 M4 Installation and Service Guide ...
Page 144: ...130 Lenovo System x3750 M4 Installation and Service Guide ...
Page 170: ...156 Lenovo System x3750 M4 Installation and Service Guide ...
Page 319: ...Adapter SAS signal connector SAS signal cable Chapter 6 Removing and replacing components 305 ...
Page 321: ...Adapter SAS signal connector SAS signal cable Chapter 6 Removing and replacing components 307 ...
Page 324: ...8x2 5 inch backplane 310 Lenovo System x3750 M4 Installation and Service Guide ...
Page 492: ...478 Lenovo System x3750 M4 Installation and Service Guide ...
Page 522: ...508 Lenovo System x3750 M4 Installation and Service Guide ...
Page 956: ...942 Lenovo System x3750 M4 Installation and Service Guide ...
Page 960: ...946 Lenovo System x3750 M4 Installation and Service Guide ...
Page 968: ...Taiwan BSMI RoHS declaration 954 Lenovo System x3750 M4 Installation and Service Guide ...
Page 981: ......
Page 982: ...Part Number 00MV562 Printed in China 1P P N 00MV562 1P00MV562 ...