20.0” LCD Color Monitor
Lenovo L2060wA
6
3. Operating Instructions
3.1 General Instructions
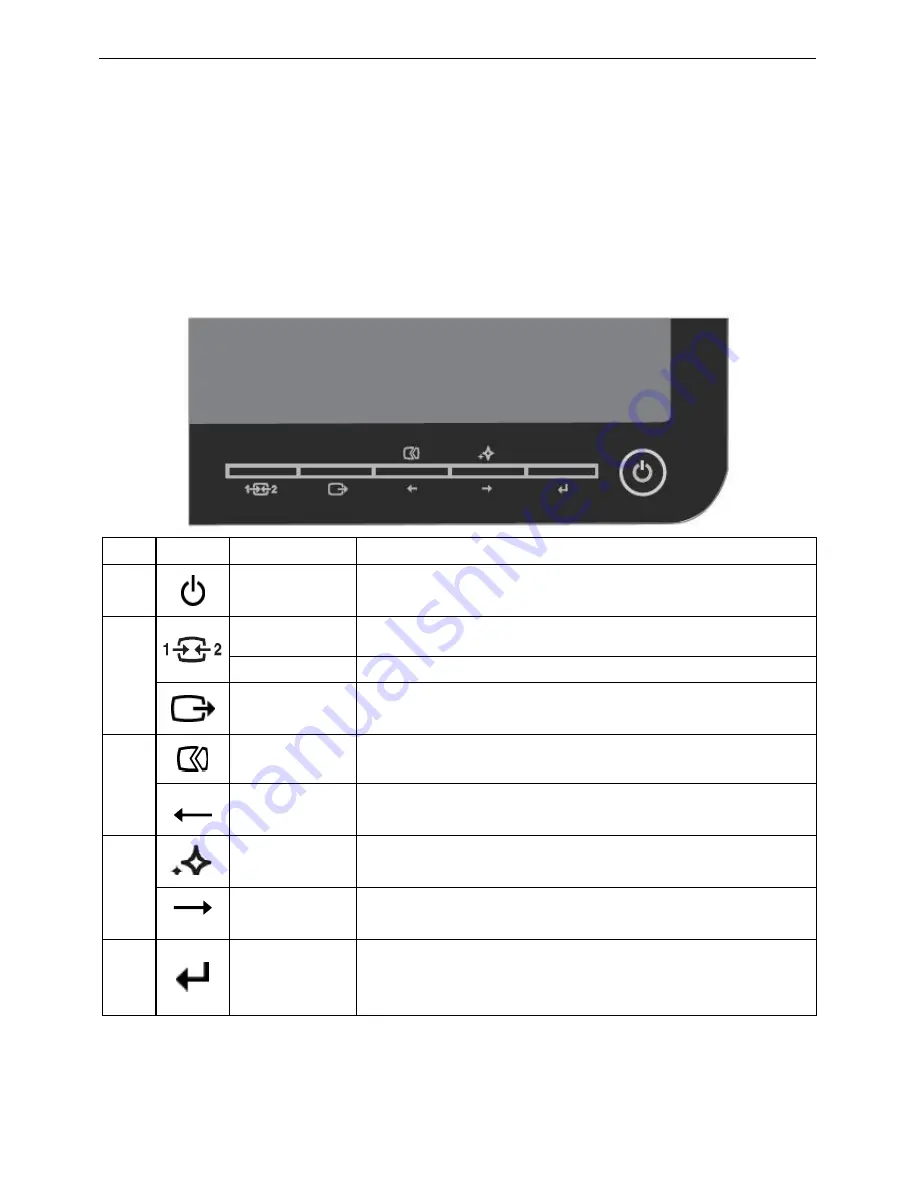
Press the power button to turn the monitor on or off. The control buttons are located on the right side of the
monitor.
By changing these settings, the picture can be adjusted to your personal preferences.
-
The power cord should be connected.
-
Connect the video cable from the monitor to the video card.
-
Press the power button to turn on the monitor, the power indicator will light up.
3.2 Control Buttons
Icon
Control
Description
1
Power Key
Power ON/OFF,and power indicator(Blue and Orange).
Input change
Switches the video input source.DVI/D-SUB
DDC-CI
Pressed till 10 seconds, will enable/disable the DDC/CI.
2
Exit
Exit current OSD return to last level.
Auto Adjustment
If there is no any OSD, it is auto configuration.
3
Decrease
OSD, it will decrease current value of bar, or move to last item of menu.
NovoVision
If there is no any OSD,Direct access to NovoVision.
4
Increase
OSD, it will increase current value of bar, or move to next item of menu.
5
Menu
/Enter/OK key
Active main menu while no OSD display,enter next level on main menu or
sub menu status, or enter last level on adjustment bar.Continued pressing
10 seconds will lock menu or un-lock menu.
Summary of Contents for L2060wA
Page 11: ...20 0 LCD Color Monitor Lenovo L2060wA 11 4 2 Factory Preset Display Modes ...
Page 15: ...20 0 LCD Color Monitor Lenovo L2060wA 15 ...
Page 29: ...20 0 LCD Color Monitor Lenovo L2060wA 29 7 PCB Layout 7 1 Main Board 715G3327 1 ...
Page 30: ...20 0 LCD Color Monitor Lenovo L2060wA 30 ...
Page 31: ...20 0 LCD Color Monitor Lenovo L2060wA 31 ...
Page 32: ...20 0 LCD Color Monitor Lenovo L2060wA 32 7 2 Power Board 715G3483 2 ...
Page 33: ...20 0 LCD Color Monitor Lenovo L2060wA 33 ...
Page 34: ...20 0 LCD Color Monitor Lenovo L2060wA 34 ...
Page 35: ...20 0 LCD Color Monitor Lenovo L2060wA 35 7 3 Key Board 715G3290 2 ...
Page 45: ...20 0 LCD Color Monitor Lenovo L2060wA 45 10 Monitor Exploded View ...


