background image

35

Lenovo ideapad MIIX 700-12ISK

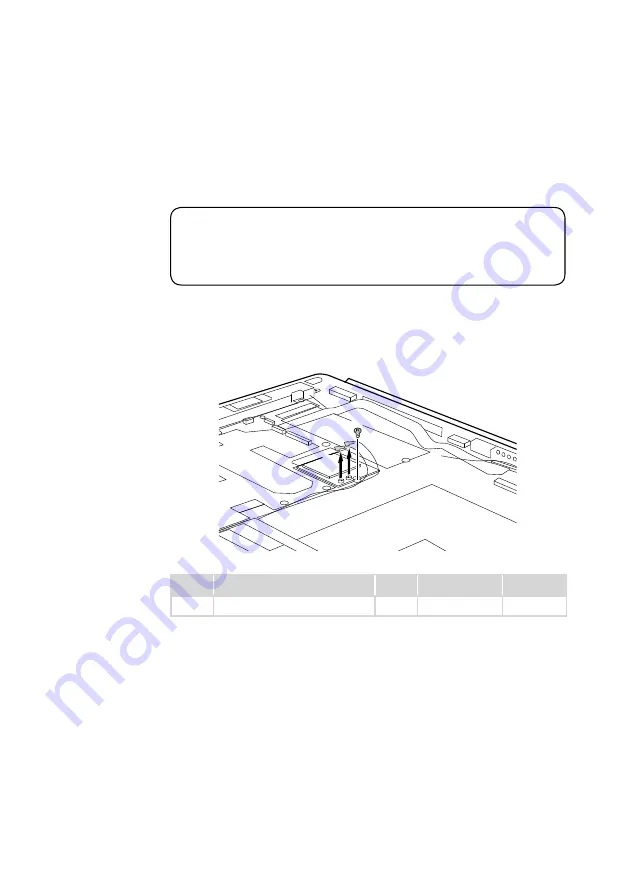
1030 PCI Express Mini Card for wireless LAN

For access, remove these FRUs in order:

“1010 LCD cover” on page 31

“1020 Battery pack” on page 33

Important: 

The preinstalled WLAN module may only be replaced with a Lenovo approved 

module in order to comply with FCC and IC regulations. Refer to Table 3 “Parts 

list-Overall” on page 57  for Lenovo part numbers for the approved modules.

Figure 3. Removal steps of PCI Express Mini Card for wireless LAN

Disconnect the two wireless LAN cables (black, white) 

1

. Remove the screw 

2

.

b

a

Step

Screw (quantity)

Color

Torque

P/N

2

M1.6 × 1.8, NGFF to Bezel (1)

Black

1.00±0.2kgf*cm

5S10K37822

In step 

1

, unplug the jacks by using the removal tool antenna RF connector  

(P/N: 08K7159), or pick up the connectors with your fingers and gently unplug 

them in the direction shown by the arrows.

When installing:

In models with a wireless LAN card that has two antenna connectors, plug
the black cable (1st) (MAIN) into the jack labeled 

1

, and the grey cable (2nd)

(AUX) into the jack labeled 

2

 on the card.

Summary of Contents for ideapad MIIX 700-12ISK

Page 1: ...ideapad MIIX 700 12ISK Hardware Maintenance Manual ...

Page 2: ...t 23 Passwords 23 Power on password 23 Supervisor password 24 Power management 24 Screen blank mode 24 Putting the computer to sleep or shutting it down 24 Putting your computer to sleep 24 Shutting down the computer 25 Lenovo ideapad MIIX 700 12ISK 26 Specifications 26 Hotkeys 28 FRU replacement notices 29 Screw notices 29 Removing and replacing an FRU 30 1010 LCD cover 31 1020 Battery pack 33 10...

Page 3: ...who are familiar with Lenovo ideapad products Use this manual to troubleshoot problems effectively Before servicing a Lenovo ideapad product make sure to read all the information under Safety information on page 1 and Important service information on page 16 Safety information This chapter presents the following safety information that you need to get familiar with before you service an Lenovo ide...

Page 4: ...e keeping them away from all personnel while you are servicing the machine Keep your toolcase away from walk areas so that other people will not trip it over Do not wear loose clothing that can be trapped in the moving parts of the machine Make sure that your sleeves are fastened or rolled up above your elbows If your hair is long fasten it Insert the ends of your necktie or scarf inside clothing ...

Page 5: ...box in the off position If you need to work on a machine that has exposed electrical circuits observe the following precautions Ensure that another person familiar with the power off controls is near you Attention Another person must be there to switch off the power if necessary Use only one hand when working with powered on electrical equipment keep the other hand in your pocket or behind your ba...

Page 6: ...ce of a plastic dental mirror The surface is conductive such touching can cause personal injury and machine damage Do not service the following parts with the power on when they are removed from their normal operating places in a machine Power supply units Pumps Blowers and fans Motor generators and similar units This practice ensures correct grounding of the units If an electrical accident occurs...

Page 7: ... missing hardware To determine whether there are any potential unsafe conditions use the following checklist at the beginning of every service task Begin the checks with the power off and the power cord disconnected Checklist 1 Check exterior covers for damage loose broken or sharp edges 2 Turn off the computer Disconnect the power cord 3 Check the power cord for a A third wire ground connector in...

Page 8: ...skin to eliminate static on your body Prevent the part from touching your clothing Most clothing is insulative and retains a charge even when you are wearing a wrist strap Use the black side of a grounded work mat to provide a static free work surface The mat is especially useful when handling ESD sensitive devices Select a grounding system such as those listed below to provide protection that mee...

Page 9: ...ly the battery in the appropriate parts listing Use of an incorrect battery can result in ignition or explosion of the battery Safety notice 3 DANGER The battery pack contains small amounts of nickel Do not disassemble it throw it into fire or water or short circuit it Dispose of the battery pack as required by local ordinances or regulations Use only the battery in the appropriate parts listing w...

Page 10: ...ng Safety notice 6 DANGER To avoid shock do not remove the plastic cover that protects the lower part of the inverter card Safety notice 7 DANGER Though the main batteries have low voltage a shorted or grounded battery can produce enough current to burn personnel or combustible materials Safety notice 8 DANGER Before removing any FRU turn off the computer unplug all power cords from electrical out...

Page 11: ...n IEC 825 and CENELEC EN 60 825 for Class 1 laser products If a CD ROM drive a DVD ROM drive or another laser device is installed note the following CAUTION Use of controls or adjustments or performance of procedures other than those specified herein might result in hazardous radiation exposure Opening the CD ROM drive the DVD ROM drive or any other optical storage device could result in exposure ...

Page 12: ...BIOS and device Strategy for replacing FRUs Before replacing parts Make sure that all software fixes drivers and BIOS downloads are installed before replacing any FRUs listed in this manual After a system board is replaced ensure that the latest BIOS is loaded to the system board before completing the service action To download software fixes drivers and BIOS follow the steps below 1 Enter a seria...

Page 13: ... one by one to see if the symptoms change Replace only the FRU that changed the symptoms Attention The setup configuration on the computer you are servicing may have been customized Running Automatic Configuration may alter the settings Note the current configuration settings using the View Configuration option then when service has been completed verify that those settings remain in effect Import...

Page 14: ...ompliance well before the implementation date and expects its suppliers to be ready to support Lenovo s requirements and schedule in the EU Products sold in 2005 and 2006 will contain some RoHS compliant FRUs The following statement pertains to these products and any product Lenovo produces containing RoHS compliant FRUs RoHS compliant FRUs have unique FRU part numbers Before or after the RoHS imp...

Page 15: ...ence might have been altered If you select an incorrect drive data or programs might be overwritten Replace an FRU only with another FRU of the correct model When you replace an FRU make sure that the machine model and the FRU part number are correct by referring to the FRU parts list An FRU should not be replaced just because of a single unreproducible failure Single failures can occur for a vari...

Page 16: ... the warranty by referring to the following list The following are not covered under warranty LCD panel cracked from the application of excessive force or from being dropped Scratched cosmetic parts Distortion deformation or discoloration of the cosmetic parts Plastic parts latches pins or connectors that have been cracked or broken by excessive force Damage caused by liquid spilled into the syste...

Page 17: ...t continuity and installation If the computer does not charge during operation go to Checking operational charging To check the AC adapter follow the steps below 1 Unplug the AC adapter cable from the computer 2 Measure the output voltage at the plug of the AC adapter cable See the following figure 9ROWDJH 9 3LQ Note Output voltage for the AC adapter pin No 2 may differ from the one you are servic...

Page 18: ...tus indicator or icon does not light on remove the battery pack and let it return to room temperature Reinstall the battery pack If the charge indicator or icon is still off replace the battery pack If the charge indicator still does not light on replace the system board Then reinstall the battery pack ...

Page 19: ...on the system partition C drive which is not recoverable Make sure to back up your critical data before you perform this action When you use the recovery discs to boot your computer the system will enter the user interface for system recovery automatically Please follow the prompt to insert the backup discs to complete the whole recovery process Note The recovery process might take up to 2 hours P...

Page 20: ...e Turn off monitor timer in the operating system expires the LCD backlight turns off To end screen blank mode and resume normal operation press any key Putting the computer to sleep or shutting it down When you have finished working with your computer you can put it to sleep or shut it down Putting your computer to sleep If you will be away from your computer for only a short time put the computer...

Page 21: ...e not going to use your computer for a long time shut it down To shut down the computer do one of the following Select the Start button then select Power Shut down Right click or press the Start button in the lower left corner and select Shut down or sign out Shut down ...

Page 22: ... Tablet Form Factor Dimensions Appr 292 mm 210 mm 9 0 mm Weight Appr 780 g LCD size 12 0 inch Processor See the system properties of your computer You can do this as follows Click Control Panel then click Hardware and Sound click Device Manager under Devices and Printers and double click Processors Memory Type LPDDR3 Maximum supported capacity 8 GB Storage Capacity SSD 64 GB 128 GB 256 GB Interfac...

Page 23: ...pter Input 100 240 V 50 60 Hz AC Output voltage 20 V 5 V DC Power 40 W Miscellaneous Camera 5 0 MP front camera 3D camera 5 0 MP rear camera Keyboard folio Form Factor Dimensions Appr 293 mm 224 mm 5 mm Weight Appr 330 g I O Ports Pogo pin with guide pin Pogo pin with guide pin 1 ...

Page 24: ...es the sound Decreases the volume level Increases the volume level Closes the currently active window Refreshes the desktop or the currently active window Enables disables the touch pad Enables disables Airplane mode Displays all currently active apps Toggles the display between the computer and an external device Decreases display brightness Increases display brightness ...

Page 25: ... remove screws for reuse when replacing FRUs Use a torque screwdriver if you have one Tighten screws as follows Plastic to plastic Turn an additional 90 after the screw head touches the surface of the plastic part more than 90 Cross section Logic card to plastic Turn an additional 180 after the screw head touches the surface of the logic card more than 180 Cross section Torque driver If you have a...

Page 26: ...gure 7 To put the new FRU in place reverse the removal procedures and follow any of the notes that pertain to replacement For information about connecting and arranging internal cables see Locations on page 54 8 When replacing an FRU use the correct screw as shown in the procedures DANGER Before removing any FRU turn off the computer unplug all power cords from electrical outlets and then disconne...

Page 27: ...10 LCD cover Figure 1 Removal step of LCD cover As shown by the arrow flip the stand cover gently to the desired angle by inserting your finger in the finger recess between the stand cover and the bottom plate Remove screws 1 a a a a a a ...

Page 28: ...gure 1 Removal step of LCD cover continued Detach the system connectors in the directions shown by arrows 2 and 3 c b Remove the LCD cover in the direction shown by arrow 4 d Step Screw quantity Color Torque 2 M2 3 5 A COVER TO FRAME 6 Black 1 85 0 20 kgf cm ...

Page 29: ... in the parts list for your computer Any other battery could ignite or explode Figure 2 Removal steps of battery pack Disconnect the battery connector in the direction shown by arrow 1 then remove the battery a Remove the battery pack in the direction shown by arrow 2 b When installing Make sure the battery pack connector is attached firmly ...

Page 30: ...re of the Wi Fi model For other models please refer to the actual product For Wi Fi models Apply sponges on area A LCD cover Apply sponges on area B along the USB connector A B For LTE models Apply sponges on area A Apply sponges on area B along the USB connector Apply the conductive fabric on area C A B For 3D models Apply sponges on the gap between the 3D camera and the Wi Fi antenna area A Appl...

Page 31: ...moval steps of PCI Express Mini Card for wireless LAN Disconnect the two wireless LAN cables black white 1 Remove the screw 2 b a Step Screw quantity Color Torque P N 2 M1 6 1 8 NGFF to Bezel 1 Black 1 00 0 2kgf cm 5S10K37822 In step 1 unplug the jacks by using the removal tool antenna RF connector P N 08K7159 or pick up the connectors with your fingers and gently unplug them in the direction show...

Page 32: ...36 ideapad MIIX 700 12ISK Hardware Maintenance Manual Figure 3 Removal steps of PCI Express Mini Card for wireless LAN continued Remove the card in the direction shown by arrow 3 c ...

Page 33: ... 31 1020 Battery pack on page 33 1030 PCI Express Mini Card for wireless LAN on page 35 Figure 4 Removal steps of SSD card Remove the one screw 1 a Remove the SSD card in the direction shown by arrow 2 b Step Screw quantity Color Torque P N 1 M1 6 1 8 NGFF to Bezel 1 Black 1 00 0 2kgf cm 5S10K37822 ...

Page 34: ... Express Mini Card for wireless LAN on page 35 1040 SSD card on page 37 Figure 5 Removal steps of audio board Detach the two FPC connectors in the direction shown by arrows 1 and 2 Loosen the one screw 3 c 1 2 Step Screw quantity Color Torque P N 3 M2x4 5 Audio Board to Bezel 1 Black 1 85 0 2kgf cm 5S10K37808 When installing Make sure the FPC connector is attached firmly ...

Page 35: ...enovo ideapad MIIX 700 12ISK Figure 5 Removal steps of Audio Board continued Remove the audio board in the direction shown by arrow 4 d When installing Make sure the audio board connector is attached firmly ...

Page 36: ...ch as metal wood or composite Avoid rough handling of any kind In the whole process make sure not to drop or stack the system board If you put a system board down make sure to put it only on a padded surface such as an ESD mat or conductive corrugated material For access remove these FRUs in order 1010 LCD cover on page 31 1020 Battery pack on page 33 1030 PCI Express Mini Card for wireless LAN on...

Page 37: ...peaker and microphone connectors shown by arrows 1 and 2 Unplug DC IN Cable connector shown by arrow 3 then remove the screws 4 c b a d d d d d d d d d d d When installing Make sure that all the connectors are attached firmly Step Screw quantity Color Torque 5 M2 2 5 MB to Bezel 11 Black 1 85 0 20kgf cm ...

Page 38: ...ce Manual Figure 6 Removal steps of system board continued Turn the system board over as shown by arrow 5 and detach the rear camera board connector in the direction shown by arrows 6 and 7 Then remove the system board as shown by arrow 8 g f e h ...

Page 39: ...ack on page 33 1030 PCI Express Mini Card for wireless LAN on page 35 1040 SSD card on page 37 1050 Audio Board on page 38 1060 System board on page 40 Figure 7 Removal steps of speakers Unplug one speaker connector in the direction shown by arrows 1 and 2 b a When installing Make sure the speaker connector is attached firmly ...

Page 40: ...44 ideapad MIIX 700 12ISK Hardware Maintenance Manual Figure 7 Removal steps of speakers continued Remove the speakers in the direction shown by arrows 3 c ...

Page 41: ... Battery pack on page 33 1030 PCI Express Mini Card for wireless LAN on page 35 1040 SSD card on page 37 1050 Audio Board on page 38 1060 System board on page 40 1070 Speakers on page 43 Figure 8 Removal steps of Power assembly Unplug the power assembly connector in the direction shown by arrow 1 Remove the screws 2 a b b ...

Page 42: ...e 8 Removal steps of power assembly continued Remove the power assembly 3 c Step Screw quantity Color Torque P N 2 M2 2 5 PWR assembly bracket to Bezel 2 Black 1 85 0 20kgf cm 5S10K37830 When installing Make sure the power assembly connector is attached firmly ...

Page 43: ...board on page 40 1070 Speakers on page 43 1080 Power assembly on page 45 Figure 9 Removal steps of integrated camera Remove the two screws 1 Remove the integrated camera in the direction shown by arrow 2 b a a Step Screw quantity Color Torque P N 1 M2 2 5 camera Board to Bezel 2 Black 1 85 0 20kgf cm 5S10K37830 Note Select models have a 3D camera 3D camera cable and the location of the 3D camera a...

Page 44: ...on page 35 1040 SSD card on page 37 1050 Audio Board on page 38 1060 System board on page 40 1070 Speakers on page 43 1080 Power assembly on page 45 1090 Integrated camera on page 47 Figure 10 Removal steps of antenna module Remove the Wi Fi antennas in the direction shown by arrows 1 a a Note For select models the location of the antennas is different from the common models Please refer to the ac...

Page 45: ...SSD card on page 37 1050 Audio Board on page 38 1060 System board on page 40 1070 Speakers on page 43 1080 Power assembly on page 45 1090 Integrated camera on page 47 1100 Antenna Module on page 48 Figure 11 Removal steps of Stand Cover Remove the six screws 1 and four screws 2 and then remove the stand cover a b a b Step Screw quantity Color Torque 1 M2 2 5 stand cover to Bezel 2 Black 1 85 0 20k...

Page 46: ...f Stand Cover continued Remove the Stand Cover in the direction shown by arrow 3 c Remove the four screws 4 and then remove the hinge covers in the direction shown by arrows 5 d d d d e e Step Screw quantity Color Torque 3 M2 0 3 HINGE CAP TO STANDER COVER 4 Silver 1 85 0 20kgf cm ...

Page 47: ...51 Lenovo ideapad MIIX 700 12ISK Figure 11 Removal steps of touch pad board continued Remove the four screws 6 and then remove the hinges in the direction shown by arrows 7 f f f f g g ...

Page 48: ...ontaining labels of several kinds When you replace the base cover you need to apply the following label The following labels need to be peeled off from the old base cover and need to be put on the new base cover a WLAN label b Print Rating label c Intel Label d GML Label For the location of each label refer to the following figure c b d a ...

Page 49: ... WLAN antennas are located in 2 1 For LTE models the WLAN antennas are located in 2 1 and 2 2 3 Multi touch screen 3 1 2 1 2 2 2 2 2 1 Left side view 1 Speakers 2 AC power adapter jack with USB 2 0 function 2 1 Right side view 1 Power button 2 Volume up down button 3 Micro HDMI port 4 USB 3 0 port 5 Speakers 3 2 1 5 4 ...

Page 50: ...1 Pogo pin with guide pin 1 Rear view 1 1 1 Rear camera 1 2 Rear 3D camera on select models Note The rear camera has two kinds of specifications depending on the model 2 Stand cover 3 SIM card slot on select models 4 Micro SD card slot 1 2 3 4 2 1 1 Keyboard folio top view 1 Pogo pin with guide pin 2 Keyboard 3 Touch pad 2 3 1 ...

Page 51: ...ection presents the following service parts Overall on page 57 Keyboard on page 60 Miscellaneous parts on page 61 Screws on page 62 AC adapters on page 63 Notes Each FRU is available for all types or models unless specific types or models are specified ...

Page 52: ...56 ideapad MIIX 700 12ISK Hardware Maintenance Manual Overall 2 1 3 10 10 11 11 c d d 7 6 8 9 15 a b 12 5 4 13 14 16 17 7 8 For 3D camera model ...

Page 53: ...I 5B20K66801 3 MB L 80QL NOK 6Y54 4G WIFI PRC 5B20K66809 3 MB L 80QL WIN 6Y54 4G WIFI PRC 5B20K66822 3 MB L 80QL NOK 6Y54 4G WIFI WW 5B20K66815 3 MB L 80QL WIN 6Y54 4G WIFI WW 5B20K66812 3 MB L 80QL NOK 6Y54 8G WIFI 5B20K66810 3 MB L 80QL WIN 6Y54 8G WIFI 5B20K66798 3 MB L 80QL NOK 6Y54 8G WIFI PRC 5B20K66799 3 MB L 80QL WIN 6Y54 8G WIFI PRC 5B20K66828 3 MB L 80QL NOK 6Y54 8G WIFI WW 5B20K66827 3 ...

Page 54: ...0QL R L balck 5CB0K37810 7 Hinge Cover L 80QL R L Golden 5CB0K42979 8 Hinge L 80QL L R_Black 5H50K37823 8 Hinge L 80QL L R_Golden 5H50K37805 8 Hinge LCD Chelsea_12_hinge_assy_AVC_ gold SH50K42156 8 Hinge LCD Chelsea_12_hinge_assy_AVC_ black SH50K42155 9 Stand Cover L 80QL WIFI_Black 5CB0K37827 9 Stand Cover L 80QL WIFI_Golden 5CB0K37820 9 Stand Cover L 80QL WIFI_Black_WW 5CB0K66806 9 Stand Cover L...

Page 55: ...ac BT PCIE NV SAR SW10A11647 15 WirelessLan_Non_Intel Ltn BCM4350 2x2AC BT4 0 PCIE M 2 WLAN SW10H24481 15 WirelessLan_Non_Intel Fxn BCM4350 2x2AC BT4 0 PCIE M 2 WLAN SW10H24482 15 WWAN Huawei ME906S FDD TDD LTE WW M 2 SW10H24475 16 LCD Cover L 80QL WIFI Black 5CB0K42984 16 LCD Cover L 80QL WIFI Golden 5CB0K42981 17 Panel SD LTN120QL01 L01 QX I G S NB 5D10J33311 17 Touch_panel SLC SDC 12QX 120001AK...

Page 56: ...ench 5N20K07177 Korean 5N20K07166 Traditional Chinese 5N20K07153 Russian 5N20K07173 French 5N20K07160 German 5N20K07164 Arabic 5N20K07154 Brazilian 5N20K07174 Japanese 5N20K07162 Dutch 5N20K07156 Greek 5N20K07175 Hebrew 5N20K07163 Hungarian 5N20K07181 Four Nordic countries 5N20K07170 Belgian 5N20K07158 Icelandic 5N20K07178 Slovenian 5N20K07167 Swiss 5N20K07180 International English 5N20K07168 Czec...

Page 57: ...ts a Touch Cable L 80QL FPC TO MB b LED Board Cable L 80QL non 3D System miscellaneous parts c Bracket Camera L 80QL 5M MIPI d Tape L 80QL GRAPHITE N3D d Tape L 80QL GRAPHITE 3D Note Italicized letters in parentheses are references to the exploded view in Overall on page 56 5C10K37826 5C10K37812 5B40K42977 5T10K42982 5T10K42978 N ...

Page 58: ...M 2 0D 2 5L 5S10K37830 Screw L 80QL MM 2 0D 4 5L 5S10K37808 Screw L 80QL MM 1 6D 1 8L 5S10K37822 Screw L 80QL MM 2 0D 3 5L 5S10K37835 Screw L 80QL MM 2 0D 3 0L 5S10K37809 Active Pen Table 7 Parts list Screws FRU P N CRU ID Active Pen Wacom ESP10110C5 D9 5 BK A Pen 5T70J33309 Active Pen PEN Holder Black J SM20F17096 Active Pen PEN Holder Black C SM20F17098 ...

Page 59: ...40324 Adapter Liteon ADL40WLC 20V 5 2V 2A40W adp B 5A10J40332 Adapter Liteon ADL40WLD 20V 5 2V 2A40W adp B 5A10J40325 Adapter Liteon ADL40WLK 20V 5 2V 2A40W adp B 5A10J40331 Adapter Liteon ADL40WLE 20V 5 2V 2A40W adp B 5A10J40322 Adapter Liteon ADL40WLF 20V 5 2V 2A40W adp B 5A10J40329 Adapter Liteon ADL40WLG 20V 5 2V 2A40W adp B 5A10J40321 Adapter Liteon ADL40WLH 20V 5 2V 2A40W adp B 5A10J40392 Ad...

Page 60: ...cords A Lenovo power cord for a specifi c country or region is usually available only in that country or region Table 9 Parts list 2 pin power cords FRU P N CRU ID Linetek fool proof 1 85m ORG USB cord 5L60J33144 Luxshare fool proof 1 85m ORG USB cord 5L60J33145 ...

Page 61: ...you This information could include technical inaccuracies or typographical errors Changes are periodically made to the information herein these changes will be incorporated in new editions of the publication Lenovo may make improvements and or changes in the product s and or the program s described in this publication at any time without notice The products described in this document are not inten...

Page 62: ...ill be the same on generally available systems Furthermore some measurements may have been estimated through extrapolation Actual results may vary Users of this document should verify the applicable data for their specific environment Trademarks The following terms are trademarks or registered trademarks of Lenovo in the United States other countries or both Lenovo ideapad Microsoft and Windows ar...

Reviews: