


Performance problems
Problem
Solution
Excessive fragmented files exist on the
storage drives.
Note:
Depending on the volume of the storage drives and amount of
data stored on the storage drives, the disk-defragmentation process
might take up to several hours.
1. Close any open programs and windows.
2. Open the
Start
menu.
3. Click
Windows System
➙
File Explorer
➙
This PC
.
4. Right-click your C drive and then click
Properties
.
5. Click the
Tools
tab.
6. Click
Optimize
. Select the drive as desired, and then click
Optimize
.
7. Follow the on-screen instructions.
The free storage drive space is insufficient.
• Clean out your Inbox, Sent Items, and Deleted Items folders from
your e-mail application.
• Clean up your C drive.
1. Open the
Start
menu.
2. Click
Windows System
➙
File Explorer
➙
This PC
.
3. Right-click your C drive and then click
Properties
.
4. Check the amount of free space, and then click
Disk Cleanup
.
5. A list of unnecessary file categories is displayed. Select the
category you want to delete, and then click
OK
.
• Disable some Windows features or remove some unnecessary
programs.
1. Go to
Control Panel
and view by large icons or small icons.
2. Click
Programs and Features
.
3. Do one of the following:
– To disable some Windows features, click
Turn Windows
features on or off
. Follow the on-screen instructions.
– To remove some unnecessary programs, select the
program you want to remove, and then click
Uninstall/
Change
or
Uninstall
.
The free memory space is insufficient.
• Right-click a blank area on the taskbar and open Task Manager.
Then, end some tasks you are not performing.
• Install additional memory modules.
Troubleshooting, diagnostics, and recovery
29
Summary of Contents for IdeaCentre AIO 3
Page 1: ...User Guide IdeaCentre AIO 3 ...
Page 4: ...ii User Guide ...
Page 6: ...iv User Guide ...
Page 14: ...8 User Guide ...
Page 28: ...22 User Guide ...
Page 40: ...34 User Guide ...
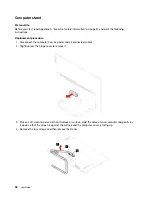
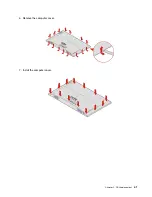
Page 47: ...6 Remove the computer cover 7 Install the computer cover Chapter 5 CRU replacement 41 ...
Page 56: ...50 User Guide ...
Page 89: ......
Page 90: ......