background image

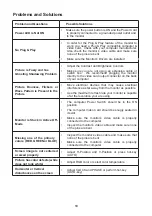
Problems and Solutions

Problem and Questions

Possible Solutions

Power LED is Not ON

•      Make sure the power button is ON and the Power Cord 

is properly connected to a grounded power outlet and 

to the monitor

No Plug & Play

• 

In order for the Plug & Play feature of the monitor to 

work, you need a Plug & Play compatible computer & 

video card.  Check with your computer manufacturer.  

Also check the monitor’s video cable and make sure 

none of the pins are bent

•      Make sure the Monitor’s Drivers are installed

Picture

is

Fuzzy and

has 

Ghosting Shadowing Problem

• 

Adjust the Contrast and Brightness Controls

• 

Make  sure  you  are  not  using  an  extension  cable  or 

switch  box.    We  recommend  plugging  the  monitor 

directly to the video card output connector on the back 

of your computer

Picture  Bounces,  Flickers  or 

Wave Pattern is Present in the 

Picture

• 

Move  electrical  devices  that  may  cause  electrical 

interference as far away from the monitor as possible

• 

Use the maximum refresh rate your monitor is capable 

of at the resolution your are using

Monitor is Stuck in Active Off-

Mode

• 

The  computer  Power  Switch  should  be  in  the  ON 

posiiton

• 

The computer Video Card should be snugly seated in 

its slot 

• 

Make  sure  the  monitor’s  video  cable  is  properly 

connected to the computer

• 

Inspect the monitor’s video cable and make sure none 

of the pins are bent

Missing one of the primary 

colors (RED, GREEN or BLUE)

• 

Inspect the monitor’s video cable and make sure that 

none of the pins are bent

• 

Make  sure  the  monitor’s  video  cable  is  properly 

connected to the computer

Screen image is not centerred 

or sized properly

• 

Adjust  H-Position  and  V-Position  or  press  hot-key 

(AUTO)

Picture has color defects (while 

does not look white)

• 

Adjust RGB color or select color temperature

Horizontal

or

Vertical 

disturbances on the screen

• 

     Adjust CLOCK and PHASE or perform hot-key

 (AUTO-key)

Summary of Contents for E2001bA

Page 1: ...E2001bA LCD Monitor User s Guide ...

Page 2: ...2 PRECAUTIONS 3 SETUP THE STAND AND BASE 4 ADJUSTING VIEWING ANGLE 4 ATTACHING THE CABLES 5 WALL MOUNTING 6 EXTERNAL CONTROLS 7 OSD SETTINGS 8 IMAGE ADJUSTMENT LED INDICATORS PROBLEMS AND SOLUTIONS 1 SPECIFICATIONS 1 PRESET DISPLAY MODES 1 PIN ASSIGNMENTS 1 PLUG AND PLAY 1 ...

Page 3: ...d in bold type or in italic type These blocks are notes cautions and warnings and they are used as follows NOTE A NOTE indicates important information that helps you make better use of your computer system WARNING A WARNING indicates the potential for bodily harm and tells you how to avoid the problem Some warnings may appear in alternate formats and may be unaccompanied by an icon In such cases t...

Page 4: ...eception which can be determined by turning the equipment off and on the user is encouraged to try to correct the interference by one or more of the following measures 1 Reorient or relocate the receiving antenna 2 Increase the separation between the equipment and receiver 3 Connect the equipment into an outlet on a circuit different from that to which the receiver is connected 4 Consult the deale...

Page 5: ...orrect outlet or use an adapter to ground the appliance safely Do not defeat the safety purpose of the grounded plug Unplug the unit during a lightning storm or when it will not be used for long periods of time This will protect the monitor from damage due to power surges Do not overload power strips and extension cords Overloading can result in fire or electric shock Never push any object into th...

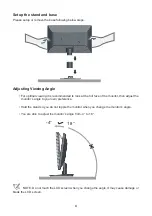
Page 6: ... to look at the full face of the monitor then adjust the monitor s angle to your own preference Hold the stand so you do not topple the monitor when you change the monitor s angle You are able to adjust the monitor s angle from 4 to 18 NOTE Do not touch the LCD screen when you change the angle It may cause damage or break the LCD screen 4 18 ...

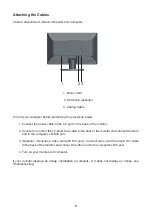
Page 7: ...or 2 Connect one end of the 15 pin D Sub cable to the back of the monitor and connect the other end to the computer s D Sub port 3 Optional Requires a video card with DVI port Connect one end of the 24 pin DVI cable to the back of the monitor and connect the other end to the computer s DVI port 4 Turn on your monitor and computer If your monitor displays an image installation is complete If it doe...

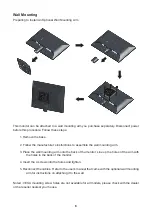
Page 8: ... the wall mounting arm 3 Place the wall mounting arm onto the back of the monitor Line up the holes of the arm with the holes in the back of the monitor 4 Insert the 4 screws into the holes and tighten 5 Reconnect the cables Refer to the user s manual that came with the optional wall mounting arm for instructions on attaching it to the wall Noted VESA mounting screw holes are not available for all...

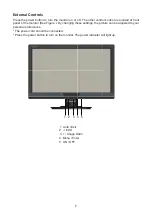
Page 9: ...r on or off The other control knobs are located at front panel of the monitor See Figure By changing these settings the picture can be adjusted to your personal preferences The power cord should be connected Press the power button to turn on the monitor The power indicator will light up 3 ON OFF 1 2 3 4 5 ...

Page 10: ... To lock the OSD press and hold the Menu button while the monitor is off and then press power button to turn the monitor on To un lock the OSD press and hold the Menu button while the monitor is off and then press power button to turn the monitor on Auto configure hot key When the OSD is closed Source window will be pop up when press auto button continue to press Auto button will changed to next s...

Page 11: ...Temperature Normal 7200K Recall Normal ColorTemperature Cool 9300K Recall Cool Color Temperature sRGB Recall SRGB Color Temperature Blue Gain from Digital register Green Gain Digital register Red Gain from Digital register OSD Setup V Position 0 100 Adjust the Vertical position of OSD H Position 0 100 Adjust the Horizontal position of OSD Timeout 0 100 Adjust the OSD Timeout Language Select the OS...

Page 12: ...Pattern is Present in the Picture Move electrical devices that may cause electrical interference as far away from the monitor as possible Use the maximum refresh rate your monitor is capable of at the resolution your are using Monitor is Stuck in Active Off Mode The computer Power Switch should be in the ON posiiton The computer Video Card should be snugly seated in its slot Make sure the monitor ...

Page 13: ... resolution 1 60 Hz Plug Play VESA DDC2B CI Input Connector D Sub 15 pin DVI D Input Video Signal Analog 0 7 V p p standard 75 OHM Positive DVI D Digital Interface TMDS Power Source 100 240 VAC 50 60 Hz Power Consumption Active 2 W Power saving W Physical Characteristics Connector Type 15 pin D Sub DVI D Signal Cable Type Detachable Dimensions Weight Height with base mm Width mm Depth PP Weight mo...

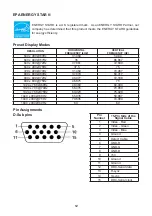
Page 14: ...640 x 480 75Hz 37 5 75 720 x 400 70Hz 31 469 70 087 800 x 600 60Hz 37 879 60 317 800 x 600 72Hz 48 077 72 188 800 x 600 75Hz 46 875 75 1024 x 768 60Hz 48 363 60 004 1024 x 768 70Hz 56 476 70 069 1024 x 768 75Hz 60 023 75 029 Pin Assignments D Sub pins Pin Number Pin Side of the Signal Cable 1 Video Red 2 Video Green 3 Video Blue 4 Ground 5 Detect Cable 6 GND R 7 GND G 8 GND B 9 5V 10 Ground 11 Gro...

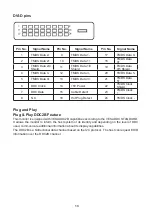
Page 15: ...TMDS Clock Shield 7 DDC Data 15 Cable Detect 23 TMDS Clock 8 N C 16 Hot Plug Detect 24 TMDS Clock Plug and Play Plug Play DDC2B Feature This monitor is equipped with VESA DDC2B capabilities according to the VESA DDC STANDARD It allows the monitor to inform the host system of its identity and depending on the level of DDC used communicate additional information about its display capabilities The DD...

Reviews: