Replace drive (12-drive or 24-drive)
The Recovery Guru in ThinkSystem System Manager monitors the drives in the storage array and can notify
you of an impending drive failure or an actual drive failure. When a drive has failed, its amber Attention LED is
on. You can hot-swap a failed drive while the storage array is receiving I/O.
Prepare to replace drive (12-drive or 24-drive)
You prepare to replace a drive by checking the Recovery Guru in ThinkSystem System Manager and
completing any prerequisite steps. Then, you can locate the failed component.
Step 1. If the Recovery Guru in ThinkSystem System Manager has notified you of an
impending drive
failure
, but the drive has not yet failed, follow the instructions in the Recovery Guru to fail the drive.
Step 2. If needed, use ThinkSystem System Manager to confirm you have a suitable replacement drive.
a. Select
Hardware
.
b. Select the failed drive on the shelf graphic.
c. Click the drive to display its context menu, and then select
View settings
.
d. Confirm that the replacement drive has a capacity equal to or greater than the drive you are
replacing and that it has the features you expect.For example, do not attempt to replace a hard
disk drive (HDD) with a solid-state disk (SSD). Similarly, if you are replacing a secure-capable
drive, make sure the replacement drive is also secure-capable.
Step 3. If needed, use ThinkSystem System Manager to locate the drive within your storage array: From the
drive's context menu, select
Turn on locator light
.
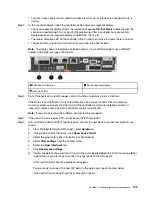
The drive's Attention LED (amber) blinks so you can identify which drive to replace.
Note:
If you are replacing a drive in a shelf that has a bezel, you must remove the bezel to see the
drive LEDs.
Go to Remove failed drive (12-drive or 24-drive).
Remove failed drive (12-drive or 24-drive)
You remove a failed drive to replace it with a new one.
Before you begin
• You have an ESD wristband, or you have taken other antistatic precautions.
• You have reviewed the Requirements for handling drives topic.
When you remove a drive, you must slide the drive partly out of the shelf and wait for the drive to spin down.
Then, you can remove the drive completely.
Step 1. Unpack the replacement drive, and set it on a flat, static-free surface near the shelf.Save all
packing materials.
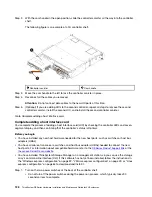
Step 2. Press the release button on the failed drive.
118
ThinkSystem DE Series Hardware Installation and Maintenance Guide for 2U Enclosures
Summary of Contents for DE120S
Page 96: ...90 ThinkSystem DE Series Hardware Installation and Maintenance Guide for 2U Enclosures ...
Page 282: ...276 ThinkSystem DE Series Hardware Installation and Maintenance Guide for 2U Enclosures ...
Page 284: ...278 ThinkSystem DE Series Hardware Installation and Maintenance Guide for 2U Enclosures ...
Page 291: ......
Page 292: ......


