background image

E-8

TROUBLESHOOTING

If your monitor fails to operate functionally, it may
be possible to correct the problem by making simple
checks as follows:

Refer to the operation instructions for your computer/
video adapter to ensure that you have the correct signal
output source for the monitor. Ensure that the switches
on the video adapter are set correctly for operation
with this monitor.

If the above steps fail to correct the  problem  contact
your  dealer for servicing by qualified service
personnel.

Please remember that the monitor should be returned
for servicing together with the power cord.

* Note: You can easily distinguish the problem is on

the monitor or on the computer by using the
monitor’s built-in selftest function.
With the monitor power ON, disconnect the
signal cable from monitor. If you see a “NO
SIGNAL” image on the screen, (shown
below) the monitor is function properly, and
the problem is at PC side, or signal cable.

m

e

l

b

o

r

P

t

s

u

j

d

A

&

k

c

e

h

C

n

e

e

r

c

s

k

n

a

l

B

)

.

e

t

o

n

*

(

,

h

c

t

i

w

s

r

e

w

o

p

r

o

t

i

n

o

M

,

e

l

b

a

c

l

a

n

g

i

s

,

d

r

o

c

r

e

w

o

p

r

o

t

c

e

n

n

o

c

r

o

h

c

t

i

w

s

r

e

w

o

p

C

P

t

s

a

r

t

n

o

c

&

s

s

e

n

t

h

g

i

r

B

s

l

o

r

t

n

o

c

n

o

i

t

i

s

o

p

y

a

l

p

s

i

D

r

e

t

n

e

c

-

f

f

o

&

g

n

i

r

e

t

n

e

c

l

a

c

i

t

r

e

V

s

l

o

r

t

n

o

c

e

s

a

h

p

l

a

t

n

o

z

i

r

o

h

l

l

a

m

s

o

o

t

y

a

l

p

s

i

D

e

g

r

a

l

o

o

t

r

o

e

z

i

s

l

a

t

n

o

z

i

r

o

h

&

l

a

c

i

t

r

e

V

s

l

o

r

t

n

o

c

t

h

g

i

r

b

o

o

t

y

a

l

p

s

i

D

m

i

d

o

o

t

r

o

t

s

a

r

t

n

o

c

&

s

s

e

n

t

h

g

i

r

B

s

l

o

r

t

n

o

c

SERVICING

Refer all servicing to qualified service personnel.
Serious shock hazards exist within the covers
of this monitor.
Do not open the covers under any
circumstances- there are no  serviceable parts
inside.

1

5

15

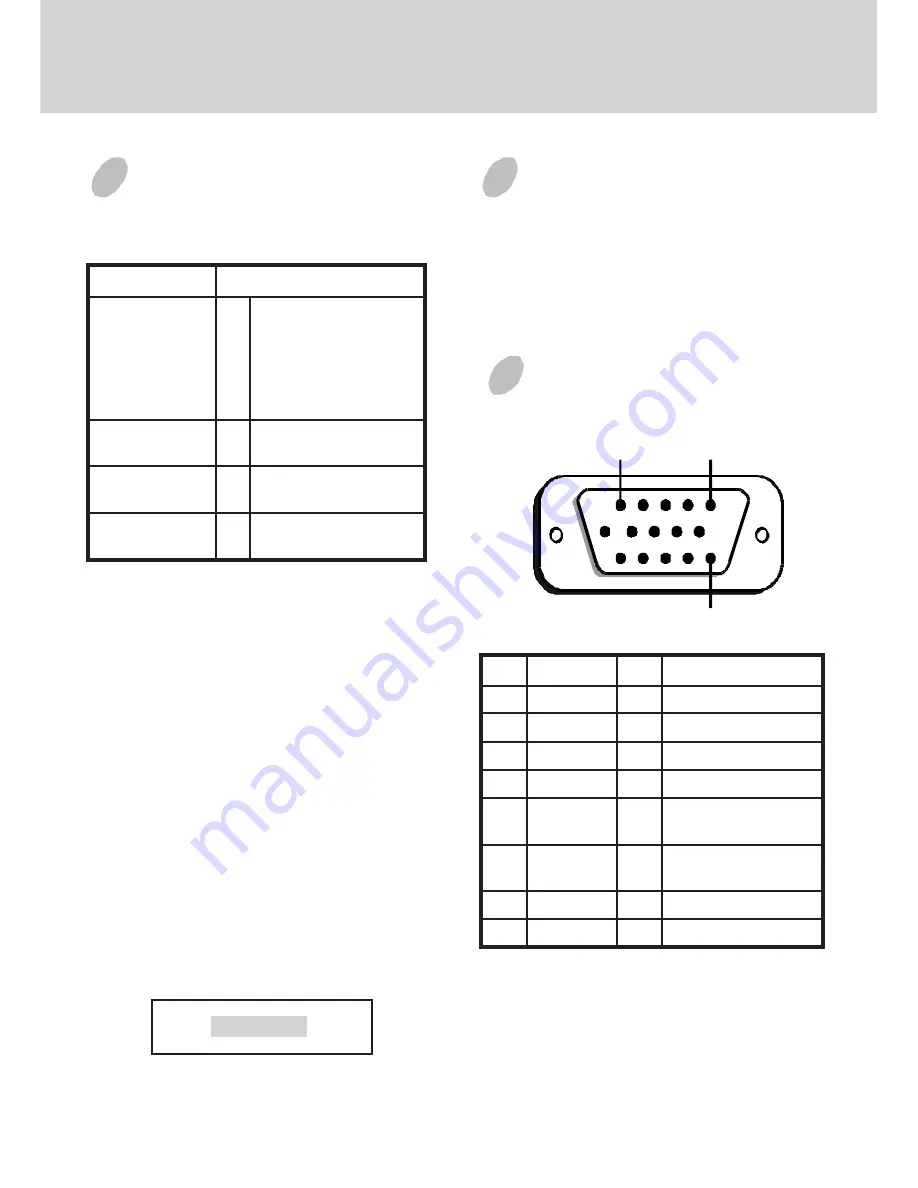
*Note:

This pin is used for self test detection; at
PC side, this pin has to be connected to
ground.

n

i

P

n

o

i

t

c

n

u

F

n

i

P

n

o

i

t

c

n

u

F

1

l

a

n

g

i

s

d

e

R

9

C

N

2

l

a

n

g

i

s

n

e

e

r

G

0

1

d

n

u

o

r

g

l

a

t

i

g

i

D

3

l

a

n

g

i

s

e

u

l

B

1

1

d

n

u

o

r

G

4

d

n

u

o

r

G

2

1

)

B

2

C

D

D

/

1

C

D

D

(

A

D

S

5

*

3

1

l

a

t

n

o

z

i

r

o

H

n

o

i

t

a

z

i

n

o

r

h

c

n

y

S

6

n

r

u

t

e

r

d

e

R

4

1

n

o

i

t

a

z

i

n

o

r

h

c

n

y

s

l

a

c

i

t

r

e

V

)

1

C

D

D

(

K

L

C

V

&

7

n

e

e

r

G

n

r

u

t

e

r

5

1

)

B

2

C

D

D

(

L

C

S

8

n

r

u

t

e

r

e

u

l

B

SIGNAL CONNECTOR
INFORMATION

NO SIGNAL

Summary of Contents for C72

Page 1: ...he receiver is connected Consult the dealer or an experienced radio TV technician for help This equipment has been certified to comply with the limits for a Class B computing device pursuant to part 15 of the FCC rules Only peripherals computer input output devices terminals printers etc certified to comply to the Class B limits may be attached to this computer Operation with non certified periphe...

Page 2: ...fferent power saving states upon receiving control signals from the display controller this meets the EPA Environment Protection Agency Energy Star requirements and reduces power consumption The monitor will work in the following 4 states according to the VESA standard Display Power Management Signal The power saving states will be kept until a control signal has been detected or the keyboard or m...

Page 3: ...n either 100 120V AC or 220 240V AC voltage area No user adjustment is re quired First connect the power cord into your monitor s power input socket and then plug the other end into a 3 pin AC outlet The power cord may be connected to either a wall socket or the power out put socket on your PC depending on the type of power cord supplied with your monitor For units to be used at 120V AC Use a UL L...

Page 4: ...R CONTROLS AND INDICATORS a Displays menu exits menu b Scrolls through menu to choose an icon for adjustment Adjusts level of selected icon c Confirms menu selection 1 Power LED 2 Power ON OFF switch a b c 1 2 ...

Page 5: ...T S A R T N O C S S E N T H G I R B E Z I S H N O I T I S O P H E Z I S V N O I T I S O P V N O I H S U C N I P V D I O Z E P A R T N O I T A T O R R O L O C E G A U G N A L Q E R F P S I D S S U A G E D L L A C E R E R I O M H E R I O M V 1 H POSITION 50 1 2 Name of adjustment screen The adjustment level is shown by both a number and a bar It can be varied with the front buttons When the button i...

Page 6: ...the right Press the key toggles between HORIZONTAL SIZE and HORIZONTAL POSITION 2 2 2 VERTICAL SIZE adjustment Fills the viewable area vertically Press the button to make the image smaller or press the button to make it larger Press the key toggles between VERTICAL SIZE and VERTICAL POSITION VERTICAL POSITION adjustment Shifts the image on the screen vertically Press the button to move it downward...

Page 7: ... 2 6550O K or 3 the user s preferred color 2 If the 3 the user s color is selected 2 appears in the lower right of the On Screen Menu Press the front button to display the USER COLOR adjustment screen USER COLOR The white in the video image can be adjusted to the user s preferred color 1 Use the button to select R red or B blue 2 Use the button to adjust the color as desired The GREEN color is fix...

Page 8: ...c l a n g i s d r o c r e w o p r o t c e n n o c r o h c t i w s r e w o p C P t s a r t n o c s s e n t h g i r B s l o r t n o c n o i t i s o p y a l p s i D r e t n e c f f o g n i r e t n e c l a c i t r e V s l o r t n o c e s a h p l a t n o z i r o h l l a m s o o t y a l p s i D e g r a l o o t r o e z i s l a t n o z i r o h l a c i t r e V s l o r t n o c t h g i r b o o t y a l p s i ...

Page 9: ...W 0 2 4 X 4 1 4 X 1 1 4 m m x a M n o i t u l o s e R s e n i L 4 2 0 1 x s t o D 0 8 2 1 t h g i e W g k 5 6 1 y t i l i b i t a p m o C h t i w s e d o m c i h p a r g l l A s e i c n e u q e r f l a t n o z i r o h 9 6 o t z H K 0 3 n e e w t e b z H K g n i t a r e p O e r u t a r e p m e T C 5 3 o t C 5 n o i t a z i n o r h c n y S l a t n o z i r o H l a c i t r e V z H K 9 6 o t 0 3 z H 0 ...

Page 10: ... 4 x 0 2 7 4 1 3 0 7 8 8 6 7 x 4 2 0 1 3 8 4 0 6 2 0 8 4 x 0 4 6 4 1 3 0 6 9 0 0 6 x 0 0 8 6 3 5 5 8 3 0 8 4 x 0 4 6 0 5 3 6 6 0 1 8 6 7 x 4 2 0 1 4 6 5 0 7 4 0 0 6 x 0 0 8 8 7 3 0 6 1 1 8 6 7 x 4 2 0 1 0 0 6 5 7 5 0 8 4 x 0 4 6 5 7 3 5 7 2 1 4 2 0 1 x 0 8 2 1 3 4 6 0 6 6 0 8 4 x 0 4 6 3 3 4 5 8 3 1 8 6 7 x 4 2 0 1 6 8 6 5 8 7 0 0 6 x 0 0 8 8 6 4 5 7 ...

Reviews: