


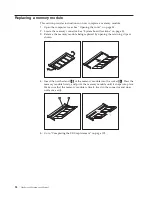
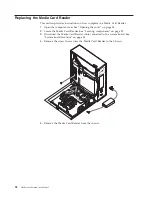


7.
To
install
the
new
hard
disk
drive
into
the
plastic
bracket
1
,
flex
the
bracket
and
align
the
pins
on
the
bracket
with
the
holes
in
the
hard
disk
drive.
Do
not
touch
the
circuit
board
2
on
the
bottom
of
the
hard
disk
drive.
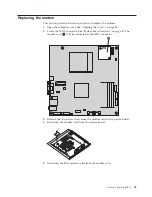
8.
Connect
the
signal
and
power
cables
to
the
rear
of
the
new
hard
disk
drive.
9.
Slide
the
new
hard
disk
drive
into
the
drive
bay
until
it
snaps
into
position.
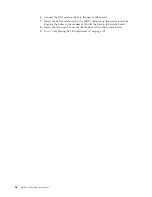
10.
Reconnect
the
power
cable
to
the
optical
drive.
11.
Go
to
“Completing
the
FRU
replacement”
on
page
102.
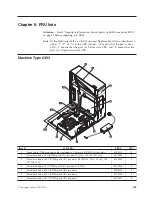
Chapter
8.
Replacing
FRUs
91
Summary of Contents for 6071A3U
Page 1: ......
Page 2: ......
Page 3: ...ThinkCentre Hardware Maintenance Manual ...
Page 6: ...iv Hardware Maintenance Manual ...
Page 16: ...10 Hardware Maintenance Manual ...
Page 17: ...Chapter 2 Safety information 11 ...
Page 18: ... 18 kg 37 lbs 32 kg 70 5 lbs 55 kg 121 2 lbs 1 2 12 Hardware Maintenance Manual ...
Page 22: ...16 Hardware Maintenance Manual ...
Page 23: ...1 2 Chapter 2 Safety information 17 ...
Page 24: ...18 Hardware Maintenance Manual ...
Page 25: ...1 2 Chapter 2 Safety information 19 ...
Page 32: ...26 Hardware Maintenance Manual ...
Page 33: ...Chapter 2 Safety information 27 ...
Page 34: ...1 2 28 Hardware Maintenance Manual ...
Page 38: ...32 Hardware Maintenance Manual ...
Page 39: ...1 2 Chapter 2 Safety information 33 ...
Page 48: ...42 Hardware Maintenance Manual ...
Page 54: ...48 Hardware Maintenance Manual ...
Page 58: ...52 Hardware Maintenance Manual ...
Page 110: ...104 Hardware Maintenance Manual ...
Page 166: ...160 Hardware Maintenance Manual ...
Page 170: ...164 Hardware Maintenance Manual ...
Page 173: ......
Page 174: ...Part Number 45C6891 Printed in USA 1P P N 45C6891 ...


