background image

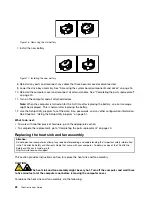
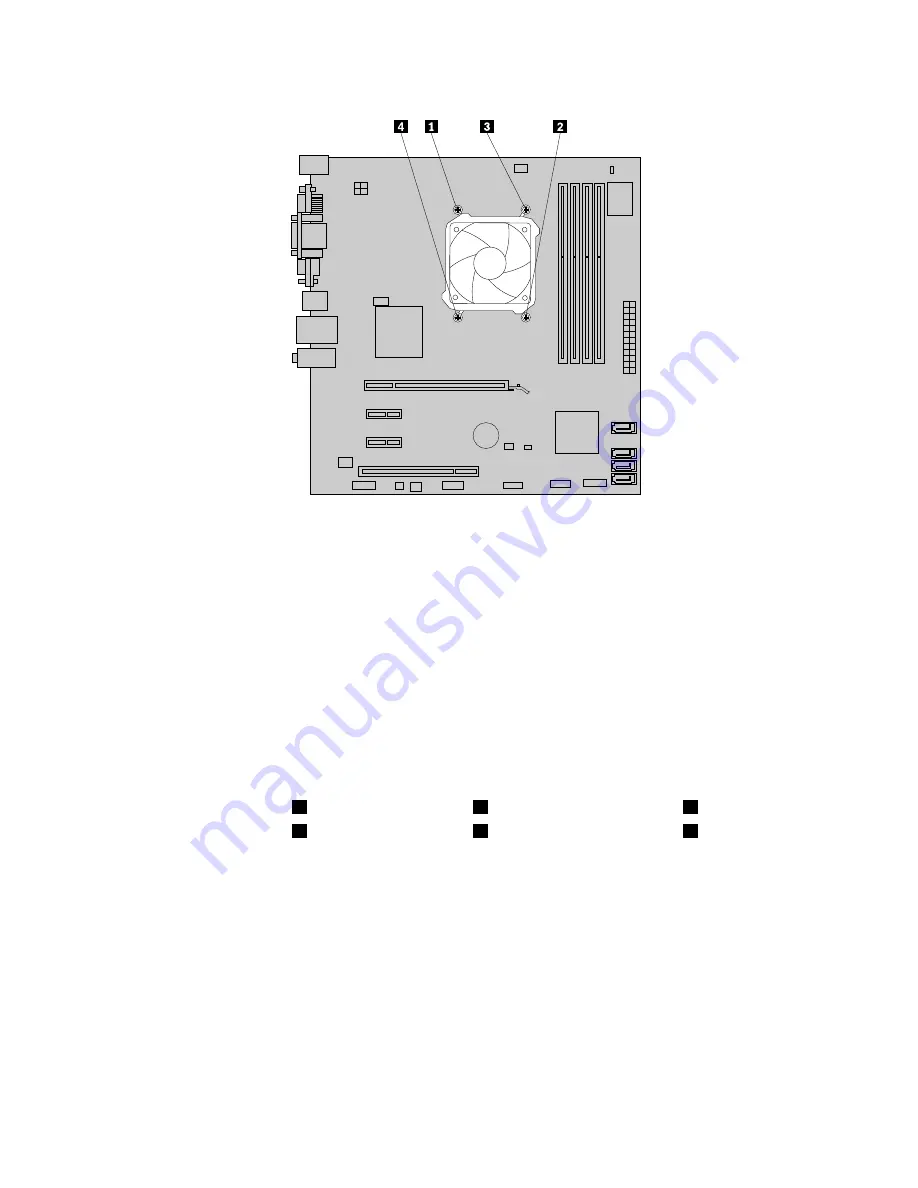
Figure 19. Screws that secure the heat sink and fan assembly

7. Lift the heat sink and fan assembly off the system board.

Notes:

a. You might have to gently twist the heat sink and fan assembly to free it from the microprocessor.

b. When handling the heat sink and fan assembly, do not touch the thermal grease on the bottom

of the heat sink and fan assembly.

8. Place the new heat sink and fan assembly on the system board so that the four screws are aligned

with the corresponding holes in the system board. Make sure that you properly place the new heat
sink and fan assembly so that you can easily connect the new heat sink and fan assembly cable to the
microprocessor fan connector on the system board.

9. Follow this sequence to install the four screws to secure the new heat sink and fan assembly, as shown

in Figure 19 “Screws that secure the heat sink and fan assembly” on page 24:

a. Partially tighten screw

1

, then fully tighten screw

2

, and then fully tighten screw

1

.

b. Partially tighten screw

3

, then fully tighten screw

4

, and then fully tighten screw

3

.

10. Connect the new heat sink and fan assembly cable to the microprocessor fan connector on the system

board. See “Locating parts on the system board” on page 9.

11. Lower and position the heat sink fan duct on the top of the heat sink and fan assembly until the two

screw holes in the heat sink fan duct are aligned with those in the heat sink and fan assembly. Install
the two screws to secure the heat sink fan duct.

24

ThinkCentre User Guide

Summary of Contents for 4163B2U

Page 1: ...ThinkCentre User Guide Machine Types 4163 5042 5046 5052 5054 5056 5058 5060 5062 5064 and 5066 ...

Page 2: ......

Page 3: ...ThinkCentre User Guide Machine Types 4163 5042 5046 5052 5054 5056 5058 5060 5062 5064 and 5066 ...

Page 4: ...services have been developed exclusively at private expense and are sold to governmental entities as commercial items as defined by 48 C F R 2 101 with limited and restricted rights to use reproduction and disclosure LIMITED AND RESTRICTED RIGHTS NOTICE If products data computer software or services are delivered pursuant a General Services Administration GSA contract use reproduction or disclosur...

Page 5: ...ction 42 Erasing a lost or forgotten password clearing CMOS 42 Chapter 3 Recovery information 45 Creating and using recovery media 45 Creating recovery media 45 Using recovery media 46 Performing backup and recovery operations 46 Performing a backup operation 47 Performing a recovery operation 47 Using the Rescue and Recovery workspace 47 Creating and using a rescue medium 48 Creating a rescue med...

Page 6: ... Welcome 64 Access Help 64 Safety and warranty 64 Lenovo Web site http www lenovo com 64 Help and service 65 Using the documentation and diagnostic programs 65 Calling for service 65 Using other services 66 Purchasing additional services 66 Appendix A Notices 67 Television output notice 68 European conformance CE mark 68 Trademarks 68 Index 69 iv ThinkCentre User Guide ...

Page 7: ...at you received with this product for the latest safety information Reading and understanding this safety information reduces the risk of personal injury and or damage to your product If you no longer have a copy of the ThinkCentre Safety and Warranty Guide you can obtain a Portable Document Format PDF version from the Lenovo Support Web site at http www lenovo com support Copyright Lenovo 2010 v ...

Page 8: ...vi ThinkCentre User Guide ...

Page 9: ...llowing information covers a variety of models For information about your specific model use the Setup Utility program See Chapter 4 Using the Setup Utility program on page 51 Microprocessor Your computer comes with one of the following microprocessors internal cache size varies by model type AMD Athlon II microprocessor AMD Phenom II microprocessor AMD Sempron microprocessor Memory module s Your ...

Page 10: ...rd in some models Ethernet connector PS 2 keyboard connector PS 2 mouse connector Six Universal Serial Bus USB 2 0 connectors two on the front panel and four on the rear panel there might also be two optional USB connectors on the rear panel Two audio connectors on the front panel headphone connector and microphone connector Three audio connectors on the rear panel audio line in connector audio li...

Page 11: ...some software programs to help you work more easily and securely For more information see Software overview on page 4 Preinstalled operating system Your computer is preinstalled with one of the following operating systems Microsoft Windows 7 Microsoft Windows Vista Operating system s certified or tested for compatibility1 varies by model type Linux Specifications This section lists the physical sp...

Page 12: ... range 50 to 60 Hz Voltage selection switch setting 115 V ac High range Minimum 200 V ac Maximum 240 V ac Input frequency range 50 to 60 Hz Voltage selection switch setting 230 V ac Software overview The computer comes with a preinstalled operating system and several software programs provided by Lenovo Software provided with your Windows operating system This section provides information about th...

Page 13: ... icon in the Lenovo ThinkVantage Tools program is dimmed it indicates that you need to install the Rescue and Recovery program manually before enabling its features To install the Rescue and Recovery program do the following 1 Click Start All Programs Lenovo ThinkVantage Tools and double click Enhanced Backup and Restore 2 Follow the instructions on the screen 3 When the installation process compl...

Page 14: ...computer improve computing security diagnose computer problems get familiar with the innovative technologies provided by Lenovo and get more information about your computer For more information see Lenovo ThinkVantage Toolbox on page 60 Adobe Reader The Adobe Reader program is a tool used to view print and search PDF documents See Online Books folder on page 63 for more information about accessing...

Page 15: ...one connector 4 Power indicator 8 USB connector Locating connectors and parts on the rear of your computer Figure 2 Rear connector and part locations on page 8 shows the locations of the connectors and parts on the rear of your computer Some connectors on the rear of your computer are color coded to help you determine where to connect the cables on your computer Chapter 1 Product overview 7 ...

Page 16: ...he audio line in connector of the computer Audio line out connector Used to send audio signals from the computer to external devices such as powered stereo speakers speakers with built in amplifiers headphones multimedia keyboards the audio line in connector on a stereo system or other external recording devices DVI monitor connector Used to attach a DVI monitor or other devices that use a DVI mon...

Page 17: ...connector Used to attach a VGA monitor or other devices that use a VGA monitor connector Locating components Figure 3 Component locations on page 9 shows the locations of the various components in your computer To remove the computer cover and gain access to the inside of the computer see Removing the computer cover on page 14 Figure 3 Component locations 1 Heat sink and fan assembly 6 Front bezel...

Page 18: ...r connector Locating internal drives Internal drives are devices that your computer uses to read and store data You can add drives to your computer to increase storage capacity and enable your computer to read other types of media Internal drives are installed in bays In this manual the bays are referred to as bay 1 bay 2 and so on When installing or replacing an internal drive it is important to ...

Page 19: ...Figure 5 Drive bay locations 1 Bay 1 Optical drive bay with an optical drive installed 2 Bay 2 Slim card reader drive bay 3 Bay 3 SATA hard disk drive bay Chapter 1 Product overview 11 ...

Page 20: ...12 ThinkCentre User Guide ...

Page 21: ...uter for at least two seconds This reduces static electricity from the package and your body Remove the new part from the static protective package and directly install it in the computer without placing it on any other surface If it is hard for you to do this in your specific situation place the static protective package of the new part on a smooth level surface and then place the new part on the...

Page 22: ...do the following 1 Remove all media from the drives Then turn off all attached devices and the computer 2 Disconnect all power cords from electrical outlets 3 Disconnect the power cord Input Output cables and all other cables that are connected to the computer 4 Remove any locking device that secures the computer cover such as an integrated cable lock or a padlock See Integrated cable lock on page...

Page 23: ...bezel by releasing the three plastic tabs on the top of the front bezel and pivoting the front bezel outward to remove it from the computer Carefully lay the front bezel aside without disconnecting the power switch and light emitting diode LED assembly cable Figure 7 Removing the front bezel 4 To reinstall the front bezel align the other three plastic tabs on the bottom of the front bezel with the...

Page 24: ...ng 1 Remove all media from the drives and turn off all attached devices and the computer Then disconnect all power cords from electrical outlets and disconnect all cables that are connected to the computer 2 Remove the computer cover to access the system board components See Removing the computer cover on page 14 3 Remove the front bezel See Removing and reinstalling the front bezel on page 14 4 P...

Page 25: ...sconnect all power cords from electrical outlets and disconnect all cables that are connected to the computer 2 Remove the computer cover See Removing the computer cover on page 14 3 Do one of the following If you are replacing a PCI card remove the screw that secures the old PCI card and release the old PCI card from the PCI card slot Then carefully remove the old PCI card from the chassis as sho...

Page 26: ...ves on page 16 Figure 11 Removing the PCI card If you are installing a PCI card remove the appropriate PCI card slot cover See Locating parts on the system board on page 9 to identify the types of PCI card slots 4 Remove the new PCI card from its static protective package 5 Install the new PCI card into the appropriate PCI card slot on the system board Then install the screw to secure the new PCI ...

Page 27: ...vo com support This section provides instructions on how to install or replace a memory module Your computer has four memory slots for installing or replacing DDR3 SDRAM DIMMs that provide up to a maximum of 16 GB of system memory When installing or replacing a memory module use 1 GB 2 GB or 4 GB DDR3 SDRAM DIMMs in any combination up to a maximum of 16 GB of system memory To install or replace a ...

Page 28: ...stalling a memory module open the retaining clips of the memory slot into which you want to install the memory module Figure 14 Opening the retaining clips of the memory slot 7 Position the new memory module over the memory slot Make sure that the notch 1 on the new memory module is aligned with the key 2 in the memory slot Then press the new memory module straight down into the memory slot until ...

Page 29: ...ghout its life however no battery lasts forever If the battery fails the date time and configuration information including passwords are lost An error message is displayed when you turn on the computer Before performing the following procedure be sure to read and understand the information about replacing and disposing of the battery in the Batteries and Lithium battery notice sections of the Thin...

Page 30: ...rmation See Chapter 4 Using the Setup Utility program on page 51 What to do next To work with another piece of hardware go to the appropriate section To complete the replacement go to Completing the parts replacement on page 40 Replacing the heat sink and fan assembly Attention Do not open your computer or attempt any repair before reading and understanding the Important safety information in the ...

Page 31: ...he chassis Figure 18 Removing the heat sink fan duct 5 Disconnect the heat sink and fan assembly cable from the microprocessor fan connector on the system board See Locating parts on the system board on page 9 6 Follow this sequence to remove the four screws that secure the heat sink and fan assembly to the system board a Partially remove screw 1 then fully remove screw 2 and then fully remove scr...

Page 32: ...o the microprocessor fan connector on the system board 9 Follow this sequence to install the four screws to secure the new heat sink and fan assembly as shown in Figure 19 Screws that secure the heat sink and fan assembly on page 24 a Partially tighten screw 1 then fully tighten screw 2 and then fully tighten screw 1 b Partially tighten screw 3 then fully tighten screw 4 and then fully tighten scr...

Page 33: ...microprocessor CAUTION The heat sink and microprocessor might be very hot Turn off the computer and wait three to five minutes to let the computer cool before removing the computer cover To replace the microprocessor do the following 1 Remove all media from the drives and turn off all attached devices and the computer Then disconnect all power cords from electrical outlets and disconnect all cable...

Page 34: ...et might look different from the one illustrated b Note the orientation of the microprocessor in the socket You can look for the small triangle 1 on one corner of the microprocessor This is important when installing the new microprocessor on the system board c Touch only the edges of the microprocessor Do not touch the gold contacts on the bottom d Do not drop anything onto the microprocessor sock...

Page 35: ... removed or disconnected What to do next To work with another piece of hardware go to the appropriate section To complete the replacement go to Completing the parts replacement on page 40 Replacing the power supply assembly Attention Do not open your computer or attempt any repair before reading and understanding the Important safety information in the ThinkCentre Safety and Warranty Guide that ca...

Page 36: ...t bezel on page 14 4 Pivot the drive bay assembly upward remove the two screws that secure the heat sink fan duct and then lift the heat sink fan duct out of the chassis Figure 23 Removing the heat sink fan duct 5 Disconnect the power supply assembly cables from all drives and from the 24 pin power connector and 4 pin power connector on the system board See Locating parts on the system board on pa...

Page 37: ... outlet If necessary use a ballpoint pen to slide the voltage selection switch to the correct position If the voltage supply range in your local country or region is 100 127 V ac set the voltage selection switch to 115 V If the voltage supply range in your local country or region is 200 240 V ac set the voltage selection switch to 230 V 8 Install the new power supply assembly into the chassis so t...

Page 38: ...p of the heat sink and fan assembly until the two screw holes in the heat sink fan duct are aligned with those in the heat sink and fan assembly Install the two screws to secure the heat sink fan duct Figure 26 Installing the heat sink fan duct What to do next To work with another piece of hardware go to the appropriate section To complete the replacement go to Completing the parts replacement on ...

Page 39: ...omputer Then disconnect all power cords from electrical outlets and disconnect all cables that are connected to the computer 2 Remove the computer cover See Removing the computer cover on page 14 3 Remove the front bezel See Removing and reinstalling the front bezel on page 14 4 Pivot the drive bay assembly upward See Accessing the system board components and drives on page 16 5 Disconnect the sig...

Page 40: ...ive bay assembly 8 Slide the optical drive out of the front of the computer Figure 29 Removing the optical drive 9 Slide the new optical drive into the optical drive bay from the front of the computer 32 ThinkCentre User Guide ...

Page 41: ...crews to secure the new optical drive in place Figure 31 Installing the optical drive 11 Connect one end of the signal cable to the rear of the new optical drive and the other end to an available SATA connector on the system board See Locating parts on the system board on page 9 Then locate an available five wire power connector and connect it to the rear of the new optical drive Chapter 2 Install...

Page 42: ...e go to http www lenovo com support This section provides instructions on how to replace the hard disk drive To replace the hard disk drive do the following 1 Remove all media from the drives and turn off all attached devices and the computer Then disconnect all power cords from electrical outlets and disconnect all cables that are connected to the computer 2 Remove the computer cover See Removing...

Page 43: ...he new hard disk drive and the other end to an available SATA connector on the system board See Locating parts on the system board on page 9 Then locate an available five wire power connector and connect it to the rear of the new hard disk drive Figure 35 Connecting a SATA hard disk drive 7 Position the new hard disk drive into the hard disk drive bay and align the screw holes in the new hard disk...

Page 44: ...all media from the drives and turn off all attached devices and the computer Then disconnect all power cords from electrical outlets and disconnect all cables that are connected to the computer 2 Remove the computer cover See Removing the computer cover on page 14 3 Remove the front bezel See Removing and reinstalling the front bezel on page 14 4 Pivot the drive bay assembly upward to gain access ...

Page 45: ...rubber mounts attached Figure 37 Removing the front fan assembly 9 Install the new front fan assembly by aligning the new rubber mounts that came with the new front fan assembly with the corresponding holes in the chassis and then push the rubber mounts through the holes Then carefully pull on the tips of the rubber mounts from the bottom until the new front fan assembly is secured in place Chapte...

Page 46: ...mputer or attempt any repair before reading and understanding the Important safety information in the ThinkCentre Safety and Warranty Guide that came with your computer To obtain a copy of the ThinkCentre Safety and Warranty Guide go to http www lenovo com support This section provides instructions on how to replace the keyboard To replace the keyboard do the following 1 Remove all media from the ...

Page 47: ... a copy of the ThinkCentre Safety and Warranty Guide go to http www lenovo com support This section provides instructions on how to replace the mouse To replace the mouse do the following 1 Remove all media from the drives Then turn off all attached devices and the computer 2 Disconnect all power cords from electrical outlets 3 Disconnect the old mouse cable from the computer 4 Connect a new mouse...

Page 48: ...ccessing the system board components and drives on page 16 4 If you have removed the front bezel reinstall it See Removing and reinstalling the front bezel on page 14 5 Position the computer cover on the chassis so that the rail guides on the computer cover engage the rails on the chassis Then slide the computer cover to the front of the computer until it snaps into position and is closed Then ins...

Page 49: ...l a correct password is typed in Integrated cable lock An integrated cable lock sometimes referred to as the Kensington lock can be used to secure your computer to a desk table or other non permanent fixture The cable lock attaches to a security slot at the rear of your computer and is operated with a key The cable lock also locks the computer cover See Figure 42 Installing an integrated cable loc...

Page 50: ...rical outlets and disconnect all cables that are connected to the computer 2 Remove the computer cover See Removing the computer cover on page 14 3 Locate the Clear CMOS Recovery jumper on the system board See Locating parts on the system board on page 9 4 Remove any parts and disconnect any cables that might prevent your access to the Clear CMOS Recovery jumper 5 Move the jumper from the standard...

Page 51: ... disconnected 12 Reinstall the computer cover and reconnect all cables See Completing the parts replacement on page 40 13 Turn on the computer Your password has been erased and you can use the Setup Utility program to set a new password See Chapter 4 Using the Setup Utility program on page 51 for more information Chapter 2 Installing or replacing hardware 43 ...

Page 52: ...44 ThinkCentre User Guide ...

Page 53: ...f methods to choose from when considering how to recover in the event of a software or hardware related problem Some methods vary depending on the type of your operating system 3 The product on the recovery media may be used only for the following purposes Restore the product preinstalled on your computer Reinstall the product Modify the product using the Additional Files Creating and using recove...

Page 54: ...puter or insert the boot disc into the optical drive 2 Repeatedly press and release the F12 key when turning on the computer When the Please select boot device window opens release the F12 key 3 Select the desired startup device and press Enter The restore process begins 4 Follow the instructions on the screen to complete the operation Notes 1 After restoring your computer to the factory default s...

Page 55: ... perform a recovery operation using the Rescue and Recovery program on the Windows 7 operating system do the following 1 From the Windows desktop click Start All Programs Lenovo ThinkVantage Tools Enhanced Backup and Restore The Rescue and Recovery program opens 2 In the Rescue and Recovery main window click the Launch advanced Rescue and Recovery arrow 3 Click the Restore your system from a backu...

Page 56: ... to start the Windows operating system you can use the rescue files feature of the Rescue and Recovery workspace to copy files from your hard disk drive to other media To start the Rescue and Recovery workspace do the following 1 Make sure the computer is turned off 2 Repeatedly press and release the F11 key when turning on the computer When you hear beeps or see a logo screen release the F11 key ...

Page 57: ...rnal hard disk drive 3 Click OK and follow the instructions on the screen to create a rescue medium Using a rescue medium This section provides instructions on how to use the rescue medium you have created If you have created a rescue medium using a disc use the following instructions to use the rescue medium 1 Turn off your computer 2 Repeatedly press and release the F12 key when turning on the c...

Page 58: ... you want to install the device driver using the INF file refer to your Windows Help and Support information system for detailed information about how to install the device driver Solving recovery problems If you are unable to access the Rescue and Recovery workspace or the Windows environment do one of the following Use a rescue medium to start the Rescue and Recovery workspace See Creating and u...

Page 59: ...r see a logo screen release the F1 key The Setup Utility program opens Note If a password has been set the Setup Utility program menu will not be displayed until you type the correct password For more information see Using passwords on page 51 Viewing or changing settings The Setup Utility program menu lists various items about the system configuration settings To view or change the settings start...

Page 60: ...of several computers you might want to set an administrator password For more information about how to set a password see Setting changing or deleting a password on page 52 After you have set an administrator password a password prompt is displayed each time you try to access the Setup Utility program You cannot access the Setup Utility program until a valid password is typed in If you have set bo...

Page 61: ...turn to the default settings press F9 or select Exit Load Optimal Defaults Selecting a startup device If your computer does not start up from a device such as a hard disk drive or the disc in an optical drive as expected do one of the following to select the desired startup device Selecting a temporary startup device This section provides instructions on how to select a temporary startup device Yo...

Page 62: ...ave the new settings select Exit Discard Changes and Exit b If you want to return to the default settings press F9 or select Exit Load Optimal Defaults Exiting the Setup Utility program After you finish viewing or changing settings press Esc to return to the Setup Utility program main menu You might have to press Esc several times Then you can do one of the following If you want to save the new se...

Page 63: ...ystem program update disc or running a special update program from your operating system Lenovo might make changes and enhancements to the POST and BIOS When updates are released they are available as downloadable files on the Lenovo Web site at http www lenovo com Instructions for using the POST and BIOS updates are available in a TXT file that is included with the update files For most models yo...

Page 64: ...e If the power to your computer is interrupted while the POST and BIOS is being updated your computer might not restart correctly If this happens perform the following procedure to recover from the POST and BIOS update failure This procedure is commonly called Boot block Recovery 1 Remove all media from the drives and turn off all attached devices and the computer Then disconnect all power cords f...

Page 65: ...removed or disconnected 13 Reinstall the computer cover and reconnect power cords and all other external cables See Completing the parts replacement on page 40 14 Turn on the computer and remove the disc from the optical drive Chapter 5 Updating system programs 57 ...

Page 66: ...58 ThinkCentre User Guide ...

Page 67: ...vo com support Symptom Action The computer does not start when you press the power switch Verify that The power cord is correctly connected to the rear of the computer and to a working electrical outlet The power indicator on the front of the computer is on The computer voltage matches the voltage available at the electrical outlet for your country or region The monitor screen is blank Verify that...

Page 68: ... will need the log files when you speak to a Lenovo technical support representative Lenovo ThinkVantage Toolbox The Lenovo ThinkVantage Toolbox program helps you maintain your computer improve computing security diagnose computer problems get familiar with the innovative technologies provided by Lenovo and get more information about your computer You can use the diagnostics feature of the Lenovo ...

Page 69: ...ss the F1 key 6 Remove the diagnostic disc from the optical drive after completing the diagnostic test Cleaning the mouse This section provides instructions on how to clean an optical or non optical mouse Optical mouse An optical mouse uses a light emitting diode and an optical sensor to navigate the pointer If the pointer on the screen does not move smoothly with the optical mouse you might need ...

Page 70: ...l in warm soapy water Then dry it with a clean cloth 6 Carefully blow air into the ball cage 4 to dislodge dust and lint 7 Look for a buildup of dirt on the plastic rollers 3 inside the ball cage This buildup usually appears as a stripe running across the middle of the rollers 8 If the rollers are dirty clean them by using a cotton swab soaked in isopropyl rubbing alcohol Turn the rollers with you...

Page 71: ...ed to have the Adobe Reader program preinstalled on your computer If the Adobe Reader program has not been installed on your computer a message will be displayed when you attempt to view the PDF file and you will be guided through the Adobe Reader installation 2 The publication is available in other languages on the Lenovo Support Web site at http www lenovo com support 3 If you want to install a ...

Page 72: ...Start Help and Support Lenovo Access Help To open the Access Help information system on the Windows Vista operating system click Start All Programs ThinkVantage Access Help After you have opened the Access Help information system use the left panel to make a selection from the Contents tab or the Index tab or use the Search tab to find a particular word or phrase Safety and warranty The ThinkCentr...

Page 73: ...roblems For instructions on how to use the diagnostic programs on your computer see Diagnostic programs on page 60 You can get the latest technical information and download device drivers and updates from the Lenovo Support Web site at http www lenovo com support Calling for service During the warranty period you can get help and information from the Lenovo Customer Support Center by telephone The...

Page 74: ...horized Service Providers Service methods and procedures vary by country and some services might not be available in all countries International Warranty Service is delivered through the method of service such as depot carry in or on site service that is provided in the servicing country Service centers in certain countries might not be able to service all models of a particular machine type In so...

Page 75: ...e publication Lenovo may make improvements and or changes in the product s and or the program s described in this publication at any time without notice The products described in this document are not intended for use in implantation or other life support applications where malfunction may result in injury or death to persons The information contained in this document does not affect or change Len...

Page 76: ... only unless otherwise authorized by Macrovision Corporation Reverse engineering or disassembly is prohibited European conformance CE mark Trademarks Lenovo the Lenovo logo Rescue and Recovery ThinkCentre and ThinkVantage are trademarks of Lenovo in the United States other countries or both Microsoft Windows and Windows Vista are trademarks of the Microsoft group of companies AMD AMD Athlon AMD Ph...

Page 77: ...ng the replacement 40 D device drivers 41 installing 49 reinstalling 49 devices handling static sensitive 13 diagnostic programs troubleshooting 59 diagnostic programs using 65 documentation using 65 drivers device 41 drives internal 10 DVI monitor connector 8 E environment operating 4 Ethernet 2 Ethernet connector 8 exiting Setup Utility program 54 expansion 2 external options installing 13 F fai...

Page 78: ...I card 17 installing replacing 17 slots 17 physical specifications 3 power supply features 2 power supply assembly replacing 27 power on password 52 power on self test POST 55 productivity center ThinkVantage 64 programs updating system 55 protection password 42 PS 2 keyboard connector 8 PS 2 mouse connector 9 purchasing additional services 66 R rear connectors 7 recovering from a POST and BIOS up...

Page 79: ...dling 13 system management 2 programs 55 system board connectors 10 locating parts 9 location 9 system board components and drives accessing 16 T television output notice 68 temporary startup device 53 the BIOS updating flashing 55 56 ThinkVantage productivity center 64 trademarks 68 troubleshooting basic 59 troubleshooting diagnostic programs 59 U updating flashing the BIOS 55 system programs 55 ...

Page 80: ...72 ThinkCentre User Guide ...

Page 81: ......

Page 82: ...Part Number 0A22719 Printed in USA 1P P N 0A22719 0A22719 ...

Reviews: