background image

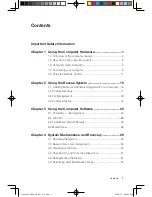
Contents

Contents

Important Safety Information

Chapter 1  Using the Computer Hardware .............................. 1

1.1 Front view of the computer chassis .........................................2

1.2 Rear view of the computer chassis ..........................................3

1.3 Computer stand instruction .....................................................4

1.4 Connecting your computer  .....................................................5

1.5  Using the Remote Control .....................................................11

Chapter 2  Using the Rescue System .................................... 15

2.1 Installing Drivers and Software Shipped with Your Computer ...16

2.2 OneKey Recovery ..................................................................17

2.3 File Management ...................................................................18

2.4 OneKey Antivirus ...................................................................20

Chapter 3  Using the Computer Software ............................. 23

3.1 Power2Go — Burning Discs  .................................................24

3.2 WinDVD 

................................................................................25

3.3 Trend Micro Internet Security .................................................26

3.4 Media Show ..........................................................................28

Chapter 4  System Maintenance and Recovery .................... 29

4.1 Restoring the System ............................................................30

4.2 Backup status and configuration ...........................................30

4.3 Cleaning Up the Disk .............................................................30

4.4 Checking For and Correcting Disk Errors ...............................31

4.5 Defragmenting the Disk(s) ......................................................31

4.6 Performing Daily Maintenance Tasks ......................................31

31039306_Q700_UG_EN_V1.1.indd   1

2009.7.3   3:09:40 PM

Summary of Contents for 30151NU

Page 1: ...Version 1 1 2009 7 User Guide Lenovo IdeaCentre Q700 Series 31039306 31039306_Q700_UG_FM_EN_V1 1 indd1 1 2009 7 3 3 05 02 PM ...

Page 2: ...h this product for the latest safety information Reading and understanding this safety information reduces the risk of personal injury and damage to your product Danger Beware of extremely hazardous or lethal situations Attention Beware of possible damage to programs devices or data Note Pay attention to this important information Copyright Lenovo 2007 2009 31039306_Q700_UG_EN_V1 1 indd 1 2009 7 3...

Page 3: ...31039306_Q700_UG_EN_V1 1 indd 2 2009 7 3 3 09 40 PM ...

Page 4: ...d with Your Computer 16 2 2 OneKey Recovery 17 2 3 File Management 18 2 4 OneKey Antivirus 20 Chapter 3 Using the Computer Software 23 3 1 Power2Go Burning Discs 24 3 2 WinDVD 25 3 3 Trend Micro Internet Security 26 3 4 Media Show 28 Chapter 4 System Maintenance and Recovery 29 4 1 Restoring the System 30 4 2 Backup status and configuration 30 4 3 Cleaning Up the Disk 30 4 4 Checking For and Corre...

Page 5: ...ng Display Problems 34 5 2 Troubleshooting Audio Problems 35 5 3 Troubleshooting Software Problems 35 5 4 Troubleshooting Problems with Optical Drives and Hard Disks 36 5 5 Special considerations for troubleshooting Windows 37 31039306_Q700_UG_EN_V1 1 indd 2 2009 7 3 3 09 40 PM ...

Page 6: ...r hardware introduction ÿ Information on computer connections Note The descriptions in this chapter may vary from your computer setup depending on computer models and configurations User Guide Using the Computer Hardware 31039306_Q700_UG_EN_V1 1 indd 1 2009 7 3 3 09 41 PM ...

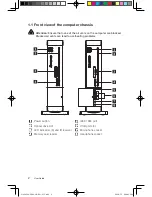
Page 7: ...air vents on the computer are blocked Blocked air vents can lead to overheating problems Power button IEEE 1394 port Optical drive slot USB ports 4 LED indicators 3 and IR receiver Microphone socket Memory card reader Headphone socket 31039306_Q700_UG_EN_V1 1 indd 2 2009 7 3 3 09 43 PM ...

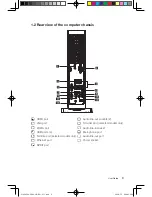
Page 8: ... line out sockets 2 VGA port TV tuner port selected models only eSATA port Audio line in socket USB ports 4 Microphone port S Video port selected models only Audio line out port Ethernet port Power socket SPDIF port 31039306_Q700_UG_EN_V1 1 indd 3 2009 7 3 3 09 45 PM ...

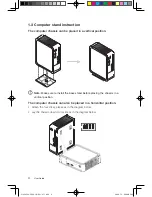
Page 9: ...e sure to install the base stand before placing the chassis in a vertical position The computer chassis can also be placed in a horizontal position Attach the four sticky pieces as in the diagram below Lay the chassis down on its side as in the diagram below PR O M MC PRO M M C 31039306_Q700_UG_EN_V1 1 indd 4 2009 7 3 3 09 48 PM ...

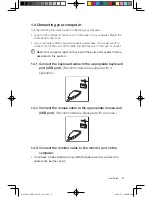
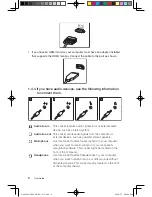
Page 10: ...socket Note Your computer might not have all of the ports and sockets that are described in this section 1 4 1 Connect the keyboard cable to the appropriate keyboard port USB port Not all models are equipped with a keyboard 1 4 2 Connect the mouse cable to the appropriate mouse port USB port Not all models are equipped with a mouse 1 4 3 Connect the monitor cable to the monitor port on the compute...

Page 11: ...This socket sends audio signals from the computer to external devices such as powered stereo speakers Microphone Use this socket to attach a microphone to your computer when you want to record sound or if you use speech recognition software This socket might be located on the front of the computer Headphone Use this socket to attach headphones to your computer when you want to listen to music or o...

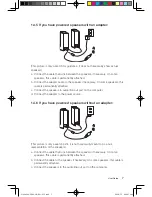
Page 12: ...he speakers to audio line out port on the computer d Connect the adapter to the power source 1 4 6 If you have powered speakers without an adapter This picture is only a sketch print it is not necessarily meant to be a true representation of the speakers a Connect the cable that runs between the speakers if necessary On some speakers this cable is permanently attached b Connect the cable to the sp...

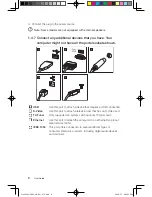
Page 13: ...e that requires a USB connection S Video Use this port to attach a television set that has an S Video port TV Tuner Only supported on systems with optional TV tuner card Ethernet Use this port to attach the computer to an Ethernet type local area network LAN IEEE 1394 This port offers connection to several different types of consumer electronic products including digital audio devices and scanners...

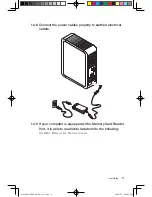
Page 14: ...properly to earthed electrical outlets 1 4 9 If your computer is equipped with a Memory Card Reader Port it is able to read write data from to the following SD MMC Memory stick Memory stick pro 31039306_Q700_UG_EN_V1 1 indd 9 2009 7 3 3 09 53 PM ...

Page 15: ...ou will find the LVT key Kindly note that this key is disabled because the LVT program is not installed on your computer F2 Your computer has the Lenovo Rescue System installed To learn more about this program turn on the computer and when the Lenovo logo appears press the F2 key and the Lenovo Rescue System will open 31039306_Q700_UG_EN_V1 1 indd 10 2009 7 3 3 09 54 PM ...

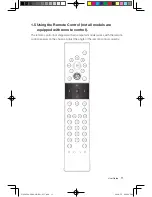
Page 16: ... models are equipped with remote control The remote control not shipped with all computer models works with the remote control receiver on the chassis Adjust the angle of the remote control correctly 31039306_Q700_UG_EN_V1 1 indd 11 2009 7 3 3 09 54 PM ...

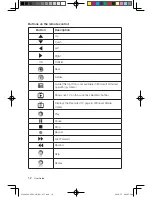
Page 17: ...ck Details Guide this function is not available in Microsoft Windows operating systems Shows live TV on the currently selected channel Displays the Recorded TV page in Windows Media Center Play Pause Stop Record Fast Forward Rewind Skip Replay 31039306_Q700_UG_EN_V1 1 indd 12 2009 7 3 3 09 57 PM ...

Page 18: ...s Windows Media Center Adjusts volume up down Previous next channel Mute DVD menu Power supply standby 0 9 Number and or Letter buttons key key CLEAR Clear ENTER Enter 31039306_Q700_UG_EN_V1 1 indd 13 2009 7 3 3 09 58 PM ...

Page 19: ...14 User Guide 31039306_Q700_UG_EN_V1 1 indd 14 2009 7 3 3 09 58 PM ...

Page 20: ...g OneKey Recovery With this operation all of the existing data on drive C will be lost but the content and format of the other partitions of the hard disk drive will remain unchanged If you want to install an operating system with the Windows Vista Recovery DVD and back it up with OneKey Recovery you must format the C partition in NTFS format and install the operating system on the C partition Oth...

Page 21: ...s in the rescue system provide a way for the user to conveniently install the drivers and software shipped with the computer The rescue system can automatically install all its drivers and software shipped with the computer or it can selectively install some of the drivers and software as required by the user Method 1 Automatic Installation Turn on the computer When the Lenovo logo appears press t...

Page 22: ...revent loss of data be sure to back up important data before this operation 2 If a Windows operating system is not pre installed on your computer the OneKey Recovery function will provide the following two functions Create base backup In the absence of the factory backup the Lenovo OneKey Recovery system enables you to back up all data on the current system partition manually after installing the ...

Page 23: ...g system recovery 3 Follow the onscreen instructions and press E on the keyboard to start recovery if you are sure you want to recover 4 Please wait during the process of system recovery Do not interrupt the operation during the recovery process 5 After the system is recovered successfully the software prompts you to restart the computer Restart the computer and enter the system 2 3 File Managemen...

Page 24: ...de of the main interface to configure the password The default password is blank Set a password when you access the File Backup for the first time If you don t want to set a password you may simply access the system directly and operate accordingly 2 3 4 Search File management provides a search function and backs up the searched files Input the file or file type to search for and click the search ...

Page 25: ...the optional character or the Tab key to select the option to start scanning and killing viruses 2 Wait while the software is scanning and killing viruses Try to avoid interrupting the process 3 If you need to stop scanning or killing viruses in the middle of the process click the corresponding stop button to stop the virus scanning killing process Click the corresponding cancel button to continue...

Page 26: ...the software will show that the update has been completed successfully 2 4 3 3 Obtaining the Latest Virus Package from a Flash Disk 1 First using Windows make a copy of OneKey Antivirus on a flash disk Connect the flash disk to the USB port and click Start All Programs Lenovo Download USB update package 2 Save the latest virus definitions to the flash disk Creating an update on the flash disk will...

Page 27: ...sh disks or CDs You can install and use anti virus software in Windows to scan such media 3 In the process of cleaning viruses do not power off the computer Otherwise files on the hard disk drive may be damaged 31039306_Q700_UG_EN_V1 1 indd 22 2009 7 3 3 10 01 PM ...

Page 28: ...llowing topics ÿ Computer software instructions Note The interface and functionality of these features are may vary according to the actual software that was shipped with the computer model that you purchased User Guide 23 31039306_Q700_UG_EN_V1 1 indd 23 2009 7 3 3 10 02 PM ...

Page 29: ...deo players plug ins and audio and video files This product has been tested for playing high quality audio and video files of the following specifications the actual audio and video performance may be different according to differences in individual product configuration software and hardware as well as audio and video file formats Resolution Video encoding format Bit rate Frame rate 1920x1080 VC ...

Page 30: ...n to add your files to the disc compilation column Click the burn icon to start the burning process 3 1 3 Disc Utility The burner also provides utility tools for preparing and processing various CDs and DVDs such as the recording of mirror files erasing of discs and conversion of audio 3 1 4 Help For more information about using Power2Go click the Help icon 3 2 WinDVD This software is provided onl...

Page 31: ...ur computer use the following instructions Trend Micro Internet Security is a common type of antivirus software It can scan and kill viruses and Trojans on the computer 3 3 1 Using Trend Micro Internet Security Choose Trend Micro Internet Security in All Programs from the Start menu to launch the Trend Micro Internet Security antivirus software Another option is to right click the Trend Micro Inte...

Page 32: ...erface select Custom Scan from More Options You can select the disks that you want to scan in the scan targets dialog 3 3 5 Other Protection Functions Other software settings are available in the toolbar on the left side including the level of protection against Trojan viruses personal network and interconnection settings and email settings Configure them as you require 3 3 6 Help and Support For ...

Page 33: ...o your friends Create discs with your photos and video 3 4 1 Photos You can manage your photos in MediaShow via the different creative functions there are a variety of editing functions and you have the ability to email your photos or upload them to Flickr 3 4 2 Videos You can manage your videos in MediaShow through the different creative functions there are a variety of editing functions as well ...

Page 34: ...1 2 3 4 5 Chapter System Maintenance and Recovery This chapter contains the following topics ÿ Daily Maintenance and Tools Instructions User Guide 29 31039306_Q700_UG_EN_V1 1 indd 29 2009 7 3 3 10 05 PM ...

Page 35: ...e system was running properly Click Next to continue 3 The system will start restoration When all processes have completed the software displays a message informing you that the restore operation has completed successfully 4 2 Backup status and configuration For added security you can back up the state of your system before you install additional software or otherwise modify system settings To bac...

Page 36: ... want to reorganize then select Properties from the pop up menu 2 Go to the Tools tab from disk Properties and select Defragment Now 3 Select the time and scheme to be used by the defragging program then start the defragmenting program Depending on the amount of defragmentation on the hard disk drive this procedure can take a long time sometimes more than one hour 4 6 Performing Daily Maintenance ...

Page 37: ...nd the mouse You can use a vacuum cleaner to clean in otherwise inaccessible corners To clean the keyboard thoroughly shut down the computer and scrub it gently with a wet cloth Do not use the keyboard unless it is dry Do not do any of the following Allow water to enter the computer Use a heavily dampened cloth Spray water directly onto the surface of the monitor or anywhere inside the computer ch...

Page 38: ... topics ÿ Troubleshooting and Problem Resolution Note The description of the TV Tuner card in this manual is relevant only to machines which have a TV Tuner card It does not apply to products that do not have a TV Tuner card User Guide 33 31039306_Q700_UG_EN_V1 1 indd 33 2009 7 3 3 10 07 PM ...

Page 39: ...lank screen or no image is displayed on the monitor Troubleshooting and problem resolution 1 Check that the monitor has been turned on if not press the Power button 2 Check to see if the monitor power cable is loose if so securely plug the power cable into the monitor 3 Check that the signal cable to the monitor is securely connected to the computer graphics card port if not shut down the computer...

Page 40: ...stortion Reinstall the audio driver Disconnect any headphones from the headphone socket sound from the speakers is automatically disabled when headphones are connected to the computer s side panel headphone socket Problem No sound from headphones Troubleshooting and problem resolution Check the headphone cable connection ensure that the headphone cable is securely inserted into the headphone socke...

Page 41: ...nctions dialog box and then select Uninstall Modify 6 Follow the displayed instructions to uninstall the software 5 4 Troubleshooting Problems with Optical Drives and Hard Disks Problem The Optical drive is unable to read a CD DVD Troubleshooting and problem resolution 1 Check to determine if there is an optical drive icon in the resource manager of the operating system If not restart your compute...

Page 42: ...ard disk shown in the system can be obtained The capacity of the hard disk as calculated using this method may be slightly different from the actual capacity due to the rounding of totals 5 5 Special considerations for troubleshooting Windows Record the following information that may be useful later when troubleshooting system problems 1 The serial number of the software The serial number is shipp...

Page 43: ...38 User Guide Before you can watch teletext programming you must set the TV tuner input signal to analog 31039306_Q700_UG_EN_V1 1 indd 38 2009 7 3 3 10 08 PM ...

Reviews: